深度優先搜尋 & 廣度優先搜尋
目錄
- 鄰接表
- 鄰接表的深度優先搜尋
- 鄰接表的廣度優先搜尋
- 臨接陣列
- 臨接陣列的深度優先搜尋
- 臨接陣列的廣度優先搜尋
- 二叉樹
- 二叉樹的深度優先搜尋
- 二叉樹的廣度優先搜尋
鄰接表
鄰接表的深度優先搜尋
假如我們有如下無向圖
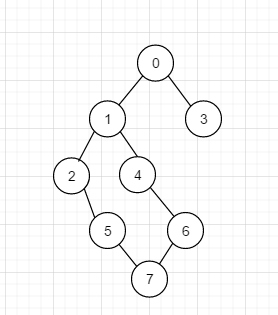
如果我們想對其進行深度優先遍歷的話, 其實情況不止一種, 比如 0 1 2 5 7 6 4 3
下面介紹使用臨接表法對其進行遍歷, 一般鄰接表長下面這樣:
思路: 參照上下兩圖我們可以發現, 鄰接表中的左半部分是一個連結串列陣列, 0-6 一共7個位置, 每一個位置上都對應一個連結串列, 比如 下面的 位置0 , 表示它是第一個節點, 右邊的連結串列中的node1 和 node3 分別表示他們的位置0處節點的相鄰節點,
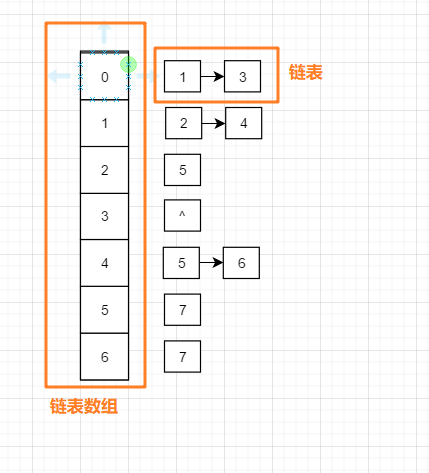
深度優先就是一條路走到黑, 走不下去了就往回退, 所以通常使用遞迴;
思路:
比如我們從node0開始, 然後可以往node1 也可以往node3 , 隨便選一個 node1 , 再從node1開始往下走, 我們可以到node2 或者 node4 --- 這種走法結合上圖來看, 翻譯一下就是下面這樣
- 列印當前節點值
- 標記當前節點被訪問過
- 遍歷當前節點的鄰接表
- 如果鄰接表中的元素曾經被訪問過, 跳過
- 如果鄰接表中的節點未被訪問過, 就 重複123過程
封裝鄰接表
public class Graph {
    private int size;
    // 連結串列陣列實現鄰接表
    private LinkedList<Integer> list[];

    public Graph(int size) {
        this.size = size;
        list = new LinkedList[size];
        for (int i = 0; i < size; i++) {
            list[i] = new LinkedList<>();
        }
    }

    /**
     * 接收兩個頂點 , 新增邊
     *
     * @param a
     * @param b
     */
    public void addEdge(int a, int b) {
        list[a].add(b);
        list[b].add(a);
    }

      public static void main(String[] args) {
        Graph graph = new Graph(8);
        graph.addEdge(0, 1);
        graph.addEdge(0, 3);
        graph.addEdge(1, 2);
        graph.addEdge(1, 4);
        graph.addEdge(2, 5);
        graph.addEdge(4, 5);
        graph.addEdge(4, 6);
        graph.addEdge(5, 7);
        graph.addEdge(6, 7);

        graph.dfs(0);
      }
}
深度優先遍歷
    public void dfs(int start) {
        boolean[] visited = new boolean[this.size];
        dodfs(start, this.list, visited);
    }

    /**
     * 遞迴深度搜索
     *
     * @param list
     * @param visited
     */
    private void dodfs(int start, LinkedList<Integer>[] list, boolean[] visited) {
        // 檢查當前節點有沒有被訪問過
        if (visited[start]) {
            return;
        }
        System.out.println(start);
        visited[start] = true;
        for (int i = 0; i < this.list[start].size(); i++) {
            int node = this.list[start].get(i);
            dodfs(node, list, visited);
        }
    }
鄰接表的廣度優先搜尋

還是看這個圖, 廣度優先遍歷的話,就是按層遍歷, 一般這樣的話 , 比如 0 1 3 2 4 5 6 7
其實這樣的話再不能使用遞迴設計函數了, 其實我當時應該能判斷出來, 遞迴的話容易往圖的一邊跑, 一邊遍歷完事後才可能進行另一面的遍歷, 可惜了,被問蒙了...
廣度優先的思路:
使用一個佇列來輔助完成, 思路如下
- 將當前節點新增進佇列
- 列印當前節點的值
- 遍歷當前節點的鄰接表中的節點
- 如果節點曾經被訪問過, 跳過,不處理他
- 如果當前節點沒有被訪問過, 並且佇列中現在沒有這個節點, 就將它新增進佇列
- 移除並得到 頭節點
- 將頭結點在輔助陣列visited中的標記 置為 true , 標識這個節點被訪問過了
- 更新現當前佇列頭位置的node, 在鄰接表中的位置
程式碼如下:
 /**
     * 廣度優先搜尋
     *
     * @param start
     */
    public void bfs(int start) {
        boolean[] visited = new boolean[this.size];
        dobfs(start, visited, this.list);

    }

    /**
     * 廣度優先搜尋
     *
     * @param start
     * @param visited
     * @param list
     */
    private void dobfs(int start, boolean[] visited, LinkedList<Integer>[] list) {
        Queue<Integer> queue = new LinkedList<>();
        queue.add(start);
        while (queue.size() > 0) {
            // 列印當前的節點
            System.out.println(queue.peek());
            for (int i = 0; i < this.list[start].size(); i++) {
                if (visited[this.list[start].get(i)]) {
                    continue;
                }
                /**
                 *  解決下面情況
                 *     1
                 *    / \
                 *   2   3
                 *    \ /
                 *     5
                 */
                if (!queue.contains(this.list[start].get(i))){
                    queue.add(this.list[start].get(i));
                }
            }

            // 移除頭結點
            Integer poll = queue.poll();
            visited[poll] = true;
            // 更新start值
            if (queue.size() > 0) {
                start = queue.peek();
            }
        }
    }
臨接陣列
臨接陣列的深度優先搜尋
什麼是臨接陣列?
如下圖:
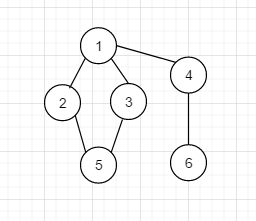
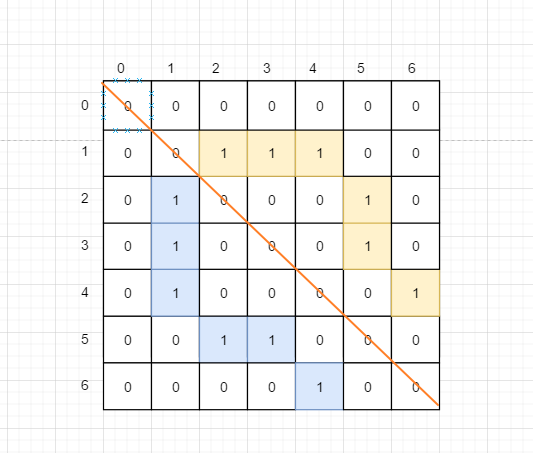
轉換成臨接矩陣長下面這樣, 很清晰的可以看出, 左下角和右上角是對稱的, 怎麼解讀下面的圖形呢?
它其實就是一個二維陣列 int [權重][X] 二維陣列可以理解成陣列巢狀陣列, 因此前面的 X 其實對應的下圖中的一行, 即 一個小陣列
- 最左邊的 縱向座標是 0 1 2 3 分別表示當前節點的 權值
- 下圖中的每一行都代表著前面的權值對應的 臨接點的數量
- 0 表示不是它的臨接點 , 1 表示是臨接點
建立鄰接表的程式碼如下
public class Graph1 {
    //頂點數
    private int numVertexes;
    // 邊數
    private int numEdges;
    // 記錄頂點
    int[] vertexes;
    // 二維陣列圖
    private int[][] points;
    // 用於標記某個點是否被訪問過的 輔助陣列
    private boolean[] visited;

    private Scanner scanner = new Scanner(System.in);

    public Graph1(int numVertexes, int numEdges) {
        this.numEdges = numEdges;
        this.numVertexes = numVertexes;
        // 初始化鄰接矩陣
        this.points = new int[numVertexes][numVertexes];
        // 初始化存放頂點的陣列
        this.vertexes = new int[numVertexes];
        // 標記已經訪問過的陣列
        this.visited = new boolean[this.numVertexes];
    }

    // 構建無向圖
    public int[][] buildGraph() {
        System.out.println("請輸入頂點的個數");

        this.numVertexes = scanner.nextInt();
        System.out.println("請輸入邊數");
        this.numEdges = scanner.nextInt();
        // 構建臨接矩陣
        for (int i = 0; i < this.numEdges; i++) {
            System.out.println("請輸入點(i,j)的 i 值");
            int i1 = scanner.nextInt();
            System.out.println("請輸入點(i,j)的 j 值");
            int j1 = scanner.nextInt();
            this.points[i1][j1] = 1;
            this.points[j1][i1] = 1;
        }
        return this.points;
    }
深度優先搜尋
思路: 深度優先依然使用遞迴演算法
- 列印當前節點的值
- 標記當前節點已經被訪問過了
- 遍歷當前節點的臨接矩陣
- 如果發現遍歷的節點為0 , 不處理, 繼續遍歷
- 如果發現遍歷的節點為1 , 但是已經被標記訪問過了, 不處理, 繼續遍歷
- 如果發現節點值為1 , 且沒有被訪問過, 遞迴重複123步驟
  /**
     * 深度搜索
     *
     * @param arr   待搜尋的陣列
     * @param value 頂點上的值
     */
    public void dfs(int[][] arr, int value) {
        System.out.println(value);
        visited[value] = true;
        for (int i = 0; i < arr.length; i++) {
            if (arr[value][i] != 0 && !visited[i]) {
                dfs(arr, i);
            }
        }
    }
臨接陣列的廣度優先搜尋
思路: 廣度優先遍歷臨接矩陣和上面說的鄰接表大致相同, 同樣需要一個輔助佇列
- 將頭結點新增到佇列中
- 列印頭結點的值
- 遍歷頭結點的臨接矩陣
- 如果發現遍歷的節點為0 , 不處理, 繼續遍歷
- 如果發現遍歷的節點為1 , 但是已經被標記訪問過了, 不處理, 繼續遍歷
- 如果發現節點值為1 , 且沒有被訪問過, 且佇列中沒有這個值 , 重複 123步驟
    /***
     * 廣度優先遍歷
     *
     * @param arr
     * @param headValue
     */
    public void bfs(int[][] arr, int headValue) {
        Queue<Integer> queue = new LinkedList<>();
        queue.add(headValue);
        while (queue.size() > 0) {
            System.out.println(queue.peek());
            for (int i = 0; i < arr[headValue].length; i++) {
                if (arr[headValue][i] == 1&&!visited[i]&&!queue.contains(i)) {
                    queue.add(i);
                }
            }
            // 頭節點出隊
            Integer poll = queue.poll();
            visited[poll]=true;
            // 更新headValue;
            if (queue.size()>0){
                headValue=queue.peek();
            }
        }
    }
二叉樹
假設我們有下面這個二叉樹,
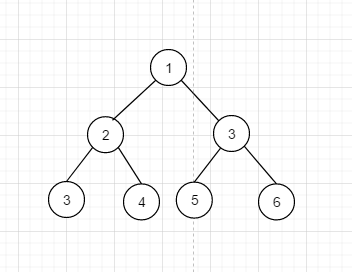
下面我們使用不同的方式遍歷它, 如果是深度優先的話, 情況依然是不確定的, 只要是符合一條路走到頭, 沒路可走再回退就ok , 比如 1 3 6 5 2 3 4
二叉樹的深度優先搜尋
下面使用java提供的棧這個資料結構輔助完成遍歷的過程
思路:
- 將頭節點壓入棧
- 彈出棧頂的元素
- 列印彈出的棧頂的元素的值
- 處理棧頂元素的子節點
- 如果存在左子節點, 將做子節點壓入棧
- 如果存在右子節點, 將右子節點壓入棧
- 重複 1 2 3 4 過程...
   /**
     * 深度優先搜尋
     * @param node
     */
    private static void dfs( Node node) {
        Stack<Node> stack = new Stack();
        stack.push(node);
        while (!stack.isEmpty()) {
            Node pop = stack.pop();
            System.out.println(pop.getValue());
            if (pop.getLeftNode()!=null){
                stack.push(pop.getLeftNode());
            }
            if (pop.getRightNode()!=null){
                stack.push(pop.getRightNode());
            }
        }
    }
二叉樹的廣度優先搜尋
思路: 廣度優先遍歷 同樣是藉助於輔助佇列
- 將頂點新增進佇列
- 列印這個節點的值
- 處理當前這個壓入棧的左右子節點
- 如果存在左節點, 將左節點存入佇列
- 如果存在右節點, 將右節點存入佇列
- 將頭結點出隊
- 重複1234過程
/**
* 廣度優先搜尋
* @param node
*/
private static void bfs( Node node) {
Queue<Node> queue = new LinkedList<>();
queue.add(node);
while (queue.size()>0){
System.out.println(queue.peek().getValue());
// 將左右節點入隊
if (queue.size()>0){
Node nd = queue.poll();
if (nd.getLeftNode()!=null){
queue.add(nd.getLeftNode());
}
if (nd.getRightNode()!=null){
queue.add(nd.getRightNode());
}
}
}
}
