Spring Boot 整合 Seata 解決分散式事務問題
seata 簡介
Seata 是 阿里巴巴2019年開源的分散式事務解決方案,致力於在微服務架構下提供高效能和簡單易用的分散式事務服務。在 Seata 開源之前,Seata 對應的內部版本在阿里內部一直扮演著分散式一致性中介軟體的角色,幫助阿里度過歷年的雙11,對各業務進行了有力的支撐。經過多年沉澱與積累,2019.1 Seata 正式宣佈對外開源 。目前 Seata 1.0 已經 GA。
微服務中的分散式事務問題
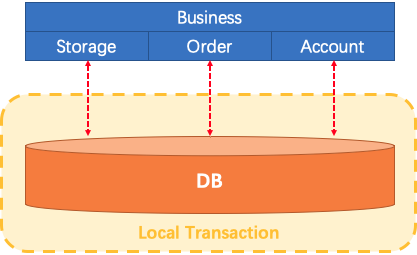
讓我們想象一下傳統的單片應用程式,它的業務由3個模組組成,他們使用單個本地資料來源。自然,本地事務將保證資料的一致性。

微服務架構已發生了變化。上面提到的3個模組被設計為3種服務。本地事務自然可以保證每個服務中的資料一致性。但是整個業務邏輯範圍如何?

Seata怎麼辦?

我們說,分散式事務是由一批分支事務組成的全域性事務,通常分支事務只是本地事務。

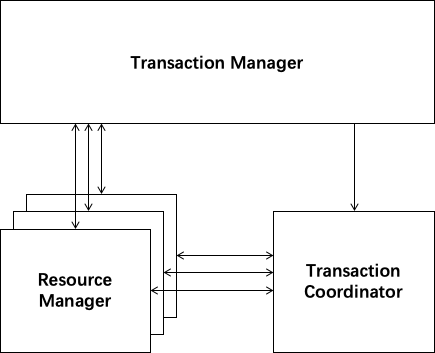
Seata有3個基本組成部分:
- 事務協調器(TC):維護全域性事務和分支事務的狀態,驅動全域性提交或回滾。
- 事務管理器TM:定義全域性事務的範圍:開始全域性事務,提交或回滾全域性事務。
- 資源管理器(RM):管理正在處理的分支事務的資源,與TC對話以註冊分支事務並報告分支事務的狀態,並驅動分支事務的提交或回滾。

Seata管理的分散式事務的典型生命週期:
- TM要求TC開始一項新的全域性事務。TC生成代表全域性事務的XID。
- XID通過微服務的呼叫鏈傳播。
- RM將本地事務註冊為XID到TC的相應全域性事務的分支。
- TM要求TC提交或回退相應的XID全域性事務。
- TC驅動XID的相應全域性事務下的所有分支事務以完成分支提交或回滾。

快速開始
用例
使用者購買商品的業務邏輯。整個業務邏輯由3個微服務提供支援:
- 倉儲服務:對給定的商品扣除倉儲數量。
- 訂單服務:根據採購需求建立訂單。
- 帳戶服務:從使用者帳戶中扣除餘額。
環境準備
步驟 1:建立資料庫
# db_seata
DROP SCHEMA IF EXISTS db_seata;
CREATE SCHEMA db_seata;
USE db_seata;

# Account
CREATE TABLE `account_tbl` (
  `id` INT(11) NOT NULL AUTO_INCREMENT,
  `user_id` VARCHAR(255) DEFAULT NULL,
  `money` INT(11) DEFAULT 0,
  PRIMARY KEY (`id`)
) ENGINE = InnoDB DEFAULT CHARSET = utf8;

INSERT INTO account_tbl (id, user_id, money)
VALUES (1, '1001', 10000);
INSERT INTO account_tbl (id, user_id, money)
VALUES (2, '1002', 10000);

# Order
CREATE TABLE `order_tbl`
(
  `id` INT(11) NOT NULL AUTO_INCREMENT,
  `user_id` VARCHAR(255) DEFAULT NULL,
  `commodity_code` VARCHAR(255) DEFAULT NULL,
  `count` INT(11) DEFAULT '0',
  `money` INT(11) DEFAULT '0',
  PRIMARY KEY (`id`)
) ENGINE = InnoDB DEFAULT CHARSET = utf8;

# Storage
CREATE TABLE `storage_tbl` (
  `id` INT(11) NOT NULL AUTO_INCREMENT,
  `commodity_code` VARCHAR(255) DEFAULT NULL,
  `count` INT(11) DEFAULT '0',
  PRIMARY KEY (`id`),
  UNIQUE KEY `commodity_code` (`commodity_code`)
) ENGINE = InnoDB DEFAULT CHARSET = utf8;


INSERT INTO storage_tbl (id, commodity_code, count)
VALUES (1, '2001', 1000);

CREATE TABLE `undo_log` (
  `id` bigint(20) NOT NULL AUTO_INCREMENT,
  `branch_id` bigint(20) NOT NULL,
  `xid` varchar(100) NOT NULL,
  `context` varchar(128) NOT NULL,
  `rollback_info` longblob NOT NULL,
  `log_status` int(11) NOT NULL,
  `log_created` datetime NOT NULL,
  `log_modified` datetime NOT NULL,
  PRIMARY KEY (`id`),
  UNIQUE KEY `ux_undo_log` (`xid`,`branch_id`)
) ENGINE=InnoDB AUTO_INCREMENT=1 DEFAULT CHARSET=utf8;
seata AT 模式需要 undo_log 表,另外三張是業務表。
步驟 2: 啟動 Seata Server
Server端儲存模式(store.mode)現有file、db兩種(後續將引入raft),file模式無需改動,直接啟動即可。db模式需要匯入用於儲存全域性事務回話資訊的三張表。
注:file模式為單機模式,全域性事務會話資訊記憶體中讀寫並持久化本地檔案root.data,效能較高;
db模式為高可用模式,全域性事務會話資訊通過db共享,相應效能差些
可以直接通過bash 指令碼啟動 Seata Server,也可以通過 Docker 映象啟動,但是 Docker 方式目前只支援使用 file 模式,不支援將 Seata-Server 註冊到 Eureka 或 Nacos 等註冊中心。
通過指令碼啟動
在 https://github.com/seata/seata/releases 下載相應版本的 Seata Server,解壓後執行以下命令啟動,這裡使用 file 配置
通過 Docker 啟動
docker run --name seata-server -p 8091:8091 seataio/seata-server:latest專案介紹
| 專案名 | 地址 | 說明 |
|---|---|---|
| sbm-account-service | 127.0.0.1:8081 | 賬戶服務 |
| sbm-order-service | 127.0.0.1:8082 | 訂單服務 |
| sbm-storage-service | 127.0.0.1:8083 | 倉儲服務 |
| sbm-business-service | 127.0.0.1:8084 | 主業務 |
| seata-server | 172.16.2.101:8091 | seata-server |
核心程式碼
為了不讓篇幅太長,這裡只給出部分程式碼,詳細程式碼文末會給出原始碼地址
maven 引入 seata 的依賴 eata-spring-boot-starter
<dependency>
    <groupId>io.seata</groupId>
    <artifactId>seata-spring-boot-starter</artifactId>
    <version>1.0.0</version>
</dependency>
倉儲服務
application.properties
spring.application.name=account-service
server.port=8081
spring.datasource.url=jdbc:mysql://172.16.2.101:3306/db_seata?useSSL=false&serverTimezone=UTC
spring.datasource.username=root
spring.datasource.password=123456
seata.tx-service-group=my_test_tx_group
mybatis.mapper-locations=classpath*:mapper/*Mapper.xml
seata.service.grouplist=172.16.2.101:8091
logging.level.io.seata=info
logging.level.io.seata.samples.account.persistence.AccountMapper=debug
StorageService
public interface StorageService {

    /**
     * 扣除儲存數量
     */
    void deduct(String commodityCode, int count);
}
訂單服務
public interface OrderService {

    /**
     * 建立訂單
     */
    Order create(String userId, String commodityCode, int orderCount);
}
帳戶服務
public interface AccountService {

    /**
     * 從使用者賬戶中借出
     */
    void debit(String userId, int money);
}
主要業務邏輯
只需要使用一個 @GlobalTransactional 註解在業務方法上。
@GlobalTransactional
public void purchase(String userId, String commodityCode, int orderCount) {
    LOGGER.info("purchase begin ... xid: " + RootContext.getXID());
    storageClient.deduct(commodityCode, orderCount);
    orderClient.create(userId, commodityCode, orderCount);
}
XID 的傳遞
全域性事務ID的跨服務傳遞,需要我們自己實現,這裡通過攔截器的方式。每個服務都需要新增下面兩個類。
SeataFilter
@Component
public class SeataFilter implements Filter {
    @Override
    public void init(FilterConfig filterConfig) throws ServletException {
    }

    @Override
    public void doFilter(ServletRequest servletRequest, ServletResponse servletResponse, FilterChain filterChain) throws IOException, ServletException {
        HttpServletRequest req = (HttpServletRequest) servletRequest;
        String xid = req.getHeader(RootContext.KEY_XID.toLowerCase());
        boolean isBind = false;
        if (StringUtils.isNotBlank(xid)) {
            RootContext.bind(xid);
            isBind = true;
        }
        try {
            filterChain.doFilter(servletRequest, servletResponse);
        } finally {
            if (isBind) {
                RootContext.unbind();
            }
        }
    }

    @Override
    public void destroy() {
    }
}
SeataRestTemplateAutoConfiguration
@Configuration
public class SeataRestTemplateAutoConfiguration {
    @Autowired(
            required = false
    )
    private Collection<RestTemplate> restTemplates;
    @Autowired
    private SeataRestTemplateInterceptor seataRestTemplateInterceptor;

    public SeataRestTemplateAutoConfiguration() {
    }

    @Bean
    public SeataRestTemplateInterceptor seataRestTemplateInterceptor() {
        return new SeataRestTemplateInterceptor();
    }

    @PostConstruct
    public void init() {
        if (this.restTemplates != null) {
            Iterator var1 = this.restTemplates.iterator();

            while (var1.hasNext()) {
                RestTemplate restTemplate = (RestTemplate) var1.next();
                List<ClientHttpRequestInterceptor> interceptors = new ArrayList(restTemplate.getInterceptors());
                interceptors.add(this.seataRestTemplateInterceptor);
                restTemplate.setInterceptors(interceptors);
            }
        }

    }
}
測試
測試成功場景:
curl -X POST http://127.0.0.1:8084/api/business/purchase/commit此時返回結果為:true
測試失敗場景:
UserId 為1002 的使用者下單,sbm-account-service會丟擲異常,事務會回滾
http://127.0.0.1:8084/api/business/purchase/rollback此時返回結果為:false
檢視 undo_log 的日誌或者主鍵,可以看到在執行過程中有儲存資料。
如檢視主鍵自增的值,在執行前後的值會發生變化,在執行前是 1,執行後是 7 。
原始碼地址
https://github.com/gf-huanchupk/SpringBootLearning/tree/master/springboot-seata
參考
http://seata.io/zh-cn/docs/overview/what-is-seata.html
歡迎掃碼或微信搜尋公眾號《程式設計師果果》關注我,關注有驚喜~

相關推薦
Spring Boot 整合 Seata 解決分散式事務問題
seata 簡介 Seata 是 阿里巴巴2019年開源的分散式事務解決方案,致力於在微服務架構下提供高效能和簡單易用的分散式事務服務。在 Seata 開源之前,Seata 對應的內部版本在阿里內部一直扮演著分散式一致性中介軟體的角色,幫助阿里度過歷年的雙11,對各業務進行了有力的支撐。經過多年沉澱與積累,2
Spring boot整合websocket實現分散式websocketsession共享(一)--基於redis的釋出訂閱
本文主要是針對分散式場景下的使用websocket的一個解決方案。我們以下面的圖來說明下業務使用場景。 針對如圖的情況,很多人第一時間想到的是websocket的session共享,這是大多數的第一反應。很遺憾的是,websocketsession是不支援序列化操作
spring boot 整合 log4j 解決與logback衝突問題
現在很流行springboot的開發,小編閒來無事也學了學,開發過程中遇見了log4j日誌的一個小小問題,特此記載。 首先在pox.xml中引入對應的maven依賴: <!-- 引入log4j--> <dependency
分散式定時任務解決方案-spring boot整合JMS以及Redis實現
最近需要設計一個分散式的定時任務的方案,從理論上來說,Quartz已經提供了一套完善的分散式定時任務的解決方案,但是由於系統目前已有JMS叢集和Redis Sentinel叢集,如果想要在目前已有的架構上,實現了一個簡單的分散式定時任務的話,如何來做了?總體架構設計圖如下:
Spring Boot 整合 Apache Solr 異常:Expected mime type application/octet-stream but got text/html 的解決.
註釋 info 過時 查看 異常 dea 沒有 時間 發的 解決方法:Spring Data Solr 3.0 以上版本 將@SolrDocument(solrCoreName = "new_core") 中的solrCoreName 字段改為使用collection字段
Spring Boot 整合Mybatis非starter時,mapper一直無法注入解決
本來呢,直接使用mybatis-spring-boot-starter還是挺好的,但是我們系統比較複雜,有多個數據源,其中一個平臺自己的資料來源,另外一些是動態配置出來的,兩者完全沒有關係。所以直接使用mybatis-spring-boot-starter就很麻煩了,會報下列錯誤: Caused by
spring boot整合mybatis查詢資料庫返回Map欄位為空不返回解決
1.出現問題原因 原因1:mybatis的配置即mapper返回對映配置。 原因2:jackson的配置即@ResponseBody序列化配置。 2.解決方式 步驟1:解決原因1 mybatis:configuration: call-setters
Spring Boot整合Hazelcast實現叢集與分散式記憶體快取
Hazelcast是Hazelcast公司開源的一款分散式記憶體資料庫產品,提供彈性可擴充套件、高效能的分散式記憶體計算。並通過提供諸如Map,Queue,ExecutorService,Lock和JCache等Java的許多開發人員友好的分散式實現。 瞭解Hazelcast Hazelcast特性 簡單易
spring boot整合mybatis以及事務的管理
1、整合mybatis。 2、事務管理 一、整合mybatis 備註:通過mapper.xml檔案來進行與資料庫的操作(sql語句靈活,較常使用) 一、整合mybatis &n
spring boot整合redis實現shiro的分散式session共享
我們知道,shiro是通過SessionManager來管理Session的,而對於Session的操作則是通過SessionDao來實現的,預設的情況下,shiro實現了兩種SessionDao,分別為CachingSessionDAO和MemorySessionDAO,
Maven專案中,關於Spring Boot 整合MyBatis時,Service層無法找到mapper介面的問題解決
mybatis: mapperlocations: classpath:com/xxx/xxx/dao/mapper/*.xml -----掃描對映檔案 config-location: classpath:mybatis-config.xml ------掃描配置檔案注意:路徑要以/ 分割3 M
Spring Boot 整合Spring Session 通過Redis實現分散式共享Session
一、首先我們要引入依賴,修改pom.xml新增: //引入spring session <dependency> <groupId>org.springframework.session</groupId> <artifactId>
Spring Boot 整合Shiro和Redis關於@Cacheble註解無效的解決方法
在我做專案的時候,在Spring Boot 中對Shiro和Redis進行了整合,但實際發現Spring boot中Shiro和Redis整合後,Spring的@cacheble註解無效。 出現的情況如下: 如果只是Spring boot和Redis整合,
Spring boot 整合CXF webservice遇到的一些問題及解決,
在spring boot整合CXF開發是遇到的一些問題 以及整合方式整合過程 網上資料引入cxf-spring-boot-starter-jaxws依賴即可<dependency> <groupId>org.apache.cxf&l
Spring boot 整合Spring Security過程中的出現的關於Session scope的異常排查及解決方案
背景介紹 最近做的一個專案,其一需要用到Spring 的oauth認證功能, 其二需要對spring 的ContextRefreshedEvent 這個事件進行監聽,實現一部分自定義註解的功能(具體功能不作贅述),本來以為毫不相關的兩個功能,卻出現了一些意料之
關於spring boot整合mybatis使用oracle資料庫出現could not load:oracle.jdbc.driver.OracleDriver問題的終極解決方案
由於開發用到資料庫為oracle,特地從外網下載下來與spring整合的mybatis的jar包,接下來本以為輕鬆愉快的加入oracle驅動的pom依賴即可,結果報錯,經查詢發現Maven倉庫由於版權的原因沒有oracle的驅動jar包。 當時考慮的是
Spring Cloud Alibaba | 微服務分散式事務之Seata
Spring Cloud Alibaba | 微服務分散式事務之Seata 本篇實戰所使用Spring有關版本: SpringBoot:2.1.7.RELEASE Spring Cloud:Greenwich.SR2 Spring CLoud Alibaba:2.1.0.RELEASE 1. 概述 在構建
spring-boot整合dubbo:Spring-boot-dubbo-starter
hub pack 自動配置 china end service get exceptio 整合 為什麽要寫這個小工具 如果你用過Spring-boot來提供dubbo服務,相信使用中有很多“不爽”的地方。既然使用spring boot,那麽能用註解的地方絕不用xml配置,這
Spring Boot 整合 Elasticsearch,實現 function score query 權重分查詢
search 小寫 業務 jpg 啟動會 last cti cal agen 摘要: 原創出處 www.bysocket.com 「泥瓦匠BYSocket 」歡迎轉載,保留摘要,謝謝! 『 預見未來最好的方式就是親手創造未來 – 《史蒂夫·喬布斯
Intellij IDEA 使用Spring-boot-devTools無效解決辦法
csdn 手動 .net reg 配置 相信自己 script log ref 相信大部分使用Intellij的同學都會遇到這個問題,即使項目使用了spring-boot-devtools,修改了類或者html、js等,idea還是不會自動重啟,非要手動去make一下或者重
