Go Web 程式設計之 程式結構
概述
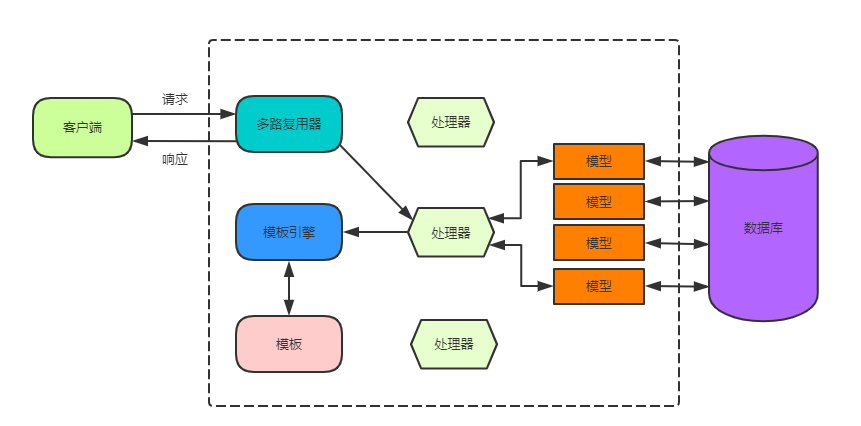
一個典型的 Go Web 程式結構如下,摘自《Go Web 程式設計》:

- 客戶端傳送請求;
- 伺服器中的多路複用器收到請求;
- 多路複用器根據請求的 URL 找到註冊的處理器,將請求交由處理器處理;
- 處理器執行程式邏輯,必要時與資料庫進行互動,得到處理結果;
- 處理器呼叫模板引擎將指定的模板和上一步得到的結果渲染成客戶端可識別的資料格式(通常是 HTML);
- 最後將資料通過響應返回給客戶端;
- 客戶端拿到資料,執行對應的操作,如渲染出來呈現給使用者。
本文介紹如何建立多路複用器,如何註冊處理器,最後再簡單介紹一下 URL 匹配。我們以上一篇文章中的"Hello World"程式作為基礎。
package main

import (
    "fmt"
    "log"
    "net/http"
)

func hello(w http.ResponseWriter, r *http.Request) {
    fmt.Fprintf(w, "Hello World")
}

func main() {
    http.HandleFunc("/", hello)
    if err := http.ListenAndServe(":8080", nil); err != nil {
        log.Fatal(err)
    }
}
多路複用器
預設多路複用器
net/http 包為了方便我們使用,內建了一個預設的多路複用器DefaultServeMux。定義如下:
// src/net/http/server.go

// DefaultServeMux is the default ServeMux used by Serve.
var DefaultServeMux = &defaultServeMux

var defaultServeMux ServeMux
這裡給大家介紹一下 Go 標準庫程式碼的組織方式,便於大家對照。
- Windows上,Go 語言的預設安裝目錄為
C:\Go,即GOROOT; GOROOT下有一個 src 目錄,標庫庫的程式碼都在這個目錄中;- 每個包有一個單獨的目錄,例如 fmt 包在
src/fmt目錄中; - 子包在其父包的子目錄中,例如 net/http 包在
src/net/http目錄中。
net/http 包中很多方法都在內部呼叫DefaultServeMux的對應方法,如HandleFunc。我們知道,HandleFunc是為指定的 URL 註冊一個處理器(準確來說,hello是處理器函式,見下文)。其內部實現如下:
// src/net/http/server.go
func HandleFunc(pattern string, handler func(ResponseWriter, *Request)) {
    DefaultServeMux.HandleFunc(pattern, handler)
}實際上,http.HandleFunc方法是將處理器註冊到DefaultServeMux中的。
另外,我們使用 ":8080" 和 nil 作為引數呼叫http.ListenAndServe時,會建立一個預設的伺服器:
// src/net/http/server.go
func ListenAndServe(addr string, handler Handler) {
    server := &Server{Addr: addr, Handler: handler}
    return server.ListenAndServe()
}這個伺服器預設使用DefaultServeMux來處理器請求:
type serverHandler struct {
    srv *Server
}

func (sh serverHandler) ServeHTTP(rw ResponseWriter, req *Request) {
    handler := sh.srv.Handler
    if handler == nil {
        handler = DefaultServeMux
    }
    handler.ServeHTTP(rw, req)
}伺服器收到的每個請求會呼叫對應多路複用器(即ServeMux)的ServeHTTP方法。在ServeMux的ServeHTTP方法中,根據 URL 查詢我們註冊的處理器,然後將請求交由它處理。
雖然預設的多路複用器使用起來很方便,但是在生產環境中不建議使用。由於DefaultServeMux是一個全域性變數,所有程式碼,包括第三方程式碼都可以修改它。
有些第三方程式碼會在DefaultServeMux註冊一些處理器,這可能與我們註冊的處理器衝突。
比較推薦的做法是自己建立多路複用器。
建立多路複用器
建立多路複用器也比較簡單,直接呼叫http.NewServeMux方法即可。然後,在新建立的多路複用器上註冊處理器:
package main

import (
    "fmt"
    "log"
    "net/http"
)

func hello(w http.ResponseWriter, r *http.Request) {
    fmt.Fprintf(w, "Hello World")
}

func main() {
    mux := http.NewServeMux()
    mux.HandleFunc("/", hello)

    server := &http.Server{
        Addr:    ":8080",
        Handler: mux,
    }

    if err := server.ListenAndServe(); err != nil {
        log.Fatal(err)
    }
}
上面程式碼的功能與 "Hello World" 程式相同。這裡我們還自己建立了伺服器物件。通過指定伺服器的引數,我們可以建立定製化的伺服器。
server := &http.Server{
    Addr:           ":8080",
    Handler:        mux,
    ReadTimeout:    1 * time.Second,
    WriteTimeout:   1 * time.Second,
}
在上面程式碼,我們建立了一個讀超時和寫超時均為 1s 的伺服器。
處理器和處理器函式
上文中提到,伺服器收到請求後,會根據其 URL 將請求交給相應的處理器處理。處理器是實現了Handler介面的結構,Handler介面定義在 net/http 包中:
// src/net/http/server.go
type Handler interface {
    func ServeHTTP(w Response.Writer, r *Request)
}
我們可以定義一個實現該介面的結構,註冊這個結構型別的物件到多路複用器中:
package main

import (
    "fmt"
    "log"
    "net/http"
)

type GreetingHandler struct {
    Language string
}

func (h GreetingHandler) ServeHTTP(w http.ResponseWriter, r *http.Request) {
    fmt.Fprintf(w, "%s", h.Language)
}

func main() {
    mux := http.NewServeMux()
    mux.Handle("/chinese", GreetingHandler{Language: "你好"})
    mux.Handle("/english", GreetingHandler{Language: "Hello"})

    server := &http.Server {
        Addr:   ":8080",
        Handler: mux,
    }

    if err := server.ListenAndServe(); err != nil {
        log.Fatal(err)
    }
}與前面的程式碼有所不同,上段程式碼中,定義了一個實現Handler介面的結構GreetingHandler。然後,建立該結構的兩個物件,分別將它註冊到多路複用器的/hello和/world路徑上。注意,這裡註冊使用的是Handle方法,注意與HandleFunc方法對比。
啟動伺服器之後,在瀏覽器的位址列中輸入localhost:8080/chinese,瀏覽器中將顯示你好,輸入localhost:8080/english將顯示Hello。
雖然,自定義處理器這種方式比較靈活,強大,但是需要定義一個新的結構,實現ServeHTTP方法,還是比較繁瑣的。為了方便使用,net/http 包提供了以函式的方式註冊處理器,即使用HandleFunc註冊。函式必須滿足簽名:func (w http.ResponseWriter, r *http.Request)。
我們稱這個函式為處理器函式。我們的 "Hello World" 程式中使用的就是這種方式。HandleFunc方法內部,會將傳入的處理器函式轉換為HandlerFunc型別。
// src/net/http/server.go
func (mux *ServeMux) HandleFunc(pattern string, handler func(ResponseWriter, *Request)) {
    if handler == nil {
        panic("http: nil handler")
    }
    mux.Handle(pattern, HandlerFunc(handler))
}HandlerFunc是底層型別為func (w ResponseWriter, r *Request)的新型別,它可以自定義其方法。由於HandlerFunc型別實現了Handler介面,所以它也是一個處理器型別,最終使用Handle註冊。
// src/net/http/server.go
type HandlerFunc func(w *ResponseWriter, r *Request)

func (f HandlerFunc) ServeHTTP(w ResponseWriter, r *Request) {
    f(w, r)
}
注意,這幾個介面和方法名很容易混淆,這裡再強調一下:
Handler:處理器介面,定義在 net/http 包中。實現該介面的型別,其物件可以註冊到多路複用器中;Handle:註冊處理器的方法;HandleFunc:註冊處理器函式的方法;HandlerFunc:底層型別為func (w ResponseWriter, r *Request)的新型別,實現了Handler介面。它連線了處理器函式與處理器。
URL 匹配
一般的 Web 伺服器有非常多的 URL 繫結,不同的 URL 對應不同的處理器。但是伺服器是怎麼決定使用哪個處理器的呢?例如,我們現在綁定了 3 個 URL,/和/hello和/hello/world。
顯然,如果請求的 URL 為/,則呼叫/對應的處理器。如果請求的 URL 為/hello,則呼叫/hello對應的處理器。如果請求的 URL 為/hello/world,則呼叫/hello/world對應的處理器。
但是,如果請求的是/hello/others,那麼使用哪一個處理器呢? 匹配遵循以下規則:
- 首先,精確匹配。即查詢是否有
/hello/others對應的處理器。如果有,則查詢結束。如果沒有,執行下一步; - 將路徑中最後一個部分去掉,再次查詢。即查詢
/hello/對應的處理器。如果有,則查詢結束。如果沒有,繼續執行這一步。即查詢/對應的處理器。
這裡有一個注意點,如果註冊的 URL 不是以/結尾的,那麼它只能精確匹配請求的 URL。反之,即使請求的 URL 只有字首與被繫結的 URL 相同,ServeMux也認為它們是匹配的。
這也是為什麼上面步驟進行到/hello/時,不能匹配/hello的原因。因為/hello不以/結尾,必須要精確匹配。
如果,我們繫結的 URL 為/hello/,那麼當伺服器找不到與/hello/others完全匹配的處理器時,就會退而求其次,開始尋找能夠與/hello/匹配的處理器。
看下面的程式碼:
package main

import (
    "fmt"
    "log"
    "net/http"
)

func indexHandler(w http.ResponseWriter, r *http.Request) {
    fmt.Fprintf(w, "This is the index page")
}

func helloHandler(w http.ResponseWriter, r *http.Request) {
    fmt.Fprintf(w, "This is the hello page")
}

func worldHandler(w http.ResponseWriter, r *http.Request) {
    fmt.Fprintf(w, "This is the world page")
}

func main() {
    mux := http.NewServeMux()
    mux.HandleFunc("/", indexHandler)
    mux.HandleFunc("/hello", helloHandler)
    mux.HandleFunc("/hello/world", worldHandler)

    server := &http.Server{
        Addr:    ":8080",
        Handler: mux,
    }

    if err := server.ListenAndServe(); err != nil {
        log.Fatal(err)
    }
}- 瀏覽器請求
localhost:8080/將返回"This is the index page",因為/精確匹配;

- 瀏覽器請求
localhost:8080/hello將返回"This is the hello page",因為/hello精確匹配;

- 瀏覽器請求
localhost:8080/hello/將返回"This is the index page"。注意這裡不是hello,因為繫結的/hello需要精確匹配,而請求的/hello/不能與之精確匹配。故而向上查詢到/;

- 瀏覽器請求
localhost:8080/hello/world將返回"This is the world page",因為/hello/world精確匹配;

- 瀏覽器請求
localhost:8080/hello/world/將返回"This is the index page",查詢步驟為/hello/world/(不能與/hello/world精確匹配)->/hello/(不能與/hello/精確匹配)->/;

- 瀏覽器請求
localhost:8080/hello/other將返回"This is the index page",查詢步驟為/hello/others->/hello/(不能與/hello精確匹配)->/;

如果註冊時,將/hello改為/hello/,那麼請求localhost:8080/hello/和localhost:8080/hello/world/都將返回"This is the hello page"。自己試試吧!
思考:
使用/hello/註冊處理器時,localhost:8080/hello/返回什麼?
總結
本文介紹了 Go Web 程式的基本結構。Go Web 的基本形式如下:
package main

import (
    "fmt"
    "log"
    "net/http"
)

func helloHandler(w http.ResponseWriter, r *http.Request) {
    fmt.Fprintf(w, "Hello, World")
}

type greetingHandler struct {
    Name string
}

func (h greetingHandler) ServeHTTP(w http.ResponseWriter, r *http.Request) {
    fmt.Fprintf(w, "Hello, %s", h.Name)
}

func main() {
    mux := http.NewServeMux()
    // 註冊處理器函式
    mux.HandleFunc("/hello", helloHandler)

    // 註冊處理器
    mux.Handle("/greeting/golang", greetingHandler{Name: "Golang"})

    server := &http.Server {
        Addr:       ":8080",
        Handler:    mux,
    }
    if err := server.ListenAndServe(); err != nil {
        log.Fatal(err)
    }
}
後續文章中大部分程式只是在此基礎上增加處理器或處理器函式並註冊到相應的 URL 中而已。處理器和處理器函式可以只使用一種或兩者都使用。注意,為了方便,命名中我都加上了Handler。
參考資料
- Go Web 程式設計
我
我的部落格
歡迎關注我的微信公眾號【GoUpUp】,共同學習,一起進步~

本文由部落格一文多發平臺 OpenWrite 釋出!
