
例項演示:如何簡化生產中的Pod安全策略?
阿新 • • 發佈:2020-04-01
Pod安全策略對於強化K8S叢集安全至關重要。本文將延續之前的文章繼續深入介紹Pod安全策略。
首先,簡單介紹瞭如何將Pod與Pod安全策略相關聯,並使用RBAC來展示具體步驟。然後介紹如何在Rancher中啟用預設的PSP和建立自定義PSP。最後將使用一種工具來簡化生產中Pod安全策略的使用,極大提升生產力,趕緊戳文咯~

------------
本文來自[RancherLabs](https://mp.weixin.qq.com/s/Zj5PPYB3VNlP8ILvbwCgug "RancherLabs")
在[之前的文章](https://mp.weixin.qq.com/s/K3aCkzSSuprF-bJElUBG8Q/ "之前的文章")中,我們演示瞭如何使用受限的PSP策略作為預設值在Rancher中啟用PSP。我們還展示瞭如何防止特權Pod被接納到叢集中。
我們有意省略了有關基於角色的訪問控制(RBAC)以及如何將Pod與特定PSP連線的具體細節。那麼,這篇文章讓我們繼續深入研究PSP。
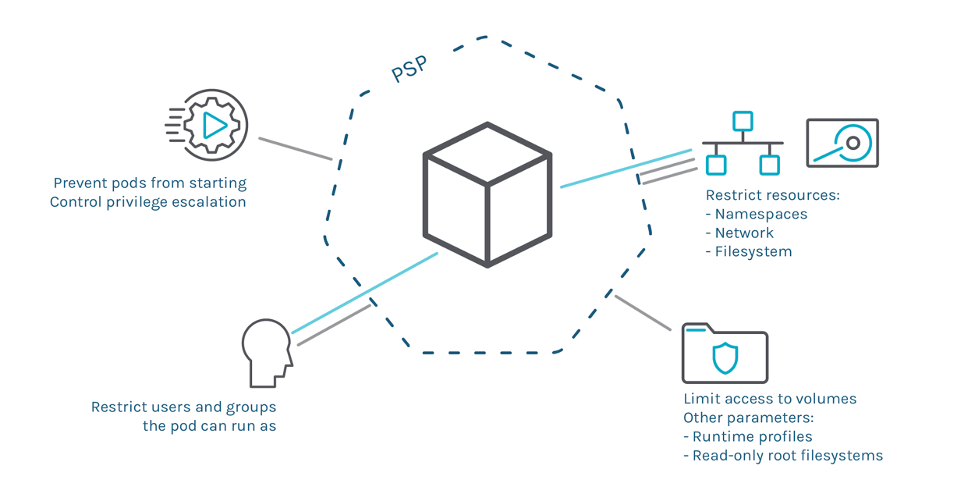
## 將Pod與Pod 安全策略匹配
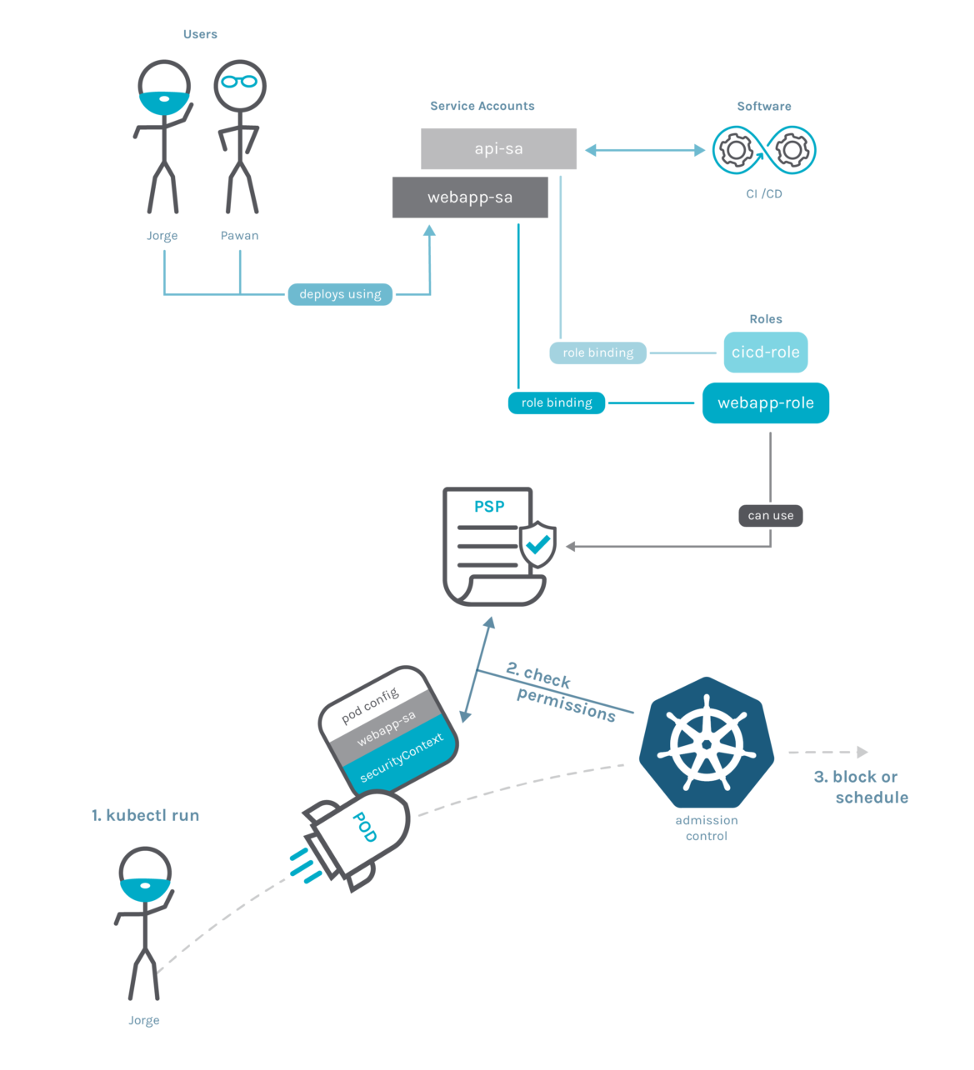
你可能已經注意到,PSP模式沒有與任何Kubernetes名稱空間、Service Account或Pod相關聯。實際上,PSP是叢集範圍的資源。那麼,我們如何指定哪些Pod應該由哪些PSP來管理呢?下圖顯示了所有參與元件、資源以及准入流程的工作方式。
也許一開始聽起來很複雜。現在,我們來詳細介紹一下。
部署Pod時,准入控制將根據請求deployment的物件來應用策略。
Pod本身沒有任何關聯的策略——執行該Deployment的是service account。在上圖中,Jorge使用webapp-sa service account部署了pod。
RoleBinding將service account與Roles(或ClusterRoles)相關聯,Role是指定可以使用PSP的資源。在該圖中,webapp-sa與webapp-role關聯,後者為特定的PSP資源提供使用許可。部署Pod時,將根據webapp-sa PSP對Pod進行檢查。實際上,一個service account可以使用多個PSP,並且其中一個可以驗證Pod就足夠了。你可以在官方文件中檢視詳細資訊:
https://kubernetes.io/docs/concepts/policy/pod-security-policy/#policy-order
然後,准入控制將決定Pod是否符合其中任何一個PSP。如果Pod符合要求,准入控制將排程Pod;如果Pod不符合規定,則會阻止部署。
以上內容可以總結為以下幾點:
- Pod身份由其service account確定
- 如果規範中未宣告任何service account,則將使用預設賬戶
- 你需要允許使用宣告Role或ClusterRole
最後,需要有一個RoleBinding,它將Role(從而允許訪問使用PSP)與Pod規範中宣告的Servcie Account相關聯。
讓我們用一些例子來說明。
## RBAC的真實示例
假設你已經有一個啟用了PSP的叢集,這是採用PSP建立限制性PSP的常用方法,該PSP可以被任意Pod使用。然後你將新增更為特定的PSP,該PSP有繫結到特定service account的其他特權。擁有預設、安全且嚴格的策略有助於叢集的管理,因為大多數Pod不需要特殊的特權或功能,並且在預設情況下即可執行。然後,如果你的某些工作負載需要其他特權,我們可以建立一個自定義PSP並將該工作負載的特定service account繫結到限制較少的PSP。
但是,如何將Pod繫結到特定的PSP而不是預設的受限PSP?以及如何使用不自動新增RoleBindings的普通Kubernetes叢集來做到這一點?
讓我們看一個完整的示例,在該示例中,我們定義一些安全的預設值(叢集中任何service account都可以使用的受限PSP),然後為需要該服務的特定deployment向單個service account提供其他特權。
首先,我們手動建立一個新的名稱空間。它不會由Rancher管理,所以不會自動建立RoleBindings。然後我們在該名稱空間中嘗試部署一個受限的Pod:
```
$ kubectl create ns psp-test
$ cat deploy-not-privileged.yaml
apiVersion: apps/v1
kind: Deployment
metadata:
labels:
app: not-privileged-deploy
name: not-privileged-deploy
spec:
replicas: 1
selector:
matchLabels:
app: not-privileged-deploy
template:
metadata:
labels:
app: not-privileged-deploy
spec:
containers:
- image: alpine
name: alpine
stdin: true
tty: true
securityContext:
runAsUser: 1000
runAsGroup: 1000
$ kubectl -n psp-test apply -f deploy-not-privileged.yaml
$ kubectl -n psp-test describe rs
...
Warning FailedCreate 4s (x12 over 15s) replicaset-controller Error creating: pods "not-privileged-deploy-684696d5b5-" is forbidden: unable to validate against any pod security policy: []
```
由於名稱空間psp-test中沒有RoleBinding,且該名稱空間繫結到允許使用任何PSP的角色,因此無法建立pod。我們將通過建立叢集範圍的ClusterRole和ClusterRoleBinding來解決此問題,以允許任何Service Account預設使用受限的PSP。之前的文章中啟用PSP時,Rancher建立了受限PSP。
```
resourceNames:
- restricted-psp
---
apiVersion: rbac.authorization.k8s.io/v1
kind: ClusterRoleBinding
metadata:
name: restricted-role-bind
roleRef:
apiGroup: rbac.authorization.k8s.io
kind: ClusterRole
name: use-restricted-psp
subjects:
- apiGroup: rbac.authorization.k8s.io
kind: Group
name: system:serviceaccounts
$ kubectl apply -f clusterrole-use-restricted.yaml
```
我們應用這些更改之後,非特權deployment應正常工作。
但是,如果我們需要部署特權Pod,則不會被現有策略允許:
```
$ cat deploy-privileged.yaml
apiVersion: v1
kind: ServiceAccount
metadata:
name: privileged-sa
namespace: psp-test
---
apiVersion: apps/v1
kind: Deployment
metadata:
labels:
app: privileged-deploy
name: privileged-deploy
namespace: psp-test
spec:
replicas: 1
selector:
matchLabels:
app: privileged-deploy
template:
metadata:
labels:
app: privileged-deploy
spec:
containers:
- image: alpine
name: alpine
stdin: true
tty: true
securityContext:
privileged: true
hostPID: true
hostNetwork: true
serviceAccountName: privileged-sa
$ kubectl -n psp-test apply -f deploy-privileged.yaml
$ kubectl -n psp-test describe rs privileged-deploy-7569b9969d
Name: privileged-deploy-7569b9969d
Namespace: default
Selector: app=privileged-deploy,pod-template-hash=7569b9969d
Labels: app=privileged-deploy
...
Events:
Type Reason Age From Message
---- ------ ---- ---- -------
Warning FailedCreate 4s (x14 over 45s) replicaset-controller Error creating: pods "privileged-deploy-7569b9969d-" is forbidden: unable to validate against any pod security policy: [spec.securityContext.hostNetwork: Invalid value: true: Host network is not allowed to be used spec.securityContext.hostPID: Invalid value: true: Host PID is not allowed to be used spec.containers[0].securityContext.privileged: Invalid value: true: Privileged containers are not allowed]
```
在這種情況下,由於我們建立了ClusterRoleBinding,所以Pod可以使用PSP,但是restricted-psp不會驗證Pod,因為它需要privileged 、hostNetwork等引數。
我們已經在前文中看到了restricted-psp策略。讓我們檢查一下default-psp的細節,這是由Rancher在啟用PSP允許這些特權時建立的:
```
$ kubectl get psp default-psp -o yaml
apiVersion: policy/v1beta1
kind: PodSecurityPolicy
metadata:
annotations:
seccomp.security.alpha.kubernetes.io/allowedProfileNames: '*'
creationTimestamp: "2020-03-10T08:45:08Z"
name: default-psp
resourceVersion: "144774"
selfLink: /apis/policy/v1beta1/podsecuritypolicies/default-psp
uid: 1f83b803-bbee-483c-8f66-bfa65feaef56
spec:
allowPrivilegeEscalation: true
allowedCapabilities:
- '*'
fsGroup:
rule: RunAsAny
hostIPC: true
hostNetwork: true
hostPID: true
hostPorts:
- max: 65535
min: 0
privileged: true
runAsUser:
rule: RunAsAny
seLinux:
rule: RunAsAny
supplementalGroups:
rule: RunAsAny
volumes:
- '*'
```
你可以看到這是一個非常寬鬆的策略,特別是我們允許privileged、hostNetwork、hostPID、hostIPC、hostPorts以及以root身份執行以及其他功能。
我們只需要明確允許該Pod使用PSP。我們通過建立類似於現有restricted-clusterrole的ClusterRole,但允許使用default-psp資源,然後為我們的psp-test 名稱空間建立RoleBinding來將privileged-sa ServiceAccount繫結到該ClusterRole:
```
$ cat clusterrole-use-privileged.yaml
---
apiVersion: rbac.authorization.k8s.io/v1
kind: ClusterRole
metadata:
name: use-privileged-psp
rules:
- apiGroups: ['policy']
resources: ['podsecuritypolicies']
verbs: ['use']
resourceNames:
- default-psp
---
apiVersion: rbac.authorization.k8s.io/v1
kind: RoleBinding
metadata:
name: privileged-role-bind
namespace: psp-test
roleRef:
apiGroup: rbac.authorization.k8s.io
kind: ClusterRole
name: use-privileged-psp
subjects:
- kind: ServiceAccount
name: privileged-sa
$ kubectl -n psp-test apply -f clusterrole-use-privileged.yaml
```
一會兒之後,特權Pod將會被建立。然後你會注意到restricted-psp和default-psp現在已經可以直接使用。接下來,我們來詳細介紹一下它們。
## 在Rancher上預設的PSP
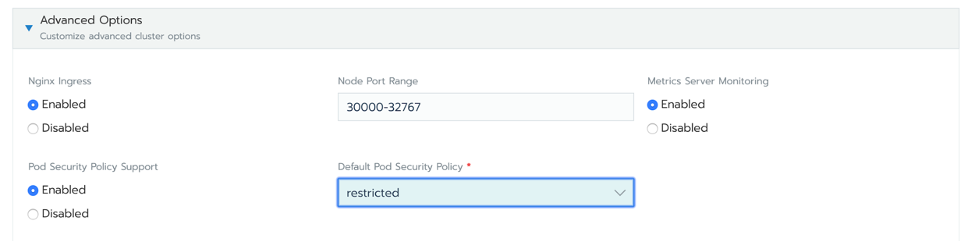
在Rancher中通過編輯叢集設定來啟用PSP准入控制,並選擇其中一個已經定義好的PSP作為預設選項:
Rancher將在叢集中建立一對PSP資源:
- restricted-psp:如果你選擇“受限(restricted)”作為預設的PSP
- default-psp:預設的PSP,允許建立特權Pod。
除了restricted-psp和default-psp,Rancher還會建立名為 restricted-clusterrole的ClusterRole:
```
annotations:
serviceaccount.cluster.cattle.io/pod-security: restricted
creationTimestamp: "2020-03-10T08:44:39Z"
labels:
cattle.io/creator: norman
name: restricted-clusterrole
rules:
- apiGroups:
- extensions
resourceNames:
- restricted-psp
resources:
- podsecuritypolicies
verbs:
- use
```
此ClusterRole允許使用restricted-psp策略。那麼Binding在何處才可以允許授權使用pod ServiceAccount 呢?
對於屬於Rancher中專案的名稱空間,它還在其中為你設定RoleBinding配置:
```
$ kubectl -n default get rolebinding default-default-default-restricted-clusterrole-binding -o yaml
apiVersion: rbac.authorization.k8s.io/v1
kind: RoleBinding
metadata:
annotations:
podsecuritypolicy.rbac.user.cattle.io/psptpb-role-binding: "true"
serviceaccount.cluster.cattle.io/pod-security: restricted
labels:
cattle.io/creator: norman
name: default-default-default-restricted-clusterrole-binding
namespace: default
...
roleRef:
apiGroup: rbac.authorization.k8s.io
kind: ClusterRole
name: restricted-clusterrole
subjects:
- kind: ServiceAccount
name: default
namespace: default
```
資源名稱(default-default-default-restricted-clusterrole-binding)可能會令人感到困惑,實際上它的構成為:
default-serviceaccountname-namespace-restricted-clusterrole-binding
並且如果你建立一個類似myserviceaccount的新的service account,那麼將會自動建立一個新的角色繫結:
```
$ kubectl create sa myserviceaccount
serviceaccount/myserviceaccount created
$ kubectl get rolebinding
NAME AGE
---
default-default-default-restricted-clusterrole-binding 13m
default-myserviceaccount-default-restricted-clusterrole-binding 4s
```
藉助這種神奇的功能,你無需為不需要任何提升特權的安全pod配置RBAC。
## 在Rancher中建立你的PSP
PSP是一個標準的Kubernetes資源,全程是Pod安全策略,所以你可以通過Kubernetes API或kubectl CLI來使用它。
你可以通過在YAML檔案中定義它們來建立你的自定義PSP,然後使用kubectl在叢集中建立資源。檢視官方文件即可瞭解所有可用控制元件(https://kubernetes.io/docs/concepts/policy/pod-security-policy/ )。在YAML中定義了控制元件集之後,你可以執行:
```
$ kubectl create psp my-custom-psp
```
以建立PSP資源。
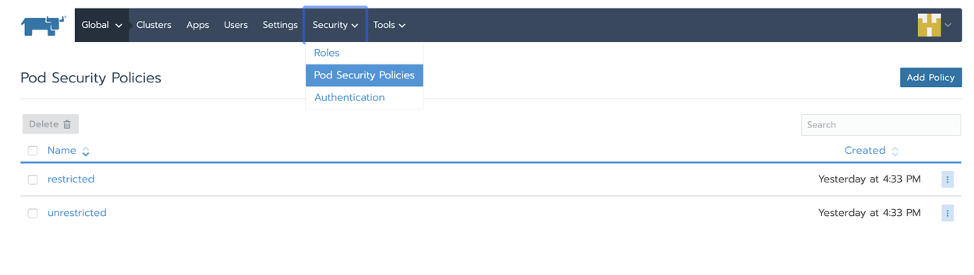
使用Rancher,你可以從UI中直接檢視或新增新的策略:
## PSP十分強大,但也十分複雜
配置Pod安全策略是一個十分乏味的過程。你在Kubernetes叢集中啟用PSP之後,你想要部署的任意Pod都必須經由其中一個PSP允許。實施強大的安全策略可能十分耗時,而且為每個應用程式的每個deployment生成一個策略也是一種負擔。如果你的策略十分寬鬆,那麼不強制執行最小特權訪問方法;然而,如果它存在很多限制,你可能會破壞你的應用程式,因為Pod無法在Kubernetes中成功執行。
能夠以最少的訪問要求集自動生成Pod安全策略,將幫助你更輕鬆地安裝PSP。並且你不能只在生產環境中部署它們,而不驗證你的應用程式是否可以正常工作,而且進行手動測試既繁瑣又效率低下。如果你可以針對Kubernetes工作負載的執行時行為驗證PSP呢?
## 如何簡化生產環境中PSP的使用?
Kubernetes Pod安全策略 Advisor(又名kube-psp-advisor)是一個Sysdig的開源工具。kube-psp-advisor會從Kubernetes資源(如deployment、daemonset、replicaset等)中掃描現有的安全上下文,將其作為我們想要執行的reference模型,然後在整個叢集中為所有資源自動生成Pod安全策略。kube-psp-advisor通過檢視不同的屬性以建立推薦的Pod安全策略:
- allowPrivilegeEscalation
- allowedCapabilities
- allowedHostPaths
- hostIPC
- hostNetwork
- hostPID
- Privileged
- readOnlyRootFilesystem
- runAsUser
- Volume
檢視kube-psp-advisor教程,以獲取有關其工作原理的更多詳細資訊:
https://sysdig.com/blog/enable-kubernetes-pod-security-policy/
## 使用Sysdig Secure自動生成PSP
Sysdig Secure Kubernetes Policy Advisor可以幫助使用者建立和驗證Pod安全策略。
第一步是設定新的PSP模擬環境。你可以針對不同範圍內的不同策略(例如Kubernetes名稱空間)進行多種模擬。
Sysdig在你的Deployment定義中分析Pod規範的要求,併為你的應用程式建立許可權最小的PSP。這可以控制是否允許特權Pod,使用者將其作為容器、volume等執行。Ni 可以微調PSP並針對你將要執行的模擬環境定義名稱空間:
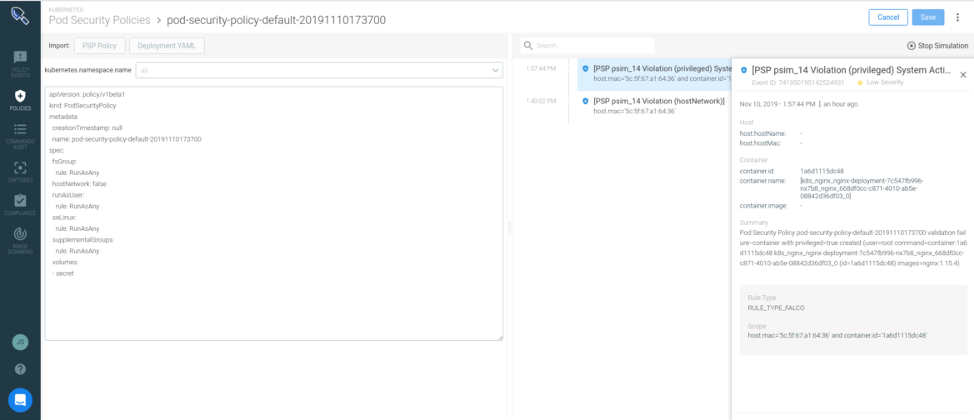
左側的策略會破壞應用程式,因為nginx Deployment是特權Pod,並且具有主機網路訪問許可權。你必須決定是擴大PSP以允許這種行為,還是選擇減少Deployment的特權以適應該策略。無論如何,你在應用PSP之前都會檢測到此情況,這會阻止Pod執行並在應用程式部署上造成破壞。
## 結 論
如這些示例所示,通過授予或拒絕對特定資源的訪問,PSP使你可以對在Kubernetes中執行的Pod和容器進行精細控制。這些策略相對來說容易建立和部署,並且應該是任何Kubernetes安全策略的有用