
Tensorflow 模型線上部署
獲取原始碼,請移步筆者的github: tensorflow-serving-tutorial
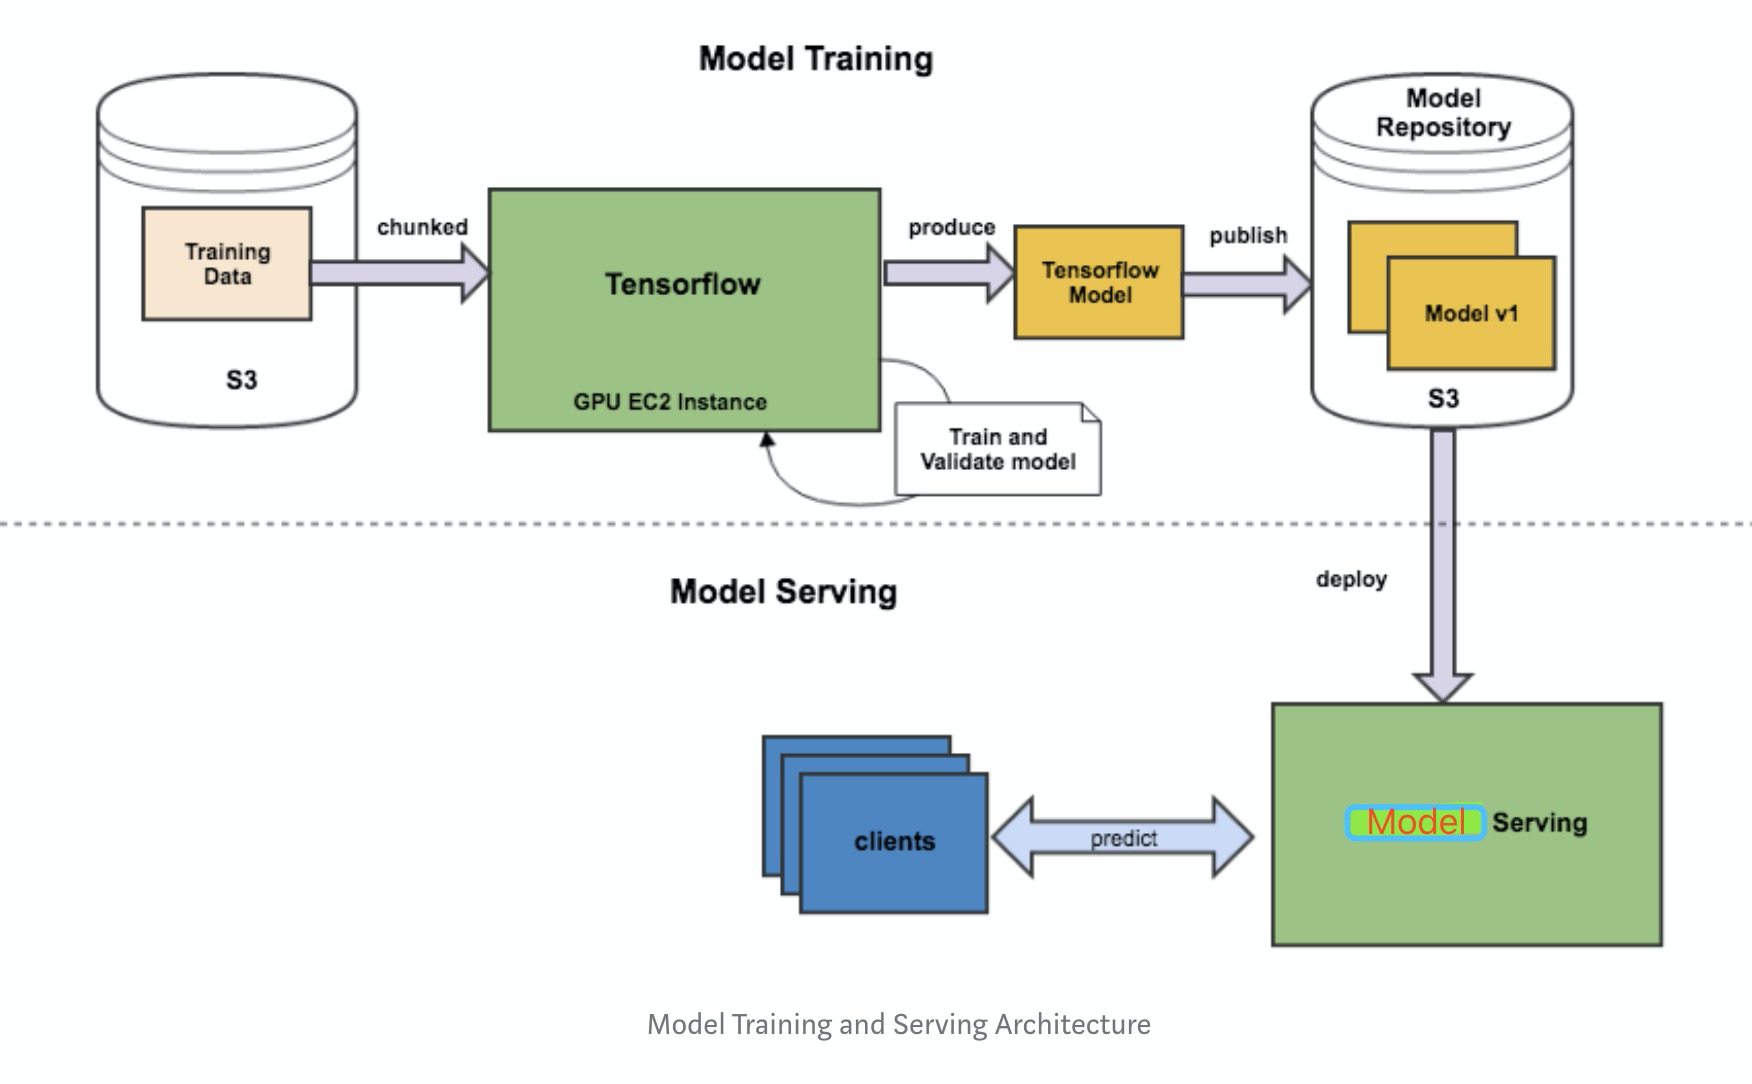
由於python的靈活性和完備的生態庫,使得其成為實現、驗證ML演算法的不二之選。但是工業界要將模型部署到生產環境上,需要考略效能問題,就不建議再使用python端的服務。這個從訓練到部署的整個流程如下圖所示:
基本可以把工作分為三塊:
- Saver端 模型的離線訓練與匯出
- Serving端 模型載入與線上預測
- Client端 構建請求
本文采用 Saver (python) + Serving (tensorflow serving) + Client (Java) 作為解決方案,從零開始記錄線上模型部署流程。
1、Saver
部署模型第一步是將訓練好的整個模型匯出為一系列標準格式的檔案,然後即可在不同的平臺上部署模型檔案。TensorFlow 使用 SavedModel(pb檔案) 這一格式用於模型部署。與Checkpoint 不同,SavedModel 包含了一個 TensorFlow 程式的完整資訊: 不僅包含引數的權值,還包含計算圖。
SavedModel最終儲存結果包含兩部分saved_model.pb和variables資料夾。

此處分別介紹,Tensorflow 1.0 和 2.0兩個版本的匯出方法。
1.1 Tensorflow 1.0 export
參考連結
個人認為官方文件對具體使用寫得不是特別明白,不想看官方文件的同學,可以對著示例照葫蘆畫瓢。其實也很簡單,就兩件事:
Step 1、建立 SignatureDefs
Step 2、儲存計算圖和權重
builder = tf.saved_model.builder.SavedModelBuilder("out_dir")

# define signature which specify input and out nodes
predict_sig_def = (saved_model.signature_def_utils.build_signature_def(
inputs={"input_x":saved_model.build_tensor_info(fast_model.input_x)},
outputs={"out_y": saved_model.build_tensor_info(fast_model.y_pred_cls),
         "score": saved_model.build_tensor_info(fast_model.logits)},
         method_name=saved_model.signature_constants.PREDICT_METHOD_NAME))

# add graph and variables
builder.add_meta_graph_and_variables(sess, ["serve"],
                                     signature_def_map={"fastText_sig_def": predict_sig_def},
                                     main_op=tf.compat.v1.tables_initializer(),
                                     strip_default_attrs=True)
builder.save()
需要注意的是,此處儲存時的signature、input、out的相關屬性諸如:
- name(自定義,不用和圖內節點名稱相同)
- shape
- data type
應與Client端傳參對應。
1.2 Tensorflow 2.0 export
參考連結
Keras 模型均可方便地匯出為 SavedModel 格式。不過需要注意的是,因為 SavedModel 基於計算圖,所以對於使用繼承 tf.keras.Model 類建立的 Keras 模型,其需要匯出到 SavedModel 格式的方法(比如 call )都需要使用 @tf.function 修飾。
class MLP(tf.keras.Model):
    def __init__(self):
        super().__init__()
        self.flatten = tf.keras.layers.Flatten()
        self.dense1 = tf.keras.layers.Dense(units=100, activation=tf.nn.relu)
        self.dense2 = tf.keras.layers.Dense(units=10)

    @tf.function
    def call(self, inputs):         # [batch_size, 28, 28, 1]
        x = self.flatten(inputs)    # [batch_size, 784]
        x = self.dense1(x)          # [batch_size, 100]
        x = self.dense2(x)          # [batch_size, 10]
        output = tf.nn.softmax(x)
        return output

model = MLP()
然後使用下面的程式碼即可將模型匯出為 SavedModel
tf.saved_model.save(model, "儲存的目標資料夾名稱")
1.3 check SavedModel
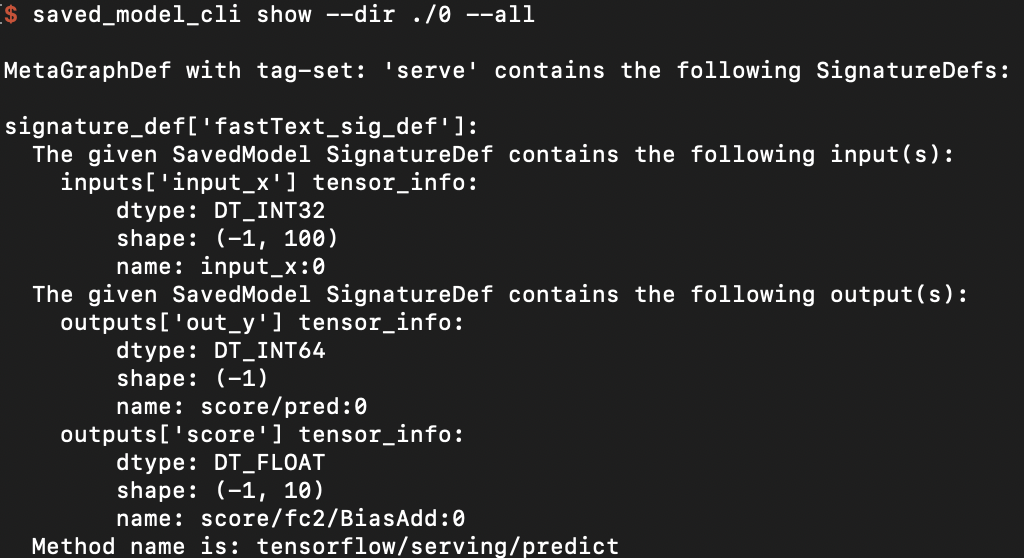
如果想要檢查儲存的模型的SignatureDef、Inputs、Outputs等資訊,可在cmd下使用命令:
saved_model_cli show --dir model_dir_path --all
2、Serving
模型儲存好,就到Serving端的載入與預測步驟了。在介紹Tensorflow Serving之前,先介紹下基於 Tensorflow Java lib 的解決方案。
2.1 Tensorflow Java lib
參考連結
Tensorflow提供了一個Java API(本質上是Java封裝了C++的動態庫), 允許在Java可以很方便的載入SavedModel, 並呼叫模型推理。
2.1.1 新增依賴
首先,在maven的pom.xml中新增依賴,此處tensorflow的版本最好與python訓練版本一致。
<dependency>
  <groupId>org.tensorflow</groupId>
  <artifactId>tensorflow</artifactId>
  <version>1.11.0</version>
</dependency>
2.1.2 Load & Predict
然後,載入模型,呼叫模型線上預測。以fast text模型為例,程式碼如下:
package model;

import org.tensorflow.SavedModelBundle;
import org.tensorflow.Session;
import org.tensorflow.Graph;
import org.tensorflow.Tensor;

public class FastTextModel {
  SavedModelBundle tensorflowModelBundle;
  Session tensorflowSession;

  void load(String modelPath){
    this.tensorflowModelBundle = SavedModelBundle.load(modelPath, "serve");
    this.tensorflowSession = tensorflowModelBundle.session();
  }

  public Tensor predict(Tensor tensorInput){
    // feed()傳參類似python端的feed_dict
    // fetch()指定輸出節點的名稱
    Tensor output = this.tensorflowSession.runner().feed("input_x", tensorInput).fetch("out_y").run().get(0);

    return output;
  }

  public static void main(String[] args){
	 // 建立輸入tensor, 注意type、shape應和訓練時一致
    int[][] testvec = new int[1][100];
    for(int i=0; i<100; i++){
      testvec[0][i] = i;
    }
    Tensor input = Tensor.create(testvec);

	 // load 模型
    FastTextModel myModel = new FastTextModel();
    String modelPath = "Your model path";
    myModel.load(modelPath);

	 // 模型推理,注意resultValues的type、shape
    Tensor out = myModel.predict(input);
    float[][] resultValues = (float[][]) out.copyTo(new float[1][10]);
    // 防止記憶體洩漏,釋放tensor記憶體
    input.close();
    out.close();
	 // 結果輸出
    for(int i=0; i< 10; i++) {
      System.out.println(resultValues[0][i]);
    }
  }
}
2.1.3 Pros & Cons
初步驗證,Java 端和 Python 端呼叫模型推理,結果一致,可以滿足基本使用。筆者並未進行嚴謹的測試,所以也談不上踩坑,記錄下想法。
適用場景
需求簡單,人力成本有限(一錘子買賣)
網路限制,不易搭建Tensorflow Serving
可能存在的問題
- 優化少,效率未必高
- Java 封裝 C++ 動態庫,有些變數需要手動釋放,若使用不當,可能出現記憶體洩漏
- 無開箱即用的版本管理、併發處理等功能
- API 不在 Tensorflow穩定性保障範圍內
- 資料匱乏,google投入的維護少
2.2 Tensorflow Serving
參考連結
Tensorflow Serving 是google為機器學習模型生產環境部署設計的高效能的服務系統。具有以下特性:
- 支援模型版本控制和回滾
- 支援併發與GPU加速,實現高吞吐量
- 開箱即用,並且可定製化
- 支援多模型服務
- 支援 gRPC/ REST API 呼叫
- 支援批處理
- 支援熱更新
- 支援分散式模型
- 支援多平臺模型,如 TensorFlow/MXNet/PyTorch/Caffe2/CNTK等
Tensorflow Serving 豐富的、開箱即用的功能,使得其成為業內認可的部署方案。
Tensorflow Serving 內部的工作流如下圖所示。
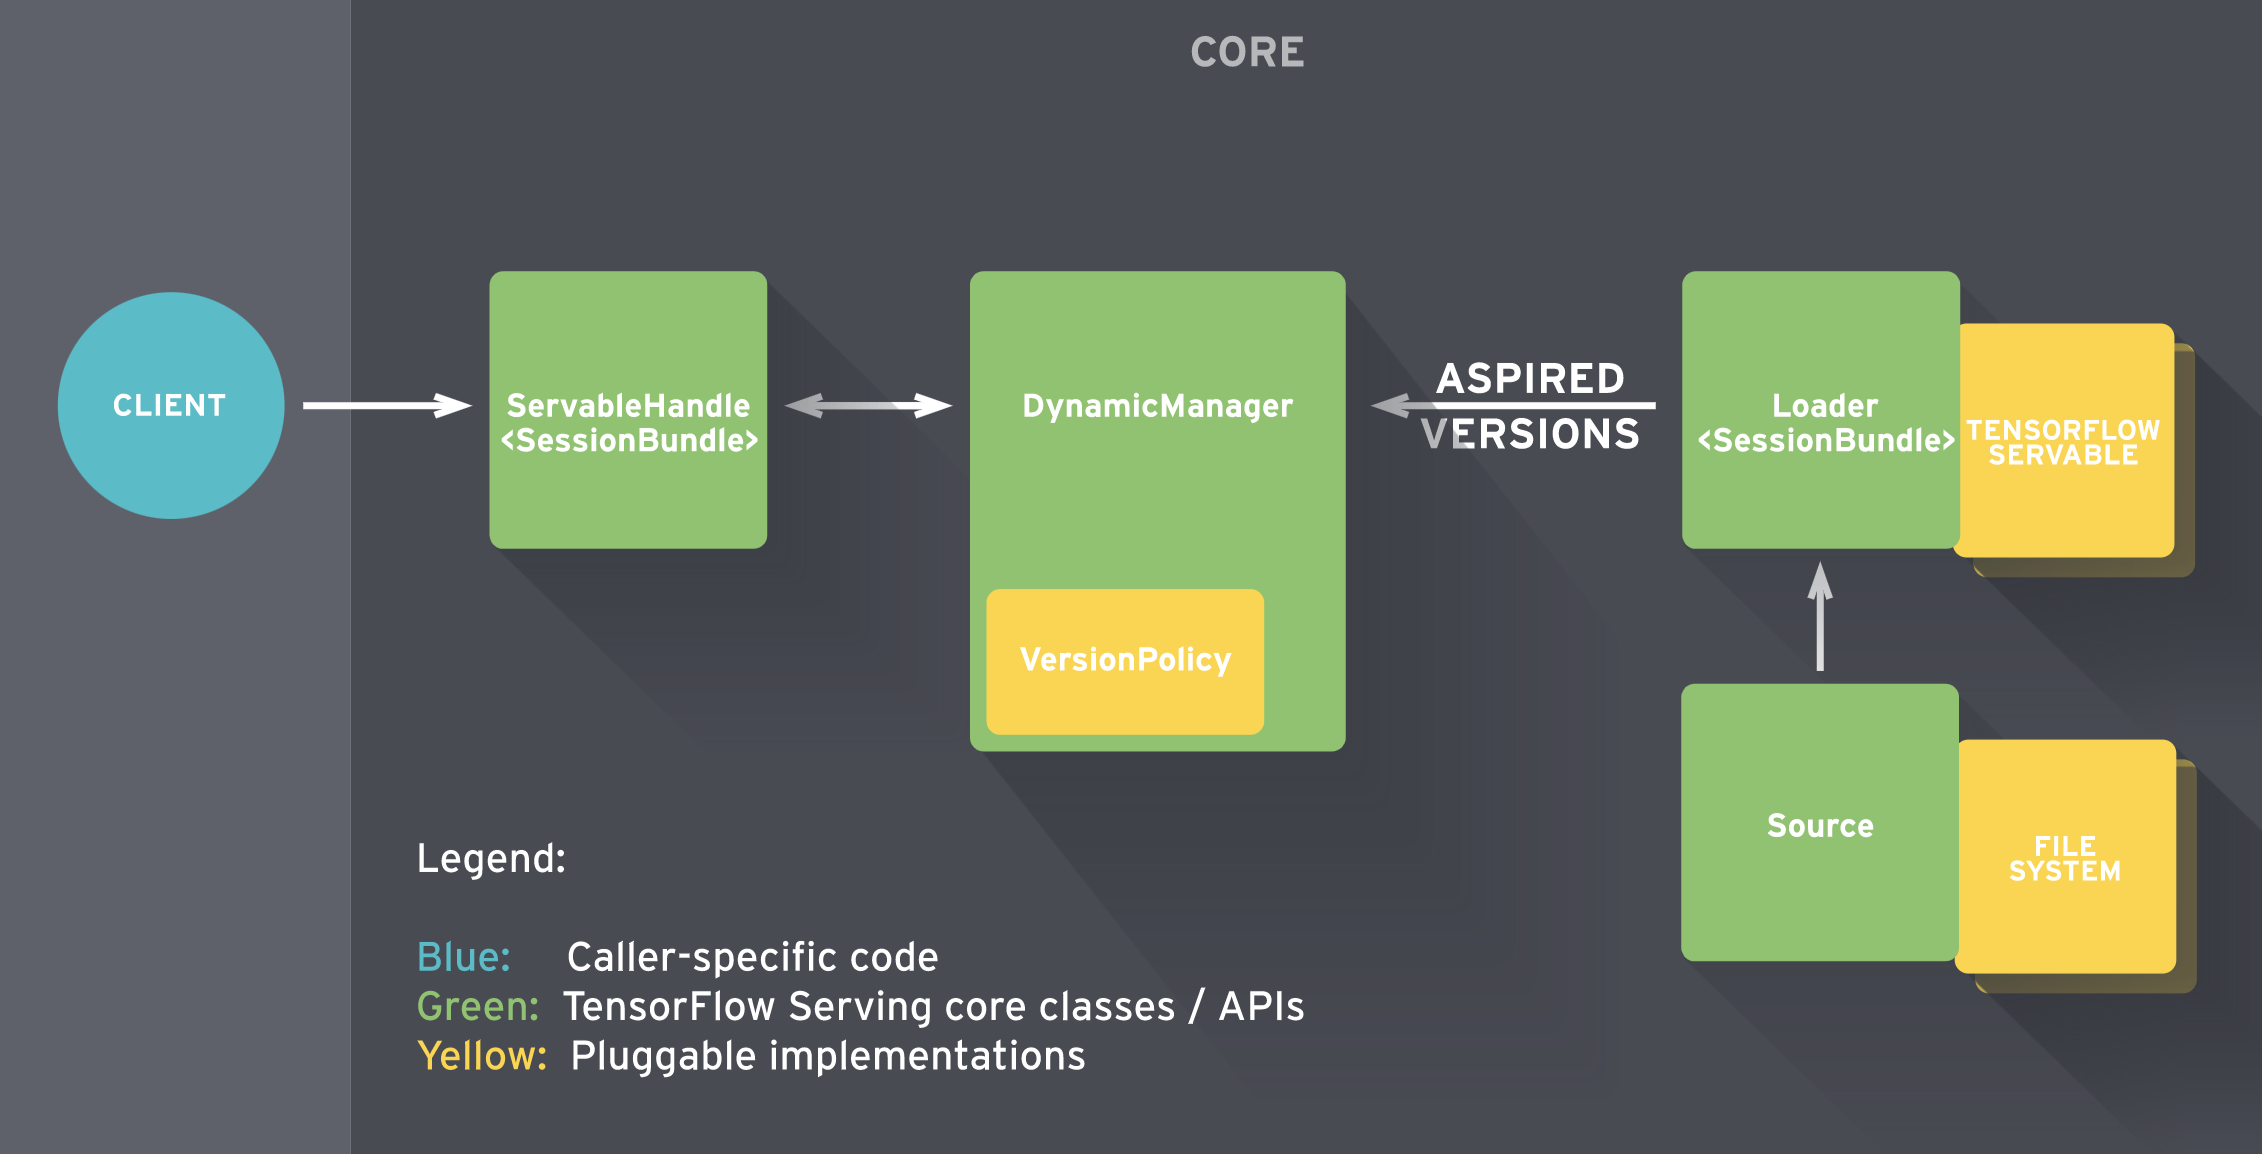
簡單的說:
- Sources 建立 Servable(可理解為計算圖)的 Loader
- Loader 傳遞版本號給 Manager 由其決定是否載入,同時 Manger 負責管理 Servable 並響應 Client的請求
詳情見:參考連結
相比方案一,Tensorflow Serving要做的事情要多一點,但長遠來看收益也更高。從零開始的話,大概要經過如下步驟:
- Tensorflow serving環境搭建
- 部署模型
- 解決Client依賴
- Client程式碼編寫
2.2.1 環境搭建
參考連結
推薦基於Docker的方式搭建Tensorflow Serving, 未安裝Docker的小夥伴請移步Docker官網,關於Docker的安裝、使用網上資料一大堆,不在此贅述。
Docker安裝完畢後,拉取tensorflow/serving的映象。
docker pull tensorflow/serving
利用映象, 新建服務例項,說明見2.2.2節。
docker run -p 8500:8500 -p 8501:8501 --mount \ type=bind,source=/path/to/my_model/,target=/models/my_model \ -e MODEL_NAME=my_model -t tensorflow/serving
這裡直接給出官網示例,執行正常則說明環境搭建完成。
# Download the TensorFlow Serving Docker image and repo
docker pull tensorflow/serving

git clone https://github.com/tensorflow/serving
# Location of demo models
TESTDATA="$(pwd)/serving/tensorflow_serving/servables/tensorflow/testdata"

# Start TensorFlow Serving container and open the REST API port
docker run -t --rm -p 8501:8501 -v \ "$TESTDATA/saved_model_half_plus_two_cpu:/models/half_plus_two" -e MODEL_NAME=half_plus_two tensorflow/serving &

# Query the model using the predict API
curl -d '{"instances": [1.0, 2.0, 5.0]}' \
    -X POST http://localhost:8501/v1/models/half_plus_two:predict

# Returns => { "predictions": [2.5, 3.0, 4.5] }
GPU版Tensorflow Serving 的環境搭建見參考連結。
2.2.2 部署模型
可以使用2.2.1節的指令部署單個模型,也可以通過 config 部署多模型,部署指令示例:
docker run -p 8500:8500 -p 8501:8501 --mount type=bind,source=/tmp/multi_models/,target=/models/multi_models -t tensorflow/serving \
--model_config_file=/models/multi_models/model.config
說明一下:
- Serving 映象支援 gRPC(埠8500)、RESTful API (埠8501)兩種方式呼叫,使用時需要將host的埠與之繫結
- Serving 無法直接載入 host 下的模型檔案,所以需要將其對映到容器內路徑,
MODEL_BASE_PATH預設為/models- 多模型載入和模型版本管理在 model_config_file 中配置
這裡給出我的 model.config 內容示例:
model_config_list:{
  config:{
    name:"textCnn",
    base_path:"/models/multi_models/textCnn/pb",
    model_platform:"tensorflow",
    model_version_policy {
      specific {
        versions: 0
      }
    }
  },

  config:{
    name:"rcnn",
    base_path:"/models/multi_models/rcnn/pb",
    model_platform:"tensorflow",
    model_version_policy {
      specific {
        versions: 0
      }
    }
  },

  config:{
    name:"bert",
    base_path:"/models/multi_models/bert/pb",
    model_platform:"tensorflow",
  }
}
這裡 load 了三個模型(textCnn、rcnn、bert), 每個模型維護自己的config,當一個模型存在多個版本時,tensorflow serving 預設載入版本號最高的版本,若想要指定版本載入,配置 model_version_policy 內容即可。
注意, base_path 是對映到 Docker容器內的路徑,而不是本地路徑。
2.2.3 更多功能
以上是Tensorflow Serving 基本功能的介紹,其他功能諸如:自定義API、與Kubernetes的結合等操作,請見 參考連結。
3、Client
在上一節中說到 Tensorflow Serving 支援 RESTful 和 gRPC 兩種API。若使用 RESTful API 呼叫,相關協議請見參考連結。
本文著重介紹 gRPC的呼叫方法, Tensorflow Serving 的 gRPC API 在 protobuf 檔案中定義,一般需要將其編譯成相應的 Client 原始碼,再整合至應用。
3.1 解決依賴
若使用 Python 作為 Client , 安裝對應包即可:
pip install tensorflow-serving-api
若使用 Java 作為 Client,則需要編譯 proto 檔案,好處是使用者可以編譯自定義的API。編譯流程參考了前人文件,此外還有一些要注意的點,見下文。
3.1.1 獲取 protobuf 檔案
第一個注意點就是版本問題,因為由 .proto 檔案編譯出來的 java class 依賴 tensorflow的 jar 包,可能存在不相容問題。
ok! 下載tensorflow的工程檔案:
$ export SRC=~/Documents/source_code/
$ mkdir -p $SRC

$ cd $SRC
$ git clone [email protected]:tensorflow/serving.git
$ cd serving
$ git checkout tags/2.1.0

# another repo
$ cd $SRC
$ git clone [email protected]:tensorflow/tensorflow.git
$ cd tensorflow
$ git checkout tags/v2.1.0
將需要的proto檔案複製到 Java 工程下:
$ export PROJECT_ROOT=$SRC/tensorflow-serve-client
$ mkdir -p $PROJECT_ROOT/src/main/proto/
$ rsync -arv  --prune-empty-dirs --include="*/" --include='*.proto' --exclude='*' $SRC/serving/tensorflow_serving  $PROJECT_ROOT/src/main/proto/
$ rsync -arv  --prune-empty-dirs --include="*/" --include="tensorflow/core/lib/core/*.proto" --include='tensorflow/core/framework/*.proto' --include="tensorflow/core/example/*.proto" --include="tensorflow/core/protobuf/*.proto" --exclude='*' $SRC/tensorflow/tensorflow  $PROJECT_ROOT/src/main/proto/
3.1.2 生成 Java 原始碼
首先向maven專案中新增依賴:
<properties>
    <grpc.version>1.20.0</grpc.version>
</properties>

<dependencies>
    <dependency>
        <groupId>com.google.protobuf</groupId>
        <artifactId>protobuf-java</artifactId>
        <version>3.11.4</version>
    </dependency>
    <!-- gRPC protobuf client -->
    <dependency>
        <groupId>io.grpc</groupId>
        <artifactId>grpc-protobuf</artifactId>
        <version>1.28.0</version>
    </dependency>
    <dependency>
        <groupId>io.grpc</groupId>
        <artifactId>grpc-stub</artifactId>
        <version>1.28.0</version>
    </dependency>
    <dependency>
        <groupId>io.grpc</groupId>
        <artifactId>grpc-netty-shaded</artifactId>
        <version>1.28.0</version>
    </dependency>
</dependencies>
安裝 protoc 工具,以筆者的mbp為例:
$ brew install protobuf
開始編譯protobuf檔案,有兩種方法可選擇,通過外掛編譯或者手動編譯。
3.1.2.1 maven編譯
向maven中新增編譯外掛(注意版本):
    <build>
        <plugins>
            <!--protocol buffers plugin -->
            <plugin>
                <groupId>org.apache.maven.plugins</groupId>
                <artifactId>maven-compiler-plugin</artifactId>
                <version>3.8.1</version>
                <configuration>
                    <source>1.6</source>
                    <target>1.6</target>
                    <!--<useArgumentFile>true</useArgumentFile>-->
                </configuration>
            </plugin>
            <plugin>
                <groupId>org.xolstice.maven.plugins</groupId>
                <artifactId>protobuf-maven-plugin</artifactId>
                <version>0.6.1</version>
                <configuration>
                    <protocExecutable>/usr/local/bin/protoc</protocExecutable>
                </configuration>
                <executions>
                    <execution>
                        <goals>
                            <goal>compile</goal>
                            <goal>compile-custom</goal>
                        </goals>
                    </execution>
                </executions>
            </plugin>
        </plugins>
    </build>
外掛下載完畢後,執行指令,將專案下的 *.proto編譯為 Java 程式碼:
$ mvn protobuf:compile
編譯完成之後,在 $PROJECT_ROOT/src/main/resources 下會增加一個名為new_old的資料夾,將裡面的 ./org/tensorflow 和 ./tensorflow/serving 兩個資料夾移動至PROJECT_ROOT/src/main/java下即可。
3.1.2.2 手動編譯
手動編譯相較前者麻煩些,但是可以編譯出靜態的程式碼整合至工程中,而不是每次執行都動態生成。
獲取 grpc-java repo 程式碼,建立外掛:
$ cd $SRC
$ git clone https://github.com/grpc/grpc-java.git
Cloning into 'grpc-java'...
remote: Enumerating objects: 166, done.
remote: Counting objects: 100% (166/166), done.
remote: Compressing objects: 100% (121/121), done.
remote: Total 84096 (delta 66), reused 92 (delta 25), pack-reused 83930
Receiving objects: 100% (84096/84096), 31.18 MiB | 23.14 MiB/s, done.
Resolving deltas: 100% (38843/38843), done.

$ cd grpc-java/compiler/
$ ../gradlew java_pluginExecutable
$ ls -l build/exe/java_plugin/protoc-gen-grpc-java
執行shell指令碼,編譯protobuf檔案,指令碼與前人略有不同,將路徑稍作修改,執行即可:
export SRC=~/code/TFS_source/
export PROJECT_ROOT=~/java/JavaClient/
cd $PROJECT_ROOT/src/main/proto/
protoc --java_out $PROJECT_ROOT/src/main/java --proto_path ./ ./tensorflow/core/example/*.proto
# append by wangxiao
protoc --java_out $PROJECT_ROOT/src/main/java --proto_path ./ ./tensorflow_serving/core/logging.proto
protoc --java_out $PROJECT_ROOT/src/main/java --proto_path ./ ./tensorflow/stream_executor/dnn.proto

protoc --java_out $PROJECT_ROOT/src/main/java --proto_path ./ ./tensorflow_serving/apis/*.proto
protoc --java_out $PROJECT_ROOT/src/main/java --proto_path ./ ./tensorflow_serving/config/*.proto
protoc --java_out $PROJECT_ROOT/src/main/java --proto_path ./ ./tensorflow_serving/util/*.proto
protoc --java_out $PROJECT_ROOT/src/main/java --proto_path ./ ./tensorflow_serving/sources/storage_path/*.proto

# the following 3 cmds will generate extra *Grpc.java stub source files in addition to the regular protobuf Java source files.
# The output grpc-java files are put in the same directory as the regular java source files.
# note the --plugin option uses the grpc-java plugin file we created in step 1.
protoc --java_out $PROJECT_ROOT/src/main/java --proto_path ./ ./tensorflow/core/protobuf/*.proto
protoc --java_out $PROJECT_ROOT/src/main/java --proto_path ./ ./tensorflow/core/lib/core/*.proto
protoc --java_out $PROJECT_ROOT/src/main/java --proto_path ./ ./tensorflow/core/framework/*.proto

protoc --grpc-java_out $PROJECT_ROOT/src/main/java --java_out $PROJECT_ROOT/src/main/java --proto_path ./ tensorflow_serving/apis/prediction_service.proto --plugin=protoc-gen-grpc-java=$SRC/grpc-java/compiler/build/exe/java_plugin/protoc-gen-grpc-java
protoc --grpc-java_out $PROJECT_ROOT/src/main/java --java_out $PROJECT_ROOT/src/main/java --proto_path ./ tensorflow_serving/apis/model_service.proto --plugin=protoc-gen-grpc-java=$SRC/grpc-java/compiler/build/exe/java_plugin/protoc-gen-grpc-java
protoc --grpc-java_out $PROJECT_ROOT/src/main/java --java_out $PROJECT_ROOT/src/main/java --proto_path ./ tensorflow_serving/apis/session_service.proto --plugin=protoc-gen-grpc-java=$SRC/grpc-java/compiler/build/exe/java_plugin/protoc-gen-grpc-java
執行正常的情況下,$PROJECT_ROOT/src/main/java/ 檔案家裡應該多了 /org/tensorflow 和 /tensorflow/serving 兩個資料夾,至此,編譯結束!
3.2 Client編寫
分別給出 Python 和 Java Client 的簡單示例。
3.2.1 Python client
from __future__ import print_function
import argparse
import numpy as np
import time
tt = time.time()

import cv2
import tensorflow as tf

from grpc.beta import implementations
from tensorflow_serving.apis import predict_pb2
from tensorflow_serving.apis import prediction_service_pb2

parser = argparse.ArgumentParser(description='incetion grpc client flags.')
parser.add_argument('--host', default='0.0.0.0', help='inception serving host')
parser.add_argument('--port', default='9000', help='inception serving port')
parser.add_argument('--image', default='', help='path to JPEG image file')
FLAGS = parser.parse_args()

def main():
  # create prediction service client stub
  channel = implementations.insecure_channel(FLAGS.host, int(FLAGS.port))
  stub = prediction_service_pb2.beta_create_PredictionService_stub(channel)

  # create request
  request = predict_pb2.PredictRequest()
  request.model_spec.name = 'resnet'
  request.model_spec.signature_name = 'serving_default'

  # read image into numpy array
  img = cv2.imread(FLAGS.image).astype(np.float32)

  # convert to tensor proto and make request
  # shape is in NHWC (num_samples x height x width x channels) format
  tensor = tf.contrib.util.make_tensor_proto(img, shape=[1]+list(img.shape))
  request.inputs['input'].CopyFrom(tensor)
  resp = stub.Predict(request, 30.0)

  print('total time: {}s'.format(time.time() - tt))
3.2.2 Java Client
package client;

import io.grpc.ManagedChannel;
import io.grpc.ManagedChannelBuilder;
import tensorflow.serving.Model;
import org.tensorflow.framework.DataType;
import org.tensorflow.framework.TensorProto;
import org.tensorflow.framework.TensorShapeProto;

import tensorflow.serving.Predict;
import tensorflow.serving.PredictionServiceGrpc;

import java.util.ArrayList;
import java.util.List;


public class FastTextTFSClient {

    /**
     * @param args
     * @throws Exception
     */
    public static void main(String[] args) throws Exception {
        String host = "127.0.0.1";
        int port = 8500;
        // the model's name.
        String modelName = "fastText";
        int seqLen = 50;

        // assume this model takes input of free text, and make some sentiment prediction.
        List<Integer> intData = new ArrayList<Integer>();
        for(int i=0; i < seqLen; i++){
            intData.add(i);
        }

        // create a channel for gRPC
        ManagedChannel channel = ManagedChannelBuilder.forAddress(host, port).usePlaintext().build();
        PredictionServiceGrpc.PredictionServiceBlockingStub stub = PredictionServiceGrpc.newBlockingStub(channel);

        // create a modelspec
        Model.ModelSpec.Builder modelSpecBuilder = Model.ModelSpec.newBuilder();
        modelSpecBuilder.setName(modelName);
        modelSpecBuilder.setSignatureName("fastText_sig_def");

        Predict.PredictRequest.Builder builder = Predict.PredictRequest.newBuilder();
        builder.setModelSpec(modelSpecBuilder);

        // create the input TensorProto and request
        TensorProto.Builder tensorProtoBuilder = TensorProto.newBuilder();
        tensorProtoBuilder.setDtype(DataType.DT_INT32);
        for (Integer intDatum : intData) {
            tensorProtoBuilder.addIntVal(intDatum);
        }
        // build input TensorProto shape
        TensorShapeProto.Builder tensorShapeBuilder = TensorShapeProto.newBuilder();
        tensorShapeBuilder.addDim(TensorShapeProto.Dim.newBuilder().setSize(1));
        tensorShapeBuilder.addDim(TensorShapeProto.Dim.newBuilder().setSize(seqLen));
        tensorProtoBuilder.setTensorShape(tensorShapeBuilder.build());

        TensorProto tp = tensorProtoBuilder.build();
        builder.putInputs("input_x", tp);
        Predict.PredictRequest request = builder.build();

        // get response
        Predict.PredictResponse response = stub.predict(request);
    }
}
4、Test
4.1 一致性測試
筆者先後驗證了 Text Cnn 和 base BERT 模型,分別用 Python 和 Tensorflow Serving 載入相同模型,輸入10組不同資料,輸出結果比對一致!
4.2 效能測試
以文字分類任務為例,這邊一共訓練了四個模型,基本覆蓋了主流網路結構(Cnn/Rnn/Transformer):
- Fast text
- Text Cnn
- Rcnn (1 layer Bilstm + pooling)
- BERT (12 layer)
此外,還針對單執行緒和多執行緒請求作了對比測試。
4.2.1 測試環境
測試機器使用的是mbp-2019,Docker 資源配置:
| Cpu | Intel Core i5 - 2.4 GHz - 4 core |
|---|---|
| Memory | 2 GB 2133MHz LPDDR3 |
| Swap | 1 GB |
4.2.2測試結果
在輸入文字長度固定為 50 時,分別驗證單執行緒和多執行緒效能,結果如下表。
| model | thread | Queries | total costs (s) | single costs (ms) |
|---|---|---|---|---|
| Fast text | 1 | 1000 | 1.804726 | 1.804726 |
| Fast text | 1 | 5000 | 9.322348 | 1.8644696 |
| Fast text | 10 | 1000 | 0.863049 | 0.863049 |
| Fast text | 10 | 5000 | 3.302042 | 0.6604084 |
| Text Cnn | 1 | 1000 | 3.149949 | 3.149949 |
| Text Cnn | 1 | 5000 | 11.433131 | 2.2866262 |
| Text Cnn | 10 | 1000 | 1.054073 | 1.054073 |
| Text Cnn | 10 | 5000 | 5.116928 | 1.0233856 |
| Rcnn | 1 | 1000 | 8.709985 | 8.709985 |
| Rcnn | 1 | 5000 | 41.316675 | 8.263335 |
| Rcnn | 10 | 1000 | 4.097872 | 4.097872 |
| Rcnn | 10 | 5000 | 21.650854 | 4.3301708 |
| BERT | 1 | 500 | 48.831417 | 97.662834 |
| BERT | 1 | 1000 | 99.502192 | 99.502192 |
| BERT | 10 | 500 | 30.662522 | 61.325044 |
| BERT | 10 | 1000 | 62.584200 | 62.5842 |
在輸入文字長度固定為 100 時,分別驗證單執行緒和多執行緒效能,結果如下表。
| model | thread | QUERIEs | total costs (s) | single costs (ms) |
|---|---|---|---|---|
| Fast text | 1 | 1000 | 2.294074 | 2.294074 |
| Fast text | 1 | 5000 | 9.183258 | 1.8366516 |
| Fast text | 10 | 1000 | 0.711471 | 0.711471 |
| Fast text | 10 | 5000 | 4.440220 | 0.888044 |
| Text Cnn | 1 | 1000 | 2.905316 | 2.905316 |
| Text Cnn | 1 | 5000 | 12.867391 | 2.5734782 |
| Text Cnn | 10 | 1000 | 1.055177 | 1.055177 |
| Text Cnn | 10 | 5000 | 5.400848 | 1.0801696 |
| Rcnn | 1 | 1000 | 17.621534 | 17.621534 |
| Rcnn | 1 | 5000 | 83.072520 | 16.614504 |
| Rcnn | 10 | 1000 | 6.960749 | 6.960749 |
| Rcnn | 10 | 5000 | 36.704266 | 7.3408532 |
| BERT | 1 | 500 | 74.752247 | 149.504494 |
| BERT | 1 | 1000 | 154.435726 | 154.435726 |
| BERT | 10 | 500 | 49.598261 | 99.196522 |
| BERT | 10 | 1000 | 101.888118 | 101.888118 |
輸入長度為50時,可以看到 Cnn 類模型效率極高,即使是單層的BiLstm 也能在10ms以內完成預測。
而12層BERT單次預測竟然用了 100 ms! NLP的小夥伴們也不用著急,個人認為仍有很多優化點:
- 自己訓練個小點的 BERT,如6層
- 部署 GPU 版 Tensorflow Serving
- 用BERT的加速版變體替代
- 輸入截斷
此外,多執行緒Tensorflow Serving 內部對併發作了優化(batch操作),多執行緒請求明顯快於單執行緒。
4.3 測試結論
- Tensorflow Serving 的輸出可靠;
- Tensorflow Serving 執行效率極高,達到生產上線要求。
開源時代,歡迎轉載,註明出處即可
原文連結:https://www.cnblogs.com/ustcwx/p/12768463.h