【認證與授權】2、基於session的認證方式
阿新 • • 發佈:2020-04-27
這一篇將通過一個簡單的`web`專案實現基於`Session`的認證授權方式,也是以往傳統專案的做法。
*先來複習一下流程*
> 使用者認證通過以後,在服務端生成使用者相關的資料儲存在當前會話`(Session)`中,發給客戶端的資料將通過`session_id `存放在`cookie`中。在後續的請求操作中,客戶端將帶上`session_id`,服務端就可以驗證是否存在了,並可拿到其中的資料校驗其合法性。當用戶退出系統或`session_id`到期時,服務端則會銷燬`session_id`。具體可檢視上篇的基本概念瞭解。
### 1. 建立工程
本案例為了方便,直接使用`springboot`快速建立一個`web`工程
#### pom.xml
```xml
org.springframework.boot 2.2.5.RELEASE
4.0.0
simple-mvc
org.springframework.boot
spring-boot-starter-web
org.springframework.boot
spring-boot-starter-thymeleaf
```
### 1.2 實現認證功能
實現認證功能,我們一般需要這樣幾個資源
* 認證的入口(認證頁面)
* 認證的憑證(使用者的憑證資訊)
* 認證邏輯(如何才算認證成功)
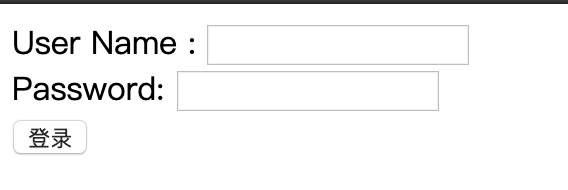
*認證頁面*
也就是我們常說的登入頁
```html
Login
```
*頁面控制器*
現在有了認證頁面,那我如果才可以進入到認證頁面呢,同時我點選登陸後,下一步該做什麼呢?
```java
@Controller
public class LoginController {
// 認證邏輯處理
@Autowired
private AuthenticationService authenticationService;
// 根路徑直接跳轉至認證頁面
@RequestMapping("/")
public String loginUrl() {
return "/login";
}
// 認證請求
@RequestMapping("/login")
@ResponseBody
public String login(HttpServletRequest request) {
AuthenticationRequest authenticationRequest = new AuthenticationRequest(request);
User user = authenticationService.authentication(authenticationRequest);
return user.getUsername() + "你好!";
}
}
```
通過客戶端傳遞來的引數進行處理
```java
public class AuthenticationRequest {
private String username;
private String password;
public AuthenticationRequest(HttpServletRequest request){
username = request.getParameter("username");
password = request.getParameter("password");
}
// 省略 setter getter
}
```
同時我們還需要一個狀態使用者資訊的物件User
```java
public class User {
private Integer userId;
private String username;
private String password;
private boolean enable;
public User(Integer userId, String username, String password, boolean enable) {
this.userId = userId;
this.username = username;
this.password = password;
this.enable = enable;
}
// 省略 setter getter
}
```
有了使用者了,有了入口了,接下來就是對這些資料的處理,看是否如何認證條件了
```java
@Service
public class AuthenticationService{
// 模擬資料庫中儲存的兩個使用者
private static final Map userMap = new HashMap() {{
put("admin", new User(1, "admin", "admin", true));
put("spring", new User(2, "spring", "spring", false));
}};
private User loginByUserName(String userName) {
return userMap.get(userName);
}
@Override
public User authentication(AuthenticationRequest authenticationRequest) {
if (authenticationRequest == null
|| StringUtils.isEmpty(authenticationRequest.getUsername())
|| StringUtils.isEmpty(authenticationRequest.getPassword())) {
throw new RuntimeException("賬號或密碼為空");
}
User user = loginByUserName(authenticationRequest.getUsername());
if (user == null) {
throw new RuntimeException("使用者不存在");
}
if(!authenticationRequest.getPassword().equals(user.getPassword())){
throw new RuntimeException("密碼錯誤");
}
if (!user.isEnable()){
throw new RuntimeException("該賬戶已被禁用");
}
return user;
}
}
```
這裡我們模擬了兩個使用者,一個是正常使用的賬號,還有個賬號因為某些特殊的原因被封禁了,我們一起來測試一下。
啟動專案在客戶端輸入`localhost:8080` 會直接跳轉到認證頁面

我們分別嘗試不同的賬戶密碼登入看具體顯示什麼資訊。
1、資料的密碼不正確

2、賬戶被禁用

3、資料正確的使用者名稱和密碼

此時我們的測試均已符合預期,能夠將正確的資訊反饋給使用者。這也是最基礎的認證功能,使用者能夠通過系統的認證,說明他是該系統的合法使用者,但是使用者在後續的訪問過程中,我們需要知道到底是哪個使用者在操作呢,這時我們就需要引入到會話的功能呢。
### 1.3 實現會話功能
[會話](https://baike.baidu.com/item/會話/1657433)是指一個終端使用者與互動系統進行通訊的過程,比如從輸入賬戶密碼進入作業系統到退出作業系統就是一個會話過程。
1、增加會話的控制
*關於`session`的操作,可參考`HttpServletRqeust`的相關API*
前面引言中我們提到了session_id的概念,與客戶端的互動。
定義一個常量作為存放使用者資訊的key,同時在登入成功後儲存使用者資訊
```
privata finl static String USER_SESSION_KEY = "user_session_key";
@RequestMapping("/login")
@ResponseBody
public String login(HttpServletRequest request) {
AuthenticationRequest authenticationRequest = new AuthenticationRequest(request);
User user = authenticationService.authentication(authenticationRequest);
request.getSession().setAttribute(USER_SESSION_KEY,user);
return user.getUsername() + "你好!";
}
```
2、測試會話的效果
既然說使用者認證後,我們將使用者的資訊儲存在了服務端中,那我們就測試一下通過會話,服務端是否知道後續的操作是哪個使用者呢?我們新增一個獲取使用者資訊的介面` /getUser`,看是否能後查詢到當前登入的使用者資訊
```java
@ResponseBody
@RequestMapping("/getUser")
public String getUser(HttpServletRequest request){
Object object = request.getSession().getAttribute("user_");
if (object != null){
User user = (User) object;
return "當前訪問使用者為:" + user.getUsername();
}
return "匿名使用者訪問";
}
```
我們通過客戶端傳遞的資訊,在服務端查詢是否有使用者資訊,如果沒有則是匿名使用者的訪問,如果有則返回該使用者資訊。
首先在不登入下直接訪問`localhost:8080/getUser` 返回`匿名使用者訪問`
登陸後再訪問返回`當前訪問使用者為:admin`
此時我們已經可以看到當認證通過後,後續的訪問服務端通過會話機制將知道當前訪問的使用者是說,這將便於我們進一步處理對使用者和資源的控制。
### 1.4 實現授權功能
既然我們知道了是誰在訪問使用者,接下來我們將對使用者訪問的資源進行控制。
* 匿名使用者針對部分介面不可訪問,提示其認證後再訪問
* 根據使用者擁有的許可權對資源進行操作(資源查詢/資源更新)
1、實現匿名使用者不可訪問。
前面我們已經可以通過`/getUser`的介面示例中知道是否是匿名使用者,那接下來我們就對匿名使用者進行攔截後跳轉到認證頁面。
```java
public class NoAuthenticationInterceptor extends HandlerInterceptorAdapter {
private final static String USER_SESSION_KEY = "user_session_key";
// 前置攔截,在介面訪問前處理
@Override
public boolean preHandle(HttpServletRequest request, HttpServletResponse response, Object handler) throws Exception {
Object attribute = request.getSession().getAttribute(USER_SESSION_KEY);
if (attribute == null){
// 匿名訪問 跳轉到根路徑下的login.html
response.sendRedirect("/");
return false;
}
return true;
}
}
```
然後再將自定義的匿名使用者攔截器,放入到`web`容器中使其生效
```java
@Configuration
public class WebSecurityConfig implements WebMvcConfigurer {
// 新增自定義攔截器,保護路徑/protect 下的所有介面資源
@Override
public void addInterceptors(InterceptorRegistry registry) {
registry.addInterceptor(new NoAuthenticationInterceptor()).addPathPatterns("/protect/**");
}
}
```
我們保護`/protect` 下的所有介面資源,當匿名使用者訪問上述介面時,都將被系統跳轉到認證頁面進行認證後才可以訪問。
```java
@ResponseBody
@RequestMapping("/protect/getResource")
public String protectResource(HttpServletRequest request){
return "這是非匿名使用者訪問的資源";
}
```
這裡我們就不盡興測試頁面的展示了。
2、根據使用者擁有的許可權對資源進行操作(資源查詢/資源更新)
根據匿名使用者處理的方式,我們此時也可設定攔截器,對介面的許可權和使用者的許可權進行對比,通過後放行,不通過則提示。此時我們需要配置這樣幾個地方
* 使用者所具有的許可權
* 一個許可權對比的攔截器
* 一個資源介面
改造使用者資訊,使其具有相應的許可權
```java
public class User {
private Integer userId;
private String username;
private String password;
private boolean enable;
// 授予許可權
private Set authorities;
public User(Integer userId, String username, String password, boolean enable,Set authorities) {
this.userId = userId;
this.username = username;
this.password = password;
this.enable = enable;
this.authorities = authorities;
}
}
```
重新設定使用者
```java
private static final Map userMap = new HashMap() {{
Set all =new HashSet<>();
all.add("read");
all.add("update");
Set read = new HashSet<>();
read.add("read");
put("admin", new User(1, "admin", "admin", true,all));
put("spring", new User(2, "spring", "spring", false,read));
}};
```
我們將`admin`使用者設定最高許可權,具有`read`和`update`操作,`spring`使用者只具有`read`許可權
許可權攔截器
```java
public class AuthenticationInterceptor extends HandlerInterceptorAdapter {
private final static String USER_SESSION_KEY = "user_session_key";
// 前置攔截,在介面訪問前處理
@Override
public boolean preHandle(HttpServletRequest request, HttpServletResponse response, Object handler) throws Exception {
Object attribute = request.getSession().getAttribute(USER_SESSION_KEY);
if (attribute == null) {
writeContent(response,"匿名使用者不可訪問");
return false;
} else {
User user = ((User) attribute);
String requestURI = request.getRequestURI();
if (user.getAuthorities().contains("read") && requestURI.contains("read")) {
return true;
}
if (user.getAuthorities().contains("update") && requestURI.contains("update")) {
return true;
}
writeContent(response,"許可權不足");
return false;
}
}
//響應輸出
private void writeContent(HttpServletResponse response, String msg) throws IOException {
response.setContentType("text/html;charset=utf‐8"); PrintWriter writer = response.getWriter(); writer.print(msg);
writer.close();
response.resetBuffer();
}
}
```
在分別設定兩個操作資源的介面
```java
@ResponseBody
@RequestMapping("/protect/update")
public String protectUpdate(HttpServletRequest request){
return "您正在更新資源資訊";
}
@ResponseBody
@RequestMapping("/protect/read")
public String protectRead(HttpServletRequest request){
return "您正在獲取資源資訊";
}
```
啟用自定義攔截器
```java
@Configuration
public class WebSecurityConfig implements WebMvcConfigurer {
// 新增自定義攔截器
@Override
public void addInterceptors(InterceptorRegistry registry) {
registry.addInterceptor(new NoAuthenticationInterceptor()).addPathPatterns("/protect/**");
registry.addInterceptor(new AuthenticationInterceptor()).addPathPatterns("/protect/**");
}
}
```
此時我們就可以使用不同的使用者進行認證後訪問不同的資源來進行測試了。
### 2、總結
當然,這僅僅是最簡單的實踐,特別是許可權處理這一塊,很多都是採取硬編碼的方式處理,旨在梳理流程相關資訊。而在正式的生產環境中,我們將會採取更安全更靈活更容易擴充套件的方式處理,同時也會使用非常實用的安全框架進行企業級認證授權的處理,例如`spring security`,`shiro`等安全框架,在接下來的篇幅中,我們將進入到`sping security`的學習。加油。
