第三章:Python高階程式設計-深入類和物件
阿新 • • 發佈:2020-05-07
# 第三章:Python高階程式設計-深入類和物件
[Python3高階核心技術97講](https://coding.imooc.com/class/200.html) **筆記**
## 3.1 鴨子型別和多型
```python
"""
當看到一直鳥走起來像鴨子、游泳起來像鴨子、叫起來像鴨子,那麼這隻鳥就可以被稱為鴨子。
這句話看上去有趣,卻不太容易理解。接下來用例項來說明。
"""
# ============ Demo1 start =============
class Cat(object):
def say(self):
print("I am a cat")
class Dog(object):
def say(self):
print("I am a dog")
class Duck(object):
def say(self):
print("I am a duck")
animal = Cat
animal().say()
# ============ Demo1 end ===============
# ============ Java pseudocode contrast start =============
"""
在 Java中實現多型,需要子類繼承父類並重寫父類方法。並需要宣告型別
"""
class Animal:
def say(self):
print("I am an animal")
class Dog(Animal):
def say(self):
print("I am an Doy")
Ainmal animal = Cat()
animal.say()
# ============ Java pseudocode contrast end =============
"""
在Python中就不一樣了,如Demo1所示,變數animal可以指向任意型別,
所有類不需要繼承父類,只需定義相同的方法say()就可以實現多型。再呼叫的時候,
只需呼叫共同say()方法。如下示例。
"""
# ============== Demo2 start ===================
class Cat(object):
def say(self):
print("I am a cat")
class Dog(object):
def say(self):
print("I am a dog")
class Duck(object):
def say(self):
print("I am a duck")
animal_list = [Cat, Dog, Duck]
for animal in animal_list:
animal().say()
# ============== Demo2 end ===================
"""
有內感覺了嗎,反正我看到這,感觸較深。嘎嘎嘎.....
老師又來了個例子。
"""
# ============== Demo3 start ====================
a = ["bobby1", "bobby2"]
name_tuple = ("bobby3", "bobby4")
name_set = set()
name_set.add("bobby5")
name_set.add("bobby6")
name_list = ["bobby7", "bobby8"]
a.extend(name_tuple)
a.extent(name_list)
a.extent(name_set)
# =============== Demo4 end ======================
"""
在 Demo3 中不知你是否發現除了列表本身,元組和集合物件都可以傳入列表物件的
extend()方法。其實是extend()是接收一個可迭代物件,也就是前面章節所提到的
迭代型別,那麼好玩的就來了。
"""
# =============== Demo5 start =====================
class Dog(object):
def say(self):
print("I am a dog")
def __getitem__(self):
print("loop!!!!!!!!")
a = ["bobby1", "bobby2"]
dog = Dog()
# name_tuple = ("bobby3", "bobby4")
# name_set = set()
# name_set.add("bobby5")
# name_set.add("bobby6")
# name_list = ["bobby7", "bobby8"]
# a.extend(name_tuple)
# a.extend(name_list)
a.extend(dog)
"""
結果:
loop!!!!!!!!
loop!!!!!!!!
loop!!!!!!!!
loop!!!!!!!!
loop!!!!!!!!
loop!!!!!!!!
loop!!!!!!!!
loop!!!!!!!!
loop!!!!!!!!
....
"""
# =============== Demo5 end =======================
"""
在 Demo5 中程式陷入了死迴圈,傳入一個Dog物件也沒有報錯,
為什麼?因為魔法函式,前面章節提到的__getitem__()是的物件
變成了可迭代物件,因此傳入extend中,方法一直執行,知道丟擲異常,
但是示例中是不會丟擲異常的,因此會陷入死迴圈。
"""
```
## 3.2 抽象基類(abc模組)
```python
"""
abc -> abstract base class
抽象基類相當於Java中的介面,Java無法實現多繼承,
但可以繼承多個介面,介面是不可以例項化的。所以說,
Python中的抽象基類也是不可以例項化的。Python是
動態語言,是沒有變數型別的。實際上,變數只是一個符
號而已,它是可以指向任意型別的物件。動態語言不需要
指定型別,所以就少了一個編譯時檢查錯誤的環境,只有運
行時才知道錯誤。
與Java最大的一個區別就是,在定義一個類的時候,是不
需要去繼承一個指定型別的。而要知道Python的一個類是
屬於哪個型別的,是去看實現了那些魔法函式,魔法函式賦予
了類的一些特性。在實現了某個魔法函式之後,使得物件變成了
一個指定的型別,這種方法,在Python中可以說是一種協議。
在寫程式碼是要儘量遵守這種協議,這樣寫出來的程式碼,才是
足夠Python的一種程式碼。
"""
# ============ Demo1 start =============
class Company(object):
def __init__(self, employee_list):
self.employee = employee_list
def __len__(self):
return len(self.employee_list)
com = Company(["bob", "jane"])
# 如何判斷物件的型別呢?
# 第一種方案
print(hasattr(com, '__len__')) # 通過判斷是否有某個屬性而判斷屬於什麼型別,不夠直觀
# 通過抽象基類
from collections.abc import Sized
print(isinstance(com, Sized)) # 這樣的方式更加直觀,易讀
# ============ Demo2 end =============
"""
抽象基類的兩個使用場景:
1. 我們在某些情況下希望判定某個物件的型別
2. 我們需要強制某個子類必須實現某些方法
"""
# =============== Demo2 start =================
# 如何去模擬一個抽象基類
class CacheBase():
def get(self, key):
raise NotImplementedError
def set(self, key, value):
raise NotImplementedError
class RedisCache(CacheBase):
pass
redis_cahe = RedisCache()
redis_cache.set("key", "value") # 會丟擲異常,因為子類沒有實現父類對應方法
# =============== Demo2 end ====================
"""
Demo2 的方法雖實現了第二個場景的需求,但是不夠好,
只是在物件方法在呼叫是才丟擲異常,如果想要在物件在
初始化就丟擲異常,就需要使用我們的abc模組了。
"""
# ================= Demo3 start ===================
# 使用全域性的abc模組
import abc
class CacheBase(metaclass=abc.ABCMeta):
@abc.abstractmethod
def get(self, key):
pass
@abc.abstractmethod
def set(self, key, value):
raise NotImplementedError
class RedisCache(CacheBase):
pass
redis_cache = RedisCache() # 丟擲異常
# ================= Demo3 end ======================
```
## 3.3 使用instance而不是type
```python
class A:
pass
class B(A):
pass
b = B()
print(isinstance(b, B)) # True
print(isinstance(b, A)) # True
print(type(b) is B) # is 判斷是否是同一個物件
print(type(b) == B) # == 判斷的是值是否相等
print(type(b) is A) # False
"""
注意isinstance比使用type好,type無法找到父類,
而isinstance可以。
同時注意 == 與 is 的區別。
"""
```
## 3.4 類變數和物件變數
```python
# =========== Demo1 start ==============
class A:
aa = 1 # 類變數
def __init__(self, x, y):
self.x = x
self.y = y
a = A(2, 3)
print(a.x, a.y, a.aa) # 2 3 1
print(A.aa) # 1
print(A.x) # 丟擲異常
# =========== Demo1 end ================
"""
在 Demo1 中列印a.aa時,首先會在物件屬性中查詢,
若是找不到則在類屬性中查詢。以上 Demo 很好理解。
"""
# ============ Demo2 start =================
class A:
aa = 1 # 類變數
def __init__(self, x, y):
self.x = x
self.y = y
a = A(2, 3)
A.aa = 11
print(a.x, a.y, a.aa) # 2 3 11
A.aa = 111
a.aa = 100
print(a.x, a.y, a.aa) # 2 3 100
# ============= Demo2 end ==================
"""
在對A.aa與a.aa同時賦值時,此時,物件屬性中
就有了aa屬性,所以在列印a.aa時,就會首先打
印物件裡的屬性啦。注意這個細節哦。類與例項的
變數是兩個獨立的存在。
"""
# 在Demo3中加入以下程式碼
b = A(3, 4)
print(b.aa) # 3 4 111
"""
可見類變數是所有例項共享的。
"""
```
## 3.5 類屬性和例項屬性以及查詢順序
```python
"""
屬性就是在類或例項中定義的變數或方法。
"""
class A:
name = "A"
def __init__(self):
self.name = "obj"
a = A()
print(a.name) # obj
"""
在單繼承這很簡單,但是在多繼承下,這些就會變得複雜起來。
"""
```
### MRO演算法
Method Relation order
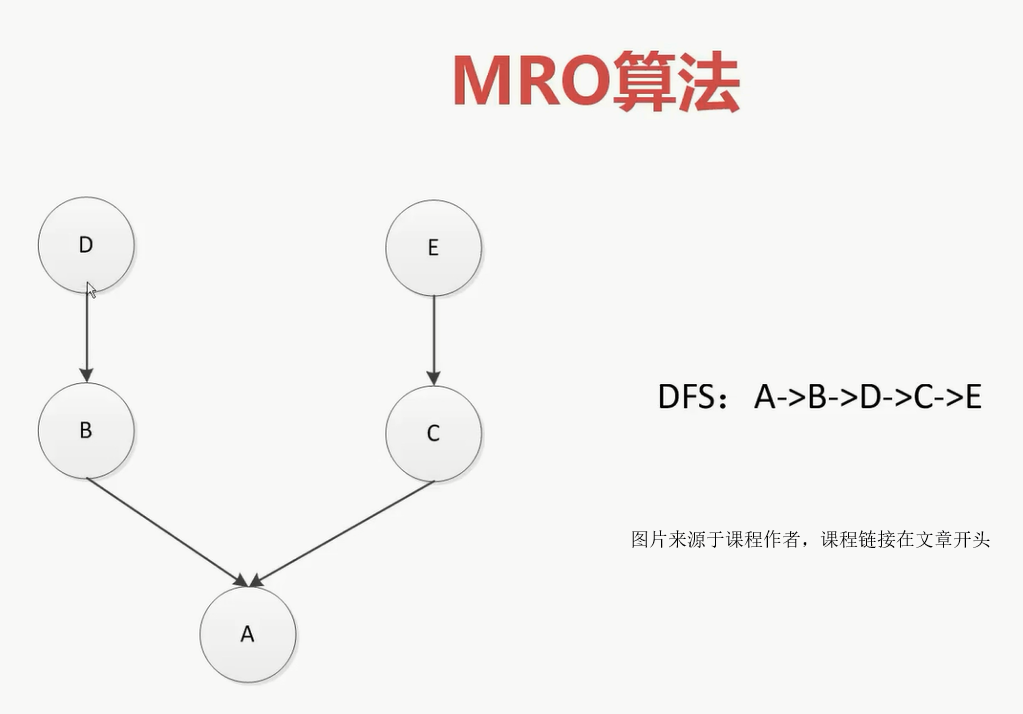
Python3使用的演算法是C3,以下演算法是Python早些版本的屬性查詢演算法,均存在一些缺陷,下面一一介紹。
**深度優先搜尋**

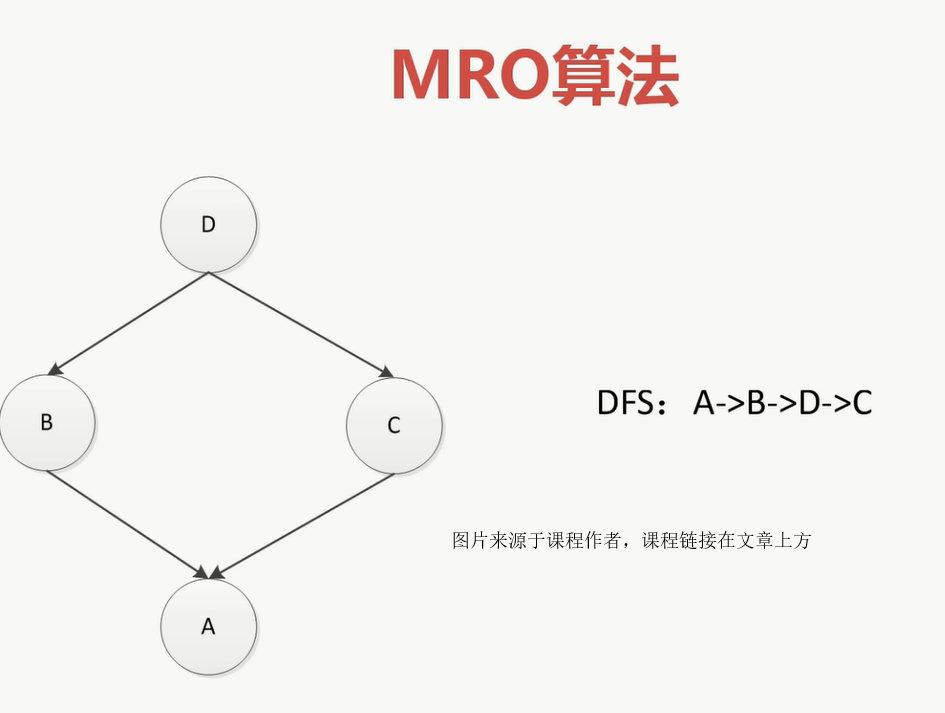
上圖的繼承關係中使用深度優先搜尋是沒有問題的,但是要是繼承關係是菱形,如下圖所示就會出現問題。需要使用廣度優先搜尋演算法,使得繼承順序為A->B->C->D。
問題就是,下圖中,如果C裡的方法重寫了D的方法。但是由於深度優先搜尋演算法會首先查詢D中的屬性,那麼C的重寫方法就不會生效。所有需要使用廣度優先搜尋演算法解決問題。

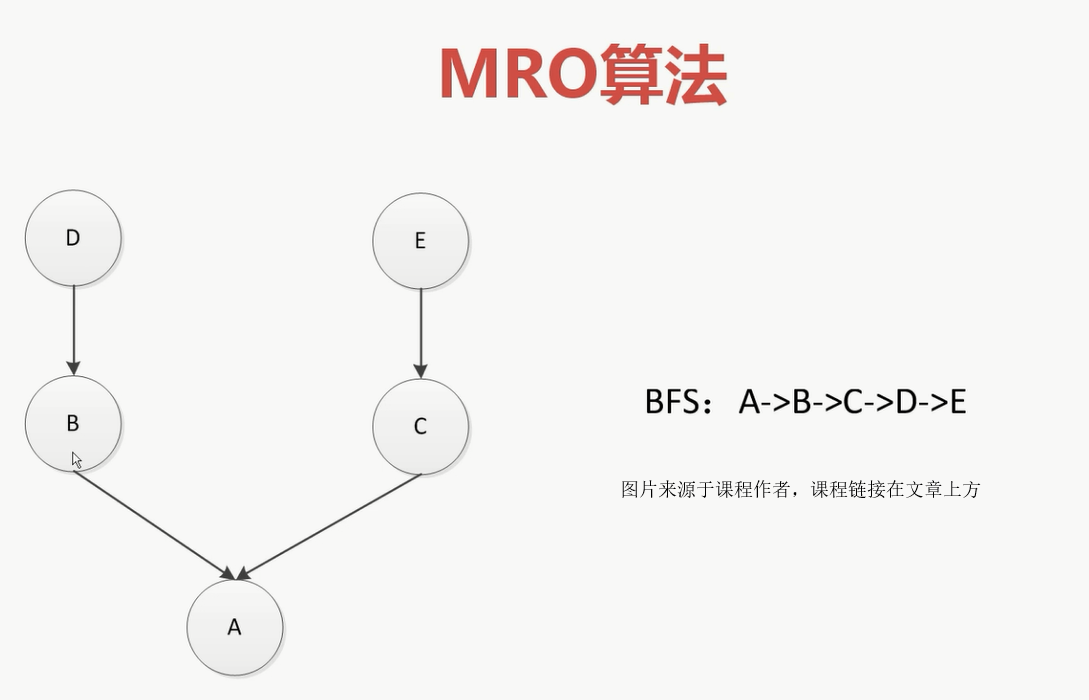
**廣度優先**
廣度優先雖然解決了上述問題,但是呢,若果出現如下繼承關係,廣度優先演算法又出現問題了。就是,如果D,C都有一個同名的方法,而繼承D的B沒有實現這個同名方法。那麼在搜尋完B時,應該搜尋D,但是廣度優先演算法回去搜尋C,這邏輯上是不合理的。

所以Python3統一成了一種方法,C3使得這些問題都不復存在。
```python
# =============== 菱形繼承問題 ==================
#新式類
class D:
pass
class B(D):
pass
class C(D):
pass
class A(B, C):
pass
print(A.__mro__)
"""
結果:
(, , , , )
"""
# ================ 非菱形繼承問題 =================
class D:
pass
class B(D):
pass
class E:
pass
class C(E):
pass
class A(B, C):
pass
print(A.__mro__)
"""
結果:
(, , , , , )
"""
```
## 3.6 靜態方法、類方法以及物件方法以及引數
```python
class Date:
def __init__(self, year, month, day):
self.year = year
self.month = month
self.day = day
def tomorrow(self):
self.day += 1
@staticmethod
def parse_from_string(data_str):
year, month, day = tuple(date_str.split("-"))
return Date(int(year), int(month), int(day)) # 出現硬編碼情況
@classmethod
def from_string(cls, date_str):
year, month, day = tuple(date_str.split("-"))
return cls(int(year), int(month), int(day)) # 解決硬編碼
def __str__(self):
return "{year}/{month}/{day}".format(year=self.year, month=self.month, day=self.day)
if __name__ == "__main__":
new_day = Date(2020, 5, 7)
new_day.tomorrow()
print(new_day)
date_str = "2020-5-7"
new_day = Date.parse_from_string(date_str)
print(new_day)
```
## 3.7 資料封裝和私有屬性
```python
class Date:
#建構函式
def __init__(self, year, month, day):
self.year = year
self.month = month
self.day = day
def tomorrow(self):
self.day += 1
@staticmethod
def parse_from_string(date_str):
year, month, day = tuple(date_str.split("-"))
return Date(int(year), int(month), int(day))
@staticmethod
def valid_str(date_str):
year, month, day = tuple(date_str.split("-"))
if int(year)>0 and (int(month) >0 and int(month)<=12) and (int(day) >0 and int(day)<=31):
return True
else:
return False
@classmethod
def from_string(cls, date_str):
year, month, day = tuple(date_str.split("-"))
return cls(int(year), int(month), int(day))
def __str__(self):
return "{year}/{month}/{day}".format(year=self.year, month=self.month, day=self.day)
class User:
def __init__(self, birthday):
self.__birthday = birthday # _User__birthday
def get_age(self):
return 2018 - self.__birthday.year
if __name__ == "__main__":
user = User(Date(1990, 2, 1))
print(user.birthday))
print(user.get_age())
```
## 3.8 Python物件自省機制
```python
"""
自省就是通過一定的機制查詢到物件的內部結構。
"""
class Person:
name = "User"
class Student(Person):
"""
文件
"""
def __init__(self, school_name):
self.school_name = school_name
if __name__ == "__main__":
stu = Student("家裡蹲")
print(stu.__dict__) # {'school_name': '家裡蹲'}
print(stu.name) # User
"""
stu的屬性字典裡沒有name,那麼是怎麼能夠得到User的呢?
實際上這個name在Person的屬性字典裡,類也是物件嘛!!
stu沒有直譯器就往上層找
"""
print(Person.__dict__) # {'__module__': '__main__', 'name': 'User', ...}
print(Student.__dict__) # {... '__doc__': '\n 文件\n ', ... }
print(dir(stu)) # ['__class__', '__delattr__', '__dict__', '__dir__', ...]
stu.__dict__["city"] = "WC"
print(stu.city) # WC
```
## 3.9 super函式
```python
"""
super函式並沒有那麼簡單...
"""
class A:
def __init__(self):
print("A")
class B(A):
def __init__(self):
print("B")
# super(B, self).__init__() # python2
super().__init__()
class C(A):
def __init__(self):
print("C")
super().__init__()
class D(B, C):
def __init__(self):
print("D")
super(D, self).__init__()
# 既然我們重寫了B的建構函式,為什麼還要去呼叫super?
"""
為了能夠重用父類的一些方法,避免編寫重複的邏輯
"""
# super到底執行順序什麼樣?
"""
super並不是僅僅呼叫父類方法....
"""
if __name__ == "__main__":
d = D()
"""
直觀結果:
D
B
A
"""
"""
實際結果:
D
B
C
A
"""
# 所以super的查詢順序是根據mro順序來的
print(D.__mro__)
```
## 3.10 Django rest framework 中對多繼承使用的經驗
Mixin模式
1. Mixin功能單一
2. 不和基類關聯,可以和任意基類組合,基類可以不和mixin關聯就能初始化
3. 在mixin中不要使用super這種用法
## 3.11 Python中的with語句
```python
"""
try expect finally 的用法
"""
# ============== Demo1 start ====================
try:
print("code started")
raise KeyError
except KeyError as e:
print("key error")
else: # 沒有異常再執行
print("other code")
finally:
print("finally") # 不管怎麼樣該行程式碼都會執行,用於關閉檔案物件等
# ============== Demo1 end =====================
# ================== Demo2 start ========================
def exe_try():
try:
print("code start")
raise KeyError
return 1
except KeyError as e:
print("Key error")
return 2
else:
print("other error")
return 3
finally:
print("finally")
return 4
if __name__ == "__main__":
result = exe_try()
print(result)
"""
result 的結果會是什麼呢?
答案是: 4
那麼註釋 return 4
結果又是什麼呢?
答案是: 2
因為每次執行到return語句時,
其值都會壓入棧中,最終去棧頂的值。
"""
# ================== Demo2 end ==========================
```
**上下文管理協議**
```python
"""
基於:
__enter__(self)
__exit__(self, exc_type, exc_val, exc_tb)
"""
class Sample:
def __enter__(self):
# 獲取資源
print("enter")
return self
def __exit__(self, exc_type, exc_val, exc_tb):
# 釋放資源
print("exit")
def do_something(self):
print("doing something")
with Sample() as sample:
sample.do_something()
"""
執行結果:
enter
doing something
exit
"""
```
## 3.12 contextlib實現上下文管理器
```python
import contextlib
@contextlib.contextmanager
def file_open(file_name):
print("file open")
yield {}
print("file end")
with file_open("bobby.txt") as f_opened:
print("file processing")
"""
執行結果:
file open
file processing
file end
