
ProxySQL簡介原理及讀寫分離應用
阿新 • • 發佈:2020-06-07
#### MySQL-ProxySQL中介軟體簡介
##### 同類型產品
- MySQL Route:是現在MySQL官方Oracle公司釋出出來的一箇中間件。
- Atlas:是由奇虎360公發的基於MySQL協議的資料庫中介軟體產品,它在MySQL官方推出的MySQL-Proxy 0.8.2版本的基礎上,修改了若干Bug,並增加了很多功能特性。目前該產品在360內部得到了廣泛應用。
- DBProxy:是由美團點評公司技術工程部DBA團隊(北京)開發維護的一個基於MySQL協議的資料中間層。它在奇虎360公司開源的Atlas基礎上,修改了部分bug,並且添加了很多特性。
- Cobar:是阿里巴巴B2B開發的關係型分散式系統,管理將近3000個MySQL例項。 在阿里經受住了考驗,後面由於作者的走開的原因cobar沒有人維護 了,阿里也開發了tddl替代cobar。
- MyCAT:是社群愛好者在阿里cobar基礎上進行二次開發,解決了cobar當時存 在的一些問題,並且加入了許多新的功能在其中。目前MyCAT社群活躍度很高,目前已經有一些公司在使用MyCAT。總體來說支援度比較高,也會一直維護下去。
> ProxySQL是使用C++語言開發的,官網文件也很齊全,以下是其特色功能點:
>
> 上面提到的MyCAT我Mysql哪一個分類文章有親測過程,有興趣小夥伴可以移步看看.
https://www.cnblogs.com/you-men/p/12838333.html
- 查詢快取
- 查詢路由
- 故障轉移
- 線上配置立刻生效無需重啟
- 應用層代理
- 跨平臺
- 高階拓展支援
- 防火牆
通過上述,我們可以看到ProxySQL可以做許多事情,已經不僅僅是純粹的MySQL讀寫分離,其實我們通過後面所述結合業務發散,ProxySQL還可以支援以下高階功能:
- 讀寫分離
- 資料庫叢集、分片
- 分庫分表
- 主從切換
- SQL審計
- 連線池 多路複用
- 負載均衡
- 查詢重寫
- 流量映象
- 自動重連
- 自動下線
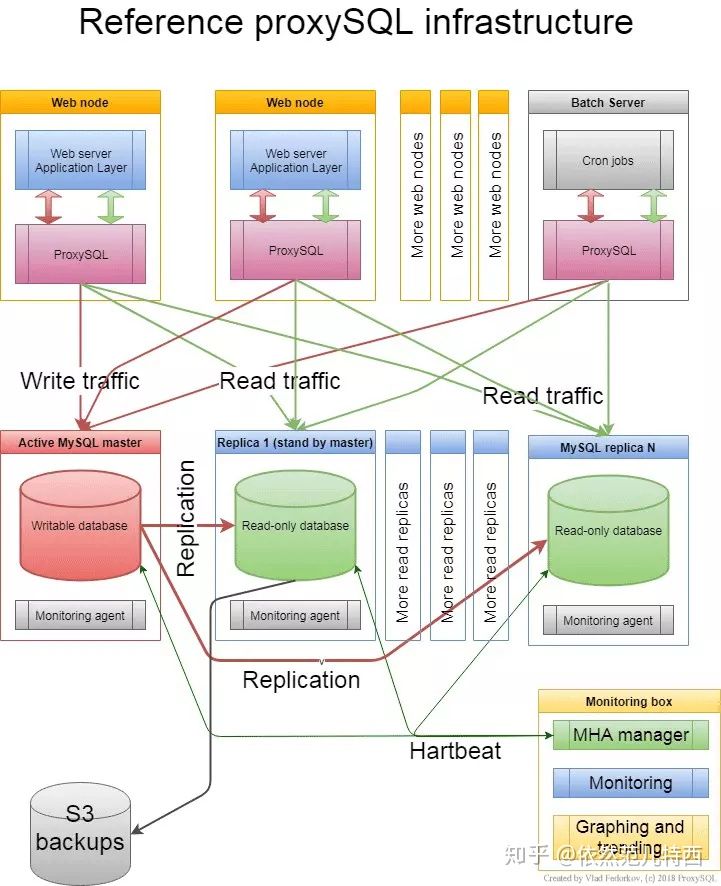
`高可用架構`
#### ProxySQL部署配置
##### 環境清單
`list`
```python
CentOS7.3
proxysql-2.0.12-1-centos7.x86_64.rpm
mysql-5.7.23-1.el7.x86_64.rpm-bundle.tar
```
| 主機 | 作業系統 | IP地址 | 硬體/網路 |
| :---------- | :-------- | :------------ | :--------- |
| Mysql105 | CentOS7.3 | 192.168.0.105 | 2C4G / nat |
| Mysql106 | CentOS7.3 | 192.168.0.106 | 2C4G / nat |
| Mysql107 | CentOS7.3 | 192.168.0.107 | 2C4G / nat |
| ProxySQL109 | CentOS7.3 | 192.168.0.109 | 2C4G / nat |
##### 安裝Mysql
```shell
#!/usr/bin/env bash
# Author: ZhouJian
# Mail: [email protected]
# Time: 2019-9-3
# Describe: CentOS 7 Install Mysql.rpm Script
clear
echo -ne "\\033[0;33m"
cat<_/___.' >' "".
| | : '- \\'.;'\\ _ /';.'/ - ' : | |
\\ \\ '_. \\_ __\\ /__ _/ .-' / /
====='-.____'.___ \\_____/___.-'____.-'=====
'=---='
^^^^^^^^^^^^^^^^^^^^^^^^^^^^^^^^^^^^^^^^^^^^^^^^
建議系統 CentOS7
^^^^^^^^^^^^^^^^^^^^^^^^^^^^^^^^^^^^^^^^^^^^^^^^
# PS:請儘量使用純淨的CentOS7系統,我們會在伺服器安裝Mysql5.7,
# 將mysql-5.7.23-1.el7.x86_64.rpm-bundle.tar包和指令碼放到root目錄下執行即可,密碼為ZHOUjian.20
EOT
echo -ne "\\033[m"
init_security() {
systemctl stop firewalld
systemctl disable firewalld &>/dev/null
setenforce 0
sed -i '/^SELINUX=/ s/enforcing/disabled/' /etc/selinux/config
sed -i '/^GSSAPIAu/ s/yes/no/' /etc/ssh/sshd_config
sed -i '/^#UseDNS/ {s/^#//;s/yes/no/}' /etc/ssh/sshd_config
systemctl enable sshd crond &> /dev/null
echo -e "\033[32m [安全配置] ==> OK \033[0m"
}
init_yumsource() {
if [ ! -d /etc/yum.repos.d/backup ];then
mkdir /etc/yum.repos.d/backup
fi
mv /etc/yum.repos.d/* /etc/yum.repos.d/backup 2>/dev/null
if ! ping -c2 www.baidu.com &>/dev/null
then
echo "您無法上外網,不能配置yum源"
exit
fi
curl -o /etc/yum.repos.d/163.repo http://mirrors.163.com/.help/CentOS7-Base-163.repo
curl -o /etc/yum.repos.d/epel.repo http://mirrors.aliyun.com/repo/epel-7.repo
timedatectl set-timezone Asia/Shanghai
echo "nameserver 114.114.114.114" > /etc/resolv.conf
echo "nameserver 8.8.8.8" >> /etc/resolv.conf
chattr +i /etc/resolv.conf
echo -e "\033[32m [YUM Source] ==> OK \033[0m"
}
init_mysql() {
rpm -e mariadb-libs --nodeps
rm -rf /var/lib/mysql
rm -rf /etc/my.cnf
tar xvf /root/mysql-5.7.23-1.el7.x86_64.rpm-bundle.tar -C /usr/local/
cd /usr/local
rpm -ivh mysql-community-server-5.7.23-1.el7.x86_64.rpm \
mysql-community-client-5.7.23-1.el7.x86_64.rpm \
mysql-community-common-5.7.23-1.el7.x86_64.rpm \
mysql-community-libs-5.7.23-1.el7.x86_64.rpm
rm -rf mysql-community-*
}
changepass() {
sed -i '/\[mysqld]/ a skip-grant-tables' /etc/my.cnf
systemctl restart mysqld
mysql <