
Spring Security 實戰乾貨:從零手寫一個驗證碼登入
阿新 • • 發佈:2020-07-27
## 1. 前言
前面關於**Spring Security**寫了兩篇文章,一篇是介紹[UsernamePasswordAuthenticationFilter](https://mp.weixin.qq.com/s/bY6-gxRginVtrypigKs5Lw),另一篇是介紹 [AuthenticationManager](https://mp.weixin.qq.com/s/B2JgdLMHtaCRPQsgSf2dXA)。很多同學表示無法理解這兩個東西有什麼用,能解決哪些實際問題?所以今天就對這兩篇理論進行實戰運用,我們從零寫一個簡訊驗證碼登入並適配到**Spring Security**體系中。如果你在閱讀中有什麼疑問可以回頭看看這兩篇文章,能解決很多疑惑。
> 當然你可以修改成郵箱或者其它通訊裝置的驗證碼登入。
## 2. 驗證碼生命週期
> 驗證碼存在有效期,一般5分鐘。 一般邏輯是使用者輸入手機號後去獲取驗證碼,服務端對驗證碼進行快取。在最大有效期內使用者只能使用驗證碼驗證成功一次(避免驗證碼浪費);超過最大時間後失效。
驗證碼的快取生命週期:
```java
public interface CaptchaCacheStorage {
/**
* 驗證碼放入快取.
*
* @param phone the phone
* @return the string
*/
String put(String phone);
/**
* 從快取取驗證碼.
*
* @param phone the phone
* @return the string
*/
String get(String phone);
/**
* 驗證碼手動過期.
*
* @param phone the phone
*/
void expire(String phone);
}
```
我們一般會藉助於快取中介軟體,比如**Redis**、**Ehcache**、**Memcached**等等來做這個事情。為了方便收看該教程的同學們所使用的不同的中介軟體。這裡我結合[Spring Cache](https://felord.cn/springcache.html)特意抽象了驗證碼的快取處理。
```java
private static final String SMS_CAPTCHA_CACHE = "captcha";
@Bean
CaptchaCacheStorage captchaCacheStorage() {
return new CaptchaCacheStorage() {
@CachePut(cacheNames = SMS_CAPTCHA_CACHE, key = "#phone")
@Override
public String put(String phone) {
return RandomUtil.randomNumbers(5);
}
@Cacheable(cacheNames = SMS_CAPTCHA_CACHE, key = "#phone")
@Override
public String get(String phone) {
return null;
}
@CacheEvict(cacheNames = SMS_CAPTCHA_CACHE, key = "#phone")
@Override
public void expire(String phone) {
}
};
}
```
> 務必保證快取的可靠性,這與使用者的體驗息息相關。
接著我們就來編寫驗證碼服務了,驗證碼服務的核心功能有兩個:**傳送驗證碼**和**驗證碼校驗**。其它的諸如統計、黑名單、歷史記錄可根據實際業務定製。這裡只實現核心功能。
```java
/**
* 驗證碼服務.
* 兩個功能: 傳送和校驗.
*
* @param captchaCacheStorage the captcha cache storage
* @return the captcha service
*/
@Bean
public CaptchaService captchaService(CaptchaCacheStorage captchaCacheStorage) {
return new CaptchaService() {
@Override
public boolean sendCaptcha(String phone) {
String existed = captchaCacheStorage.get(phone);
if (StringUtils.hasText(existed)) {
// 節約成本的話如果快取中有可用的驗證碼 不再發新的驗證碼
log.warn("captcha code 【 {} 】 is available now", existed);
return false;
}
// 生成驗證碼並放入快取
String captchaCode = captchaCacheStorage.put(phone);
log.info("captcha: {}", captchaCode);
//todo 這裡自行完善呼叫第三方簡訊服務傳送驗證碼
return true;
}
@Override
public boolean verifyCaptcha(String phone, String code) {
String cacheCode = captchaCacheStorage.get(phone);
if (Objects.equals(cacheCode, code)) {
// 驗證通過手動過期
captchaCacheStorage.expire(phone);
return true;
}
return false;
}
};
}
```
接下來就可以根據`CaptchaService`編寫簡訊傳送介面`/captcha/{phone}`了。
```java
@RestController
@RequestMapping("/captcha")
public class CaptchaController {
@Resource
CaptchaService captchaService;
/**
* 模擬手機號傳送驗證碼.
*
* @param phone the mobile
* @return the rest
*/
@GetMapping("/{phone}")
public Rest captchaByMobile(@PathVariable String phone) {
//todo 手機號 正則自行驗證
if (captchaService.sendCaptcha(phone)){
return RestBody.ok("驗證碼傳送成功");
}
return RestBody.failure(-999,"驗證碼傳送失敗");
}
}
```
## 3. 整合到Spring Security
下面的教程就必須用到前兩篇介紹的知識了。我們要實現驗證碼登入就必須定義一個**Servlet Filter**進行處理。它的作用這裡再重複一下:
- 攔截簡訊登入介面。
- 獲取登入引數並封裝為`Authentication`憑據。
- 交給`AuthenticationManager`認證。
我們需要先定製`Authentication`和`AuthenticationManager`
### 3.1 驗證碼憑據
`Authentication`在我看來就是一個載體,在未得到認證之前它用來攜帶登入的關鍵引數,比如使用者名稱和密碼、驗證碼;在認證成功後它攜帶使用者的資訊和角色集。所以模仿`UsernamePasswordAuthenticationToken` 來實現一個`CaptchaAuthenticationToken`,去掉不必要的功能,抄就完事兒了:
```java
package cn.felord.spring.security.captcha;
import org.springframework.security.authentication.AbstractAuthenticationToken;
import org.springframework.security.core.GrantedAuthority;
import org.springframework.security.core.SpringSecurityCoreVersion;
import java.util.Collection;
/**
* 驗證碼認證憑據.
* @author felord.cn
*/
public class CaptchaAuthenticationToken extends AbstractAuthenticationToken {
private static final long serialVersionUID = SpringSecurityCoreVersion.SERIAL_VERSION_UID;
private final Object principal;
private String captcha;
/**
* 此建構函式用來初始化未授信憑據.
*
* @param principal the principal
* @param captcha the captcha
* @see CaptchaAuthenticationToken#CaptchaAuthenticationToken(Object, String, Collection)
*/
public CaptchaAuthenticationToken(Object principal, String captcha) {
super(null);
this.principal = principal;
this.captcha = captcha;
setAuthenticated(false);
}
/**
* 此建構函式用來初始化授信憑據.
*
* @param principal the principal
* @param captcha the captcha
* @param authorities the authorities
* @see CaptchaAuthenticationToken#CaptchaAuthenticationToken(Object, String)
*/
public CaptchaAuthenticationToken(Object principal, String captcha,
Collection authorities) {
super(authorities);
this.principal = principal;
this.captcha = captcha;
super.setAuthenticated(true); // must use super, as we override
}
public Object getCredentials() {
return this.captcha;
}
public Object getPrincipal() {
return this.principal;
}
public void setAuthenticated(boolean isAuthenticated) throws IllegalArgumentException {
if (isAuthenticated) {
throw new IllegalArgumentException(
"Cannot set this token to trusted - use constructor which takes a GrantedAuthority list instead");
}
super.setAuthenticated(false);
}
@Override
public void eraseCredentials() {
super.eraseCredentials();
captcha = null;
}
```
### 3.2 驗證碼認證管理器
我們還需要定製一個`AuthenticationManager`來對上面定義的憑據`CaptchaAuthenticationToken`進行認證處理。下面這張圖有必要再拿出來看一下:
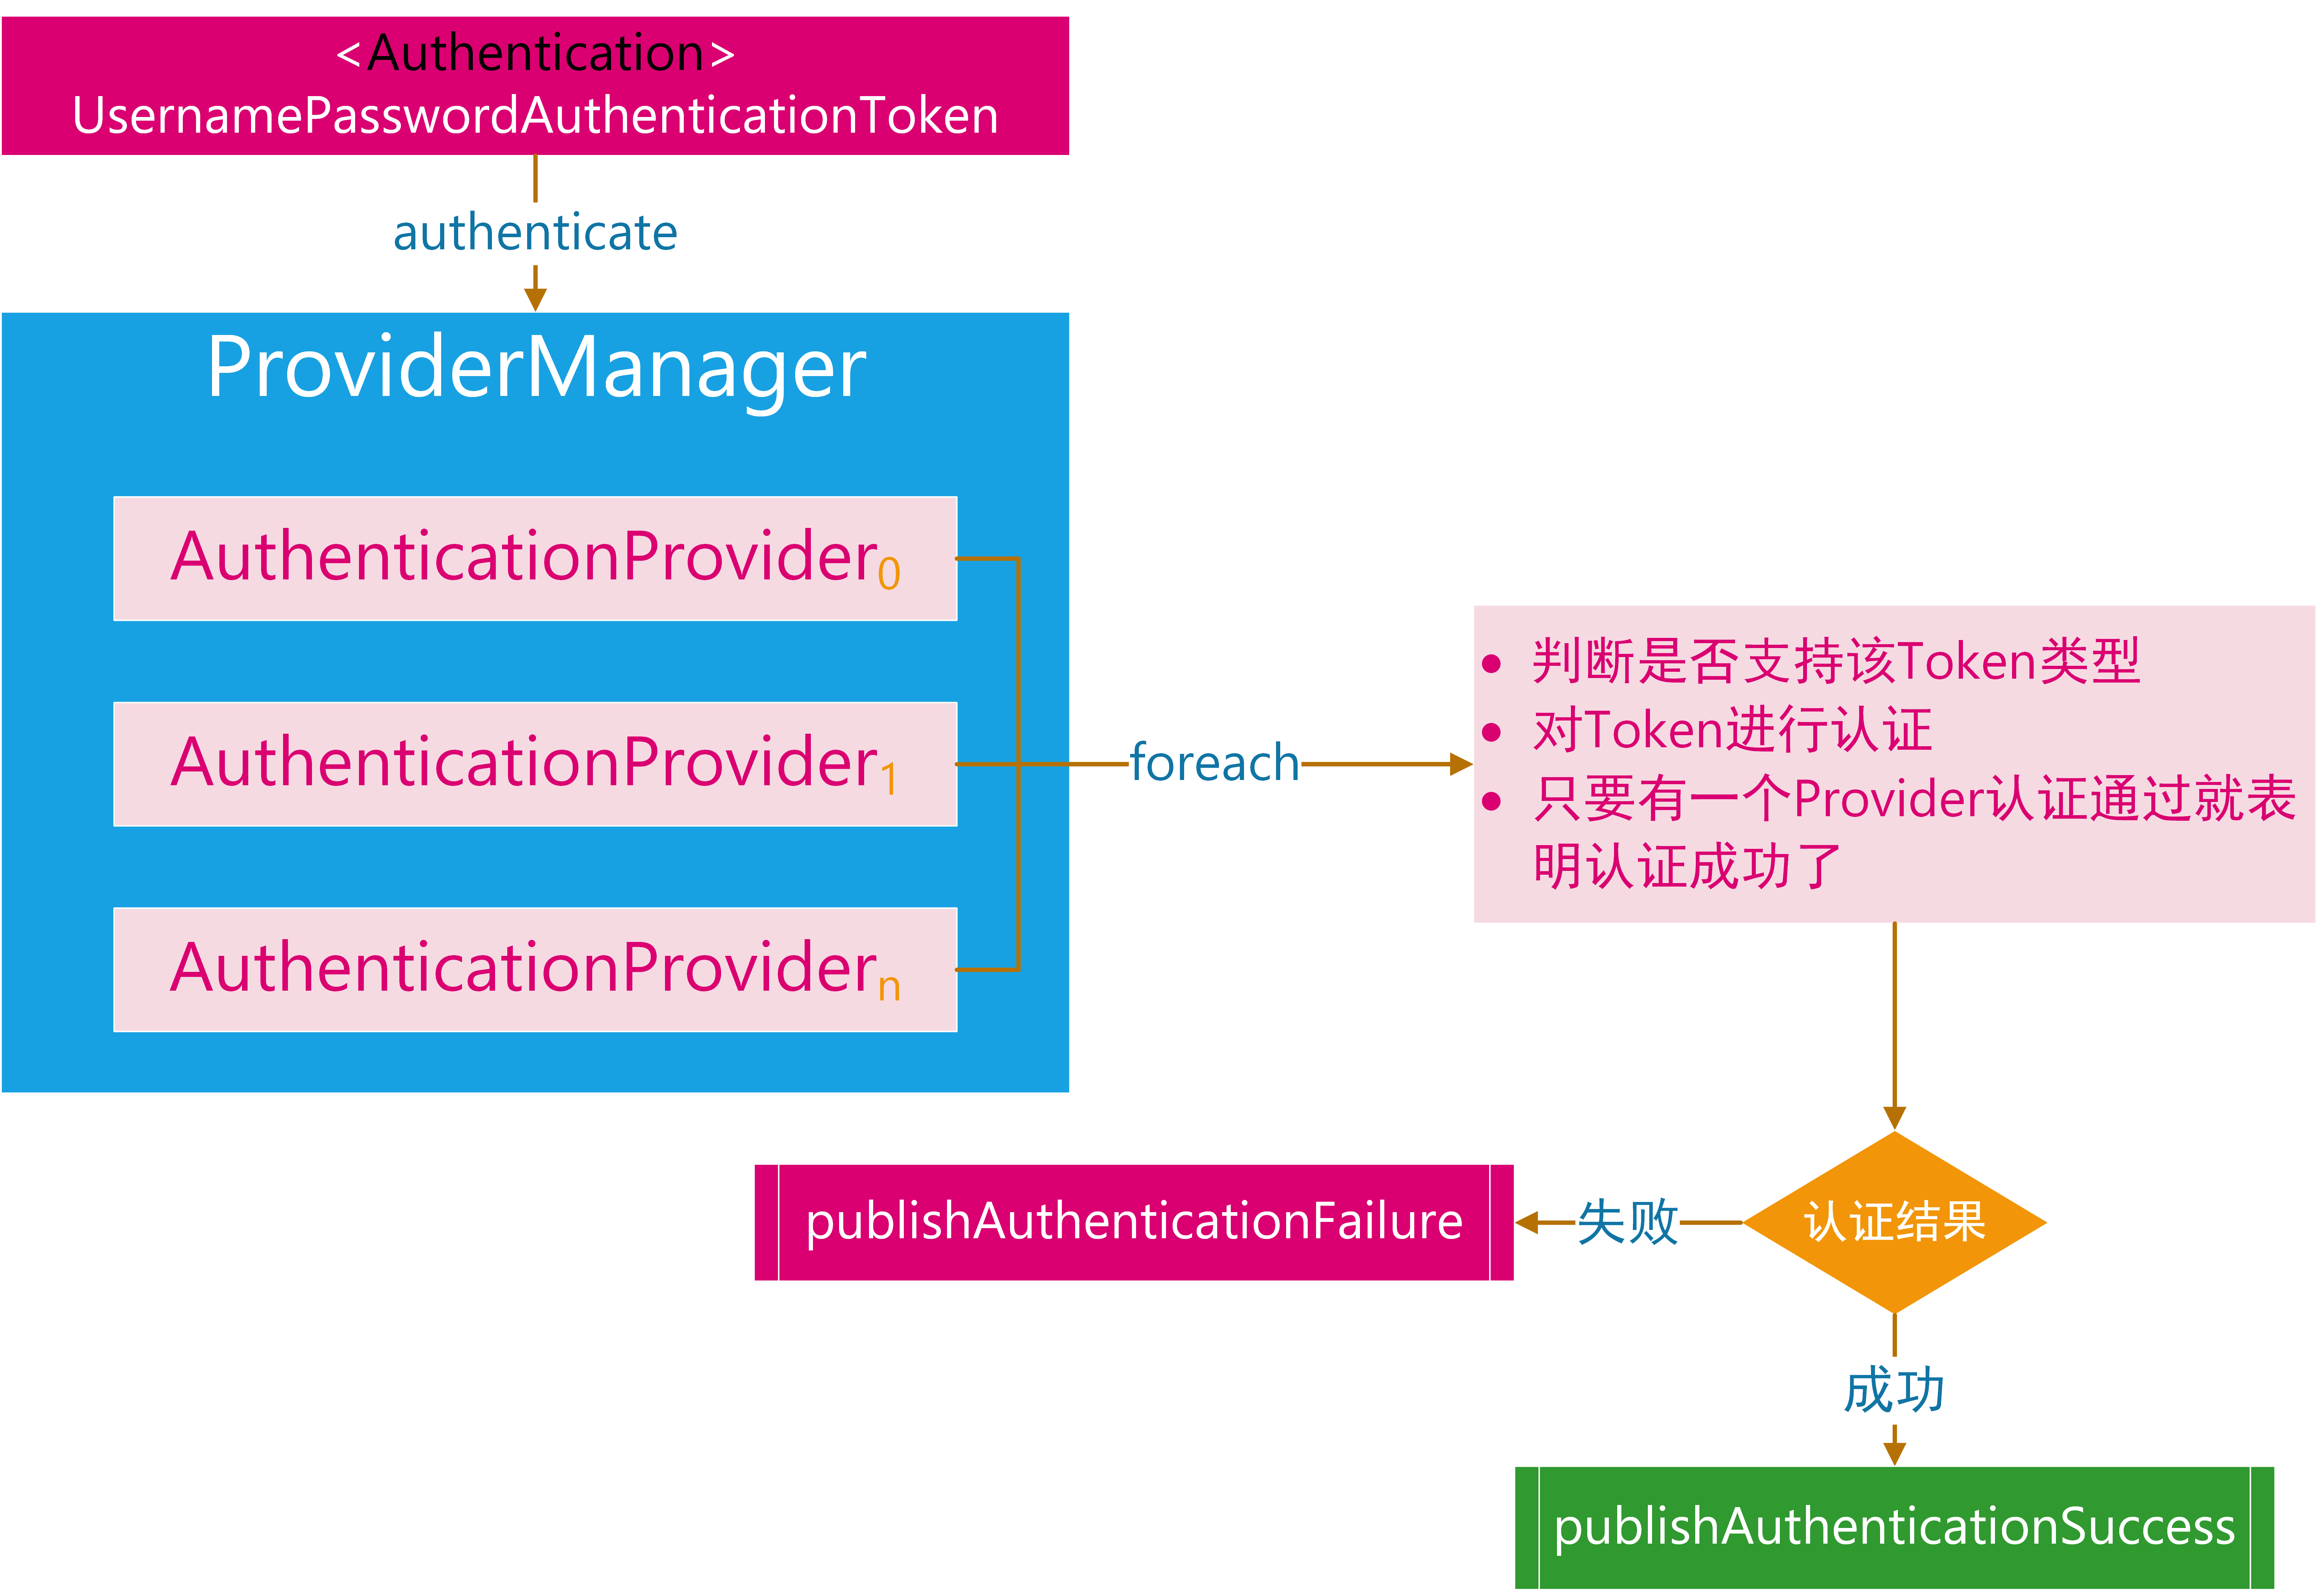
要定義`AuthenticationManager`只需要定義其實現`ProviderManager`。而`ProviderManager`又需要依賴`AuthenticationProvider`。所以我們要實現一個專門處理`CaptchaAuthenticationToken`的`AuthenticationProvider`。`AuthenticationProvider`的流程是:
1. 從`CaptchaAuthenticationToken`拿到手機號、驗證碼。
2. 利用手機號從資料庫查詢使用者資訊,並判斷使用者是否是有效使用者,實際上就是實現`UserDetailsService`介面
3. 驗證碼校驗。
4. 校驗成功則封裝授信的憑據。
5. 校驗失敗丟擲認證異常。
根據這個流程實現如下:
```java
package cn.felord.spring.security.captcha;
import lombok.extern.slf4j.Slf4j;
import org.springframework.beans.factory.InitializingBean;
import org.springframework.context.MessageSource;
import org.springframework.context.MessageSourceAware;
import org.springframework.context.support.MessageSourceAccessor;
import org.springframework.security.authentication.AuthenticationProvider;
import org.springframework.security.authentication.BadCredentialsException;
import org.springframework.security.core.Authentication;
import org.springframework.security.core.AuthenticationException;
import org.springframework.security.core.GrantedAuthority;
import org.springframework.security.core.SpringSecurityMessageSource;
import org.springframework.security.core.authority.mapping.GrantedAuthoritiesMapper;
import org.springframework.security.core.authority.mapping.NullAuthoritiesMapper;
import org.springframework.security.core.userdetails.UserDetails;
import org.springframework.security.core.userdetails.UserDetailsService;
import org.springframework.util.Assert;
import java.util.Collection;
import java.util.Objects;
/**
* 驗證碼認證器.
* @author felord.cn
*/
@Slf4j
public class CaptchaAuthenticationProvider implements AuthenticationProvider, InitializingBean, MessageSourceAware {
private final GrantedAuthoritiesMapper authoritiesMapper = new NullAuthoritiesMapper();
private final UserDetailsService userDetailsService;
private final CaptchaService captchaService;
private MessageSourceAccessor messages = SpringSecurityMessageSource.getAccessor();
/**
* Instantiates a new Captcha authentication provider.
*
* @param userDetailsService the user details service
* @param captchaService the captcha service
*/
public CaptchaAuthenticationProvider(UserDetailsService userDetailsService, CaptchaService captchaService) {
this.userDetailsService = userDetailsService;
this.captchaService = captchaService;
}
@Override
public Authentication authenticate(Authentication authentication) throws AuthenticationException {
Assert.isInstanceOf(CaptchaAuthenticationToken.class, authentication,
() -> messages.getMessage(
"CaptchaAuthenticationProvider.onlySupports",
"Only CaptchaAuthenticationToken is supported"));
CaptchaAuthenticationToken unAuthenticationToken = (CaptchaAuthenticationToken) authentication;
String phone = unAuthenticationToken.getName();
String rawCode = (String) unAuthenticationToken.getCredentials();
UserDetails userDetails = userDetailsService.loadUserByUsername(phone);
// 此處省略對UserDetails 的可用性 是否過期 是否鎖定 是否失效的檢驗 建議根據實際情況新增 或者在 UserDetailsService 的實現中處理
if (Objects.isNull(userDetails)) {
throw new BadCredentialsException("Bad credentials");
}
// 驗證碼校驗
if (captchaService.verifyCaptcha(phone, rawCode)) {
return createSuccessAuthentication(authentication, userDetails);
} else {
throw new BadCredentialsException("captcha is not matched");
}
}
@Override
public boolean supports(Class authentication) {
return CaptchaAuthenticationToken.class.isAssignableFrom(authentication);
}
@Override
public void afterPropertiesSet() throws Exception {
Assert.notNull(userDetailsService, "userDetailsService must not be null");
Assert.notNull(captchaService, "captchaService must not be null");
}
@Override
public void setMessageSource(MessageSource messageSource) {
this.messages = new MessageSourceAccessor(messageSource);
}
/**
* 認證成功將非授信憑據轉為授信憑據.
* 封裝使用者資訊 角色資訊。
*
* @param authentication the authentication
* @param user the user
* @return the authentication
*/
protected Authentication createSuccessAuthentication(Authentication authentication, UserDetails user) {
Collection authorities = authoritiesMapper.mapAuthorities(user.getAuthorities());
CaptchaAuthenticationToken authenticationToken = new CaptchaAuthenticationToken(user, null, authorities);
authenticationToken.setDetails(authentication.getDetails());
return authenticationToken;
}
}
```
然後就可以組裝`ProviderManager`了:
```java
ProviderManager providerManager = new ProviderManager(Collections.singletonList(captchaAuthenticationProvider));
```
經過**3.1**和**3.2**的準備,我們的準備工作就完成了。
### 3.3 驗證碼認證過濾器
定製好驗證碼憑據和驗證碼認證管理器後我們就可以定義驗證碼認證過濾器了。修改一下[UsernamePasswordAuthenticationFilter](https://mp.weixin.qq.com/s/bY6-gxRginVtrypigKs5Lw)就能滿足需求:
```java
package cn.felord.spring.security.captcha;
import org.springframework.lang.Nullable;
import org.springframework.security.authentication.AuthenticationServiceException;
import org.springframework.security.core.Authentication;
import org.springframework.security.core.AuthenticationException;
import org.springframework.security.web.authentication.AbstractAuthenticationProcessingFilter;
import org.springframework.security.web.util.matcher.AntPathRequestMatcher;
import javax.servlet.http.HttpServletRequest;
import javax.servlet.http.HttpServletResponse;
public class CaptchaAuthenticationFilter extends AbstractAuthenticationProcessingFilter {
public static final String SPRING_SECURITY_FORM_PHONE_KEY = "phone";
public static final String SPRING_SECURITY_FORM_CAPTCHA_KEY = "captcha";
public CaptchaAuthenticationFilter() {
super(new AntPathRequestMatcher("/clogin", "POST"));
}
public Authentication attemptAuthentication(HttpServletRequest request,
HttpServletResponse response) throws AuthenticationException {
if (!request.getMethod().equals("POST")) {
throw new AuthenticationServiceException(
"Authentication method not supported: " + request.getMethod());
}
String phone = obtainPhone(request);
String captcha = obtainCaptcha(request);
if (phone == null) {
phone = "";
}
if (captcha == null) {
captcha = "";
}
phone = phone.trim();
CaptchaAuthenticationToken authRequest = new CaptchaAuthenticationToken(
phone, captcha);
// Allow subclasses to set the "details" property
setDetails(request, authRequest);
return this.getAuthenticationManager().authenticate(authRequest);
}
@Nullable
protected String obtainCaptcha(HttpServletRequest request) {
return request.getParameter(SPRING_SECURITY_FORM_CAPTCHA_KEY);
}
@Nullable
protected String obtainPhone(HttpServletRequest request) {
return request.getParameter(SPRING_SECURITY_FORM_PHONE_KEY);
}
protected void setDetails(HttpServletRequest request,
CaptchaAuthenticationToken authRequest) {
authRequest.setDetails(authenticationDetailsSource.buildDetails(request));
}
}
```
這裡我們指定了攔截驗證碼登陸的請求為:
```http
POST /clogin?phone=手機號&captcha=驗證碼 HTTP/1.1
Host: localhost:8082
```
接下來就是配置了。
### 3.4 配置
我把所有的驗證碼認證的相關配置集中了起來,並加上了註釋。
```java
package cn.felord.spring.security.captcha;
import cn.hutool.core.util.RandomUtil;
import lombok.extern.slf4j.Slf4j;
import org.springframework.beans.factory.annotation.Qualifier;
import org.springframework.cache.annotation.CacheEvict;
import org.springframework.cache.annotation.CachePut;
import org.springframework.cache.annotation.Cacheable;
import org.springframework.context.annotation.Bean;
import org.springframework.context.annotation.Configuration;
import org.springframework.security.authentication.ProviderManager;
import org.springframework.security.core.authority.AuthorityUtils;
import org.springframework.security.core.userdetails.User;
import org.springframework.security.core.userdetails.UserDetailsService;
import org.springframework.security.web.authentication.AuthenticationFailureHandler;
import org.springframework.security.web.authentication.AuthenticationSuccessHandler;
import org.springframework.util.StringUtils;
import java.util.Collections;
import java.util.Objects;
/**
* 驗證碼認證配置.
*
* @author felord.cn
* @since 13 :23
*/
@Slf4j
@Configuration
public class CaptchaAuthenticationConfiguration {
private static final String SMS_CAPTCHA_CACHE = "captcha";
/**
* spring cache 管理驗證碼的生命週期.
*
* @return the captcha cache storage
*/
@Bean
CaptchaCacheStorage captchaCacheStorage() {
return new CaptchaCacheStorage() {
@CachePut(cacheNames = SMS_CAPTCHA_CACHE, key = "#phone")
@Override
public String put(String phone) {
return RandomUtil.randomNumbers(5);
}
@Cacheable(cacheNames = SMS_CAPTCHA_CACHE, key = "#phone")
@Override
public String get(String phone) {
return null;
}
@CacheEvict(cacheNames = SMS_CAPTCHA_CACHE, key = "#phone")
@Override
public void expire(String phone) {
}
};
}
/**
* 驗證碼服務.
* 兩個功能: 傳送和校驗.
*
* @param captchaCacheStorage the captcha cache storage
* @return the captcha service
*/
@Bean
public CaptchaService captchaService(CaptchaCacheStorage captchaCacheStorage) {
return new CaptchaService() {
@Override
public boolean sendCaptcha(String phone) {
String existed = captchaCacheStorage.get(phone);
if (StringUtils.hasText(existed)) {
// 節約成本的話如果快取存在可用的驗證碼 不再發新的驗證碼
log.warn("captcha code 【 {} 】 is available now", existed);
return false;
}
// 生成驗證碼並放入快取
String captchaCode = captchaCacheStorage.put(phone);
log.info("captcha: {}", captchaCode);
//todo 這裡自行完善呼叫第三方簡訊服務
return true;
}
@Override
public boolean verifyCaptcha(String phone, String code) {
String cacheCode = captchaCacheStorage.get(phone);
if (Objects.equals(cacheCode, code)) {
// 驗證通過手動過期
captchaCacheStorage.expire(phone);
return true;
}
return false;
}
};
}
/**
* 自行實現根據手機號查詢可用的使用者,這裡簡單舉例.
* 注意該介面可能出現多型。所以最好加上註解@Qualifier
*
* @return the user details service
*/
@Bean
@Qualifier("captchaUserDetailsService")
public UserDetailsService captchaUserDetailsService() {
// 驗證碼登陸後密碼無意義了但是需要填充一下
return username -> User.withUsername(username).password("TEMP")
//todo 這裡許可權 你需要自己注入
.authorities(AuthorityUtils.createAuthorityList("ROLE_ADMIN", "ROLE_APP")).build();
}
/**
* 驗證碼認證器.
*
* @param captchaService the captcha service
* @param userDetailsService the user details service
* @return the captcha authentication provider
*/
@Bean
public CaptchaAuthenticationProvider captchaAuthenticationProvider(CaptchaService captchaService,
@Qualifier("captchaUserDetailsService")
UserDetailsService userDetailsService) {
return new CaptchaAuthenticationProvider(userDetailsService, captchaService);
}
/**
* 驗證碼認證過濾器.
*
* @param authenticationSuccessHandler the authentication success handler
* @param authenticationFailureHandler the authentication failure handler
* @param captchaAuthenticationProvider the captcha authentication provider
* @return the captcha authentication filter
*/
@Bean
public CaptchaAuthenticationFilter captchaAuthenticationFilter(AuthenticationSuccessHandler authenticationSuccessHandler,
AuthenticationFailureHandler authenticationFailureHandler,
CaptchaAuthenticationProvider captchaAuthenticationProvider) {
CaptchaAuthenticationFilter captchaAuthenticationFilter = new CaptchaAuthenticationFilter();
// 配置 authenticationManager
ProviderManager providerManager = new ProviderManager(Collections.singletonList(captchaAuthenticationProvider));
captchaAuthenticationFilter.setAuthenticationManager(providerManager);
// 成功處理器
captchaAuthenticationFilter.setAuthenticationSuccessHandler(authenticationSuccessHandler);
// 失敗處理器
captchaAuthenticationFilter.setAuthenticationFailureHandler(authenticationFailureHandler);
return captchaAuthenticationFilter;
}
}
```
然而這並沒有完,你需要將`CaptchaAuthenticationFilter`配置到整個**Spring Security**的過濾器鏈中,這種看了胖哥教程的同學應該非常熟悉了。
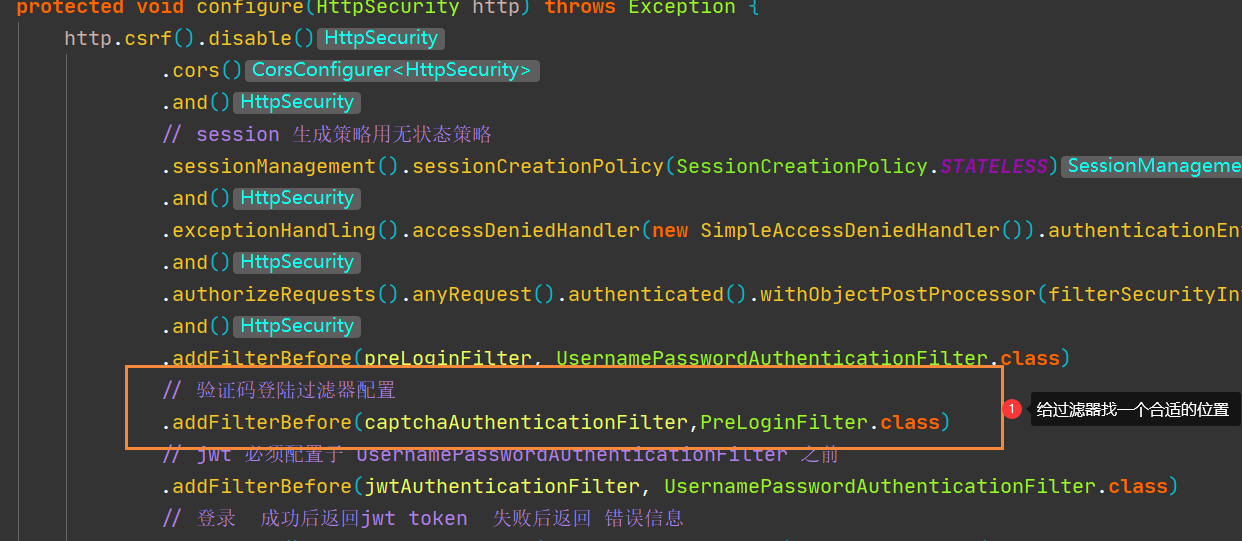
> **請特別注意:**務必保證登入介面和驗證碼介面可以匿名訪問,如果是動態許可權可以給介面新增 `ROLE_ANONYMOUS` 角色。
大功告成,測試如下:
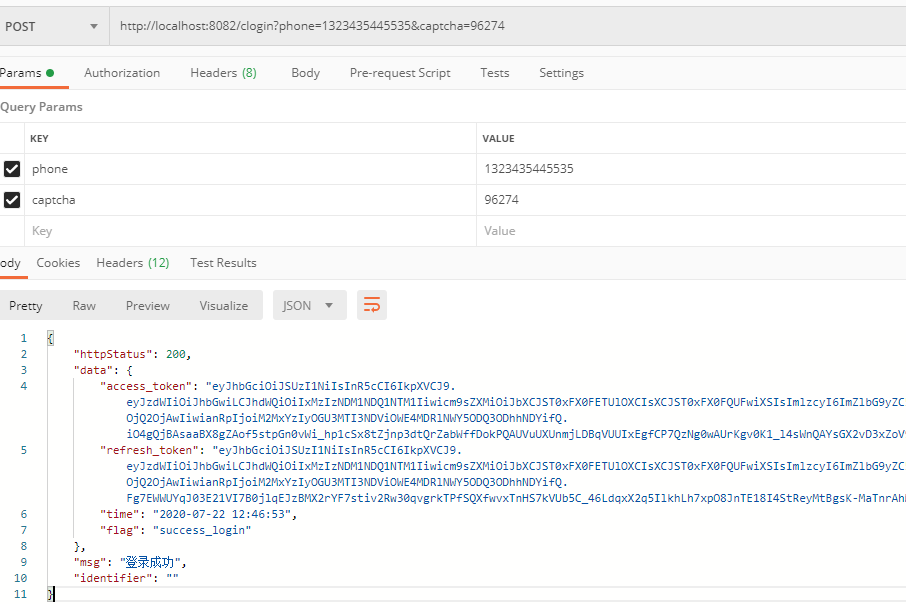
而且原先的登入方式不受影響。
## 4. 總結
通過對[UsernamePasswordAuthenticationFilter](https://mp.weixin.qq.com/s/bY6-gxRginVtrypigKs5Lw)和 [AuthenticationManager](https://mp.weixin.qq.com/s/B2JgdLMHtaCRPQsgSf2dXA)的系統學習,我們瞭解了**Spring Security**認證的整個流程,本文是對這兩篇的一個實際運用。相信看到這一篇後你就不會對前幾篇的圖解懵逼了,這也是理論到實踐的一次嘗試。DEMO 可以通過個人部落格felord.cn相關文章獲取。
`關注公眾號:Felordcn 獲取更多資訊`
[個人部落格:https://felord.cn](https://fe