
Kafka Broker原始碼:網路層設計
阿新 • • 發佈:2020-08-31
## 一、簡介
- 版本:1.1.1
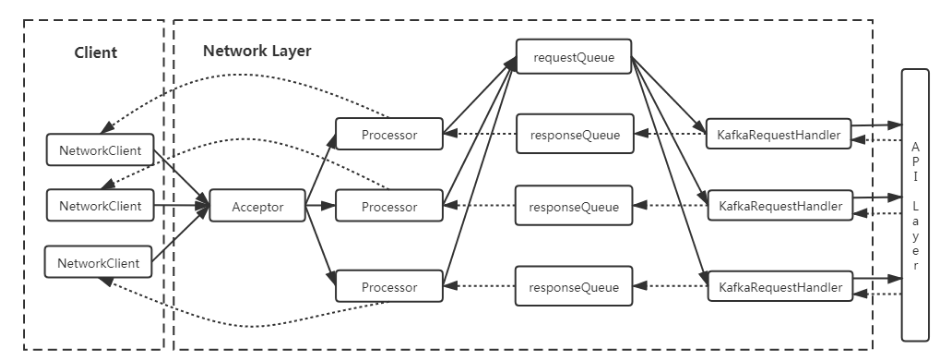
- Kafka網路層是Kafka所有請求的入口,網路模型為NIO實現的多Reactor多執行緒模型,核心功能是將接受連線、將TCP包轉換成Request,傳遞給API層,處理完後,傳送Response
## 二、整體架構
#### 2.1 核心邏輯
1. 1個Acceptor執行緒+N個Processor執行緒(network.threads)+M個Request Handle執行緒(io threads)
2. 多執行緒多Reactor模型,Acceptor獨佔一個selector,每個Processor有自己的selector
3. 每個Processor都有一個名為newConnections的ConcurrentLinkedQueue\[SocketChannel\](),Acceptor會round-robin輪詢Processor,將新的連線放入對應Processor的佇列裡
4. 每個Processor有自己的selector,監聽網路IO讀寫事件的發生
5. IO讀事件發生時,所有Processor會將組包完成後的Request放入RequestChannel中預設大小500的全域性ArrayBlockingQueue中
6. Request Handle完成kafka內部邏輯後,將Response寫到處理Request的Processor執行緒內的LinkedBlockingQueue中
7. IO寫事件發生時,將資料寫回Client
#### 2.2 核心類、方法介紹
```
SocketServer //kafka網路層的封裝
|-- Acceptor //Acceptor執行緒的封裝
|-- Processor //Processor執行緒的封裝
Selector //對java selector的封裝,封裝了核心的poll,selectionkeys的遍歷,事件的註冊等操作
KafkaChannel //對java SocketChannel的封裝,封裝是實際的讀寫IO操作
TransportLayer //對KafkaChannel遮蔽了底層是使用Plaintext不加密通訊還是ssl加密通訊
RequestChannel //和API層通訊的通道層,封裝了和API層通訊的Request、Response以及相應的通訊佇列
|-- Request //傳遞給API層的Requst
|-- Response //API層返回的Response
```
## 三、核心流程分析
#### 3.1 啟動流程
```
// 1. Kafka.scala
def main(args: Array[String]): Unit = {
val serverProps = getPropsFromArgs(args)
val kafkaServerStartable = KafkaServerStartable.fromProps(serverProps)
// 啟動Server
kafkaServerStartable.startup()
// 通過countDownLatch阻塞主執行緒,直到kafka關閉
kafkaServerStartable.awaitShutdown()
}
// 2. KafkaServerStartable.scala
private val server = new KafkaServer(staticServerConfig, kafkaMetricsReporters = reporters)
def startup() {
// 啟動Kafka Server
server.startup()
}
// 3. KafkaServer.scala
def startup() {
// 啟動socketServer,即Acceptor執行緒,processor會得到KafkaServer啟動完後延遲啟動
socketServer = new SocketServer(config, metrics, time, credentialProvider)
socketServer.startup(startupProcessors = false)
// 啟動各種其他元件
······
// 啟動socketServer中的Processor,開始進行網路IO
socketServer.startProcessors()
}
// 4. SocketServer.scala
def startup(startupProcessors: Boolean = true) {
this.synchronized {
// 建立並啟動Acceptor,建立Processor
createAcceptorAndProcessors(config.numNetworkThreads, config.listeners)
if (startupProcessors) {
// 是否立即啟動Processor,預設為false
startProcessors()
}
}
}
private def createAcceptorAndProcessors(processorsPerListener: Int,
endpoints: Seq[EndPoint]): Unit = synchronized {
val sendBufferSize = config.socketSendBufferBytes
val recvBufferSize = config.socketReceiveBufferBytes
val brokerId = config.brokerId
// 處理每個Endpoint,一般就是一個
endpoints.foreach { endpoint =>
val listenerName = endpoint.listenerName
val securityProtocol = endpoint.securityProtocol
// 建立Acceptor執行緒
val acceptor = new Acceptor(endpoint, sendBufferSize, recvBufferSize, brokerId, connectionQuotas)
// 這裡只是建立Processor並不啟動
addProcessors(acceptor, endpoint, processorsPerListener)
// 非daemon模式啟動執行緒
KafkaThread.nonDaemon(s"kafka-socket-acceptor-$listenerName-$securityProtocol-${endpoint.port}", acceptor).start()
// 阻塞直至執行緒啟動成功
acceptor.awaitStartup()
acceptors.put(endpoint, acceptor)
}
}
def startProcessors(): Unit = synchronized {
// 遍歷所有Processor並啟動
acceptors.values.asScala.foreach { _.startProcessors() }
}
private[network] def startProcessors(): Unit = synchronized {
// 確保只啟動一次
if (!processorsStarted.getAndSet(true)) {
startProcessors(processors)
}
}
// 非Daemon模式啟動Processor
private def startProcessors(processors: Seq[Processor]): Unit = synchronized {
processors.foreach { processor =>
KafkaThread.nonDaemon(s"kafka-network-thread-$brokerId-${endPoint.listenerName}-${endPoint.securityProtocol}-${processor.id}",
processor).start()
}
}
```
KafkaServer啟動時,初始化並啟動SocketServer
1. 建立並執行Acceptor執行緒,從全連線佇列中獲取連線,並round-robin交給Processor處理
2. 所有元件啟動完成後,會啟動一定數目的Processor,實際管理SocketChannel進行IO讀寫
#### 3.2 Acceptor.run流程
> Acceptor執行緒對一個Endpoint只啟動一個,核心程式碼位於Socketserver.scala中的Acceptor類中,此類實現了runnable方法,會由單獨執行緒執行
```
def run() {
// 註冊
serverChannel.register(nioSelector, SelectionKey.OP_ACCEPT)
var currentProcessor = 0
while (isRunning) {
val ready = nioSelector.select(500)
if (ready > 0) {
val keys = nioSelector.selectedKeys()
val iter = keys.iterator()
while (iter.hasNext && isRunning) {
val key = iter.next
// 處理完需要從集合中移除掉
iter.remove()
// round-robin選一個processor
val processor = synchronized {
currentProcessor = currentProcessor % processors.size
processors(currentProcessor)
}
// channel初始化,放入對應processor的newConnection佇列
accept(key, processor)
// round robin to the next processor thread, mod(numProcessors) will be done later
currentProcessor = currentProcessor + 1
}
}
}
}
def accept(key: SelectionKey, processor: Processor) {
val serverSocketChannel = key.channel().asInstanceOf[ServerSocketChannel]
val socketChannel = serverSocketChannel.accept()
connectionQuotas.inc(socketChannel.socket().getInetAddress)
// channel初始化
socketChannel.configureBlocking(false)
socketChannel.socket().setTcpNoDelay(true)
socketChannel.socket().setKeepAlive(true)
if (sendBufferSize != Selectable.USE_DEFAULT_BUFFER_SIZE)
socketChannel.socket().setSendBufferSize(sendBufferSize)
// 將連線放入processor的新連線佇列
processor.accept(socketChannel)
}
def accept(socketChannel: SocketChannel) {
// accept將新連線放入processor的ConcurrentLinkedQueue中
newConnections.add(socketChannel)
// 喚醒該processor的多路複用器
wakeup()
}
```
Acceptor做的事情很簡單,概括起來就是監聽連線,將新連線輪詢交給processor:
1. 使用多路複用器監聽全連線佇列裡的連線
2. 有連線到達後,round-robin輪詢processors陣列,選擇一個processor
3. 初始化socketChannel,開啟keepalive、禁用nagle演算法、設定send buffer
4. 將socketchannel放入選中的processor的新連線佇列裡
#### 3.3 Processor.run流程
> Processor執行緒根據num.network.threads啟動對應的執行緒數,從每個Processor獨佔的新連線佇列中取出新的連線並初始化並註冊IO事件。每個Processor有單獨的selector,監聽IO事件,讀事件組包後寫入全域性requestQueue,寫事件從每個Processor獨佔的responseQueue中獲取,再寫回Client。
```
override def run() {
while (isRunning) {
// setup any new connections that have been queued up
// acceptor執行緒會將新來的連線對應的SocketChannel放入佇列,此時消費並向selector註冊這些連線,註冊讀IO事件
configureNewConnections()
// register any new responses for writing
// 從responseQueue中讀取準備傳送給client的response,封裝成send放入channel中,並註冊IO寫事件
processNewResponses()
/**
* 1. 發生OP_READ事件的channel,若包全部到達,則形成NetworkReceives寫入到completedReceives(每個channel只會有一條在completedReceives中)
* 2. 發生OP_WRITE事件的channel,會將channel中暫存的send發出,若傳送完成則會寫入completedSends
*/
poll()
// 將網路層組包完成後的NetworkReceive轉換成Request放入到requestQueue中(後面IO Thread讀取)同時mute channel(登出OP_READ事件),保證一個channel同時只有一個請求在處理
processCompletedReceives()
// unmute channel(註冊OP_READ事件),之前的request處理完成,此channel開始接受下一個request
processCompletedSends()
// 處理關閉的連線,維護些集合,更新統計資訊
processDisconnected()
}
}
```
Processor run方法的核心邏輯做了很好的封裝,從run方法來看執行緒會一直迴圈處理以下6個邏輯:
1. 從newConenctions佇列裡取出新的連線,初始化socketChannel,註冊OP_READ事件
2. 遍歷responseQueue所有RequestChannel.Response,封裝寫入KafkaChannel,做為該Channel下一個待發送的Send,然後在對應的SelectionKey上註冊OP_WRITE事件
3. poll方法執行核心的NIO邏輯,呼叫select方法,遍歷有事件發生的selectionKeys
- 發生OP_READ事件的channel,若包全部到達,則形成NetworkReceives寫入到completedReceives(每個channel只會有一條在completedReceives中)
- 發生OP_WRITE事件的channel,會將channel中暫存的send發出,若傳送完成則會寫入completedSends
4. 遍歷completedReceives中的結果,封裝成Request,寫入全域性requestQueue並取消Channel的OP_READ事件監聽,待後續IO Thread處理完Response傳送成功後,才會重新註冊OP_READ
5. 遍歷completedSends中的結果,向selector重新註冊對該Channel的OP_READ事件
6. 遍歷各種原因down掉的connection,做一些收尾工作,清理一些狀態
以下是每一步具體的原始碼:
##### 3.3.1 configureNewConnections
> 用於處理Acceptor新交給此Processor的連線
```
// SocketChannel.scala
private def configureNewConnections() {
while (!newConnections.isEmpty) {
val channel = newConnections.poll()
// 新的連線註冊IO讀事件,connectionId就是ip+port形成的字串唯一標誌連線使用
selector.register(connectionId(channel.socket), channel)
}
}
// Selector.java
public void register(String id, SocketChannel socketChannel) throws IOException {
// 確保沒有重複註冊
ensureNotRegistered(id);
// 建立kafkachannel並attach到selectkey上
registerChannel(id, socketChannel, SelectionKey.OP_READ);
}
private SelectionKey registerChannel(String id, SocketChannel socketChannel, int interestedOps) throws IOException {
// 向selector註冊
SelectionKey key = socketChannel.register(nioSelector, interestedOps);
// 建立kafka channel並attach到SelectionKey上
KafkaChannel channel = buildAndAttachKafkaChannel(socketChannel, id, key);
this.channels.put(id, channel);
return key;
}
```
主要完成一些初始化工作
1. 遍歷newConnections佇列,從中取出新連線
2. 向Selector註冊IO讀事件
3. 建立KafkaChannel用於封裝SocketChannel
4. 將KafkaChannel attach到對應的SelectionKey上
##### 3.3.2 processNewResponses
> 處理已經處理完的Request的Response
```
// SocketServer.scala
private def processNewResponses() {
var curr: RequestChannel.Response = null
// 讀取responseQueue,處理所有返回
while ({curr = dequeueResponse(); curr != null}) {
// 理論上每個channel應該只會被遍歷一次,因為一個連線上同時只會有一個Request正在處理
val channelId = curr.request.context.connectionId
curr.responseAction match {
case RequestChannel.NoOpAction =>
// There is no response to send to the client, we need to read more pipelined requests
// that are sitting in the server's socket buffer
updateRequestMetrics(curr)
trace("Socket server received empty response to send, registering for read: " + curr)
// 空請求說明此請求處理完了,此時unmute此KafkaChannel,開始接受請求
openOrClosingChannel(channelId).foreach(c => selector.unmute(c.id))
case RequestChannel.SendAction =>
val responseSend = curr.responseSend.getOrElse(
throw new IllegalStateException(s"responseSend must be defined for SendAction, response: $curr"))
// 注意這裡只是將responseSend註冊為KafkaChannel的待發送Send並向SelectionKey註冊OP_WRITE事件
sendResponse(curr, responseSend)
case RequestChannel.CloseConnectionAction =>
updateRequestMetrics(curr)
trace("Closing socket connection actively according to the response code.")
close(channelId)
}
}
protected[network] def sendResponse(response: RequestChannel.Response, responseSend: Send) {
val connectionId = response.request.context.connectionId
// Invoke send for closingChannel as well so that the send is failed and the channel closed properly and
// removed from the Selector after discarding any pending staged receives.
// `openOrClosingChannel` can be None if the selector closed the connection because it was idle for too long
if (openOrClosingChannel(connectionId).isDefined) {
selector.send(responseSend)
inflightResponses += (connectionId -> response)
}
}
// Selector.java
public void send(Send send) {
String connectionId = send.destination();
KafkaChannel channel = openOrClosingChannelOrFail(connectionId);
// 這裡只是設定channel的send,並沒有實際傳送
channel.setSend(send);
}
public void setSend(Send send) {
// 同時只能有一個send存在
if (this.send != null)
throw new IllegalStateException("Attempt to begin a send operation with prior send operation still in progress, connection id is " + id);
// 設定send
this.send = send;
// transportLayer其實就是對不加密通訊、加密通訊的封裝,增加對OP_WRITE事件的監聽
this.transportLayer.addInterestOps(SelectionKey.OP_WRITE);
}
public void addInterestOps(int ops) {
key.interestOps(key.interestOps() | ops);
}
```
核心邏輯是從responseQueue中獲取待發送的response,並作為KafkaChannel下一個待發送Send,再註冊OP_WRITE事件
1. 遍歷responseQueue,獲取已經處理完的Response
2. 判斷Response是否為空,為空,unmute channel,註冊OP_READ,等待下一個Request,不為空呼叫sendResponse傳送Response
3. 將當前待發送Response封裝成Send,繫結到KafkaChannel上,**一次只能有一個待發送Send(一次也只處理一個Request**)
4. 註冊OP_WRITE事件,事件發生時,才實際傳送當前Send
##### 3.3.3 poll
> 實際呼叫select,並對發生的IO事件進行處理的方法
```
// SocketServer.scala
private def poll() {
selector.poll(300)
}
// selector.java
public void poll(long timeout) throws IOException {
if (timeout < 0)
throw new IllegalArgumentException("timeout should be >= 0");
boolean madeReadProgressLastCall = madeReadProgressLastPoll;
clear();
boolean dataInBuffers = !keysWithBufferedRead.isEmpty();
if (hasStagedReceives() || !immediatelyConnectedKeys.isEmpty() || (madeReadProgressLastCall && dataInBuffers))
timeout = 0;
if (!memoryPool.isOutOfMemory() && outOfMemory) {
//we have recovered from memory pressure. unmute any channel not explicitly muted for other reasons
log.trace("Broker no longer low on memory - unmuting incoming sockets");
for (KafkaChannel channel : channels.values()) {
if (channel.isInMutableState() && !explicitlyMutedChannels.contains(channel)) {
channel.unmute();
}
}
outOfMemory = false;
}
/* check ready keys */
long startSelect = time.nanoseconds();
int numReadyKeys = select(timeout);
long endSelect = time.nanoseconds();
this.sensors.selectTime.record(endSelect - startSelect, time.milliseconds());
// 有IO事件發生或有immediatelyConnect發生或上次IO事件發生時channel資料沒有讀完
if (numReadyKeys > 0 || !immediatelyConnectedKeys.isEmpty() || dataInBuffers) {