vue-element-admin改造接入後臺,搭建有來商城youlai-mall後臺前端管理平臺
阿新 • • 發佈:2020-09-07
## **一. 前言**
本篇基於[有來商城youlai-mall ](https://github.com/hxrui/youlai-mall)微服務專案,搭建後臺前端管理平臺,技術選型希望通過本篇文章你可以,技術解決方案選擇了vue-element-admin。希望通過本篇文章你可以vue-element-admin工程改造接入到自己的平臺。
## **二. 工程改造**
### **1.下載vue-element-admin**
下載 vue-element-admin的i18n分支版本,這樣可以支援中文,地址:https://github.com/PanJiaChen/vue-element-admin/tree/i18n,本次下載的版本為v4.4.O。
### **2.啟動專案**
匯入vue-element-admin至IDEA,執行npm install,如果安裝慢或網路差的情況下請參考[安裝cnpm設定npm淘寶映象源](https://www.cnblogs.com/fly4j/p/13618844.html)這篇文章安裝cnpm,然後執行cnpm install安裝依賴包。
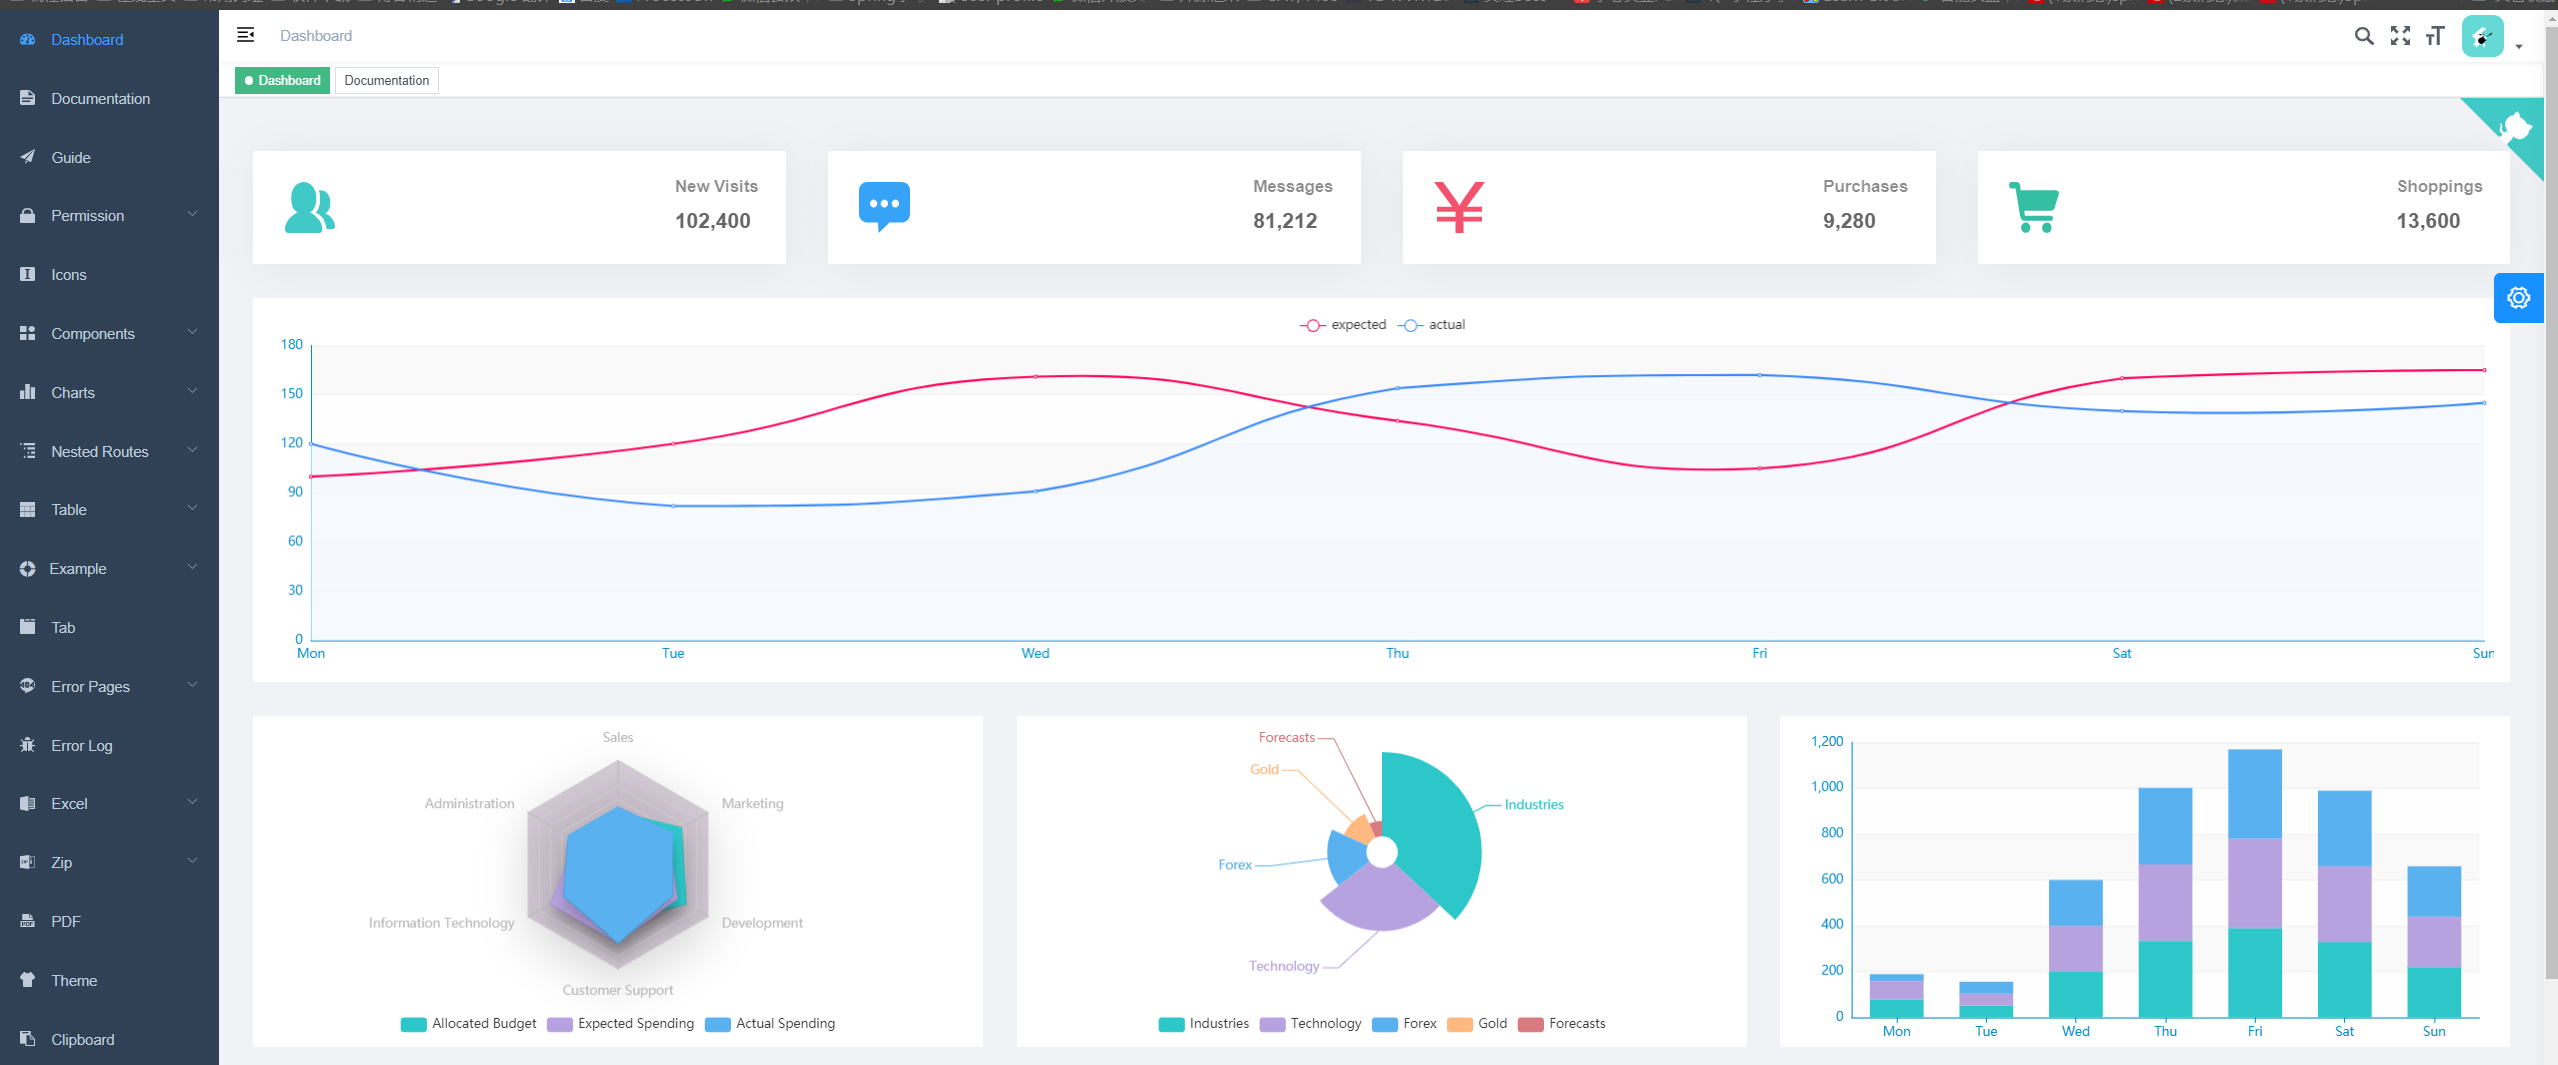
依賴包安裝完成之後,執行npm run dev本地啟動專案,瀏覽器自動會開啟平臺網址
### **3.工程改造**
vue-element-admin專案預設走的是本地mock介面資料,那怎麼接入到自己平臺的後臺介面呢?。
#### **3.1 mock介面資訊**
先看下vue-element-admin登入進入平臺所需要的介面資訊,如下圖所示,是有兩個關鍵介面

介面一:/user/login 登入認證獲取token
```
{
"code": 20000,
"data": {
"token": "admin-token"
}
}
```
介面二:/user/info?token=admin-token 根據token獲取使用者資訊
```
{
"code": 20000,
"data": {
"roles": ["admin"],
"introduction": "I am a super administrator",
"avatar": "https://wpimg.wallstcn.com/f778738c-e4f8-4870-b634-56703b4acafe.gif",
"name": "Super Admin"
}
}
```
#### **3.2 後臺介面資訊**
關於後臺介面首先對[youlai-mall](https://github.com/hxrui/youlai-mall)開源專案有些瞭解,這裡因為篇幅不做過多的介紹,詳情請拉取下專案,依次啟動nacos-server,youlai-admin,youlai-auth,youlai-gateway,專案啟動有啥問題請下方留言,見到第一時間會回覆。
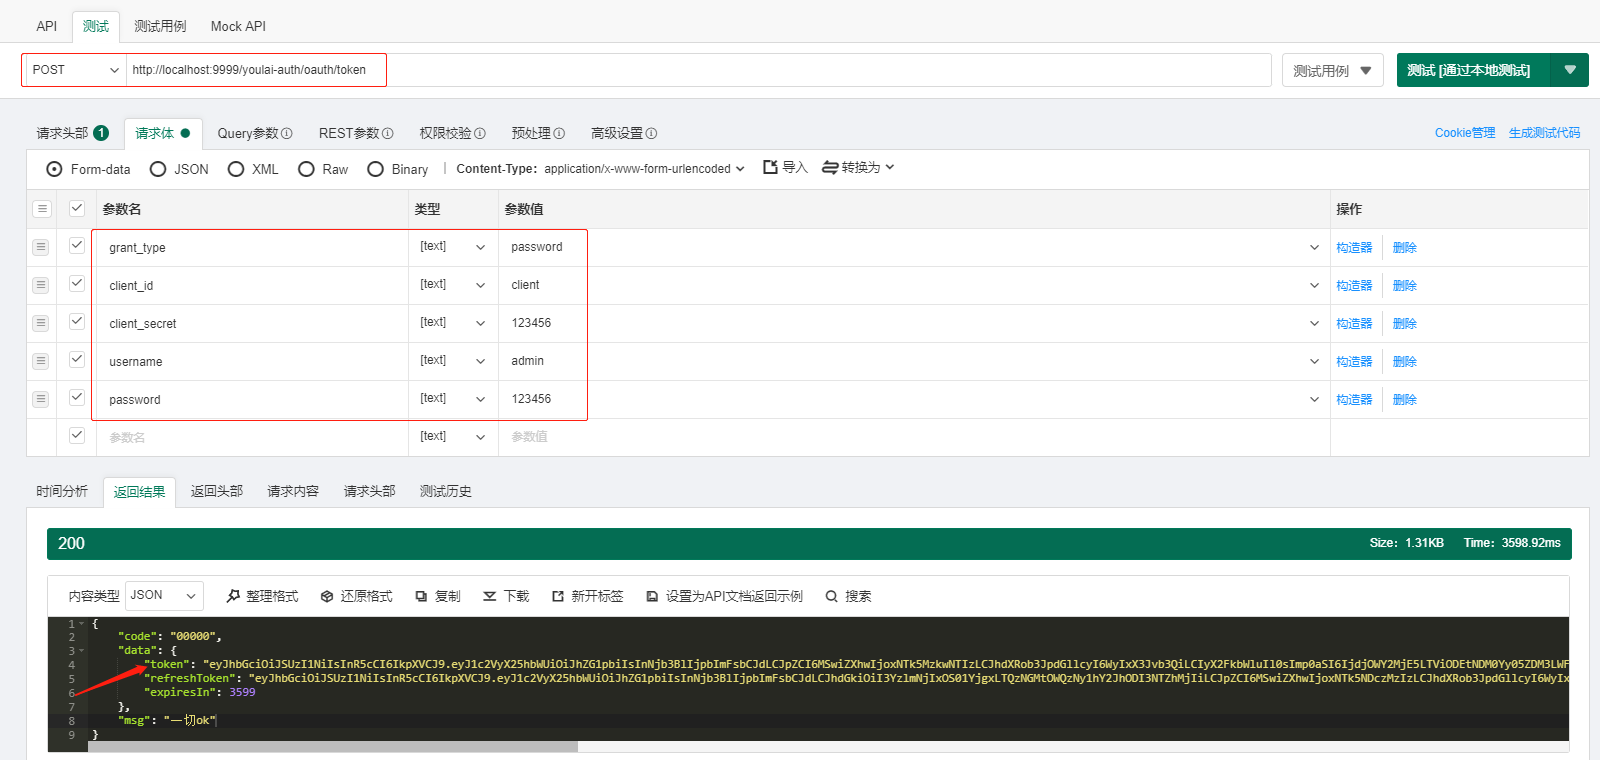
**介面一:登入認證獲取token**
youlai-mall整合SpringCloud Gateway+Spring Security OAuth2+JWT技術實現的登入認證介面,呼叫資訊如下:
http://localhost:9999/youlai-auth/oauth/token
**介面二:獲取使用者資訊**
http://localhost:9999/youlai-admin/users/current
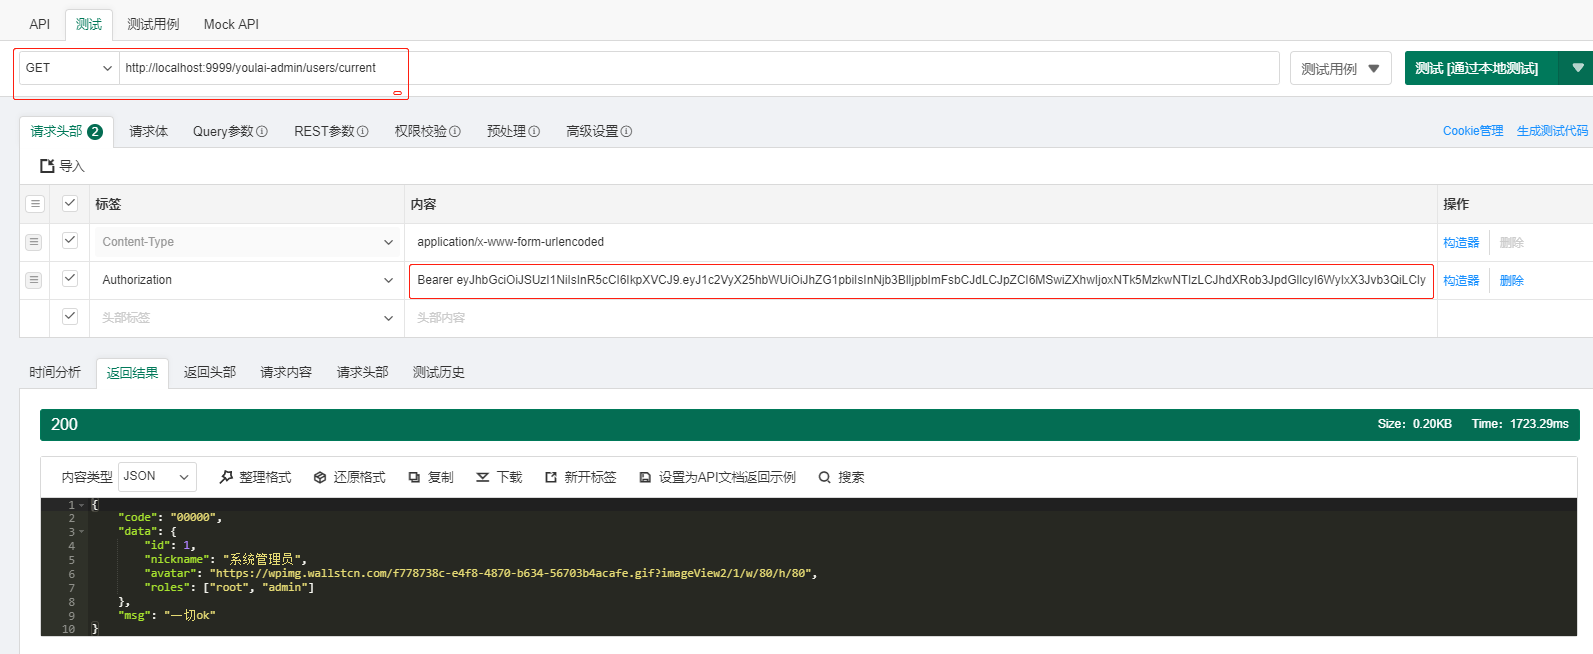
以上就是兩個介面的請求以及響應資訊,暫先可以不用顧及其內部實現。本篇側重接入後臺youlai-mall,最好拉取youlai-mall程式碼在本地啟動跑一下流程。
如果想自定義介面,只要按照特定資料格式返回即可。
#### **3.3 vue-element-admin移除mock**
**1. vue.config.js**
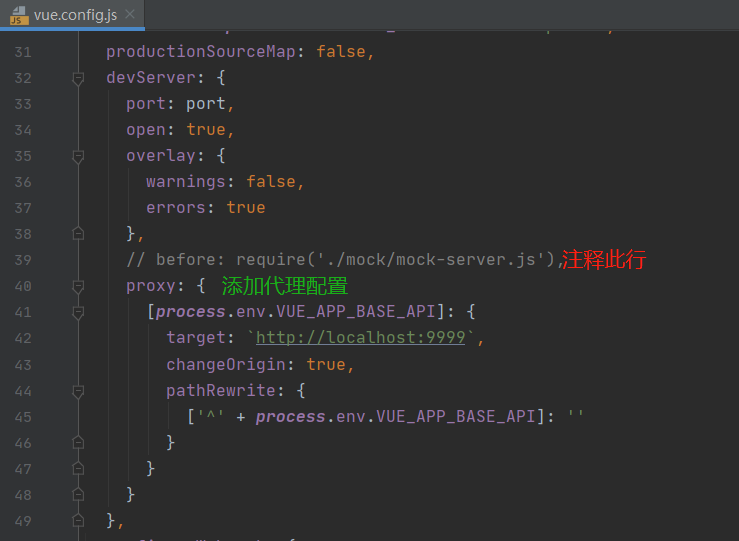
**至於為什麼新增配置devServer.proxy進行代理轉發?**
因為前後端分離,就算是本地開發,也會因為埠不同而滿足 跨域請求條件的。
一般跨域是瀏覽器禁止的,伺服器端之間並不禁止跨域(可以配置禁止)。
配置好代理之後,在專案啟動時本地會啟動一個node服務,瀏覽器先將請求傳送到本地node服務,然後經由node服務將請求代理轉發到後臺伺服器,這樣就可以避開瀏覽器禁止跨域的問題。
具體原理詳情可參照:[node中跨域代理 proxyTable的原理是什麼?](https://segmentfault.com/q/1010000014042635#comment-area)
**2. src/main.js**
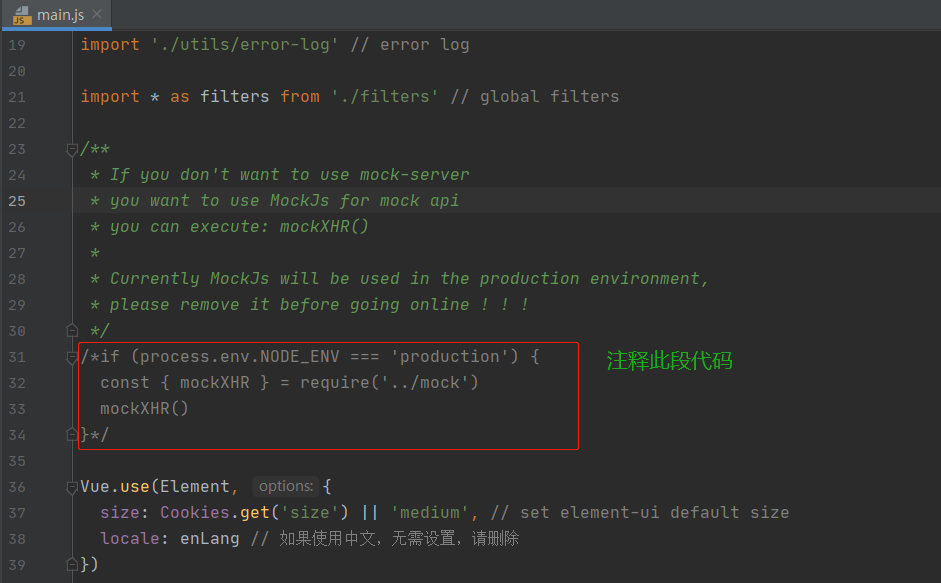
#### **3.4 vue-element-admin接入後臺介面**
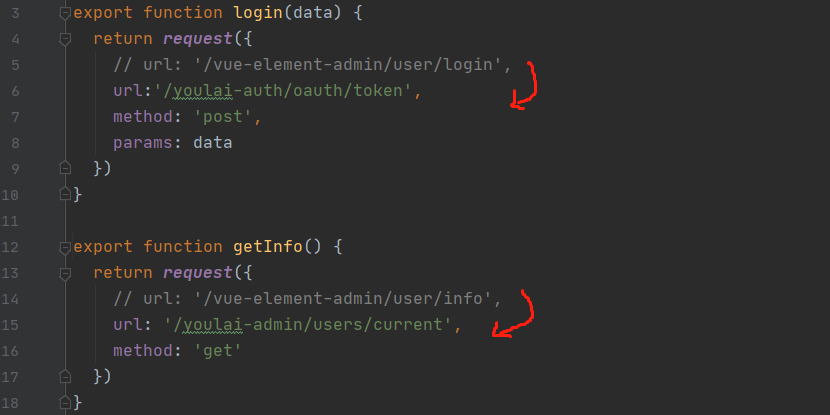
**1. src/api/user.js**
**介面URL替換:** 完成1,2步驟即移除了mock接入到了後臺,修改登入認證和獲取使用者資訊兩個介面的後臺請求路徑,替換後如下圖:
**2. src/store/modules/user.js**
**認證介面引數:** 首先看下登入入口: src/views/login/index.vue的handleLogin方法
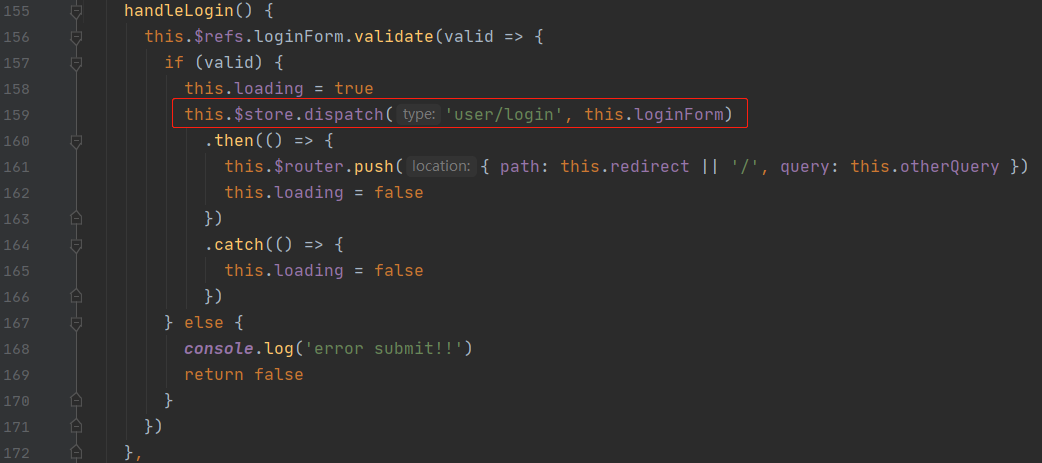
this.$store.dispatch是Vuex狀態管理中呼叫方式,具體操作是分發actions->呼叫mutations->改變state,其中action包含了非同步操做,這是action與mutation的區別,也是dispatch和commit的區別。
```
// dispatch 非同步操作
this.$store.dispatch('actions的方法',args)
// commit 同步操作
this.$store.commit('mutations的方法',args)
```
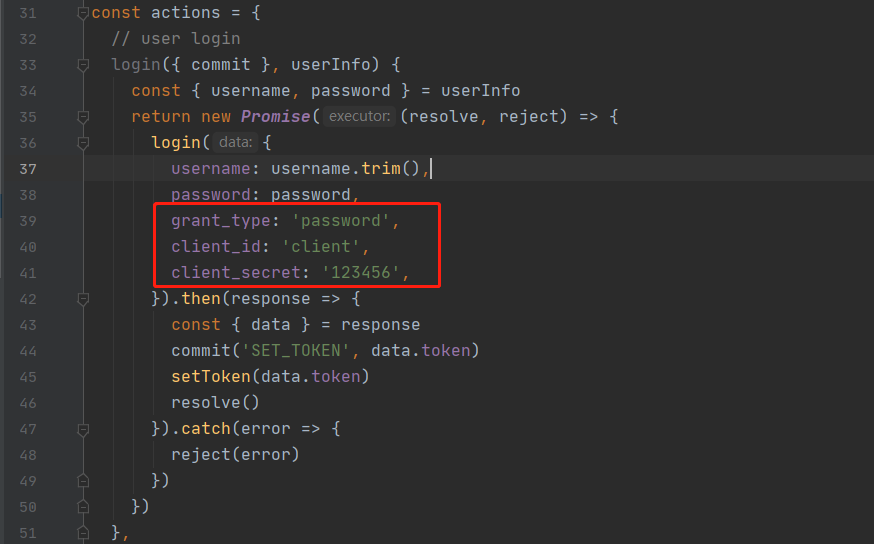
明白this.$store.dispatch是做actions的分發,分發路徑是/user/login,找到user模組檔案src/store/modules/user.js,在檔案中actions找到login方法,詳情如下圖:
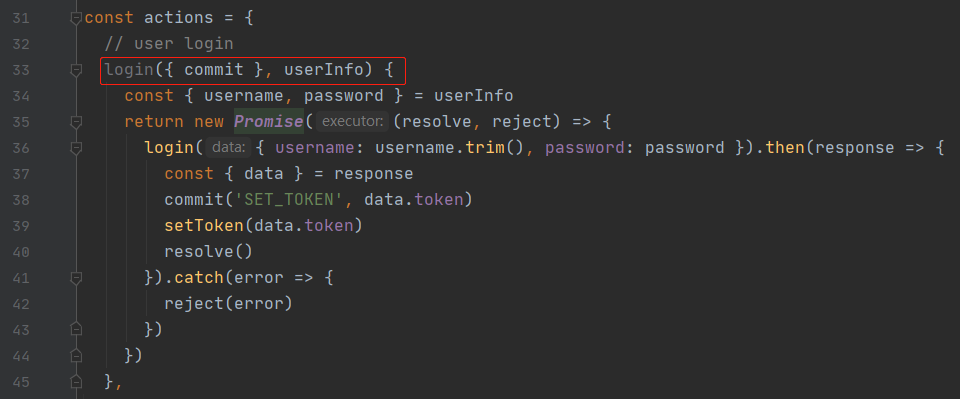
對比3.2後臺介面,發現OAuth2認證還少了3個引數:
引數值| 引數名|引數描述
---|---|---
grant_type |password | OAuth2授權方式:密碼式
client_id | client|客戶端ID
client_secret | 123456 | 客戶端金鑰
補全引數後如下:
**3.src/utils/request.js**
修改資料上傳預設為JSON格式
```
axios.defaults.headers['Content-Type'] = 'application/json;charset=utf-8'
```

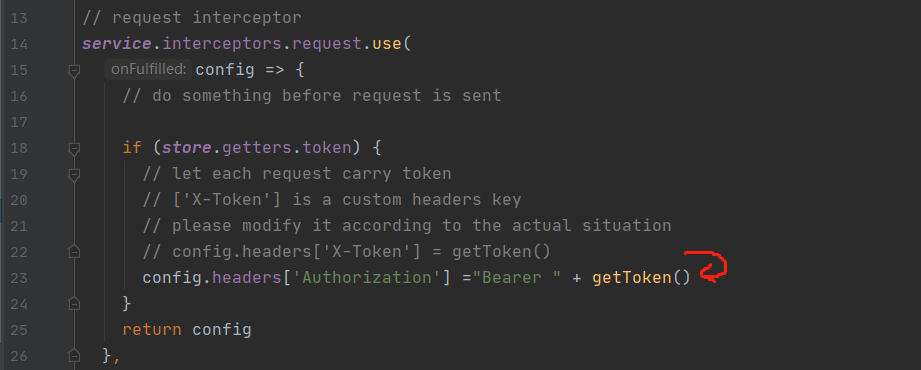
修改請求頭
修改成功響應狀態碼

#### **3.5 接入後臺登入測試**
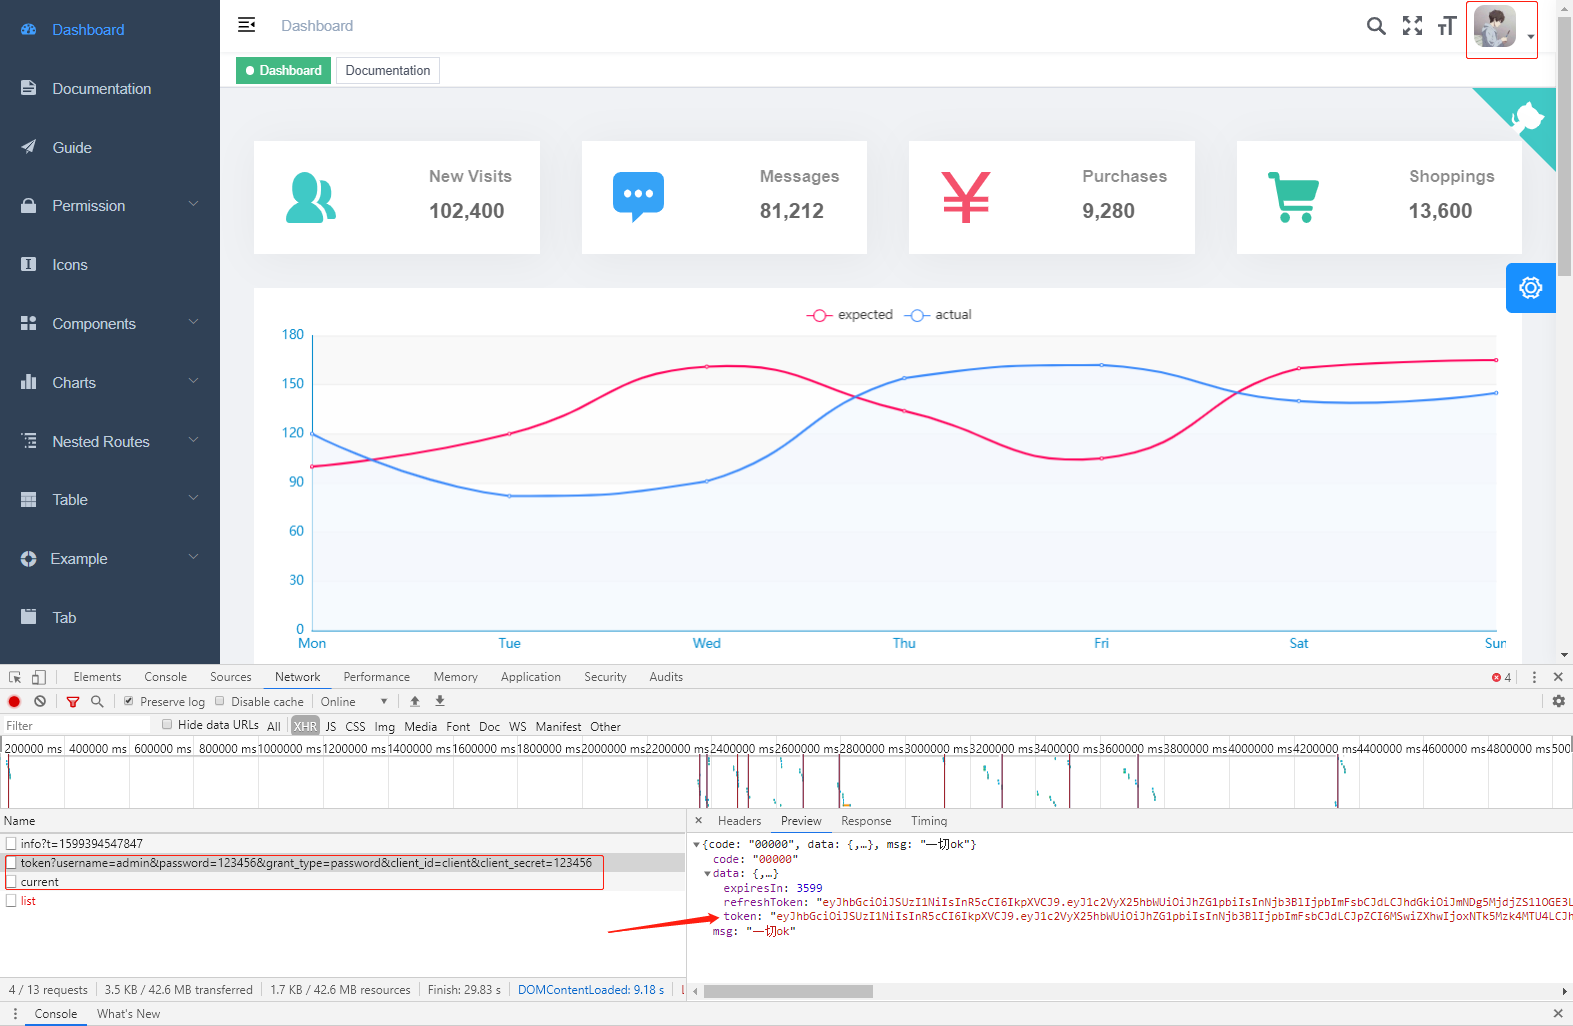


到這裡就完成了vue-element-admin移除mock接入到後臺的功能
## **三. 搭建有來商城管理平臺**
通過上面步驟,我們已成功改造vue-element-admin接入到後臺介面,接下來我們以管理平臺的使用者管理功能為例講述如何使用vue-element-admin搭建我們自己的管理平臺。
**1. 刪除多餘檔案**
mock資料夾刪除
views下除了dashboard、error-page、login、profile、redirect之外的資料夾全部刪除
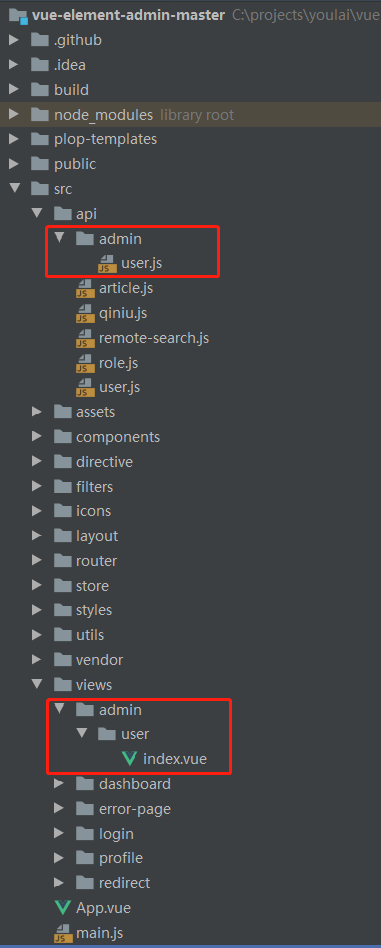
**2. 引入使用者管理**
新增user.js介面、user/index.vue使用者頁面,完整程式碼文章結尾獲取,結構如下圖所示:
**3. 路由配置**
修改路由配置檔案 src/router/index.js,其中有靜態路由constantRoutes和許可權路由asyncRoutes需要修改。
**靜態路由刪減保留如下:**
```
export const constantRoutes = [
{
path: '/redirect',
component: Layout,
hidden: true,
children: [
{
path: '/redirect/:path(.*)',
component: () => import('@/views/redirect/index')
}
]
},
{
path: '/login',
component: () => import('@/views/login/index'),
hidden: true
},
{
path: '/auth-redirect',
component: () => import('@/views/login/auth-redirect'),
hidden: true
},
{
path: '/404',
component: () => import('@/views/error-page/404'),
hidden: true
},
{
path: '/401',
component: () => import('@/views/error-page/401'),
hidden: true
},
{
path: '/',
component: Layout,
redirect: '/dashboard',
children: [
{
path: 'dashboard',
component: () => import('@/views/dashboard/index'),
name: 'Dashboard',
meta: { title: 'Dashboard', icon: 'dashboard', affix: true }
}
]
},
{
path: '/profile',
component: Layout,
redirect: '/profile/index',
hidden: true,
children: [
{
path: 'index',
component: () => import('@/views/profile/index'),
name: 'Profile',
meta: { title: 'Profile', icon: 'user', noCache: true }
}
]
}
]
```
**許可權路由刪減,並新增使用者管理路由如下:**
```
export const asyncRoutes = [
{
path: '/admin',
component: Layout,
redirect: '/admin/user',
alwaysShow: true, // will always show the root menu
name: 'Admin',
meta: {
title: '系統管理',
icon: 'documentation',
roles: ['admin', 'editor'] // you can set roles in root nav
},
children: [
{
path: 'user',
component: () => import('@/views/admin/user'),
name: 'User',
meta: {
title: '使用者管理',
roles: ['admin'] // or you can only set roles in sub nav
}
}
]
},
// 404 page must be placed at the end !!!
{ path: '*', redirect: '/404', hidden: true }
]
```
**4. 驗證使用者管理**
執行npm run dev再次開啟系統,登入後介面如下:
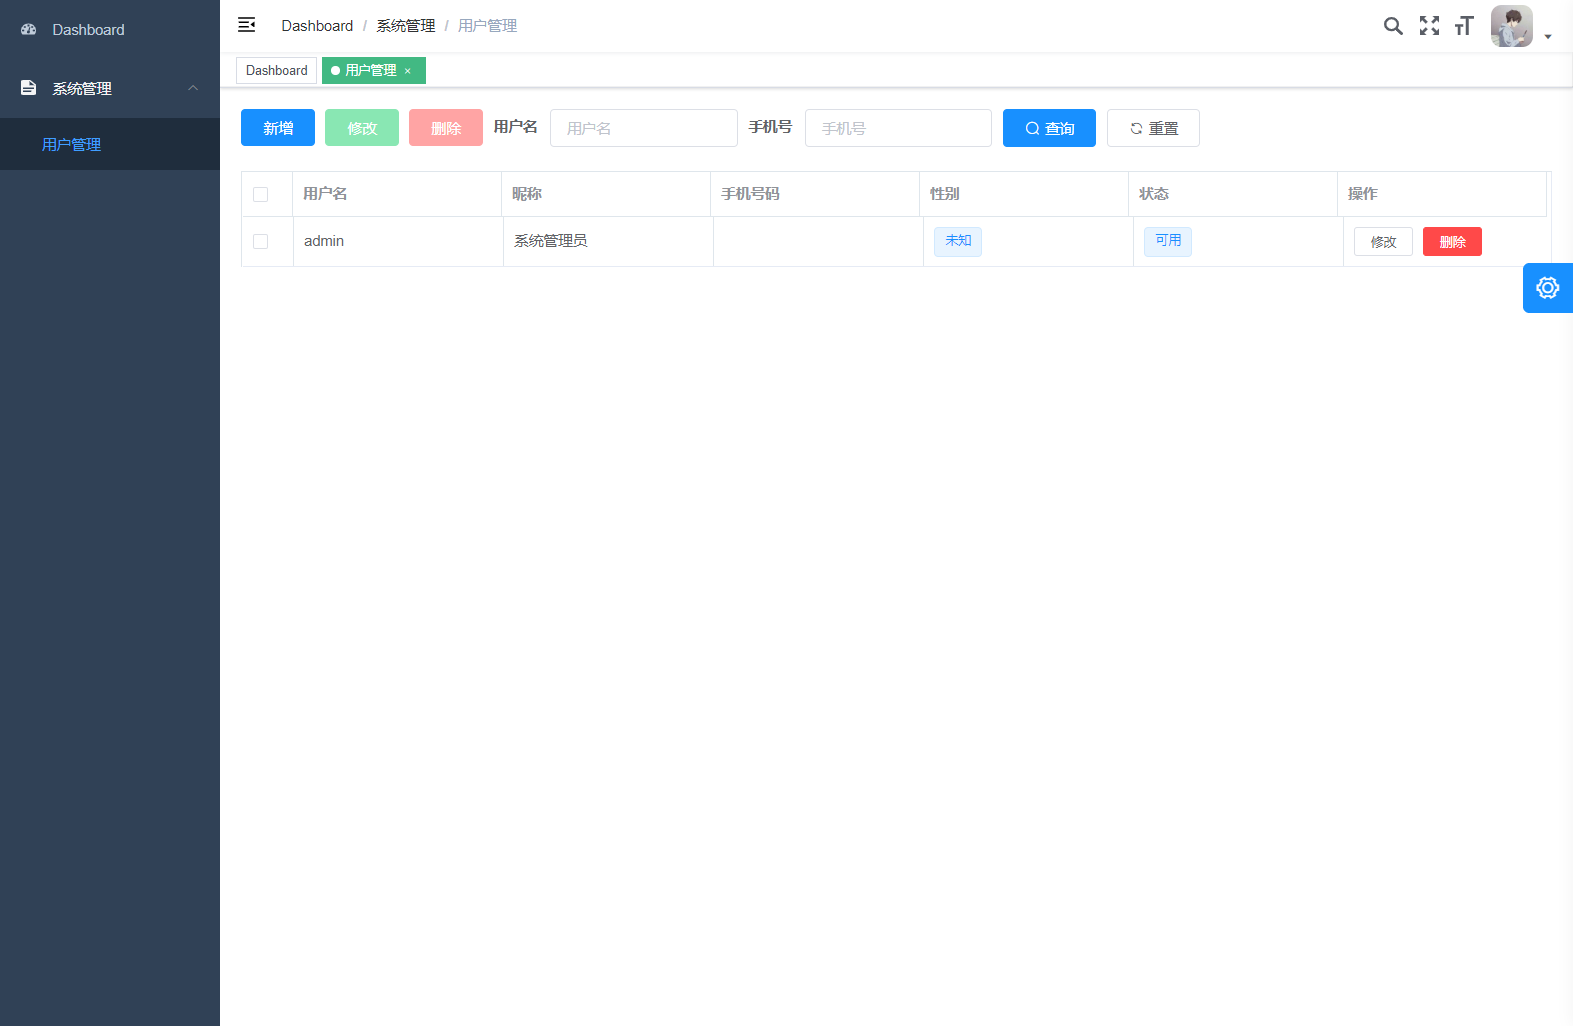
可以看到,管理平臺中的使用者管理已成功整合到我們改造後的vue-element-admin工程,其他功能搭建按照同樣方法即可。
## **四. 結語**
本篇就如何改造vue-element-admin接入到後臺實現youlai-mall後臺前端管理平臺的搭建。其中涉及的前後端分離解決瀏覽器跨域問題的解決原理,vuex、vue-router的應用,覺得很有意義去親手實踐一下,如果有問題下方留言即可。最後附上完整程式碼下載地址:
[youlai-mall](https://github.com/hxrui/youlai-mall.git)
[youlai-mall-admin-web](https://github.com/hxrui/youlai-mall-admin-w
