
初識 Istio - 服務網格管理工具
阿新 • • 發佈:2020-10-04
## What is a service mesh(服務網格)?
微服務在國內流行已經多年了,大多數公司選擇了基於容器化技術( Docker )以及容器編排管理平臺 ( Kubernetes )落地微服務 ,然而這僅僅是個開始,微服務的發展沒有停滯。
相信在調研微服務開發框架的過程中,會發現成熟的框架如 Spring Cloud ,Dubbo,Microprofile,它們都提供了諸如服務發現、負載均衡、故障恢復、度量和監控等方面的解決方案,但是都不同程度的產生了很多業務無關的程式碼。運維層面,在 Kubernetes 平臺上要實現一些常見需求很不容易,例如 A/B 測試、金絲雀釋出、速率限制、訪問控制和端到端認證等。
2016 年開發 Linkerd 的 Buoyant 公司提出,要在開發和運維中間增加一層基礎設施,提供對網路流量的洞察和操作控制的能力,包括服務註冊發現、負載均衡、故障恢復、監控、許可權控制等等,而這層基礎設施就稱作服務網格。
## What is Istio?
Istio 是谷歌對於服務網格的實現,支援 Kubernetes,Consul,VMs等多種環境,並作為透明的一層接入到現有的微服務應用程式裡,提供瞭如下功能:
- 為 HTTP、gRPC、WebSocket 和 TCP 流量自動負載均衡。
- 通過豐富的路由規則、重試、故障轉移和故障注入對流量行為進行細粒度控制。
- 可插拔的策略層和配置 API,支援訪問控制、速率限制和配額。
- 叢集內(包括叢集的入口和出口)所有流量的自動化度量、日誌記錄和追蹤。
- 在具有強大的基於身份驗證和授權的叢集中實現安全的服務間通訊。
## How istio work?
Istio 的架構圖如下,istio 服務網格,分為控制面和資料面,所有流量都從 istio 的 ingress 進,從 egress出,以 Kubernetes 為例,上圖的兩個 Service 對應 Kubernetes 中的 Pod,istio 使用 sidecar 模式,給每個 Pod 加了一層代理,實際請求通通路由到代理,滿足條件才路由給 Pod,至於控制面很簡單,就是把路由規則同步給各個代理,並且完成一些管理,安全,遙測工作。可以發現網格中 Kubernetes 的網路完全被 istio 接管了,每個 Pod 和其代理構成了一個個對外零信任的高內聚的小格子。
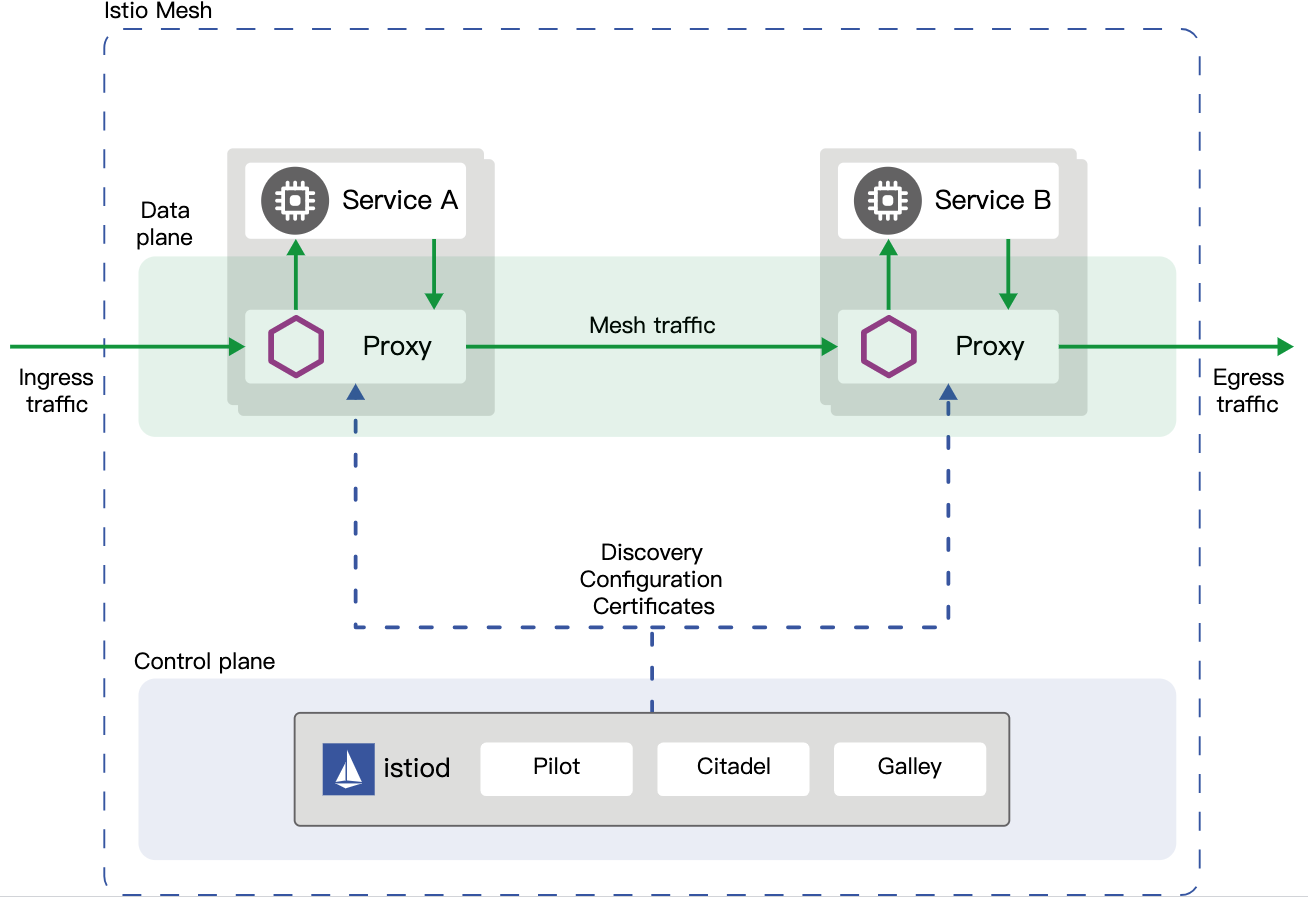
插一句,Docker 提倡每個程序一個容器,Kubernetes 提倡每個容器一個 Pod,istio 又提倡給每個 Pod 一個格子,最小單元變的越來越大了,每個格子外面還會接著套麼?
## 探祕 Istio 流量管理
流量管理無疑是 Istio 的核心,流量管理的核心又是 sidecar 代理,正是通過一個個 sidecar 代理,istio 能清晰的知道流量從哪來到哪去,從而很方便的實現,日誌收集,遙測,追蹤,監控,限流等功能。下面讓我們一起近距離體驗一下 Istio 的流量管理功能。
### 安裝
參照 [官方教程](https://istio.io/latest/docs/setup/getting-started/) 安裝 Isito demo profile,如下所示 Istio 相關的服務全裝到了 istio-system 的 namespace。其中 istiod 是 istio 的核心服務,Pilot(服務發現),Galley(配置管理),Citadel(證書管理)等服務被統一成了 istiod,istiod 中 跑著 discovery 程序,用於監聽 Kubernetes 的 ApiServer 並且實時把配置跟新到各個 sidecar 代理中。istio-ingressgateway 以及 istio-egressgateway 是 demo 模式下預設安裝,執行中 Pilot 的客戶端,接受配置實時跟新規則,envoy 是類似 ngnix 的輕量級代理工具。istio-ingressgateway 和Kubernetes 平臺中的 nginx-ingress 組建起相同作用,作為平臺外部請求進入網格的入口。其他 grafana,jaeger,kiali,prometheus為 istio 整合的可觀察性相關的元件。
```bash
chenling@ChendeMacBook-Pro ~ % kubectl get pod -n istio-system
NAME READY STATUS RESTARTS AGE
grafana-767c5487d6-j5l92 1/1 Running 0 5d5h
istio-egressgateway-55856f9f8f-s78md 1/1 Running 0 5d21h
istio-ingressgateway-85fbcc77b8-8rsfk 1/1 Running 0 5d21h
istiod-6dc785c4b9-z8v9v 1/1 Running 0 5d21h
jaeger-566c547fb9-zbhn7 1/1 Running 0 5d5h
kiali-89fd7f87b-r64dw 1/1 Running 0 5d21h
prometheus-788c945c9c-xn8mz 2/2 Running 0 5d5h
chenling@ChendeMacBook-Pro ~ % kubectl exec -it istiod-6dc785c4b9-z8v9v -n istio-system -- ps -ef
UID PID PPID C STIME TTY TIME CMD
istio-p+ 1 0 3 Sep27 ? 00:28:28 /usr/local/bin/pilot-discovery d
istio-p+ 34 0 0 00:41 pts/0 00:00:00 sh
istio-p+ 112 0 0 08:04 pts/1 00:00:00 ps -ef
chenling@ChendeMacBook-Pro ~ % kubectl exec -it istio-ingressgateway-85fbcc77b8-8rsfk -n istio-system -- ps -ef
UID PID PPID C STIME TTY TIME CMD
istio-p+ 1 0 0 Sep27 ? 00:01:38 /usr/local/bin/pilot-agent proxy
istio-p+ 14 1 1 Sep27 ? 00:08:48 /usr/local/bin/envoy -c etc/isti
istio-p+ 65 0 0 08:04 pts/0 00:00:00 ps -ef
```
### 注入
通過給 default namespace 打如下標籤,pod 建立時會自動注入 sidecar
```bash
$ kubectl label namespace default istio-injection=enabled
```
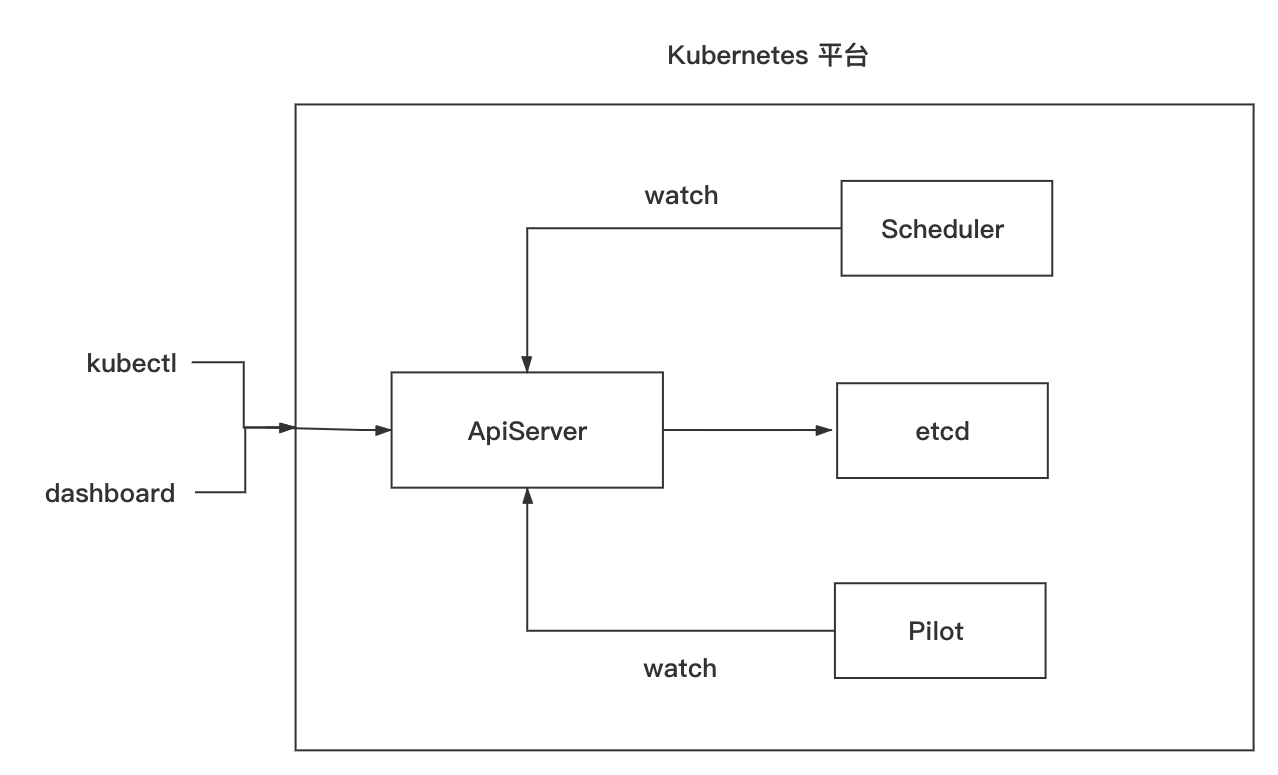
當我們通過 Kubernetes 的客戶端工具給 ApiServer 傳送指令時,平臺的 Scheduler 排程服務,會監聽建立請求,並找到合適的機器,把相關資訊傳給 ApiServer 並把原資料寫入 etcd,Isito 的 Pilot 採用類似機制監聽ApiServer ,當 namespace 被打上自動注入標籤,就會修改建立 pod 的原資料,增加 sidecar 代理容器到 pod 中,並且監聽到 Istio 自定義的資源變動,通知到相關的 sidecar。
當然也可以手動注入 sidecar,手動注入會啟動新的 pod
```bash
istioctl kube-inject -f deployment.yaml -o deployment-injected.yaml
```
書寫 deployment 資原始檔,注入完成之後如下所示,為啥 Pod 中有 2 個容器?
```bash
chenling@ChendeMacBook-Pro ~ % kubectl get pod
NAME READY STATUS RESTARTS AGE
client-6b495f748b-tgt97 2/2 Running 2 23h
hello-bc8bb7cd6-pvvkv 2/2 Running 0 24h
hello-new-5b7cbf7df4-ksxtg 2/2 Running 0 24h
```
預設容器是我們宣告的,執行著一個 httpd 服務
```bash
chenling@ChendeMacBook-Pro ~ % kubectl exec -it hello-bc8bb7cd6-pvvkv -- ps -ef
Defaulting container name to hello.
Use 'kubectl describe pod/hello-bc8bb7cd6-pvvkv -n default' to see all of the containers in this pod.
PID USER TIME COMMAND
1 root 0:00 httpd -f -p 8080 -h /var/www
435 root 0:00 ps -ef
```
檢視 pod 中另外一個容器,可以發現和 istio-gateway 一樣,其實執行著一個 envoy 代理服務,通過 pilot-agent 接受控制面資訊。
```bash
chenling@ChendeMacBook-Pro ~ % kubectl exec -it hello-bc8bb7cd6-pvvkv -c istio-proxy -- ps -ef
UID PID PPID C STIME TTY TIME CMD
istio-p+ 1 0 0 Sep27 ? 00:01:50 /usr/local/bin/pilot-agent proxy
istio-p+ 15 1 1 Sep27 ? 00:05:24 /usr/local/bin/envoy -c etc/isti
istio-p+ 140 0 0 08:13 pts/0 00:00:00 ps -ef
```
### 注入流程
下面我們看看注入過程,首先被注入的pod中增加了名為 istio-init 的 initContainer,如下日誌顯示初始化過程,通過在容器 iptables nat 表中增加規則,把所有非 Istio 的入站流量重定向到 15006 埠,所有非 Istio 的出站流量定向到 15001 埠
```bash
chenling@ChendeMacBook-Pro ~ % kubectl logs --tail=32 hello-bc8bb7cd6-pvvkv -c istio-init
iptables-save
# Generated by iptables-save v1.6.1 on Sun Sep 27 07:20:03 2020
*nat
:PREROUTING ACCEPT [0:0]
:INPUT ACCEPT [0:0]
:OUTPUT ACCEPT [0:0]
:POSTROUTING ACCEPT [0:0]
:ISTIO_INBOUND - [0:0]
:ISTIO_IN_REDIRECT - [0:0]
:ISTIO_OUTPUT - [0:0]
:ISTIO_REDIRECT - [0:0]
-A PREROUTING -p tcp -j ISTIO_INBOUND
-A OUTPUT -p tcp -j ISTIO_OUTPUT
-A ISTIO_INBOUND -p tcp -m tcp --dport 15008 -j RETURN
-A ISTIO_INBOUND -p tcp -m tcp --dport 22 -j RETURN
-A ISTIO_INBOUND -p tcp -m tcp --dport 15090 -j RETURN
-A ISTIO_INBOUND -p tcp -m tcp --dport 15021 -j RETURN
-A ISTIO_INBOUND -p tcp -m tcp --dport 15020 -j RETURN
-A ISTIO_INBOUND -p tcp -j ISTIO_IN_REDIRECT
-A ISTIO_IN_REDIRECT -p tcp -j REDIRECT --to-ports 15006
-A ISTIO_OUTPUT -s 127.0.0.6/32 -o lo -j RETURN
-A ISTIO_OUTPUT ! -d 127.0.0.1/32 -o lo -m owner --uid-owner 1337 -j ISTIO_IN_REDIRECT
-A ISTIO_OUTPUT -o lo -m owner ! --uid-owner 1337 -j RETURN
-A ISTIO_OUTPUT -m owner --uid-owner 1337 -j RETURN
-A ISTIO_OUTPUT ! -d 127.0.0.1/32 -o lo -m owner --gid-owner 1337 -j ISTIO_IN_REDIRECT
-A ISTIO_OUTPUT -o lo -m owner ! --gid-owner 1337 -j RETURN
-A ISTIO_OUTPUT -m owner --gid-owner 1337 -j RETURN
-A ISTIO_OUTPUT -d 127.0.0.1/32 -j RETURN
-A ISTIO_OUTPUT -j ISTIO_REDIRECT
-A ISTIO_REDIRECT -p tcp -j REDIRECT --to-ports 15001
COMMIT
# Completed on Sun Sep 27 07:20:03 2020
```
如下所示 ,15006 和 15001 埠都是 envoy 提供
```bash
chenling@ChendeMacBook-Pro ~ % kubectl exec -it hello-bc8bb7cd6-pvvkv -c istio-proxy -- netstat -nltp
Active Internet connections (only servers)
Proto Recv-Q Send-Q Local Address Foreign Address State PID/Program name
tcp 0 0 0.0.0.0:15021 0.0.0.0:* LISTEN 15/envoy
tcp 0 0 0.0.0.0:15090 0.0.0.0:* LISTEN 15/envoy
tcp 0 0 127.0.0.1:15000 0.0.0.0:* LISTEN 15/envoy
tcp 0 0 0.0.0.0:15001 0.0.0.0:* LISTEN 15/envoy
tcp 0 0 0.0.0.0:15006 0.0.0.0:* LISTEN 15/envoy
tcp6 0 0 :::15020 :::* LISTEN 1/pilot-agent
tcp6 0 0 :::8080 :::* LISTEN -
```
綜上所述,istio流量管理的實現大致如下
- 通過自動注入,給 pod 增加 iptables,把所有進出流量指向 envoy
- 控制面的 pilot 監控 istio 自定義資源變化,把規則傳送給各個 sidecar
- sidecar 中的 pilot-agent 接受 pilot 的資訊,熱更新 envoy 代理規則,無需重啟 pod即可改變流量路徑
### 配置
實踐一下配置網格行為
- 配置名為 xingren-gateway 的 Istio Gateway 接受所有 host為 xingren.upup 的外部流量
```yaml
---
apiVersion: networking.istio.io/v1alpha3
kind: Gateway
metadata:
name: xingren-gateway
spec:
selector:
istio: ingressgateway
servers:
- port:
number: 80
name: http
protocol: HTTP
hosts:
- xingren.upup
```
- 配置 VirtualService 接受所有來自 ingren-gateway,host 為 xingren.upup 或者 hello 的流量
- 如果 http header 中 version 欄位為 new,流量轉到 new 子集,並且設定了 5 秒的超時時間,並且以 10% 的比例,注入一個10秒的請求延遲,已驗證服務的容錯能力
- 如果 http header 中 version 欄位不存在,或者不是 new,則 70% 流量轉到 latest 子集, 30% 流量轉到 new 子集
- 配置可複用的 DestinationRule,定義了 latest 子集和 new 子集,按照 version 標籤匹配到 Kubernetes hello 服務下的真實pod,同時設定了併發請求不能大於1的熔斷規則
```yaml
---
apiVersion: networking.istio.io/v1alpha3
kind: VirtualService
metadata:
name: hello-virtualservice
spec:
hosts:
- hello
- xingren.upup
gateways:
- xingren-gateway
http:
- match:
- headers:
version:
exact: new
route:
- destination:
host: hello
subset: new
fault:
delay:
percentage:
value: 10
fixedDelay: 10s
timeout: 5s
- route:
- destination:
host: hello
subset: latest
weight: 70
- destination:
host: hello
subset: new
weight: 30
---
apiVersion: networking.istio.io/v1alpha3
kind: DestinationRule
metadata:
name: hello-destinationrule
spec:
host: hello
trafficPolicy:
connectionPool:
http:
http1MaxPendingRequests: 1
maxRequestsPerConnection: 1
tcp:
maxConnections: 1
subsets:
- name: latest
labels:
version: latest
- name: new
labels:
version: new
```
當然 istio 的功能遠遠不止這些,詳見 [官網案例](https://istio.io/latest/docs/tasks/traffic-management/)
### 視覺化
可以通過如下命令觀察服務網格,當然也可以通過閘道器暴露出去
```bash
chenling@ChendeMacBook-Pro ~ % istioctl dashboard --help
Access to Istio web UIs
Usage:
istioctl dashboard [flags]
istioctl dashboard [command]
Aliases:
dashboard, dash, d
Available Commands:
controlz Open ControlZ web UI
envoy Open Envoy admin web UI
grafana Open Grafana web UI
jaeger Open Jaeger web UI
kiali Open Kiali web UI
prometheus Open Prometheus web UI
zipkin Open Zipkin web UI
```
向服務中注入一些流量
```bash
chenling@ChendeMacBook-Pro ~ % for i in `seq 1000`; do wget -q -O - http://xingren.upup; sleep 0.2;done
Hello World(new)
Hello World
Hello World
Hello World
Hello World
Hello World
Hello World(new)
Hello World
Hello World
Hello World
Hello World(new)
Hello World
Hello World
Hello World
Hello World(new)
Hello World
...
```
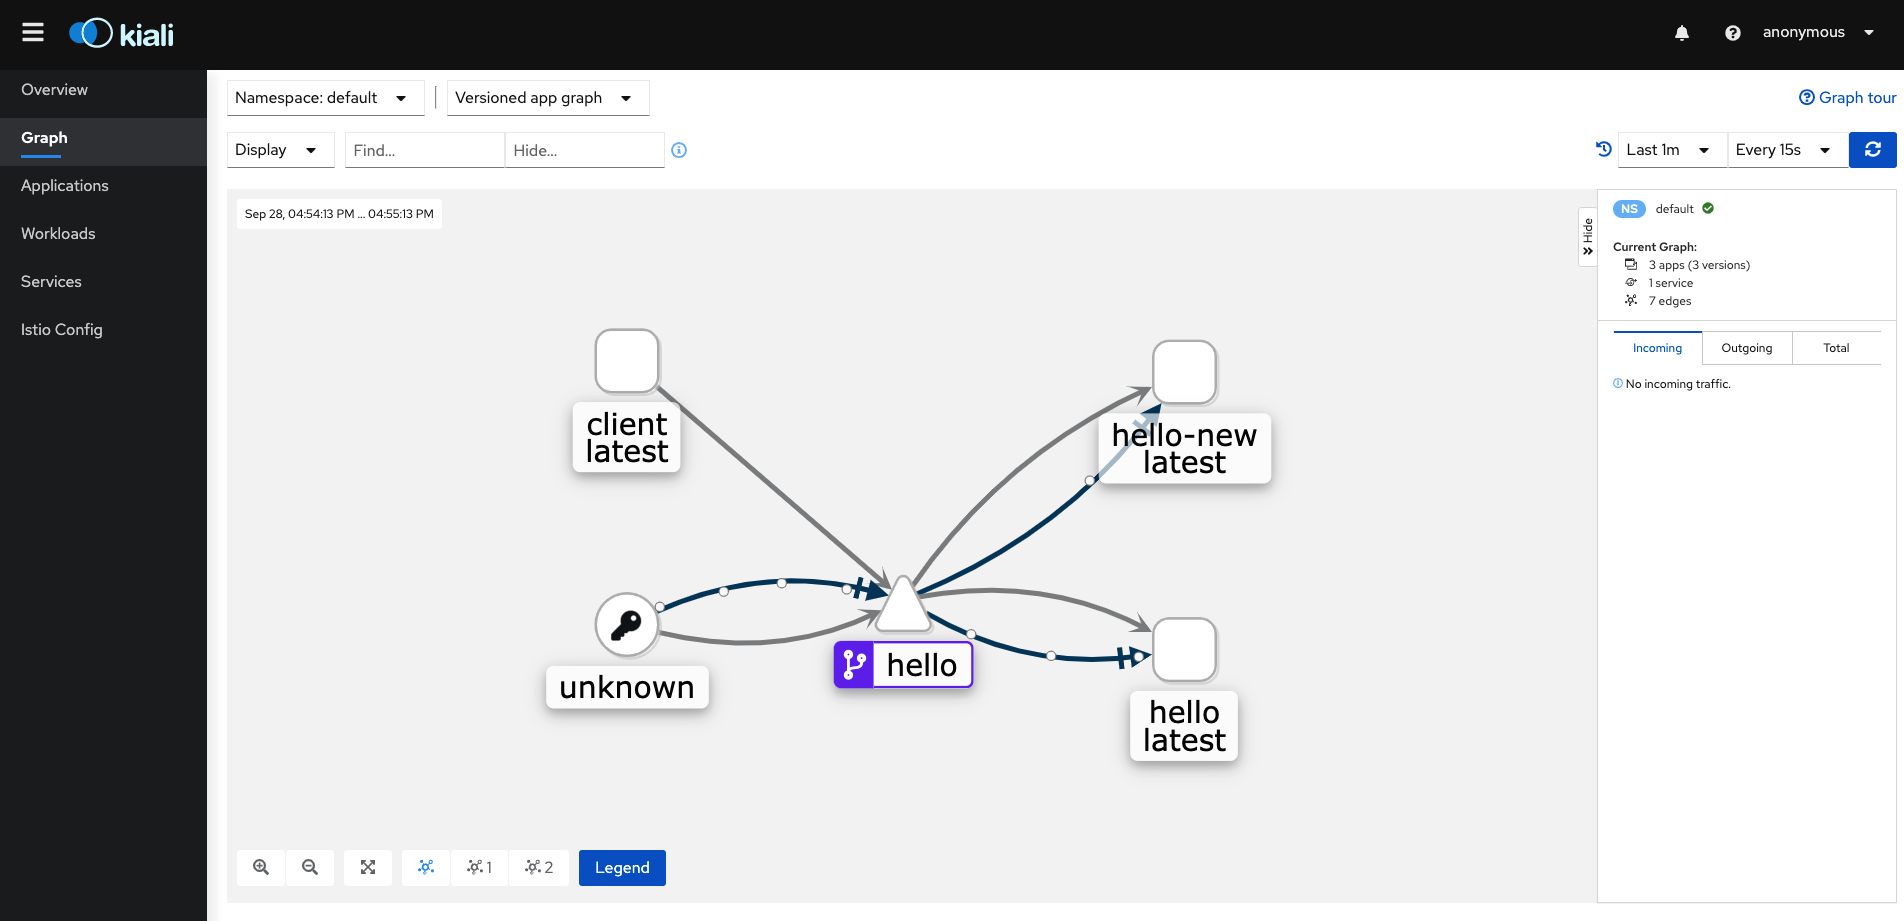
觀察 istio 的視覺化介面 kiali,可以看到流量從外部通過 hello 虛擬服務進入 pod,並且權重 大致 7比3
## 總結
Istio 出色的完成了服務網格該有的功能,且有很強的可擴充套件性,可以方便的整合 prometheus,jaeger 等工具,隨著迭代易用性也有所提高。雖然 Istio 還沒有被大規模用於生產環境 ,並且有質疑其佔用了過多的資源,總的來說利大於弊,經實驗,沒有被 Istio 注入的 pod 訪問被注入的資源,不會受到任何影響,會直接透傳給真實pod,所以還是可以小範圍嚐鮮 Isti