
Spring 事件監聽機制及原理分析
阿新 • • 發佈:2020-11-25
## 簡介
在JAVA體系中,有支援實現事件監聽機制,在Spring 中也專門提供了一套事件機制的介面,方便我們實現。比如我們可以實現當用戶註冊後,給他傳送一封郵件告訴他註冊成功的一些資訊,比如使用者訂閱的主題更新了,通知使用者注意及時檢視等。
## 觀察者模式
觀察者模式還有很多其他的稱謂,如釋出-訂閱(Publish/Subscribe)模式、模型-檢視(Model/View)模式、源-監聽器(Source/Listener)模式或從屬者(Dependents)模式。觀察者模式定義了一種一對多的依賴關係,讓多個觀察者物件同時監聽某一個主題物件。這個主題物件在狀態上發生變化時,會通知所有觀察者物件,使它們能夠自動更新自己。
觀察者模式一般包含以下幾個物件:
Subject:
被觀察的物件。它提供一系列方法來增加和刪除觀察者物件,同時它定義了通知方法notify()。目標類可以是介面,也可以是抽象類或具體類。
ConcreteSubject:
具體的觀察物件。Subject的具體實現類,在這裡實現通知事件。
Observer:
觀察者。這裡是抽象的觀察者,觀察者有一個或者多個。
ConcreteObserver:
具體的觀察者。在這裡維護觀察物件的具體操作。
## Java 中的事件機制
Java中提供了基本的事件處理基類:
1. EventObject:所有事件狀態物件都將從其派生的根類;
2. EventListener:所有事件偵聽器介面必須擴充套件的標記介面;
非常經典的開門案例:
一、建立事件物件
```java
@Getter
@Setter
public class DoorEvent extends EventObject{
int state;
public DoorEvent(Object source){
super(source);
}
public DoorEvent(Object source,int state){
super(source);
this.state = state;
}
}
```
二、事件監聽器
```java
public interface DoorListener extends EventListener{
void doorEvent(DoorEvent doorEvent);
}
public class CloseDoorEvent implements DoorListener{
@Override
public void doorEvent(DoorEvent doorEvent){
if(doorEvent.getState() == -1){
System.out.println("門關上了");
}
}
}
public class OpenDoorListener implements DoorListener{
@Override
public void doorEvent(DoorEvent doorEvent){
if(doorEvent.getState() == 1){
System.out.println("門打開了");
}
}
}
```
三、測試
```java
public static void main(String[] args){
List list = new ArrayList<>();
list.add(new OpenDoorListener());
list.add(new CloseDoorEvent());
for(DoorListener listener : list){
listener.doorEvent(new DoorEvent(-1,-1));
listener.doorEvent(new DoorEvent(1,1));
}
}
```
四、輸出結果
```java
門打開了
門關上了
```
## Spring 中的事件機制
在 Spring 容器中通過`ApplicationEven`類和 `ApplicationListener`介面來實現事件監聽機制,每次Event 被髮布到Spring容器中時都會通知該Listener。需要注意的是,Spring 的事件預設是同步的,呼叫 `publishEvent` 方法釋出事件後,它會處於阻塞狀態,直到Listener接收到事件並處理返回之後才繼續執行下去。
程式碼示例:
一、定義事件物件
```java
@Getter
@Setter
@ToString
public class UserDTO extends ApplicationEvent{
private Integer userId;
private String name;
private Integer age;
public UserDTO(Object source){
super(source);
}
}
```
二、定義事件監聽器,可以通過註解或者實現介面來實現。
```java
@Component
public class UserRegisterSmsListener{
// 通過註解實現監聽器
@EventListener
public void handleUserEvent(UserDTO userDTO){
System.out.println("監聽到使用者註冊,準備傳送簡訊,user:"+userDTO.toString());
}
}
// 通過實現介面實現監聽器
@Component
public class UserRegisterEmailListener implements ApplicationListener{
@Override
public void onApplicationEvent(UserDTO userDTO){
System.out.println("監聽到使用者註冊,準備傳送郵件,user:" + userDTO.toString());
}
}
@Component
public class UserRegisterMessageListener implements ApplicationListener{
@Override
public void onApplicationEvent(UserDTO userDTO){
System.out.println("監聽到使用者註冊,給新使用者傳送首條站內短訊息,user:" + userDTO.toString());
}
}
```
三、註冊服務
```java
public interface UserService{
void register();
}
@Service
public class UserServiceImpl implements UserService{
@Autowired
private ApplicationEventPublisher eventPublisher;
@Override
public void register(){
UserDTO userDTO = new UserDTO(this);
userDTO.setAge(18);
userDTO.setName("精靈王jinglingwang.cn");
userDTO.setUserId(1001);
System.out.println("register user");
eventPublisher.publishEvent(userDTO);
}
}
```
四、測試
```java
@Autowired
private UserService userService;
@Test
public void testUserEvent(){
userService.register();
}
```
五、輸出結果
```java
register user
監聽到使用者註冊,準備傳送簡訊,user:UserDTO(userId=1001, name=精靈王jinglingwang.cn, age=18)
監聽到使用者註冊,準備傳送郵件,user:UserDTO(userId=1001, name=精靈王jinglingwang.cn, age=18)
監聽到使用者註冊,給新使用者傳送首條站內短訊息,user:UserDTO(userId=1001, name=精靈王jinglingwang.cn, age=18)
```
### 指定監聽器的順序
監聽器的釋出順序是按照 bean 自然裝載的順序執行的,Spring 支援兩種方式來實現有序
一、實現SmartApplicationListener介面指定順序。
把上面三個Listener都改成實現SmartApplicationListener介面,並指定getOrder的返回值,返回值越小,優先順序越高。
```java
@Component
public class UserRegisterMessageListener implements SmartApplicationListener{
@Override
public boolean supportsEventType(Class eventType){
return eventType == UserDTO.class;
}
@Override
public boolean supportsSourceType(Class sourceType){
return true;
}
@Override
public void onApplicationEvent(ApplicationEvent event){
System.out.println("監聽到使用者註冊,給新使用者傳送首條站內短訊息,user:" + event.toString());
}
@Override
public int getOrder(){
return -1;
}
}
```
另外兩個監聽器的改造省略,指定改造後的UserRegisterSmsListener返回order為0,UserRegisterEmailListener的getOrder返回1,測試輸出結果如下:
```java
register user
監聽到使用者註冊,給新使用者傳送首條站內短訊息,user:UserDTO(userId=1001, name=精靈王jinglingwang.cn, age=18)
監聽到使用者註冊,準備傳送簡訊,user:UserDTO(userId=1001, name=精靈王jinglingwang.cn, age=18)
監聽到使用者註冊,準備傳送郵件,user:UserDTO(userId=1001, name=精靈王jinglingwang.cn, age=18)
```
二、使用註解@Order()
```java
@Component
public class UserRegisterSmsListener{
@Order(-2)
@EventListener
public void handleUserEvent(UserDTO userDTO){
System.out.println("監聽到使用者註冊,準備傳送簡訊,user:"+userDTO.toString());
}
}
```
測試輸出結果如下:
```java
register user
監聽到使用者註冊,準備傳送簡訊,user:UserDTO(userId=1001, name=精靈王jinglingwang.cn, age=18)
監聽到使用者註冊,給新使用者傳送首條站內短訊息,user:UserDTO(userId=1001, name=精靈王jinglingwang.cn, age=18)
監聽到使用者註冊,準備傳送郵件,user:UserDTO(userId=1001, name=精靈王jinglingwang.cn, age=18)
```
可以發現,簡訊監聽器最先執行。
### 非同步支援
Spring 事件機制預設是同步阻塞的,如果 ApplicationEventPublisher 釋出事件之後他會一直阻塞等待listener 響應,多個 listener 的情況下前面的沒有執行完後面的會一直被阻塞。這時候我們可以利用 Spring 提供的執行緒池註解 `@Async` 來實現非同步執行緒
一、使用 @Async 之前需要先開啟執行緒池,在 啟動類上新增 @EnableAsync 註解即可。
```java
@EnableAsync
@SpringBootApplication
public class DemoApplication {
public static void main(String[] args) {
SpringApplication.run(DemoApplication.class, args);
}
}
```
二、監聽器使用非同步執行緒
自定義非同步執行緒池
```java
@Configuration
public class AsyncConfig{
@Bean("asyncThreadPool")
public Executor getAsyncExecutor(){
System.out.println("asyncThreadPool init");
Executor executor = new ThreadPoolExecutor(
10,20,60L,TimeUnit.SECONDS
,new ArrayBlockingQueue<>(100),new MyThreadFactory());
return executor;
}
class MyThreadFactory implements ThreadFactory{
final AtomicInteger threadNumber = new AtomicInteger(0);
@Override
public Thread newThread(Runnable r){
Thread t = new Thread(r);
t.setName("async-thread-"+threadNumber.getAndIncrement());
t.setDaemon(true);
return t;
}
}
}
```
指定監聽器的執行緒池
```java
@Component
public class UserRegisterSmsListener{
@Order(-2)
@Async("asyncThreadPool")
@EventListener
public void handleUserEvent(UserDTO userDTO){
System.out.println(Thread.currentThread().getName() + " 監聽到使用者註冊,準備傳送簡訊,user:"+userDTO.toString());
}
}
```
三、測試輸出結果
```java
register user
監聽到使用者註冊,給新使用者傳送首條站內短訊息,user:UserDTO(userId=1001, name=admol, age=18)
監聽到使用者註冊,準備傳送郵件,user:UserDTO(userId=1001, name=admol, age=18)
async-thread-0 監聽到使用者註冊,準備傳送簡訊,user:UserDTO(userId=1001, name=admol, age=18)
```
## Spring事件機制原理分析
Spring事件機制涉及的重要類主要有以下四個:
ApplicationEvent:
事件物件,繼承至JDK的類`EventObject` ,可以攜帶事件的時間戳
ApplicationListener:
事件監聽器,繼承至JDK的介面`EventListener`,該介面被所有的事件監聽器實現,比如支援指定順序的SmartApplicationListener
ApplicationEventMulticaster:
事件管理者,管理監聽器和釋出事件,ApplicationContext通過委託ApplicationEventMulticaster來 釋出事件
ApplicationEventPublisher:
事件釋出者,該介面封裝了事件有關的公共方法,作為ApplicationContext的超級街廓,也是委託 ApplicationEventMulticaster完成事件釋出。
### 原始碼展示
**ApplicationEvent**
事件物件ApplicationEvent的主要原始碼如下,繼承了JAVA的 EventObject 物件:
```java
public abstract class ApplicationEvent extends EventObject {
private static final long serialVersionUID = 7099057708183571937L;
private final long timestamp; // 多了一個時間戳屬性
public ApplicationEvent(Object source) {
super(source);
this.timestamp = System.currentTimeMillis(); // 初始當前化時間戳
}
public final long getTimestamp() {
return this.timestamp;
}
}
```
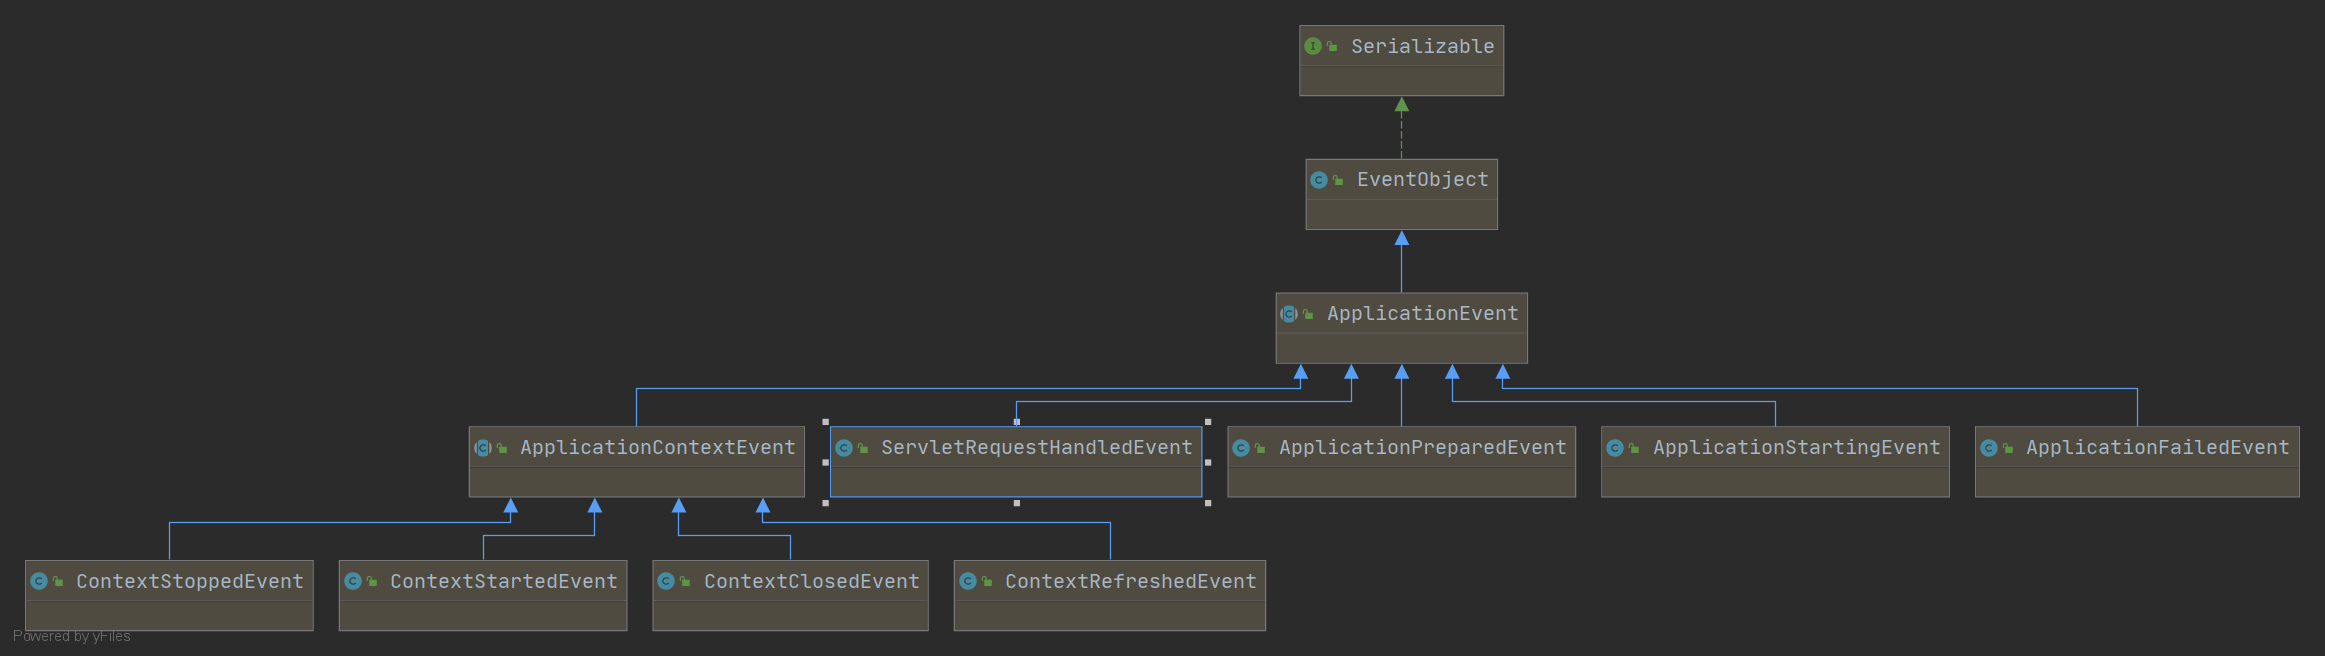
從上面ApplicationEvent的子類關係圖種可以發現,ApplicationEvent有一個重要的子類`ApplicationContextEvent`,而ApplicationContextEvent又有4個重要的子類`ContextStartedEvent`、`ContextRefreshedEvent`、`ContextClosedEvent`、`ContextStoppedEvent`。
從名字就可以看出,這4個事件都和Spring容器有關係的:
- ContextRefreshedEvent:當spring容器context重新整理時觸發
- ContextStartedEvent:當spring容器context啟動後觸發
- ContextStoppedEvent:當spring容器context停止時觸發
- ContextClosedEvent:當spring容器context關閉時觸發,容器被關閉時,其管理的所有單例Bean都被銷燬。
當每個事件觸發時,相關的監聽器就會監聽到相應事件,然後觸發`onApplicationEvent`方法。
**ApplicationListener**
事件監聽器,繼承DK的介面`EventListener`
```java
/* ...
* @author Rod Johnson
* @author Juergen Hoeller
* @param the specific ApplicationEvent subclass to listen to
* @see org.springframework.context.event.ApplicationEventMulticaster
*/
public interface ApplicationListener extends EventListener {
/**
* Handle an application event. by jinglingwang.cn
* @param event the event to respond to
*/
void onApplicationEvent(E event);
}
```
註釋`@param the specific ApplicationEvent subclass to listen to@see ApplicationEventMulticaster` 裡面說明了事件的廣播在`ApplicationEventMulticaster`類。
**ApplicationEventMulticaster**
`ApplicationEventMulticaster`是一個介面,**負責管理監聽器和釋出事件**,定義瞭如下方法:
1. `addApplicationListener(ApplicationListener listener)` :新增一個listener;
2. `addApplicationListenerBean(String listenerBeanName)`:新增一個listener,引數為bean name;
3. `removeApplicationListener(ApplicationListener listener)`:刪除listener;
4. `void removeAllListeners()`:刪除所有的Listener
5. `removeApplicationListenerBean(String listenerBeanName)`:根據bean name 刪除listener;
6. `multicastEvent(ApplicationEvent event)`:廣播事件;
7. `multicastEvent(ApplicationEvent event, @Nullable ResolvableType eventType)`:廣播事件,指定事件的source型別。
AbstractApplicationEventMulticaster 實現了 ApplicationEventMulticaster介面,SimpleApplicationEventMulticaster 繼承了AbstractApplicationEventMulticaster ;
1. AbstractApplicationEventMulticaster 主要實現了管理監聽器的方法(上面介面的前5個方法)
2. SimpleApplicationEventMulticaster 主要實現了事件廣播相關的方法(上面介面的最後2個方法)
兩個類分別繼承了部分上面的方法。
一、先看新增Listener方法實現邏輯:
```java
public abstract class AbstractApplicationEventMulticaster
implements ApplicationEventMulticaster, BeanClassLoaderAware, BeanFactoryAware {
private final ListenerRetriever defaultRetriever = new ListenerRetriever(false);
...
@Override
public void addApplicationListener(ApplicationListener listener) {
synchronized (this.retrievalMutex) { // 加排他鎖
// Explicitly remove target for a proxy, if registered already,
// in order to avoid double invocations of the same listener.
Object singletonTarget = AopProxyUtils.getSingletonTarget(listener);
if (singletonTarget instanceof ApplicationListener) {
// 刪除,避免重複呼叫
this.defaultRetriever.applicationListeners.remove(singletonTarget);
}
// 加入到Set LinkedHashSet 集合中
this.defaultRetriever.applicationListeners.add(listener);
this.retrieverCache.clear(); // 快取
}
}
...
}
```
最核心的一句程式碼:`this.defaultRetriever.applicationListeners.add(listener);`
ListenerRetriever類是AbstractApplicationEventMulticaster類的內部類,裡面有兩個集合,用來記錄維護事件監聽器。
```java
private class ListenerRetriever {
public final Set> applicationListeners = new LinkedHashSet<>();
public final Set applicationListenerBeans = new LinkedHashSet<>();
...
}
```
這就和設計模式中的釋出訂閱模式一樣了,維護一個List,用來管理所有的訂閱者,當釋出者釋出訊息時,遍歷對應的訂閱者列表,執行各自的回撥handler。
二、看SimpleApplicationEventMulticaster類實現的廣播事件邏輯:
```java
@Override
public void multicastEvent(ApplicationEvent event) {
multicastEvent(event, resolveDefaultEventType(event)); // 繼續呼叫下面的廣播方法
}
@Override
public void multicastEvent(final ApplicationEvent event, ResolvableType eventType) {
ResolvableType type = (eventType != null ? eventType : resolveDefaultEventType(event));
// 遍歷監聽器列表
for (final ApplicationListener listener : getApplicationListeners(event, type)) {
Executor executor = getTaskExecutor();
if (executor != null) { // 是否指定了執行緒池
executor.execute(new Runnable() {
@Override
public void run() { // 執行緒池執行
invokeListener(listener, event);
}
});
}
else { // 普通執行
invokeListener(listener, event);
}
}
}
```
程式碼分析:
1. 首先根據事件型別,獲取事件監聽器列表:`getApplicationListeners(event, type)`
2. 遍歷監聽器列表,for迴圈
3. 判斷是否有執行緒池,如果有,線上程池執行
4. 否則直接執行
我們再看看 `invokeListener`方法的邏輯:
```java
protected void invokeListener(ApplicationListener listener, ApplicationEvent event) {
ErrorHandler errorHandler = getErrorHandler();
if (errorHandler != null) { // 是否有錯誤處理
try {
doInvokeListener(listener, event);
} catch (Throwable err) {
errorHandler.handleError(err);
}
} else {
doInvokeListener(listener, event); // 直接執行
}
}
```
核心邏輯就是繼續呼叫`doInvokeListener`方法:
```java
private void doInvokeListener(ApplicationListener listener, ApplicationEvent event) {
try {
listener.onApplicationEvent(event);// 執行監聽器事件
}
catch (ClassCastException ex) {
String msg = ex.getMessage();
if (msg == null || msg.startsWith(event.getClass().getName())) {
// Possibly a lambda-defined listener which we could not resolve the generic event type for
Log logger = LogFactory.getLog(getClass());
if (logger.isDebugEnabled()) {
logger.debug("Non-matching event type for listener: " + listener, ex);
}
}
else {
throw ex;
}
}
}
```
發現最後實際就是呼叫的 `listener.onApplicationEvent(event);` 也就是我們通過實現介面ApplicationListener的方式來實現監聽器的onApplicationEvent實現邏輯。
**ApplicationEventPublisher類**
在我們的釋出事件邏輯程式碼的地方,通過檢視 `eventPublisher.publishEvent(userDTO);`方法可以發現ApplicationEventPublisher是一個介面,publishEvent方法的邏輯實現主要在類AbstractApplicationContext中:
```java
public abstract class AbstractApplicationContext extends DefaultResourceLoader
implements ConfigurableApplicationContext, DisposableBean {
...
private Set earlyApplicationEvents;
...
@Override
public void publishEvent(ApplicationEvent event) {
publishEvent(event, null); // 呼叫下面的方法
}
// 釋出事件主要邏輯
protected void publishEvent(Object event, ResolvableType eventType) {
Assert.notNull(event, "Event must not be null");
if (logger.isTraceEnabled()) {
logger.trace("Publishing event in " + getDisplayName() + ": " + event);
}
// 事件裝飾為 ApplicationEvent
ApplicationEvent applicationEvent;
if (event instanceof ApplicationEvent) {
applicationEvent = (ApplicationEvent) event;
} else {
applicationEvent = new PayloadApplicationEvent