自定義Django認證系統的技術方案
阿新 • • 發佈:2020-12-13
Django已經提供了開箱即用的認證系統,但是可能並不滿足我們的個性化需求。自定義認證系統需要知道哪些地方可以擴充套件,哪些地方可以替換。本文就來介紹自定義Django認證系統的相關技術細節。
# 自定義認證後端
## AUTHENTICATION_BACKENDS
Django預設認證後端為:
```python
['django.contrib.auth.backends.ModelBackend']
```
可以在`settings.py`中配置AUTHENTICATION_BACKENDS為自定義的認證後端,其本質是Python class,在呼叫`django.contrib.auth.authenticate()`時會進行遍歷:
```python
def authenticate(request=None, **credentials):
"""
If the given credentials are valid, return a User object.
"""
for backend, backend_path in _get_backends(return_tuples=True):
backend_signature = inspect.signature(backend.authenticate)
try:
backend_signature.bind(request, **credentials)
except TypeError:
# This backend doesn't accept these credentials as arguments. Try the next one.
continue
try:
user = backend.authenticate(request, **credentials)
except PermissionDenied:
# This backend says to stop in our tracks - this user should not be allowed in at all.
break
if user is None:
continue
# Annotate the user object with the path of the backend.
user.backend = backend_path
return user
# The credentials supplied are invalid to all backends, fire signal
user_login_failed.send(sender=__name__, credentials=_clean_credentials(credentials), request=request)
```
列表中的認證後端是有先後順序的,Django會依次進行認證,只要有後端認證成功,就會結束認證,如果有後端丟擲PermissionDenied異常,也會停止認證。
> 如果修改了認證後端,想要使用者重新認證,那麼需要呼叫`Session.objects.all().delete()`清除session資料,因為session中會快取已認證過的認證後端。
## 編寫認證後端
先看看預設認證後端的原始碼片段:
```python
class ModelBackend(BaseBackend):
"""
Authenticates against settings.AUTH_USER_MODEL.
"""
def authenticate(self, request, username=None, password=None, **kwargs):
if username is None:
username = kwargs.get(UserModel.USERNAME_FIELD)
if username is None or password is None:
return
try:
user = UserModel._default_manager.get_by_natural_key(username)
except UserModel.DoesNotExist:
# Run the default password hasher once to reduce the timing
# difference between an existing and a nonexistent user (#20760).
UserModel().set_password(password)
else:
if user.check_password(password) and self.user_can_authenticate(user):
return user
...
def get_user(self, user_id):
try:
user = UserModel._default_manager.get(pk=user_id)
except UserModel.DoesNotExist:
return None
return user if self.user_can_authenticate(user) else None
```
總結一下:
1. 繼承BaseBackend。
2. 實現了`authenticate()`。(backend也有個authenticate方法,跟`django.contrib.auth.authenticate()`不一樣哦)`authenticate(request=None, **credentials)`方法的第一個入參是`request`,可為空,第二個入參是credentials(使用者憑證如使用者名稱、密碼),示例:
```python
from django.contrib.auth.backends import BaseBackend
class MyBackend(BaseBackend):
def authenticate(self, request, username=None, password=None):
# Check the username/password and return a user.
...
```
使用者憑證也可以是token:
```python
from django.contrib.auth.backends import BaseBackend
class MyBackend(BaseBackend):
def authenticate(self, request, token=None):
# Check the token and return a user.
...
```
如果認證成功就返回User物件,如果認證失敗就返回None。
3. 實現了`get_user()`。`get_user(user_id)`方法入參是user_id,可以是username/資料庫ID等,必須是User的主鍵,返回值為User物件或者None。
我們試著來編寫一個認證後端,為了演示效果,我們不用客戶端伺服器模式,而是在`settings.py`檔案中增加2個配置,然後用我們自定義的認證後端進行認證,程式碼如下:
```python
from django.conf import settings
from django.contrib.auth.backends import BaseBackend
from django.contrib.auth.hashers import check_password
from django.contrib.auth.models import User
class SettingsBackend(BaseBackend):
"""
認證settings中ADMIN_LOGIN和ADMIN_PASSWORD變數,比如:
ADMIN_LOGIN = 'admin'
ADMIN_PASSWORD = 'pbkdf2_sha256$30000$Vo0VlMnkR4Bk$qEvtdyZRWTcOsCnI/oQ7fVOu1XAURIZYoOZ3iq8Dr4M='
"""
def authenticate(self, request, username=None, password=None):
login_valid = (settings.ADMIN_LOGIN == username)
pwd_valid = check_password(password, settings.ADMIN_PASSWORD)
if login_valid and pwd_valid:
try:
user = User.objects.get(username=username)
except User.DoesNotExist:
# 建立一個新使用者
user = User(username=username)
user.is_staff = True
user.is_superuser = True
user.save()
return user
return None
def get_user(self, user_id):
try:
return User.objects.get(pk=user_id)
except User.DoesNotExist:
return None
```
## 自定義認證後端授權
認證後端可以重寫方法`get_user_permissions()`, `get_group_permissions()`, `get_all_permissions()`, `has_perm()`, `has_module_perms()`, `with_perm()`來實現授權。示例:
```python
from django.contrib.auth.backends import BaseBackend
class MagicAdminBackend(BaseBackend):
def has_perm(self, user_obj, perm, obj=None):
# 如果是超管,就會獲得所有許可權,因為不管perm是什麼,都返回True
return user_obj.username == settings.ADMIN_LOGIN
```
可以根據業務編寫具體的判斷邏輯,給不同使用者/組授予不同許可權。
> user_obj可以是django.contrib.auth.models.AnonymousUser,用來給匿名使用者授予某些許可權。
> User有個is_active欄位,ModelBackend和RemoteUserBackend不能給is_active=False的使用者授權,如果想授權,可以使用AllowAllUsersModelBackend或AllowAllUsersRemoteUserBackend。
# 自定義新許可權
除了增刪改查許可權,有時我們需要更多的許可權,例如,為myapp中的BlogPost建立一個can_publish許可權:
**方法1 meta中配置**
```python
class BlogPost(models.Model):
...
class Meta:
permissions = (
("can_publish", "Can Publish Posts"),
)
```
**方法2 使用`create()`函式**
```python
from myapp.models import BlogPost
from django.contrib.auth.models import Permission
from django.contrib.contenttypes.models import ContentType
content_type = ContentType.objects.get_for_model(BlogPost)
permission = Permission.objects.create(
codename='can_publish',
name='Can Publish Posts',
content_type=content_type,
)
```
在使用`python manage.py migrate`命令後,就會建立這個新許可權,接著就可以在view中編寫程式碼判斷使用者是否有這個許可權來決定能否發表文章。
# 擴充套件User模型
## 代理模型
如果不需要修改表結構,只擴充套件行為,那麼可以使用代理模型。示例:
```python
from django.contrib.auth.models import User
class MyUser(User):
class Meta:
proxy = True
def do_something(self):
# ...
pass
```
## OneToOneField
如果需要擴充套件欄位,那麼可以使用OneToOneField。示例:
```python
from django.contrib.auth.models import User
class Employee(models.Model):
user = models.OneToOneField(User, on_delete=models.CASCADE)
department = models.CharField(max_length=100)
```
這樣會新增一張表:
```mysql
CREATE TABLE `user_employee` (
`id` int(11) NOT NULL AUTO_INCREMENT,
`department` varchar(100) COLLATE utf8mb4_unicode_ci NOT NULL,
`user_id` int(11) NOT NULL,
PRIMARY KEY (`id`),
UNIQUE KEY `user_id` (`user_id`),
CONSTRAINT `user_employee_user_id_9b2edd10_fk_auth_user_id` FOREIGN KEY (`user_id`) REFERENCES `auth_user` (`id`)
) ENGINE=InnoDB DEFAULT CHARSET=utf8mb4 COLLATE=utf8mb4_unicode_ci;
```
在程式碼中使用User也能訪問到Employee的屬性:
```
>>> u = User.objects.get(username='fsmith')
>>> freds_department = u.employee.department
```
> 雖然這種方式能實現擴充套件,但是OneToOneField會增加資料庫查詢的複雜度,加重資料庫處理負擔,並不建議採用。
# 替換User模型
新版Django的推薦做法是,如果不想用預設User模型,那麼就把它替換掉。Django除了User模型,還有2個抽象模型AbstractUser和AbstractBaseUser,從原始碼中可以看到它們的繼承關係:
```python
class User(AbstractUser):
class AbstractUser(AbstractBaseUser, PermissionsMixin):
class AbstractBaseUser(models.Model):
```
為什麼不用User模型,還要做2個抽象模型呢?這是因為一般繼承有2個用途,一是繼承父類的屬性和方法,並做出自己的改變或擴充套件,實現程式碼重用。但是這種方式會導致子類也包含了父類的實現程式碼,程式碼強耦合,所以實踐中不會這麼做。而是採用第二種方式,把共性的內容抽象出來,只定義屬性和方法,不提供具體實現(如java中的介面類),並且只能被繼承,不能被例項化。AbstractUser和AbstractBaseUser就是對User的不同程度的抽象,AbstractUser是User的完整實現,可用於擴充套件User,AbstractBaseUser是高度抽象,可用於完全自定義User。
## 繼承AbstractUser
除了代理模型和OneToOneField,擴充套件User的新方式是定義新的MyUser並繼承AbstractUser,把User替換掉,再新增額外資訊。具體操作步驟我們通過示例來了解:
> 替換User最好是建立專案後,首次`python manage.py migrate`前,就進行替換,否則資料庫的表已經生成,再中途替換,會有各種各樣的依賴問題,只能手動解決。
第一步,myapp.models中新建MyUser,繼承AbstractUser:
```python
from django.contrib.auth.models import AbstractUser
class MyUser(AbstractUser):
pass
```
第二步,`settings.py`中配置AUTH_USER_MODEL,指定新的使用者模型:
```
AUTH_USER_MODEL = 'myapp.MyUser'
```
第三步,`settings.py`中配置INSTALLED_APPS:
```python
INSTALLED_APPS = [
'django.contrib.admin',
'django.contrib.auth',
'django.contrib.contenttypes',
'django.contrib.sessions',
'django.contrib.messages',
'django.contrib.staticfiles',
'myapp.apps.MyappConfig' # 新增
]
```
第四步(可選),如果需要使用Django自帶管理後臺,那麼要在`admin.py`中註冊:
```python
from django.contrib import admin
from django.contrib.auth.admin import UserAdmin
from .models import MyUser
admin.site.register(MyUser, UserAdmin)
```
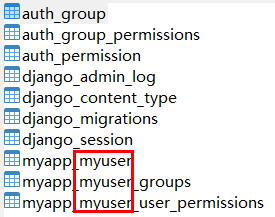
我們看下資料庫中的效果,提交資料遷移:
```python
python manage.py makemigrations
```
執行資料遷移:
```python
python manage.py migrate
```
從表能看出來,預設User已經替換為MyUser了: