基於Python的介面自動化實戰-基礎篇之pymysql模組操作資料庫
引言
在進行功能或者介面測試時常常需要通過連線資料庫,操作和檢視相關的資料表資料,用於構建測試資料、核對功能、驗證資料一致性,介面的資料庫操作是否正確等。因此,在進行介面自動化測試時,我們一樣繞不開介面和資料庫的互動,我們需要用程式碼連線資料庫,通過操作資料庫完成資料的準備、環境檢查以及資料庫斷言的功能。在python3中,使用python操作MySQL資料庫需要使用到第三方庫:pymysql,該模組本質上就是一個套接字的客戶端軟體包,它提供了諸多連線資料庫、操作資料庫表等一系列的方法。
一、PyMySQL安裝
1.在windows環境下安裝
由於python3.6及以上版本安裝python後就自帶了pip3,python版本低於3.6的,手動安裝下pip即可,因此可以直接使用pip安裝該模組
pip3 install pymysql
2.在linux環境下安裝
下載安裝pymysql的tar包,解壓後,進入解壓的目錄下,按如下安裝即可:
[root@localhost opt]#tar -xzvf PyMySQL-0.7.11.tar.gz
[root@localhost opt]#cd PyMySQL-0.7.11
[root@localhost PyMySQL-0.7.11]#python36 setup.py install
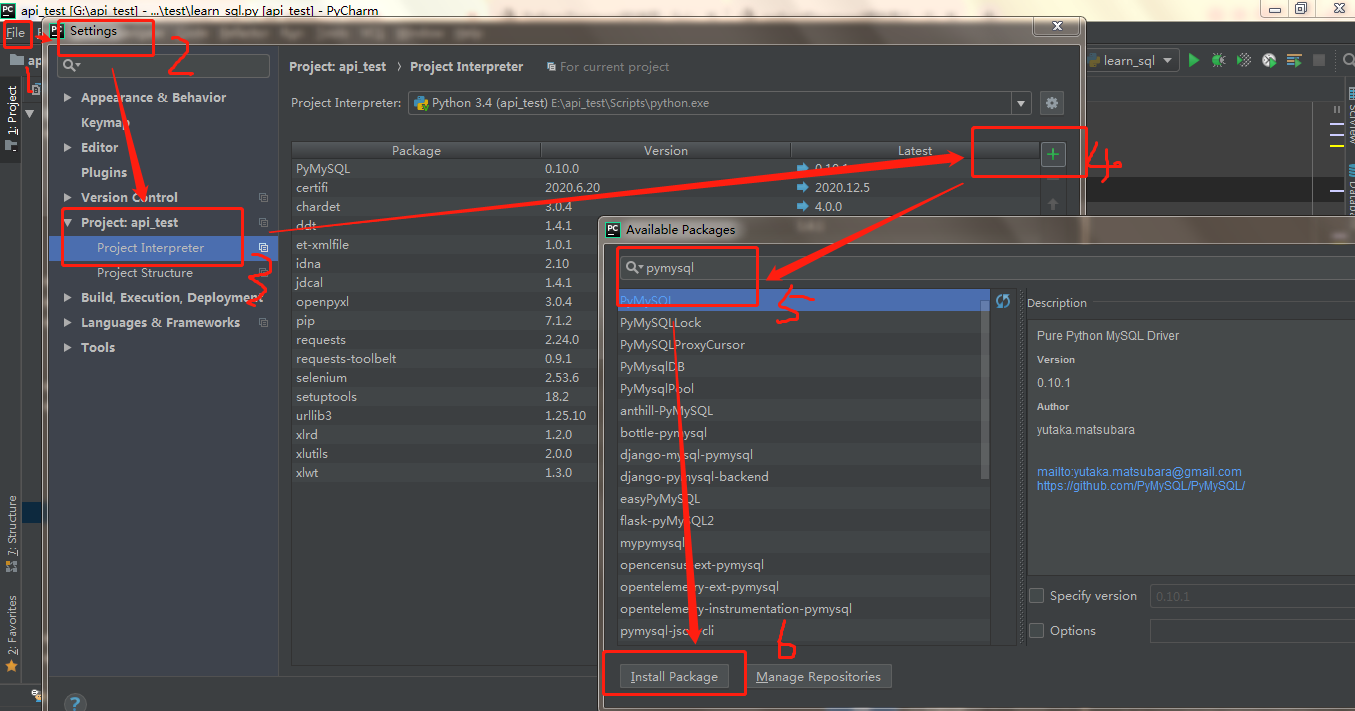
3.在PyCharm中安裝
在PyCharm中直接檢索該模組,並安裝,步驟如下:

二、Python操作資料庫
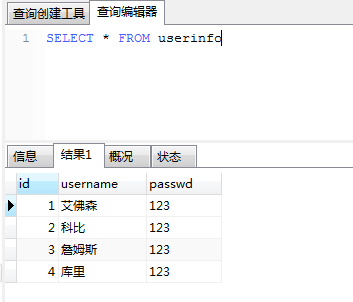
因為方便測試,我們首先在mysql資料庫建立測試表:userinfo,表資訊如下:

有了資料庫和資料表後,我們就可以匯入pymysql模組,使用該模組下封裝的方法實現資料庫操作
資料庫連線
pymysql提供的方法如下:
1. 建立資料庫連線 conn = pymysql.connect()
2. 從連線建立操作遊標 cur = conn.cursor()
3. 使用遊標執行sql(讀/寫) cur.execute(sql)
4. 獲取結果(讀)/ 提交更改(寫) cur.fetchall() / conn.commit()
5. 關閉遊標及連線 cur.close();conn.close()
程式碼示例:
import pymysql
# 建立連線
connection = pymysql.connect(host='119.29.78.234', port=3306, user='root', password='dhcc@2020', db='test123')
cursor = connection.cursor()       # 建立遊標
cursor.execute("SELECT * FROM userinfo")   #使用execute()方法執行SQL語句
data = cursor.fetchall()  #使用fetall()獲取全部資料
print(data)
cursor.close()   #關閉遊標和資料庫的連線
connection.close()

#執行結果
((1, '艾佛森', '123'), (2, '科比', '123'), (3, '詹姆斯', '123'), (4, '庫裡', '123'))
什麼是遊標? 遊標類似檔案控制代碼,可以逐條的訪問資料庫執行結果集。pymysql中只能通過遊標來執行sql和獲取結果
以上程式碼執行後,預設返回的是一個巢狀元組資料型別
資料庫增刪改查
查詢操作:
使用cur.execute(), 執行資料庫查詢後無返回的是影響的行數,而非查詢結果。我們要使用cur.fetchone()/cur.fetchmany()/cur.fetchall()來獲取查詢結果
cur.fetchone(): 獲取一條資料(同時獲取的資料會從結果集刪除),返回元組
cur.fetchmany(3): 獲取多條資料,返回巢狀元組
cur.fetchall(): 獲取所有資料,返回巢狀元組
程式碼示例:
查詢單條資料:
import pymysql
db_config = {
      "host":"119.29.78.234",
       "port":3306,
       "user":"root",
       "password":"dhcc@2020",
       "db":"test123"
}
db = pymysql.connect(**db_config)
cursor = db.cursor()
sql = "SELECT * FROM userinfo"
cursor.execute(sql)
res = cursor.fetchone()    # fetchone()第一次只能查詢表中的首行資料
print(res)
res = cursor.fetchone()    # 第二次查詢下一行資料
print(res)
cursor.close()
db.close()

# 返回結果
((1, '艾佛森', '123'))
((2, '科比', '123'))
查詢多條資料:
import pymysql
db_config = {
      "host":"119.29.78.234",
       "port":3306,
       "user":"root",
       "password":"dhcc@2020",
       "db":"test123"
}
db = pymysql.connect(**db_config)
cursor = db.cursor()
sql = "SELECT * FROM userinfo"
cursor.execute(sql)
res = cursor.fetchmany(3)   # 第一次查詢表中的前3行資料
print(res)
res = cursor.fetchmany(3)    # 第二次查詢下一個3行的資料
print(res)
cursor.close()
db.close()

#返回結果
((1, '艾佛森', '123'), (2, '科比', '123'), (3, '詹姆斯', '123'))
((4, '庫裡', '123'),)
查詢所有資料:
import pymysql
db_config = {
      "host":"119.29.78.234",
       "port":3306,
       "user":"root",
       "password":"dhcc@2020",
       "db":"test123"
}
db = pymysql.connect(**db_config)
cursor = db.cursor()
sql = "SELECT * FROM userinfo"
cursor.execute(sql)
res = cursor.fetchall()   # 第一次查詢表中的所有資料
print(res)
res = cursor.fetchall()    # 第二次查詢無資料
print(res)
cursor.close()
db.close()

#返回結果
((1, '艾佛森', '123'), (2, '科比', '123'), (3, '詹姆斯', '123'), (4, '庫裡', '123'))
()
預設都是返回元組的資料型別,看起來不太直觀,因此,在例項化時可以將遊標設定成如下這樣,就可以返回字典型別的資料
cursor = db.cursor(cursor=pymysql.cursors.DictCursor)

#返回結果
[{'username': '艾佛森', 'id': 1, 'passwd': '123'}, {'username': '科比', 'id': 2, 'passwd': '123'}, {'username': '詹姆斯', 'id': 3, 'passwd': '123'}, {'username': '庫裡', 'id': 4, 'passwd': '123'}]
增刪改操作:
在進行增刪改,執行修改資料庫的操作後不立即生效,使用連線conn.commit()提交後才生效,支援事物及回滾
程式碼示例:
import pymysql
db_config = {
      "host":"119.29.78.234",
       "port":3306,
       "user":"root",
       "password":"dhcc@2020",
       "db":"test123"
}
db = pymysql.connect(**db_config)
cursor = db.cursor()
sql = "INSERT INTO userinfo(username,passwd) VALUES('克萊','123')"
#sql = "UPDATE userinfo SET username = '奧尼爾' WHERE username = '科比'"  # 修改資料
#sql = "DELETE FROM username WHERE username ='奧尼爾'"                    # 刪除資料
try:
    cursor.execute(sql)
    db.commit()
except Exception as e :   # 執行異常回滾
    db.rollback()
cursor.close()
db.close()
#或者在execute提供需要插入的資料
import pymysql
db_config = {
      "host":"119.29.78.234",
       "port":3306,
       "user":"root",
       "password":"dhcc@2020",
       "db":"test123"
}
db = pymysql.connect(**db_config)
cursor = db.cursor()
sql = "INSERT INTO userinfo(username,passwd) VALUES(%s,%s)"
try:
    cursor.execute(sql,("克萊","123"))
    db.commit()
except Exception as e :
    db.rollback()
cursor.close()
db.close()
#批量插入資料
import pymysql
db_config = {
      "host":"119.29.78.234",
       "port":3306,
       "user":"root",
       "password":"dhcc@2020",
       "db":"test123"
}
db = pymysql.connect(**db_config)
cursor = db.cursor()
sql = "INSERT INTO userinfo(username,passwd) VALUES(%s,%s)"
try:
    cursor.executemany(sql,[("韋德","123"),("字母哥","123")])
    db.commit()
except Exception as e :
    db.rollback()
cursor.close()
db.close()
封裝資料庫操作
由於經常要使用到資料庫操作,建議將所有資料庫操作封裝成公用的資料庫模組
封裝的程式碼示例如下:
import pymysql.cursors

class Operation_mysql(object):
    def __init__(self):
        # 建立連線
        db_config = {
            "host": "119.29.78.234",
            "port": 3306,
            "user": "root",
            "password": "dhcc@2020",
            "db": "test123"
        }
        self.connection = pymysql.connect(**db_config)
        # 建立遊標
        self.cursor = self.connection.cursor()

    def execute_sql(self, sql):
        try:
            self.cursor.execute(sql)
            self.connection.commit()
        except Exception as e:  # 執行異常回滾
            db.rollback()

    def get_data(self):
        data = self.cursor.fetchone()
        #data = self.cursor.fetchall() # 查詢所有資料
        return data

    def close_mysql(self):
        # 關閉遊標
        self.cursor.close()
        # 關閉資料庫連線
        self.connection.close()
這樣封裝後後續介面測試用例需要操作資料庫時,就可以引入該模組,例項化物件呼叫該模組下的方
