
Spring Security OAuth2.0認證授權一:框架搭建和認證測試
阿新 • • 發佈:2021-01-08
## 一、OAuth2.0介紹
OAuth(開放授權)是一個開放標準,**允許使用者授權第三方應用訪問他們儲存在另外的服務提供者上的資訊,而不 需要將使用者名稱和密碼提供給第三方應用或分享他們資料的所有內容**。
### 1.stackoverflow和github
聽起來挺拗口,不如舉個例子說明下,就以stackoverflow登入為例:我們登入stackoverflow,網站上會提示幾種登入方式,如下所示
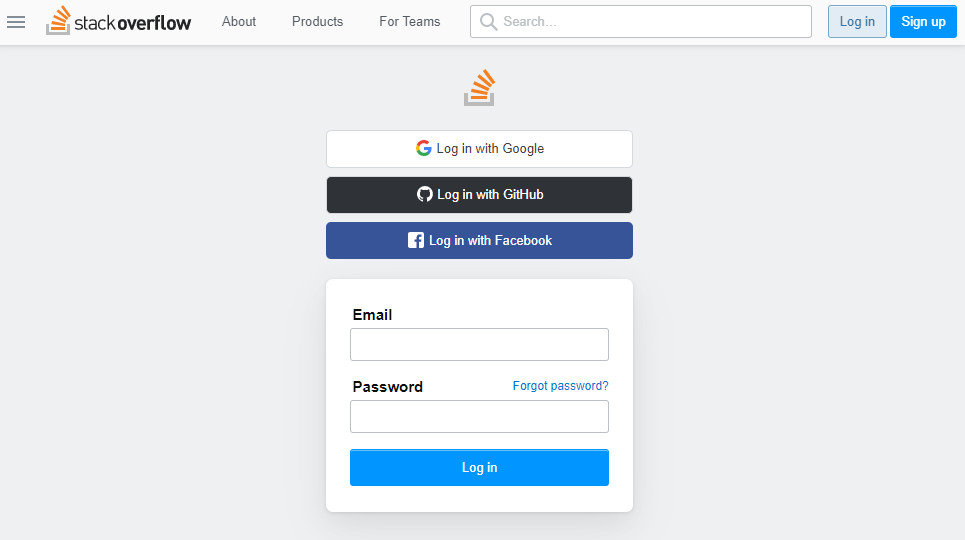
其中有一種github登入的方式,點一下進入以下頁面
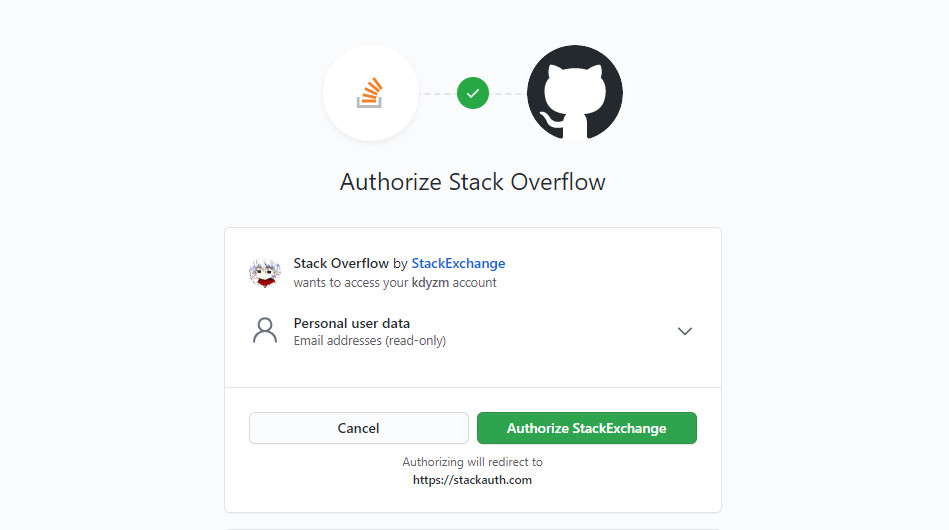
這個頁面實際上是github授權登陸stackoverflow的頁面,只要點選授權按鈕,就可以使用github上註冊的相關資訊註冊stackoverflow了,仔細看下這個授權頁面,這個授權頁面上有幾個值得注意的點:
1. 圖片中介紹了三方角色資訊:當前操作人,github以及stackoverflow
2. stackoverflow想通過github獲取你的個人資訊,哪些個人資訊呢?Email addresses (read-only),郵箱地址,而且是隻讀,也就是說就算你授權了stackoverflow,它也修改不了你github上的個人資訊。
3. 授權按鈕,以及下面的一行小字`Authorizing will redirect to **https://stackauth.com**`,也就是說如果你點選了授權按鈕,頁面將重定向到stackauth.com頁面。點選授權按鈕之後就彷彿使用github的賬號登入上了stackoverflow一樣。
這裡操作人、github、stackoverflow分別扮演了什麼角色,stackoverflow是如何從github獲取到個人資訊的呢?這裡實際上使用的是auth2.0協議進行的認證和授權。
### 2.auth2.0協議
我們看OAuth2.0認證流程:引自OAauth2.0協議rfc6749 https://tools.ietf.org/html/rfc6749
``` txt
+--------+ +---------------+
| |--(A)- Authorization Request ->| Resource |
| | | Owner |
| |<-(B)-- Authorization Grant ---| |
| | +---------------+
| |
| | +---------------+
| |--(C)-- Authorization Grant -->| Authorization |
| Client | | Server |
| |<-(D)----- Access Token -------| |
| | +---------------+
| |
| | +---------------+
| |--(E)----- Access Token ------>| Resource |
| | | Server |
| |<-(F)--- Protected Resource ---| |
+--------+ +---------------+
Figure 1: Abstract Protocol Flow
The abstract OAuth 2.0 flow illustrated in Figure 1 describes the
interaction between the four roles and includes the following steps:
(A) The client requests authorization from the resource owner. The
authorization request can be made directly to the resource owner
(as shown), or preferably indirectly via the authorization
server as an intermediary.
(B) The client receives an authorization grant, which is a
credential representing the resource owner's authorization,
expressed using one of four grant types defined in this
specification or using an extension grant type. The
authorization grant type depends on the method used by the
client to request authorization and the types supported by the
authorization server.
(C) The client requests an access token by authenticating with the
authorization server and presenting the authorization grant.
(D) The authorization server authenticates the client and validates
the authorization grant, and if valid, issues an access token.
(E) The client requests the protected resource from the resource
server and authenticates by presenting the access token.
(F) The resource server validates the access token, and if valid,
serves the request.
Hardt Standards Track [Page 7]
```
------
OAauth2.0包括以下角色:
**1、客戶端**
本身不儲存資源,需要通過資源擁有者的授權去請求資源伺服器的資源,比如:Android客戶端、Web客戶端(瀏
覽器端)、微信客戶端等,在上面的例子中,stackoverflow扮演的正是這個角色。
**2、資源擁有者**
通常為使用者,也可以是應用程式,即該資源的擁有者。在上面的例子中,資源擁有者指的是在github上已經註冊的使用者。
**3、授權伺服器(也稱認證伺服器)**
用於服務提供商對資源擁有的身份進行認證、對訪問資源進行授權,認證成功後會給客戶端發放令牌
(access_token),作為客戶端訪問資源伺服器的憑據。本例為github。
**4、資源伺服器**
儲存資源的伺服器,本例子為github儲存的使用者資訊。
如此,上面使用github登陸stackoverflow的流程大體上如下圖所示:
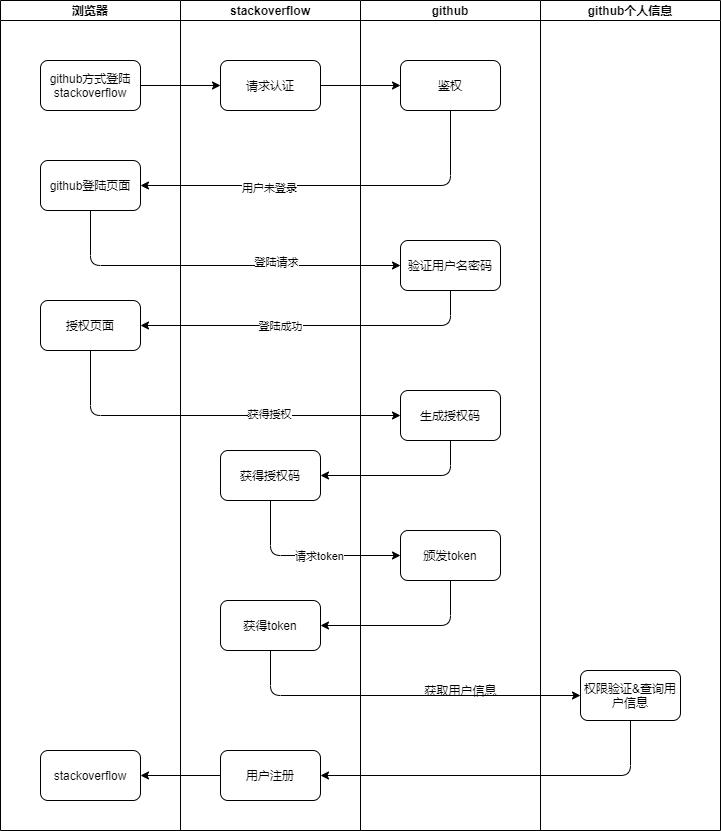
下面將演示如何使用spring boot搭建OAuth2.0認證中心以實現類似於stackoverflow使用github賬號登陸的效果。
## 二、使用springboot搭建OAuth2.0認證中心
專案目錄層次如下:
```tree
├── docs
│ └── sql
│ └── init.sql
├── pom.xml
└── src
├── main
│ ├── java
│ │ └── com
│ │ └── kdyzm
│ │ └── spring
│ │ └── security
│ │ └── auth
│ │ └── center
│ │ ├── AuthCenterApplication.java
│ │ ├── config
│ │ │ ├── AuthorizationServer.java
│ │ │ ├── MybatisPlusConfig.java
│ │ │ ├── TokenConfig.java
│ │ │ └── WebSecurityConfig.java
│ │ ├── controller
│ │ │ └── GrantController.java
│ │ ├── entity
│ │ │ └── TUser.java
│ │ ├── handler
│ │ │ └── MyAuthenticationFailureHandler.java
│ │ ├── mapper
│ │ │ └── UserMapper.java
│ │ └── service
│ │ └── MyUserDetailsServiceImpl.java
│ └── resources
│ ├── application.yml
│ ├── static
│ │ ├── css
│ │ │ ├── bootstrap.min.css
│ │ │ └── signin.css
│ │ └── login.html
│ └── templates
│ └── grant.html
```
專案原始碼地址:https://gitee.com/kdyzm/spring-security-oauth-study/tree/v2.0.0 (認準v2.0.0標籤)
接下來撿著重點說下搭建過程
### 1.引入最核心的三個maven依賴
``` xml
org.springframework.boot
org.springframework.cloud
spring-cloud-starter-security
org.springframework.cloud
spring-cloud-starter-oauth2
```
像是mybatis、mybatis plus、fastjson、lombok、thymeleaf等依賴都是輔助依賴,不贅述
### 2.編寫啟動類
``` java
@SpringBootApplication
public class AuthCenterApplication {
public static void main(String[] args) {
SpringApplication.run(AuthCenterApplication.class, args);
}
}
```
### 3.配置檔案
``` properties
server:
port: 30000
spring:
application:
name: auth-center
datasource:
url: jdbc:mysql://${db}/security?useSSL=false&userUnicode=true&characterEncoding=utf-8&serverTimezone=UTC
username: root
password: ${db_password}
driver-class-name: com.mysql.jdbc.Driver
thymeleaf:
prefix: classpath:/templates/
suffix: .html
cache: false
```
配置完以上三項,就可以將專案正常啟動起來了,但是是一個一片空白的專案。接下來配置核心程式碼實現,需要說明的一點是,https://gitee.com/kdyzm/spring-security-oauth-study/tree/v1.0.0 該標籤下的程式碼未配置自定義登入頁面和授權頁面,是實現OAuth2.0認證中心最簡單的程式碼。
### 4.EnableAuthorizationServer
可以用 @EnableAuthorizationServer 註解並繼承AuthorizationServerConfigurerAdapter來配置OAuth2.0 授權伺服器。
在config包下建立AuthorizationServer:
``` java
@Configuration
@EnableAuthorizationServer
public class AuthorizationServer extends AuthorizationServerConfigurerAdapter{
......
}
```
AuthorizationServerConfigurerAdapter要求重寫以下三個方法並配置方法中的幾個類,這幾個類是由Spring建立的獨立的配置物件,它們會被Spring傳入AuthorizationServerConfigurer中進行配置。
``` java
public void configure(AuthorizationServerSecurityConfigurer security) throws Exception {}
public void configure(ClientDetailsServiceConfigurer clients) throws Exception {}
public void configure(AuthorizationServerEndpointsConfigurer endpoints) throws Exception {}
```
- ClientDetailsServiceConfigurer :用來配置客戶端詳情服務(ClientDetailsService),客戶端詳情資訊在這裡進行初始化,你能夠把客戶端詳情資訊寫死在這裡或者是通過資料庫來儲存調取詳情資訊。
- AuthorizationServerEndpointsConfigurer :用來配置令牌(token)的訪問端點和令牌服務(tokenservices)。
- AuthorizationServerSecurityConfigurer :用來配置令牌端點的安全約束.
### 5.配置客戶端詳細資訊
ClientDetailsServiceConfigurer 能夠使用記憶體或者JDBC來實現客戶端詳情服務(ClientDetailsService),ClientDetailsService負責查詢ClientDetails,而ClientDetails有幾個重要的屬性如下列表:
- clientId :(必須的)用來標識客戶的Id。
- secret :(需要值得信任的客戶端)客戶端安全碼,如果有的話。
- scope :用來限制客戶端的訪問範圍,如果為空(預設)的話,那麼客戶端擁有全部的訪問範圍。
- authorizedGrantTypes :此客戶端可以使用的授權型別,預設為空。
- authorities :此客戶端可以使用的許可權(基於Spring Security authorities)。
客戶端詳情(Client Details)能夠在應用程式執行的時候進行更新,可以通過訪問底層的儲存服務(例如將客戶端詳情儲存在一個關係資料庫的表中,就可以使用 JdbcClientDetailsService)或者通過自己實現ClientRegistrationService介面(同時你也可以實現 ClientDetailsService 介面)來進行管理。
我們暫時使用記憶體方式儲存客戶端詳情資訊,配置如下:
``` java
@Override
public void configure(ClientDetailsServiceConfigurer clients) throws Exception {
clients.inMemory() //使用in‐memory儲存
.withClient("c1")
.secret(new BCryptPasswordEncoder().encode("secret"))//$2a$10$0uhIO.ADUFv7OQ/kuwsC1.o3JYvnevt5y3qX/ji0AUXs4KYGio3q6
.resourceIds("r1")
.authorizedGrantTypes("authorization_code", "password", "client_credentials", "implicit", "refresh_token")//該client允許的授權型別
.scopes("all") //授權範圍
.autoApprove(false)
.redirectUris("https://www.baidu.com");
}
```
### 6.管理令牌
AuthorizationServerTokenServices 介面定義了一些操作使得你可以對令牌進行一些必要的管理,令牌可以被用來載入身份資訊,裡面包含了這個令牌的相關許可權。
自己可以建立 AuthorizationServerTokenServices 這個介面的實現,則需要繼承 DefaultTokenServices 這個類,裡面包含了一些有用實現,你可以使用它來修改令牌的格式和令牌的儲存。預設的,當它嘗試建立一個令牌的時候,是使用隨機值來進行填充的,除了持久化令牌是委託一個 TokenStore 介面來實現以外,這個類幾乎幫你做了所有的事情。並且 TokenStore 這個介面有一個預設的實現,它就是 InMemoryTokenStore ,如其命名,所有的令牌是被儲存在了記憶體中。除了使用這個類以外,你還可以使用一些其他的預定義實現,下面有幾個版本,它們都實現了TokenStore介面:
- InMemoryTokenStore :這個版本的實現是被預設採用的,它可以完美的工作在單伺服器上(即訪問併發量壓力不大的情況下,並且它在失敗的時候不會進行備份),大多數的專案都可以使用這個版本的實現來進行嘗試,你可以在開發的時候使用它來進行管理,因為不會被儲存到磁碟中,所以更易於除錯。
- JdbcTokenStore :這是一個基於JDBC的實現版本,令牌會被儲存進關係型資料庫。使用這個版本的實現時,你可以在不同的伺服器之間共享令牌資訊,使用這個版本的時候請注意把"spring-jdbc"這個依賴加入到你的classpath當中。
- JwtTokenStore :這個版本的全稱是 JSON Web Token(JWT),它可以把令牌相關的資料進行編碼(因此對於後端服務來說,它不需要進行儲存,這將是一個重大優勢),但是它有一個缺點,那就是撤銷一個已經授權令牌將會非常困難,所以它通常用來處理一個生命週期較短的令牌以及撤銷重新整理令牌(refresh_token)。另外一個缺點就是這個令牌佔用的空間會比較大,如果你加入了比較多使用者憑證資訊。JwtTokenStore 不會儲存任何資料,但是它在轉換令牌值以及授權資訊方面與 DefaultTokenServices 所扮演的角色是一樣的。
**6.1 定義TokenConfig**
在config包下定義TokenConfig,我們暫時先使用InMemoryTokenStore,生成一個普通的令牌。
```
@Configuration
public class TokenConfig {
@Bean
public TokenStore tokenStore() {
return new InMemoryTokenStore();
}
}
```
**6.2 定義ClientDetailsService**
由於配置了5,所以這裡會spring會幫我們生成一個基於記憶體的 ClientDetailsService
**6.3 定義AuthorizationServerTokenServices**
在AuthorizationServer中定義AuthorizationServerTokenServices
``` java
@Autowired
private TokenStore tokenStore;
@Autowired
private ClientDetailsService clientDetailsService;
@Bean
public AuthorizationServerTokenServices tokenServices(){
DefaultTokenServices services = new DefaultTokenServices();
services.setClientDetailsService(clientDetailsService);
services.setSupportRefreshToken(true);
services.setTokenStore(tokenStore);
services.setAccessTokenValiditySeconds(7200);
services.setRefreshTokenValiditySeconds(259200);
return services;
}
```
### 7.令牌訪問端點配置
AuthorizationServerEndpointsConfigurer 這個物件的例項可以完成令牌服務以及令牌endpoint配置。
**7.1 AuthorizationServerEndpointsConfigurer 授權型別**
AuthorizationServerEndpointsConfigurer 通過設定以下屬性決定支援的授權型別(Grant Types):
- authenticationManager :認證管理器,**當你選擇了資源所有者密碼(password)授權型別的時候,請設定這個屬性注入一個 AuthenticationManager 物件**。
- userDetailsService :**如果你設定了這個屬性的話,那說明你有一個自己的 UserDetailsService 介面的實現**,或者你可以把這個東西設定到全域性域上面去(例如 GlobalAuthenticationManagerConfigurer 這個配置物件),當你設定了這個之後,那麼 "refresh_token" 即重新整理令牌授權型別模式的流程中就會包含一個檢查,用來確保這個賬號是否仍然有效,假如說你禁用了這個賬戶的話。
- authorizationCodeServices :這個屬性是用來設定授權碼服務的(即 AuthorizationCodeServices 的例項物件),主要用於 "authorization_code" 授權碼型別模式。
- implicitGrantService :這個屬性用於設定隱式授權模式,用來管理隱式授權模式的狀態。
- tokenGranter :當你設定了這個東西(即 TokenGranter 介面實現),那麼授權將會交由你來完全掌控,並且會忽略掉上面的這幾個屬性,這個屬性一般是用作拓展用途的,即標準的四種授權模式已經滿足不了你的需求的時候,才會考慮使用這個。
**7.2 AuthorizationServerEndpointsConfigurer授權端點**
AuthorizationServerEndpointsConfigurer 這個配置物件有一個叫做 pathMapping() 的方法用來配置端點URL連結,它有兩個引數:
- 第一個引數: String 型別的,這個端點URL的預設連結。
- 第二個引數: String 型別的,你要進行替代的URL連結。
以上的引數都將以 "/" 字元為開始的字串,框架的預設URL連結如下列表,可以作為這個 pathMapping() 方法的第一個引數:
- /oauth/authorize :授權端點。
- /oauth/token :令牌端點。
- /oauth/confirm_access :使用者確認授權提交端點。
- /oauth/error :授權服務錯誤資訊端點。
- /oauth/check_token :用於資源服務訪問的令牌解析端點。
- /oauth/token_key :提供公有密匙的端點,如果你使用JWT令牌的話。
綜上AuthorizationServerEndpointsConfigurer配置如下
``` java
@Autowired
private AuthenticationManager authenticationManager;
@Autowired
private AuthorizationCodeServices authorizationCodeServices;
@Bean
public AuthorizationCodeServices authorizationCodeServices(){
return new InMemoryAuthorizationCodeServices();
}
@Override
public void configure(AuthorizationServerEndpointsConfigurer endpoints) throws Exception {
endpoints
.authenticationManager(authenticationManager)
.authorizationCodeServices(authorizationCodeServices)
.tokenServices(tokenServices())
.allowedTokenEndpointRequestMethods(HttpMethod.POST);
endpoints.pathMapping("/oauth/confirm_access","/custom/confirm_access");//自定義授權頁面需要
}
```
上面需要的AuthenticationManager的定義在SpringSecurity的配置中,下面會講到。
### 8.令牌端點的安全約束
AuthorizationServerSecurityConfigurer 用來配置令牌端點(Token Endpoint)的安全約束,在AuthorizationServer中配置如下。
``` java
@Override
public void configure(AuthorizationServerSecurityConfigurer security) throws Exception {
security
.tokenKeyAccess("permitAll()") //(1)
.checkTokenAccess("permitAll()")//(2)
.allowFormAuthenticationForClients();//(3)
}
```
(1)tokenkey這個endpoint當使用JwtToken且使用非對稱加密時,資源服務用於獲取公鑰而開放的,這裡指這個endpoint完全公開。
(2)checkToken這個endpoint完全公開
(3) 允許表單認證
### 9.web安全配置
這裡可以配置安全攔截機制、自定義登入頁面、登入失敗攔截器等等
在以下的配置中建立了`AuthenticationManager` bean,這是 7.2 中所需要的。
``` java
@Configuration
@EnableGlobalMethodSecurity(securedEnabled = true,prePostEnabled = true)
public class WebSecurityConfig extends WebSecurityConfigurerAdapter {
@Autowired
private MyAuthenticationFailureHandler myAuthenticationFailureHandler;
//認證管理器
@Bean
public AuthenticationManager authenticationManagerBean() throws Exception {
return super.authenticationManagerBean();
}
//密碼編碼器
@Bean
public PasswordEncoder passwordEncoder() {
return new BCryptPasswordEncoder();
}
//安全攔截機制
@Override
protected void configure(HttpSecurity http) throws Exception {
http
.csrf().disable()
.authorizeRequests()
.antMatchers("/login*","/css/*").permitAll()
.anyRequest().authenticated()
.and()
.formLogin()
.loginPage("/login.html")
.loginProcessingUrl("/login")
.failureHandler(myAuthenticationFailureHandler);
}
}
```
## 三、自定義登陸頁面
spring security預設帶的登入頁面不可修改,載入速度賊慢,原因是使用的css連結是國外的。所以從各方面來說自定義登入頁面都是需要的。
### 1.建立login.html檔案
這個非常簡單,只需要將spring security載入速度賊慢的那個頁面扒下來就好。
專案中程式碼連結:https://gitee.com/kdyzm/spring-security-oauth-study/blob/master/auth-center/src/main/resources/static/login.html
### 2.配置攔截規則
WebSecurityConfig下如下設定
``` java
@Override
protected void configure(HttpSecurity http) throws Exception {
http
.csrf().disable()
.authorizeRequests()
.antMatchers("/login*","/css/*").permitAll()
.anyRequest().authenticated()
.and()
.formLogin()
.loginPage("/login.html")
.loginProcessingUrl("/login")
.failureHandler(myAuthenticationFailureHandler);
}
```
`.antMatchers("/login*","/css/*").permitAll()`是必須的,否則沒法登陸,會陷入重定向死迴圈;
``` java
.loginPage("/login.html")
.loginProcessingUrl("/login")
```
這兩個必須一起配置,否則會login 404。
### 3.自定義登陸失敗頁面
自定義登陸頁面之後登入失敗的原因就不提示了,這裡使用攔截器進行簡單的攔截並返回給前端結果(非常醜,但能用)
``` java
@Component
public class MyAuthenticationFailureHandler implements AuthenticationFailureHandler {
@Override
public void onAuthenticationFailure(HttpServletRequest request, HttpServletResponse response, AuthenticationException exception) throws IOException, ServletException {
response.setStatus(HttpStatus.INTERNAL_SERVER_ERROR.value());
response.setContentType("application/json;charset=utf-8");
response.getWriter().write(JSONObject.toJSONString(exception.getMessage()));
}
}
```
## 四、自定義授權頁面
預設的授權頁面非常醜,這裡重寫該頁面,頁面程式碼地址:https://gitee.com/kdyzm/spring-security-oauth-study/blob/master/auth-center/src/main/resources/templates/grant.html
然後配置OAuth訪問端點替換掉原來的地址:
``` java
endpoints.pathMapping("/oauth/confirm_access","/custom/confirm_access");
```
同時,由於重寫了頁面地址,需要實現/custom/confirm_access 介面
``` java
@Controller
@SessionAttributes("authorizationRequest")
public class GrantController {
/**
* @see WhitelabelApprovalEndpoint#getAccessConfirmation(java.util.Map, javax.servlet.http.HttpServletRequest)
* @param model
* @param request
* @return
* @throws Exception
*/
@RequestMapping("/custom/confirm_access")
public ModelAndView getAccessConfirmation(Map model, HttpServletRequest request) throws Exception {
AuthorizationRequest authorizationRequest = (AuthorizationRequest) model.get("authorizationRequest");
ModelAndView view = new ModelAndView();
view.setViewName("grant");
view.addObject("clientId", authorizationRequest.getClientId());
view.addObject("scopes",authorizationRequest.getScope());
return view;
}
}
```
## 五、實現UserDetailsService介面
完成以上配置之後基本上已經配置完了,但是還差一點,那就是實現UserDetailsService介面,不實現該介面,會出現後端死迴圈導致的stackoverflow問題。
為什麼要實現該介面?
該介面通過userName獲取使用者密碼資訊用於校驗使用者密碼登陸和許可權資訊等。
``` java
@Service
@Slf4j
public class MyUserDetailsServiceImpl implements UserDetailsService {
@Autowired
private UserMapper userMapper;
@Override
public UserDetails loadUserByUsername(String username) throws UsernameNotFoundException {
TUser tUser = userMapper.selectOne(new LambdaQueryWrapper().eq(TUser::getUsername, username));
if (Objects.isNull(tUser)) {
throw new UsernameNotFoundException(username + "賬號不存在");//return null也可以
}
List allPermissions = userMapper.findAllPermissions(tUser.getId());
String[] array = null;
if (CollectionUtils.isEmpty(allPermissions)) {
log.warn("{} 無任何許可權", tUser.getUsername());
array = new String[]{};
} else {
array = new String[allPermissions.size()];
allPermissions.toArray(array);
}
return User
.withUsername(tUser.getUsername())
.password(tUser.getPassword())
.authorities(array).build();
}
}
```
## 六、介面測試
在測試前,需要先執行資料庫指令碼並啟動服務
1. 執行auth-center/docs/sql/init.sql 檔案,建立資料庫並建立相關的表
2. 修改auth-center專案下的配置檔案中的資料庫連線配置
然後執行 AuthCenterApplication 程式,測試幾種oauth認證模式
### 1. 授權碼認證模式
> 最安全的一種模式。一般用於client是Web伺服器端應用或第三方的原生App呼叫資源服務的時候。因為在這種模式中access_token不會經過瀏覽器或移動端的App,而是直接從服務端去交換,這樣就最大限度的減小了令牌洩漏的風險。
> 該模式下獲取token需要分兩步走,第一步獲取授權碼,第二步獲取token。
- 獲取授權碼

**介面地址** `http://127.0.0.1:30000/oauth/authorize`
**請求方式** `GET`
**請求引數**
| 欄位名 | 描述 |
| ------------- | ------------------------------------------------- |
| client_id | 改值必須和配置在clients中的值保持一致 |
| response_type | 固定傳值`code`表示使用授權碼模式進行認證 |
| scope | 改值必須配置的clients中的值一致 |
| redirect_uri | 獲取code之後重定向的地址,必須和配置的clients一致 |
**請求示例**
http://127.0.0.1:30000/oauth/authorize?client_id=c1&response_type=code&scope=all&redirect_uri=https://www.baidu.com
賬號密碼分別輸入:zhangsan/123,進入授權頁面之後點選授權按鈕,頁面跳轉之後獲取到code。
- 獲取token
在上一步獲取到code之後,利用獲取到的該code獲取token。
**介面地址** `http://127.0.0.1:30000/oauth/token`
**請求方式** `POST`
**請求引數**
| 欄位名 | 描述 |
| ------------- | ------------------------------------------------- |
| code | 上一步獲取到的code |
| grant_type | 在授權碼模式,固定使用`authorization_code` |
| client_id | 改值必須和配置在clients中的值保持一致 |
| client_secret | 這裡的值必須和程式碼中配置的clients中配置的保持一致 |
| redirect_uri | 獲取token之後重定向的地址,該地址可以隨意寫 |
**請求示例**
http://127.0.0.1:30000/oauth/token
請求體
``` x-www-form-urlencoded
code:5Rmc3m
grant_type:authorization_code
client_id:c1
client_secret:secret
redirect_uri:https://www.baidu.com
```
### 2.簡化模式
> 該模式去掉了授權碼,使用者登陸之後直接獲取token並顯示在瀏覽器位址列中,引數和請求授權碼的介面基本上一模一樣,唯一的區別就是`response_type`欄位,授權碼模式下使用的是code欄位,在簡化模式下使用的是token欄位。一般來說,簡化模式用於沒有伺服器端的第三方單頁面應用,因為沒有伺服器端就無法接收授權碼。
**介面地址** `http://127.0.0.1:30000/oauth/authorize`
**請求方式** `GET`
**請求引數**
| 欄位名 | 描述 |
| ------------- | ------------------------------------------------- |
| client_id | 改值必須和配置在clients中的值保持一致 |
| response_type | 固定傳值`token`表示使用簡化模式進行認證 |
| scope | 該值必須和配置的clients中的值一致 |
| redirect_uri | 獲取code之後重定向的地址,必須和配置的clients一致 |
**請求示例**
http://127.0.0.1:30000/oauth/authorize?client_id=c1&response_type=token&scope=all&redirect_uri=https://www.baidu.com
### 3.密碼模式
> 這種模式十分簡單,但是卻意味著直接將使用者敏感資訊洩漏給了client,因此這就說明這種模式只能用於client是我
> 們自己開發的情況下。因此密碼模式一般用於我們自己開發的,第一方原生App或第一方單頁面應用
**介面地址** `http://127.0.0.1:30000/oauth/token`
**請求方式** `POST`
**請求引數**
| 欄位名 | 描述 |
| ------------- | ------------------------------------- |
| client_id | 改值必須和配置在clients中的值保持一致 |
| client_secret | 改值必須和配置在clients中的值保持一致 |
| grant_type | 在密碼模式下,該值固定為`password` |
| username | 使用者名稱 |
| password | 密碼 |
**請求示例**
http://127.0.0.1:30000/oauth/token?client_id=c1&client_secret=secret&grant_type=password&username=zhangsan&password=123
### 4.客戶端模式
> 這種模式是最方便但最不安全的模式。因此這就要求我們對client完全的信任,而client本身也是安全的。因此這種模式一般用來提供給我們完全信任的伺服器端服務。比如,合作方系統對接,拉取一組使用者資訊。
**介面地址** `http://127.0.0.1:30000/oauth/token`
**請求方式** `POST`
**請求引數**
| 欄位名 | 描述 |
| ------------- | -------------------------------------------- |
| client_id | 改值必須和配置在clients中的值保持一致 |
| client_secret | 改值必須和配置在clients中的值保持一致 |
| grant_type | 在密碼模式下,該值固定為`client_credentials` |
**請求示例**
http://127.0.0.1:30000/oauth/token?client_id=c1&client_secret=secret&grant_type=client_credentials
### 5.refresh_token換取新token
**介面地址** `http://127.0.0.1:30000/oauth/token`
**請求方式** `POST`
**請求引數**
| 欄位名 | 描述 |
| ------------- | ------------------------------------------------------------ |
| client_id | 該值必須和配置在clients中的值保持一致 |
| client_secret | 該值必須和配置在clients中的值保持一致 |
| grant_type | 如果想根據refresh_token換新的token,這裡固定傳值`refresh_token` |
| refresh_token | 未失效的refresh_token |
**請求示例**
http://127.0.0.1:30000/oauth/token?grant_type=refresh_token&refresh_token=09c9d11a-525a-4e5f-bac1-4f32e9025301&client_id=c1&client_secret=secret
## 七、原始碼地址
原始碼地址:https://gitee.com/kdyzm/spring-security-oauth-study
我的部落格地址:https://blog.kdyzm.cn/ 歡迎大家