
Kubernetes官方java客戶端之六:OpenAPI基本操作
阿新 • • 發佈:2021-01-11
### 歡迎訪問我的GitHub
[https://github.com/zq2599/blog_demos](https://github.com/zq2599/blog_demos)
內容:所有原創文章分類彙總及配套原始碼,涉及Java、Docker、Kubernetes、DevOPS等;
### 概覽
1. 本文是《Kubernetes官方java客戶端》系列的第六篇,以下提到的java客戶端都是指client-jar.jar;
2. 前文[《Kubernetes官方java客戶端之五:proto基本操作 》](https://blog.csdn.net/boling_cavalry/article/details/107552722)已經提到,java客戶端的基本功能由兩個主要脈絡組成,第一個是proto,主要功能是使用ProtoClient類提供的增刪改查介面,這些介面用到的入參和返回物件所涉及到的java類,都是通過K8S的protobuf生成的;
3. 除了使用ProtoClient對K8S資源進行增刪改查,還提供了另一種更強大的方式:OpenAPI,本章咱們就來一起學習OpenAPI相關的操作;
### K8S的OpenAPI
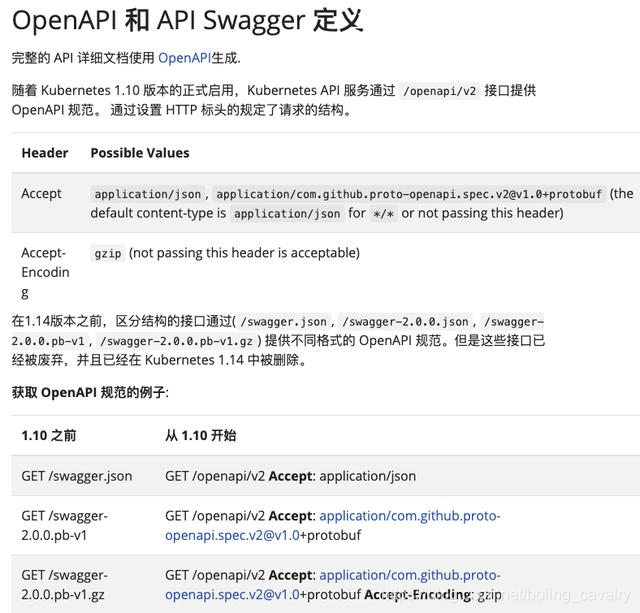
1. 先拋開java客戶端不提,咱們來看看K8S本身的OpenAPI,地址是:https://kubernetes.io/zh/docs/concepts/overview/kubernetes-api/ ,關鍵資訊如下圖所示,可見K8S提供了OpenAPI規範:
2. 如果您想檢視當前K8S環境的OpenAPI規範,請開啟K8S環境的/etc/kubernetes/manifests/kube-apiserver.yaml檔案,增加下圖紅框中的內容:
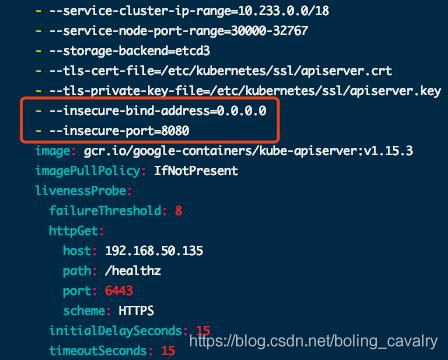
3. 修改完畢後請稍候,系統會根據檔案的變化自動更新(千萬不要執行kubectl apply -f kube-apiserver.yaml,這會導致新建api-server的pod,由於端口占用而啟動失敗);
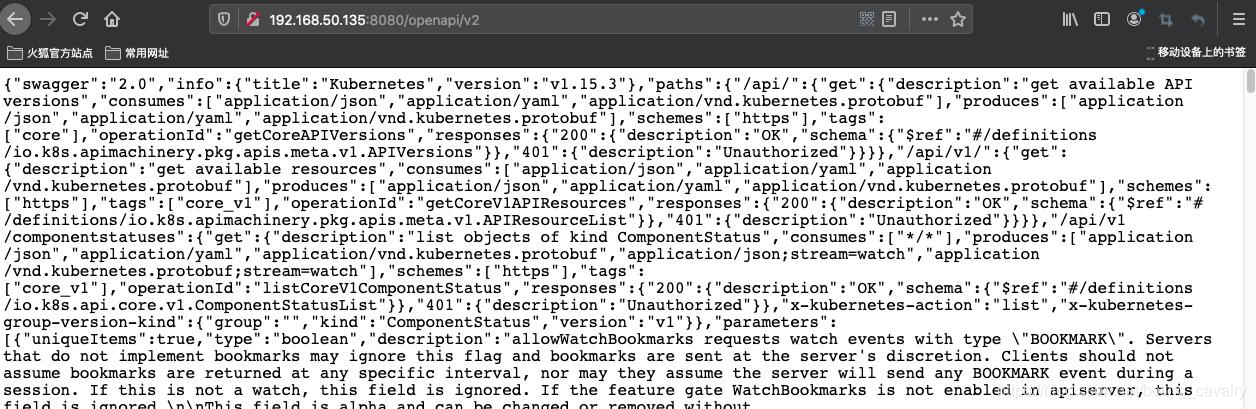
4. 假設宿主機IP地址是192.168.50.135,那麼在瀏覽器上訪問:http://192.168.50.135:8080/openapi/v2,就能得到所有OpenAPI資訊如下圖:
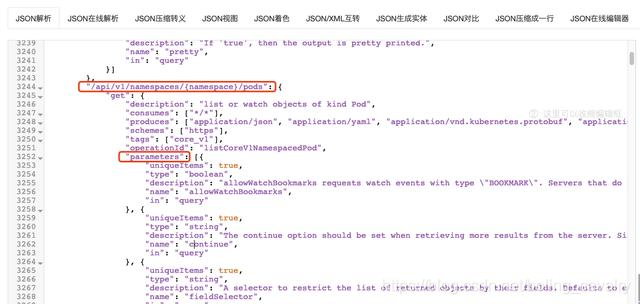
5. 上圖的原始資料沒有可讀性,複製到線上JSON格式化網站,得到的內容如下圖,例如查詢pod列表的API資訊已經非常詳細了:
6. 以上就是對K8S的OpenAPI簡介,接下來回到java客戶端本身,看看它提供了哪些OpenAPI相關的能力;
### java客戶端的OpenAPI
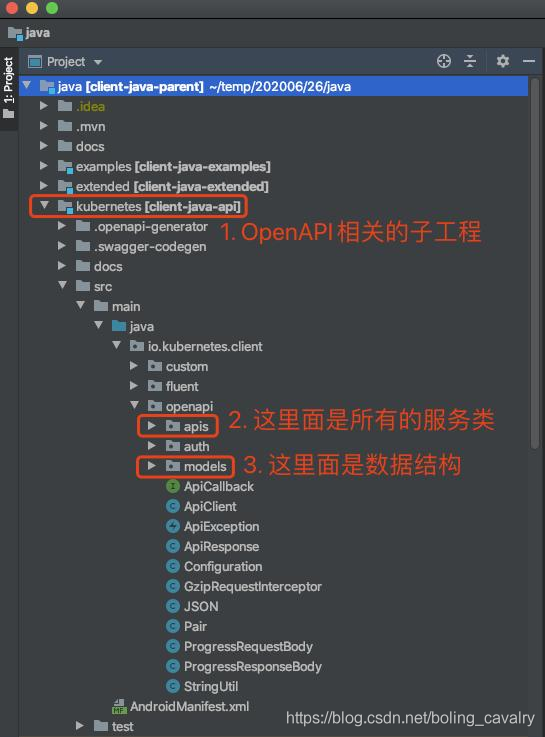
1. 開啟java客戶端工程的原始碼如下圖,紅框1就是和OpenAPI相關的子工程,提供服務的功能類都在紅框2的package中,也就是說,依靠紅框2中的API以及紅框3中的資料結構,我們可以完成大部分K8S資源控制相關的操作:
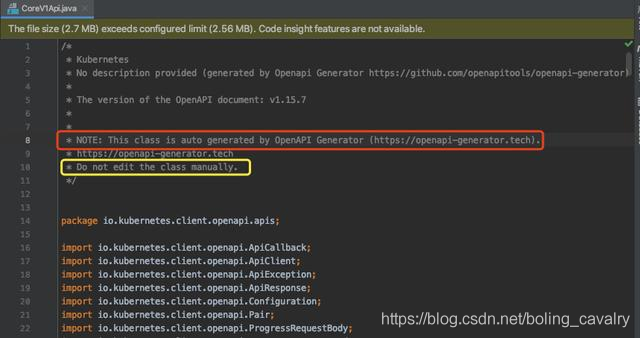
2. 開啟常用的CoreV1Api.java,如下圖紅框,頂部的註釋已經說明了一切:這些程式碼都是工具生成的(至於如何生成就不在本文中討論了):
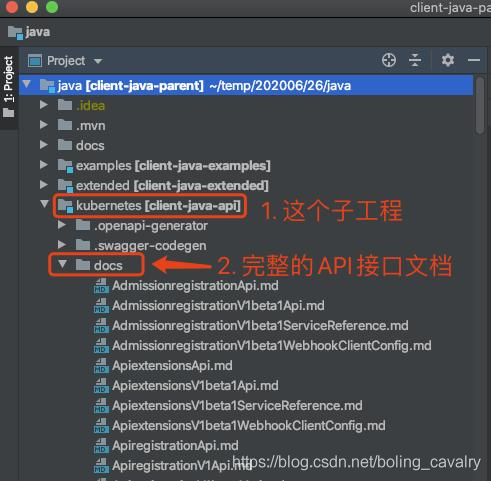
3. 如果您下載了java客戶端原始碼,可以在client-java-api這個子工程中看到完整的OpenAPI介面文件:
4. 前文[《Kubernetes官方java客戶端之五:proto基本操作 》](https://blog.csdn.net/boling_cavalry/article/details/107552722)的程式碼中,咱們嘗試過獲取pod列表,但是ProtoClient的已有API不支援提交更詳細的業務引數,此時選擇OpenAPI介面即可輸入詳細的業務引數,介面詳細資訊可以在文件中查到,還帶有完整的demo程式碼,如下圖所示:
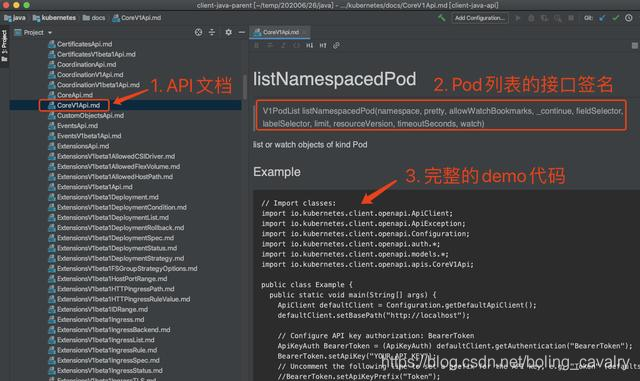
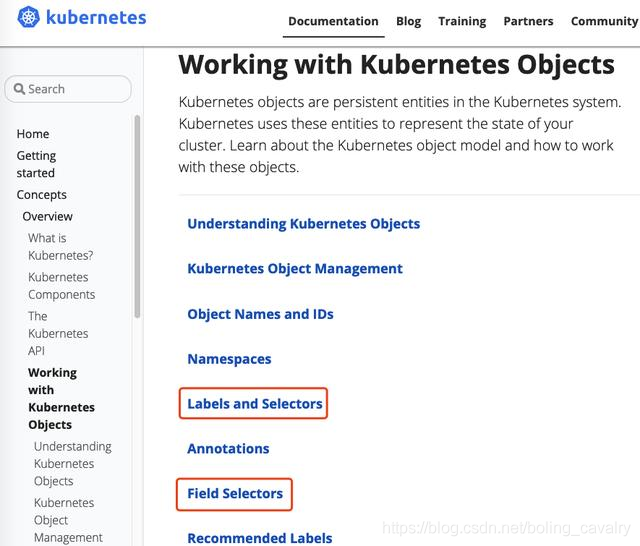
5. 上圖中的listNamespacedPod介面有兩個重要引數:fieldSelector和labelSelector,這是過濾用的,詳細的用法請參考K8S官方文件,地址是:https://kubernetes.io/docs/concepts/overview/working-with-objects/ ,如下圖紅框:
6. 弄清楚了K8S的OpenAPI規範,以及java客戶端依據此規範生成的API服務,還有詳細的介面文件在手,可以編碼實戰了;
### 原始碼下載
1. 如果您不想編碼,可以在GitHub下載所有原始碼,地址和連結資訊如下表所示(https://github.com/zq2599/blog_demos):
| 名稱 | 連結 | 備註|
| :-------- | :----| :----|
| 專案主頁| https://github.com/zq2599/blog_demos | 該專案在GitHub上的主頁 |
| git倉庫地址(https)| https://github.com/zq2599/blog_demos.git | 該專案原始碼的倉庫地址,https協議 |
| git倉庫地址(ssh)| [email protected]:zq2599/blog_demos.git | 該專案原始碼的倉庫地址,ssh協議 |
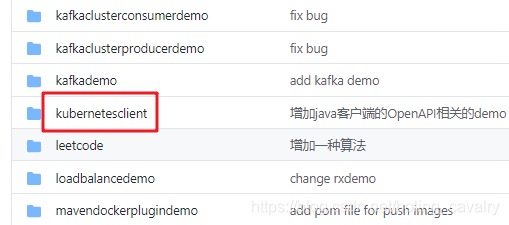
2. 這個git專案中有多個資料夾,本章的應用在kubernetesclient資料夾下,如下圖紅框所示:
### 開始編碼
1. 開啟[《Kubernetes官方java客戶端之一:準備 》]()中建立的kubernetesclient工程,在裡面新建子工程openapi,其pom.xml內容如下,要注意的是spring-boot-starter-json已經被排除,因此序列化工具會變為Gson(原本預設是jackson):
```xml
```
2. 新增OpenAPIDemoApplication.java,這是新工程的引導類,也有兩個web介面,一個建立namespace,另一個按照namespace查詢pod列表,關鍵位置已添加了註釋,就不多贅述了:
```java
package com.bolingcavalry.openapi;
import com.google.gson.GsonBuilder;
import io.kubernetes.client.openapi.ApiClient;
import io.kubernetes.client.openapi.ApiException;
import io.kubernetes.client.openapi.Configuration;
import io.kubernetes.client.openapi.apis.CoreV1Api;
import io.kubernetes.client.openapi.models.V1Namespace;
import io.kubernetes.client.openapi.models.V1NamespaceBuilder;
import io.kubernetes.client.openapi.models.V1PodList;
import io.kubernetes.client.util.ClientBuilder;
import io.kubernetes.client.util.KubeConfig;
import lombok.extern.slf4j.Slf4j;
import org.springframework.boot.SpringApplication;
import org.springframework.boot.autoconfigure.SpringBootApplication;
import org.springframework.web.bind.annotation.PathVariable;
import org.springframework.web.bind.annotation.RequestMapping;
import org.springframework.web.bind.annotation.RequestMethod;
import org.springframework.web.bind.annotation.RestController;
import javax.annotation.PostConstruct;
import java.io.FileReader;
@SpringBootApplication
@RestController
@Slf4j
public class OpenAPIDemoApplication {
public static void main(String[] args) {
SpringApplication.run(OpenAPIDemoApplication.class, args);
}
/**
* 預設的全域性設定
* @return
* @throws Exception
*/
@PostConstruct
private void setDefaultApiClient() throws Exception {
// 存放K8S的config檔案的全路徑
String kubeConfigPath = "/Users/zhaoqin/temp/202007/05/config";
// 以config作為入參建立的client物件,可以訪問到K8S的API Server
ApiClient client = ClientBuilder
.kubeconfig(KubeConfig.loadKubeConfig(new FileReader(kubeConfigPath)))
.build();
// 建立操作類
Configuration.setDefaultApiClient(client);
}
@RequestMapping(value = "/openapi/createnamespace/{namespace}", method = RequestMethod.GET)
public V1Namespace createnamespace(@PathVariable("namespace") String namespace) throws Exception {
CoreV1Api coreV1Api = new CoreV1Api();
V1Namespace v1Namespace = new V1NamespaceBuilder()
.withNewMetadata()
.withName(namespace)
.endMetadata()
.build();
V1Namespace ns = coreV1Api.createNamespace(v1Namespace, null, null, null);
// 使用Gson將集合物件序列化成JSON,在日誌中打印出來
log.info("ns info \n{}", new GsonBuilder().setPrettyPrinting().create().toJson(ns));
return ns;
}
@RequestMapping(value = "/openapi/pods/{namespace}", method = RequestMethod.GET)
public V1PodList pods(@PathVariable("namespace") String namespace) throws ApiException {
CoreV1Api apiInstance = new CoreV1Api();
// String | If 'true', then the output is pretty printed.
String pretty = null;
// 訂閱事件相關的引數,這裡用不上
Boolean allowWatchBookmarks = false;
// 連續查詢的標誌,類似於翻頁
String _continue = null;
// 欄位選擇器
String fieldSelector = "status.phase=Running";
// 根據標籤過濾
// String labelSelector = "component=kube-apiserver";
String labelSelector = null;
Integer limit = null;
String resourceVersion = null;
Integer timeoutSeconds = null;
Boolean watch = false;
V1PodList v1PodList = apiInstance.listNamespacedPod(namespace,
pretty,
allowWatchBookmarks,
_continue,
fieldSelector,
labelSelector,
limit,
resourceVersion,
timeoutSeconds,
watch);
// 使用Gson將集合物件序列化成JSON,在日誌中打印出來
log.info("pod info \n{}", new GsonBuilder().setPrettyPrinting().create().toJson(v1PodList));
return v1PodList;
}
}
```
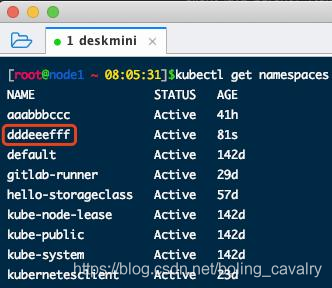
3. 將OpenAPIDemoApplication執行起來,先測試建立namespace的服務,在瀏覽器訪問:http://localhost:8080/openapi/createnamespace/dddeeefff ,瀏覽器返回資訊如下圖:

4. SSH登入K8S主機,執行命令檢視namespace,如下圖紅框,已經建立成功:
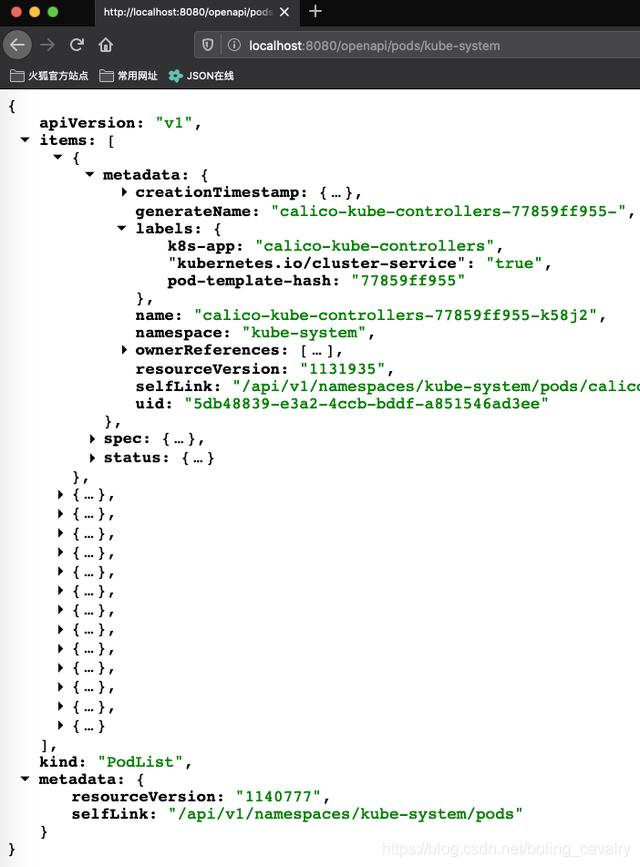
5. 再試試Pod列表,地址是 :http://localhost:8080/openapi/pods/kube-system ,如下圖:
- 至此,OpenAPI介面的實踐就完成了,現在已將java客戶端的最基本的功能都實踐過了,接下來的文章咱們將開始學習精彩的高階功能;
### 你不孤單,欣宸原創一路相伴
1. [Java系列](https://xinchen.blog.csdn.net/article/details/105068742)
2. [Spring系列](https://xinchen.blog.csdn.net/article/details/105086498)
3. [Docker系列](https://xinchen.blog.csdn.net/article/details/105086732)
4. [kubernetes系列](https://xinchen.blog.csdn.net/article/details/105086794)
5. [資料庫+中介軟體系列](https://xinchen.blog.csdn.net/article/details/105086850)
6. [DevOps系列](https://xinchen.blog.csdn.net/article/details/105086920)
### 歡迎關注公眾號:程式設計師欣宸
> 微信搜尋「程式設計師欣宸」,我是欣宸,期待與您一同暢遊Java世界...
[https://github.com/zq2599/blog_demos](https://github.com/zq2599/blo