
YYDS: Webpack Plugin開發
阿新 • • 發佈:2021-01-19
[toc]
作為一名踏足前端時間不長的小開發必須得聊一聊`webpack`,剛開始接觸webpack時第一反應這是啥(⊙_⊙)? 怎麼這麼複雜,感覺好難呀,算了先不管這些!時間是個好東西呀,隨著對`前端工程化`的實踐和理解慢慢加深,跟webpack接觸越來越多,最終還是被ta折服,不禁高呼一聲“`webpack yyds(永遠滴神)!`”
去年年中就想寫一些關於webpack的文章,由於各種原因耽擱了(主要是覺得對webpack理解還不夠,不敢妄自下筆);臨近年節,時間也有些了,與其 "摸魚"不如摸摸webpack,整理一些"年貨"分享給需要的xdm!後續會繼續寫一些【 Webpack】系列文章,xdm監督···
## 導讀
本文主要通過實現一個`cdn優化`的外掛`CdnPluginInject`介紹下`webpack`的外掛`plugin`開發的具體流程,中間會涉及到`html-webpack-plugin`外掛的使用、`vue/cli3+`專案中webpack外掛的配置以及webpack相關知識點的說明。全文大概2800+字,預計耗時5~10分鐘,希望xdm看完有所學、有所思、有所輸出!
**注意:**文章中例項基於`vue/cli3+`工程展開!
## 一、cdn常規使用
index.html:
```javascript
···
···
```
vue.config.js:
```javascript
module.exports = {
···
configureWebpack: {
···
externals: {
'vuex': 'Vuex',
'vue-router': 'VueRouter',
···
}
},
```
## 二、開發一個webpack plugin
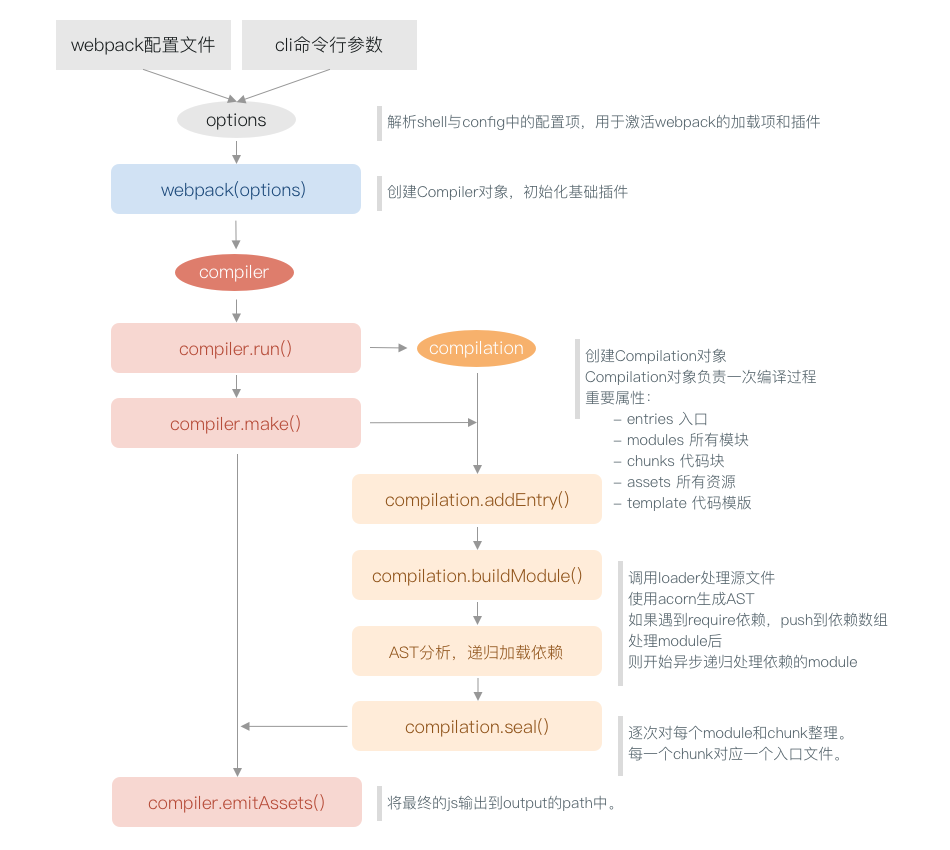
>[webpack官網](https://v4.webpack.docschina.org/contribute/writing-a-plugin/#建立一個外掛)如此介紹到:外掛向第三方開發者提供了 webpack 引擎中完整的能力。使用階段式的構建回撥,開發者可以引入它們自己的行為到 webpack 構建流程中。建立外掛比建立 loader 更加高階,因為你將需要理解一些 webpack 底層的內部特性來實現相應的鉤子!
>
>一個外掛由以下構成:
>
>>+ 一個具名 JavaScript 函式。
>>+ 在它的原型上定義 apply 方法。
>>+ 指定一個觸及到 webpack 本身的 [事件鉤子](https://v4.webpack.docschina.org/api/compiler-hooks/)。
>>+ 操作 webpack 內部的例項特定資料。
>>+ 在實現功能後呼叫 webpack 提供的 callback。
>> ```javascript
>> // 一個 JavaScript class
>>class MyExampleWebpackPlugin {
>>// 將 `apply` 定義為其原型方法,此方法以 compiler 作為引數
>> apply(compiler) {
>> // 指定要附加到的事件鉤子函式
>> compiler.hooks.emit.tapAsync(
>> 'MyExampleWebpackPlugin',
>> (compilation, callback) => {
>> console.log('This is an example plugin!');
>> console.log('Here’s the `compilation` object which represents a single build of assets:', compilation);
>> // 使用 webpack 提供的 plugin API 操作構建結果
>> compilation.addModule(/* ... */);
>> callback();
>> }
>> );
>> }
>>}
>> ```
## 三、cdn優化外掛實現
思路:
- 1、建立一個具名` JavaScript` 函式(使用`ES6`的`class`實現);
- 2、在它的原型上定義 `apply` 方法;
- 3、指定一個觸及到 webpack 本身的事件鉤子(此處觸及`compilation`鉤子:編譯(compilation)建立之後,執行外掛);
- 4、在鉤子事件中操作`index.html`(將`cdn`的`script標籤`插入到`index.html`中);
- 5、在`apply`方法執行完之前將`cdn的引數`放入`webpack`的`外部擴充套件externals`中;
- 6、在實現功能後呼叫` webpack` 提供的` callback`;
實現步驟:
### 1、建立一個具名` JavaScript` 函式(使用`ES6`的`class`實現)
建立類`cdnPluginInject`,新增類的建構函式接收傳遞過來的引數;此處我們定義接收引數的格式如下:
```javascript
modules:[
{
name: "xxx", //cdn包的名字
var: "xxx", //cdn引入庫在專案中使用時的變數名
path: "http://cdn.url/xxx.js" //cdn的url連結地址
},
···
]
```
定義類的變數`modules`接收傳遞的`cdn引數`的處理結果:
```javascript
class CdnPluginInject {
constructor({
modules,
}) {
// 如果是陣列,將this.modules變換成物件形式
this.modules = Array.isArray(modules) ? { ["defaultCdnModuleKey"]: modules } : modules;
}
···
}
module.exports = CdnPluginInject;
```
### 2、在它的原型上定義 `apply` 方法
> 外掛是由一個建構函式(此建構函式上的 prototype 物件具有 `apply` 方法)的所例項化出來的。這個 `apply` 方法在安裝外掛時,會被 webpack compiler 呼叫一次。`apply` 方法可以接收一個 webpack compiler 物件的引用,從而可以在回撥函式中訪問到 compiler 物件
`cdnPluginInject.js`程式碼如下:
```javascript
class CdnPluginInject {
constructor({
modules,
}) {
// 如果是陣列,將this.modules變換成物件形式
this.modules = Array.isArray(modules) ? { ["defaultCdnModuleKey"]: modules } : modules;
}
//webpack plugin開發的執行入口apply方法
apply(compiler) {
···
}
module.exports = CdnPluginInject;
```
### 3、指定一個觸及到 webpack 本身的事件鉤子
此處觸及`compilation`鉤子:編譯(compilation)建立之後,執行外掛。
`compilation `是` compiler` 的一個hooks函式, compilation 會建立一次新的編譯過程例項,一個 compilation 例項可以`訪問所有模組和它們的依賴`,在獲取到這些模組後,根據需要對其進行操作處理!
```javascript
class CdnPluginInject {
constructor({
modules,
}) {
// 如果是陣列,將this.modules變換成物件形式
this.modules = Array.isArray(modules) ? { ["defaultCdnModuleKey"]: modules } : modules;
}
//webpack plugin開發的執行入口apply方法
apply(compiler) {
//獲取webpack的輸出配置物件
const { output } = compiler.options;
//處理output.publicPath, 決定最終資源相對於引用它的html檔案的相對位置
output.publicPath = output.publicPath || "/";
if (output.publicPath.slice(-1) !== "/") {
output.publicPath += "/";
}
//觸發compilation鉤子函式
compiler.hooks.compilation.tap("CdnPluginInject", compilation => {
···
}
}
module.exports = CdnPluginInject;
```
### 4、在鉤子事件中操作`index.html`
這一步主要是要實現 **將`cdn`的`script標籤`插入到`index.html`中** ;如何實現呢?在vue專案中webpack進行打包時其實是使用[html-webpack-plugin](https://www.npmjs.com/package/html-webpack-plugin)生成`.html`檔案的,所以我們此處也可以藉助`html-webpack-plugin`對html檔案進行操作插入cdn的script標籤。
```javascript
// 4.1 引入html-webpack-plugin依賴
const HtmlWebpackPlugin = require("html-webpack-plugin");
class CdnPluginInject {
constructor({
modules,
}) {
// 如果是陣列,將this.modules變換成物件形式
this.modules = Array.isArray(modules) ? { ["defaultCdnModuleKey"]: modules } : modules;
}
//webpack plugin開發的執行入口apply方法
apply(compiler) {
//獲取webpack的輸出配置物件
const { output } = compiler.options;
//處理output.publicPath, 決定最終資源相對於引用它的html檔案的相對位置
output.publicPath = output.publicPath || "/";
if (output.publicPath.slice(-1) !== "/") {
output.publicPath += "/";
}
//觸發compilation鉤子函式
compiler.hooks.compilation.tap("CdnPluginInject", compilation => {
// 4.2 html-webpack-plugin中的hooks函式,當在資源生成之前非同步執行
HtmlWebpackPlugin.getHooks(compilation).beforeAssetTagGeneration
.tapAsync("CdnPluginInject", (data, callback) => { // 註冊非同步鉤子
//獲取外掛中的cdnModule屬性(此處為undefined,因為沒有cdnModule屬性)
const moduleId = data.plugin.options.cdnModule;
// 只要不是false(禁止)就行
if (moduleId !== false) {
// 4.3得到所有的cdn配置項
let modules = this.modules[
moduleId || Reflect.ownKeys(this.modules)[0]
];
if (modules) {
// 4.4 整合已有的js引用和cdn引用
data.assets.js = modules
.filter(m => !!m.path)
.map(m => {
return m.path;
})
.concat(data.assets.js);
// 4.5 整合已有的css引用和cdn引用
data.assets.css = modules
.filter(m => !!m.style)
.map(m => {
return m.style;
})
.concat(data.assets.css);
}
}
// 4.6 返回callback函式
callback(null, data);
});
}
}
module.exports = CdnPluginInject;
```
接下來逐步對上述實現進行分析:
- 4.1、引入html-webpack-plugin依賴,這個不用多說;
- 4.2、呼叫`html-webpack-plugin`中的`hooks`函式,在`html-webpack-plugin`中資源生成之前非同步執行;這裡由衷的誇誇`html-webpack-plugin`的作者了,ta在開發`html-webpack-plugin`時就在外掛中內建了很多的hook函式供開發者在呼叫外掛的不同階段嵌入不同操作;因此,此處我們可以使用`html-webpack-plugin`的`beforeAssetTagGeneration`對html進行操作;
- 4.3、 在`beforeAssetTagGeneration`中,獲取得到所有的需要進行cdn引入的配置資料;
- 4.4、 整合已有的js引用和cdn引用;通過`data.assets.js`可以獲取到`compilation`階段所有生成的`js資源`(最終也是插入index.html中)的連結/路徑,並且將需要配置的`cdn的path資料(cdn的url)`合併進去;
- 4.5、 整合已有的css引用和cdn引用;通過`data.assets.css`可以獲取到`compilation`階段所有生成的`css資源`(最終也是插入index.html中)的連結/路徑,並且將需要配置的css型別`cdn的path資料(cdn的url)`合併進去;
- 4.6、 返回callback函式,目的是告訴`webpack`該操作已經完成,可以進行下一步了;
### 5、設定`webpack`的`外部擴充套件externals`
在`apply`方法執行完之前還有一步必須完成:將`cdn的引數`配置到`外部擴充套件externals`中;可以直接通過`compiler.options.externals`獲取到webpack中externals屬性,經過操作將cdn配置中資料配置好就ok了。
### 6、` callback`;
返回callback,告訴webpack `CdnPluginInject`外掛已經完成;
```javascript
// 4.1 引入html-webpack-plugin依賴
const HtmlWebpackPlugin = require("html-webpack-plugin");
class CdnPluginInject {
constructor({
modules,
}) {
// 如果是陣列,將this.modules變換成物件形式
this.modules = Array.isArray(modules) ? { ["defaultCdnModuleKey"]: modules } : modules;
}
//webpack plugin開發的執行入口apply方法
apply(compiler) {
//獲取webpack的輸出配置物件
const { output } = compiler.options;
//處理output.publicPath, 決定最終資源相對於引用它的html檔案的相對位置
output.publicPath = output.publicPath || "/";
if (output.publicPath.slice(-1) !== "/") {
output.publicPath += "/";
}
//觸發compilation鉤子函式
compiler.hooks.compilation.tap("CdnPluginInject", compilation => {
// 4.2 html-webpack-plugin中的hooks函式,當在資源生成之前非同步執行
HtmlWebpackPlugin.getHooks(compilation).beforeAssetTagGeneration
.tapAsync("CdnPluginInject", (data, callback) => { // 註冊非同步鉤子
//獲取外掛中的cdnModule屬性(此處為undefined,因為沒有cdnModule屬性)
const moduleId = data.plugin.options.cdnModule;
// 只要不是false(禁止)就行
if (moduleId !== false) {
// 4.3得到所有的cdn配置項
let modules = this.modules[
moduleId || Reflect.ownKeys(this.modules)[0]
];
if (modules) {
// 4.4 整合已有的js引用和cdn引用
data.assets.js = modules
.filter(m => !!m.path)
.map(m => {
return m.path;
})
.concat(data.assets.js);
// 4.5 整合已有的css引用和cdn引用
data.assets.css = modules
.filter(m => !!m.style)
.map(m => {
return m.style;
})
.concat(data.assets.css);
}
}
// 4.6 返回callback函式
callback(null, data);
});
// 5.1 獲取externals
const externals = compiler.options.externals || {};
// 5.2 cdn配置資料新增到externals
Reflect.ownKeys(this.modules).forEach(key => {
const mods = this.modules[key];
mods
.forEach(p => {
externals[p.name] = p.var || p.name; //var為專案中的使用命名
});
});
// 5.3 externals賦值
compiler.options.externals = externals; //配置externals
// 6 返回callback
callback();
}
}
module.exports = CdnPluginInject;
```
至此,一個完整的webpack外掛`CdnPluginInject`就開發完成了!接下來使用著試一試。
## 四、cdn優化外掛使用
在vue專案的`vue.config.js`檔案中引入並使用`CdnPluginInject`:
cdn配置檔案CdnConfig.js:
```javascript
/*
* 配置的cdn
* @name: 第三方庫的名字
* @var: 第三方庫在專案中的變數名
* @path: 第三方庫的cdn連結
*/
module.exports = [
{
name: "moment",
var: "moment",
path: "https://cdn.bootcdn.net/ajax/libs/moment.js/2.27.0/moment.min.js"
},
···
];
```
#### configureWebpack中配置:
```javascript
const CdnPluginInject = require("./CdnPluginInject");
const cdnConfig = require("./CdnConfig");
module.exports = {
···
configureWebpack: config => {
//只有是生產山上線打包才使用cdn配置
if(process.env.NODE.ENV =='production'){
config.plugins.push(
new CdnPluginInject({
modules: CdnConfig
})
)
}
}
···
}
```
#### chainWebpack中配置:
```javascript
const CdnPluginInject = require("./CdnPluginInject");
const cdnConfig = require("./CdnConfig");
module.exports = {
···
chainWebpack: config => {
//只有是生產山上線打包才使用cdn配置
if(process.env.NODE.ENV =='production'){
config.plugin("cdn").use(
new CdnPluginInject({
modules: CdnConfig
})
)
}
}
···
}
```
通過使用`CdnPluginInject`:
- 1、通過配置實現對cdn優化的管理和維護;
- 2、實現針對不同環境做cdn優化配置(開發環境直接使用本地安裝依賴進行除錯,生產環境適應cdn方式優化載入);
## 五、小結
看完後肯定有`webpack`大佬有一絲絲疑惑,這個外掛不就是 [webpack-cdn-plugin](https://www.npmjs.com/package/webpack-cdn-plugin) 的乞丐版!`CdnPluginInject`只不過是本人根據`webpack-cdn-plugin`原始碼的學習,結合自己專案實際所需修改的仿寫版本,相較於`webpack-cdn-plugin`將cdn連結的生成進行封裝,`CdnPluginInject`是直接將cdn連結進行配置,對於選擇cdn顯配置更加簡單。想要進一步學習的xdm可以看看`webpack-cdn-plugin`的原始碼,經過作者的不斷的迭代更新,其提供的可配置引數更加豐富,功能更加強大(再次膜拜)。
**`重點:整理不易,覺得還可以的xdm記得 一鍵三連 喲!`**
## 文章參考
- [揭祕webpack-plugin](https://champyin.com/2020/01/12/%E6%8F%AD%E7%A7%98webpack-plugin/)
- [webpack-cdn-plugin的github](https://github.com/shirotech/webpack-cdn-