MyBatis初級實戰之五:一對一關聯查詢
阿新 • • 發佈:2021-01-21
### 歡迎訪問我的GitHub
[https://github.com/zq2599/blog_demos](https://github.com/zq2599/blog_demos)
內容:所有原創文章分類彙總及配套原始碼,涉及Java、Docker、Kubernetes、DevOPS等;
### 本篇概覽
- 本文是《MyBatis初級實戰》系列的第五篇,從多表獲取資料是個常見的場景,一般有以下兩種方式:
- 聯表查詢:join操作,一次查詢完成
- 多次查詢:用第一次查詢的結果作為條件,再做查詢(MyBatis中叫做巢狀查詢)
- 本篇的內容就是學習MyBatis對上述兩種查詢的支援,全文由以下章節組成:
1. 準備資料;
2. 本次實戰的java工程
3. 最簡單的聯表(兩個表的資料儲存在一個實體類的不同欄位);
4. 一對一聯表查詢(兩個表的資料分別儲存在不同實體類,假設是A和B,A是B的成員變數)
5. 一對一巢狀查詢(兩個表的資料分別儲存在不同實體類,假設是A和B,A是B的成員變數)
### 原始碼下載
1. 如果您不想編碼,可以在GitHub下載所有原始碼,地址和連結資訊如下表所示(https://github.com/zq2599/blog_demos):
| 名稱 | 連結 | 備註|
| :-------- | :----| :----|
| 專案主頁| https://github.com/zq2599/blog_demos | 該專案在GitHub上的主頁 |
| git倉庫地址(https)| https://github.com/zq2599/blog_demos.git | 該專案原始碼的倉庫地址,https協議 |
| git倉庫地址(ssh)| [email protected]:zq2599/blog_demos.git | 該專案原始碼的倉庫地址,ssh協議 |
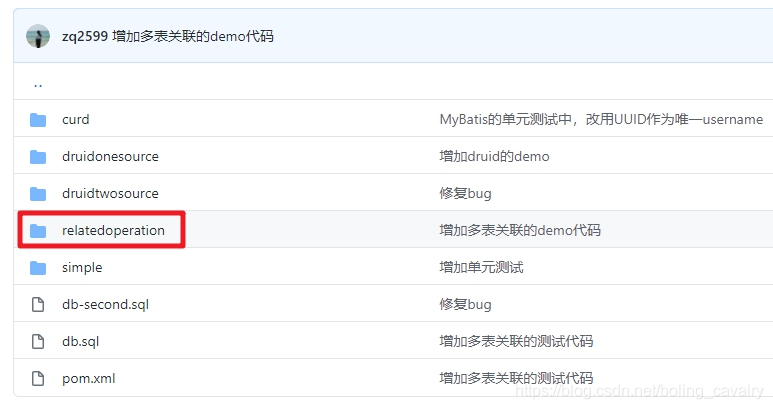
2. 這個git專案中有多個資料夾,本章的應用在mybatis資料夾下,如下圖紅框所示:

3. mybatis是個父工程,裡面有數個子工程,本篇的原始碼在relatedoperation子工程中,如下圖紅框所示:

### 準備資料
1. 本次實戰,在名為mybatis的資料庫中建立兩個表(和前面幾篇文章中的表結構一模一樣):user和log表;
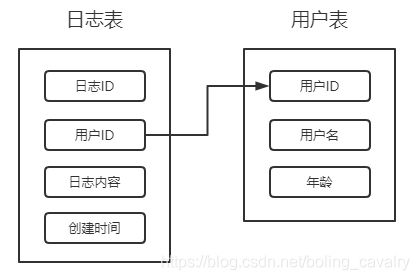
2. user表記錄用戶資訊,非常簡單,只有三個欄位:主鍵、名稱、年齡
3. log表記錄用戶行為,四個欄位:主鍵、使用者id、行為描述、行為時間
4. user和log的關係如下圖:

5. 建表和新增資料的語句如下:
```sql
use mybatis;
DROP TABLE IF EXISTS `user`;
CREATE TABLE `user` (
`id` int(32) NOT NULL AUTO_INCREMENT,
`name` varchar(32) NOT NULL,
`age` int(32) NOT NULL,
PRIMARY KEY (`id`)
) ENGINE=InnoDB AUTO_INCREMENT=3 DEFAULT CHARSET=utf8;
DROP TABLE IF EXISTS `log`;
CREATE TABLE `log` (
`id` int(32) NOT NULL AUTO_INCREMENT,
`user_id` int(32),
`action` varchar(255) NOT NULL,
`create_time` datetime not null,
PRIMARY KEY (`id`)
) ENGINE=InnoDB AUTO_INCREMENT=3 DEFAULT CHARSET=utf8;
INSERT INTO mybatis.user (id, name, age) VALUES (3, 'tom', 11);
INSERT INTO mybatis.log (id, user_id, action, create_time) VALUES (3, 3, 'read book', '2020-08-07 08:18:16');
INSERT INTO mybatis.log (id, user_id, action, create_time) VALUES (4, 3, 'go to the cinema', '2020-09-02 20:00:00');
INSERT INTO mybatis.log (id, user_id, action, create_time) VALUES (5, 3, 'have a meal', '2020-10-05 12:03:36');
INSERT INTO mybatis.log (id, user_id, action, create_time) VALUES (6, 3, 'have a sleep', '2020-10-06 13:00:12');
INSERT INTO mybatis.log (id, user_id, action, create_time) VALUES (7, 3, 'write', '2020-10-08 09:21:11');
```
### 本次實戰的java工程
1. 在父工程mybatis下新建子工程relatedoperation,pom.xml如下:
```xml
```
2. 基本配置檔案application.yml:
```yml
server:
port: 8080
spring:
#1.JDBC資料來源
datasource:
username: root
password: 123456
url: jdbc:mysql://192.168.50.43:3306/mybatis?useUnicode=true&characterEncoding=utf-8&useSSL=true&serverTimezone=UTC
driver-class-name: com.mysql.cj.jdbc.Driver
#2.連線池配置
druid:
#初始化連線池的連線數量 大小,最小,最大
initial-size: 5
min-idle: 5
max-active: 20
#配置獲取連線等待超時的時間
max-wait: 60000
#配置間隔多久才進行一次檢測,檢測需要關閉的空閒連線,單位是毫秒
time-between-eviction-runs-millis: 60000
# 配置一個連線在池中最小生存的時間,單位是毫秒
min-evictable-idle-time-millis: 30000
# 配置一個連線在池中最大生存的時間,單位是毫秒
max-evictable-idle-time-millis: 300000
validation-query: SELECT 1 FROM user
test-while-idle: true
test-on-borrow: true
test-on-return: false
# 是否快取preparedStatement,也就是PSCache 官方建議MySQL下建議關閉 個人建議如果想用SQL防火牆 建議開啟
pool-prepared-statements: true
max-pool-prepared-statement-per-connection-size: 20
# 配置監控統計攔截的filters,去掉後監控介面sql無法統計,'wall'用於防火牆
filters: stat,wall,slf4j
filter:
stat:
merge-sql: true
slow-sql-millis: 5000
#3.基礎監控配置
web-stat-filter:
enabled: true
url-pattern: /*
#設定不統計哪些URL
exclusions: "*.js,*.gif,*.jpg,*.png,*.css,*.ico,/druid/*"
session-stat-enable: true
session-stat-max-count: 100
stat-view-servlet:
enabled: true
url-pattern: /druid/*
reset-enable: true
#設定監控頁面的登入名和密碼
login-username: admin
login-password: admin
allow: 127.0.0.1
#deny: 192.168.1.100
# mybatis配置
mybatis:
# 配置檔案所在位置
config-location: classpath:mybatis-config.xml
# 對映檔案所在位置
mapper-locations: classpath:mappers/*Mapper.xml
# 日誌配置
logging:
level:
root: INFO
com:
bolingcavalry:
relatedoperation:
mapper: debug
```
3. 再準備名為application-test.yml的配置檔案,這是執行單元測試時用到的,和application.yml的不同之處是spring.datasource.druid.web-stat-filter.enabled配置設定成false;
4. mybatis的配置檔案mybatis-config.xml如下:
```xml
```
5. 資料來源配置類DruidConfig.java:
```java
package com.bolingcavalry.relatedoperation;
import com.alibaba.druid.pool.DruidDataSource;
import org.slf4j.Logger;
import org.slf4j.LoggerFactory;
import org.springframework.beans.factory.annotation.Value;
import org.springframework.context.annotation.Bean;
import org.springframework.context.annotation.Configuration;
@Configuration
public class DruidConfig {
private static final Logger logger = LoggerFactory.getLogger(DruidConfig.class);
@Value("${spring.datasource.url}")
private String dbUrl;
@Value("${spring.datasource.username}")
private String username;
@Value("${spring.datasource.password}")
private String password;
@Value("${spring.datasource.driver-class-name}")
private String driverClassName;
@Value("${spring.datasource.druid.initial-size}")
private int initialSize;
@Value("${spring.datasource.druid.max-active}")
private int maxActive;
@Value("${spring.datasource.druid.min-idle}")
private int minIdle;
@Value("${spring.datasource.druid.max-wait}")
private int maxWait;
@Value("${spring.datasource.druid.pool-prepared-statements}")
private boolean poolPreparedStatements;
@Value("${spring.datasource.druid.max-pool-prepared-statement-per-connection-size}")
private int maxPoolPreparedStatementPerConnectionSize;
@Value("${spring.datasource.druid.time-between-eviction-runs-millis}")
private int timeBetweenEvictionRunsMillis;
@Value("${spring.datasource.druid.min-evictable-idle-time-millis}")
private int minEvictableIdleTimeMillis;
@Value("${spring.datasource.druid.max-evictable-idle-time-millis}")
private int maxEvictableIdleTimeMillis;
@Value("${spring.datasource.druid.validation-query}")
private String validationQuery;
@Value("${spring.datasource.druid.test-while-idle}")
private boolean testWhileIdle;
@Value("${spring.datasource.druid.test-on-borrow}")
private boolean testOnBorrow;
@Value("${spring.datasource.druid.test-on-return}")
private boolean testOnReturn;
@Value("${spring.datasource.druid.filters}")
private String filters;
@Value("{spring.datasource.druid.connection-properties}")
private String connectionProperties;
/**
* Druid 連線池配置
*/
@Bean
public DruidDataSource dataSource() {
DruidDataSource datasource = new DruidDataSource();
datasource.setUrl(dbUrl);
datasource.setUsername(username);
datasource.setPassword(password);
datasource.setDriverClassName(driverClassName);
datasource.setInitialSize(initialSize);
datasource.setMinIdle(minIdle);
datasource.setMaxActive(maxActive);
datasource.setMaxWait(maxWait);
datasource.setTimeBetweenEvictionRunsMillis(timeBetweenEvictionRunsMillis);
datasource.setMinEvictableIdleTimeMillis(minEvictableIdleTimeMillis);
datasource.setMaxEvictableIdleTimeMillis(minEvictableIdleTimeMillis);
datasource.setValidationQuery(validationQuery);
datasource.setTestWhileIdle(testWhileIdle);
datasource.setTestOnBorrow(testOnBorrow);
datasource.setTestOnReturn(testOnReturn);
datasource.setPoolPreparedStatements(poolPreparedStatements);
datasource.setMaxPoolPreparedStatementPerConnectionSize(maxPoolPreparedStatementPerConnectionSize);
try {
datasource.setFilters(filters);
} catch (Exception e) {
logger.error("druid configuration initialization filter", e);
}
datasource.setConnectionProperties(connectionProperties);
return datasource;
}
}
```
6. swagger配置類:
```java
package com.bolingcavalry.relatedoperation;
import springfox.documentation.service.Contact;
import org.springframework.context.annotation.Bean;
import org.springframework.context.annotation.Configuration;
import springfox.documentation.builders.ApiInfoBuilder;
import springfox.documentation.builders.PathSelectors;
import springfox.documentation.builders.RequestHandlerSelectors;
import springfox.documentation.service.ApiInfo;
import springfox.documentation.service.Tag;
import springfox.documentation.spi.DocumentationType;
import springfox.documentation.spring.web.plugins.Docket;
import springfox.documentation.swagger2.annotations.EnableSwagger2;
@Configuration
@EnableSwagger2
public class SwaggerConfig {
@Bean
public Docket createRestApi() {
return new Docket(DocumentationType.SWAGGER_2)
.apiInfo(apiInfo())
.tags(new Tag("UserController", "使用者服務"), new Tag("LogController", "日誌服務"))
.select()
// 當前包路徑
.apis(RequestHandlerSelectors.basePackage("com.bolingcavalry.relatedoperation.controller"))
.paths(PathSelectors.any())
.build();
}
//構建 api文件的詳細資訊函式,注意這裡的註解引用的是哪個
private ApiInfo apiInfo() {
return new ApiInfoBuilder()
//頁面標題
.title("MyBatis CURD操作")
//建立人
.contact(new Contact("程式設計師欣宸", "https://github.com/zq2599/blog_demos", "[email protected]"))
//版本號
.version("1.0")
//描述
.description("API 描述")
.build();
}
}
```
7. springboot引導類:
```java
package com.bolingcavalry.relatedoperation;
import org.mybatis.spring.annotation.MapperScan;
import org.springframework.boot.SpringApplication;
import org.springframework.boot.autoconfigure.SpringBootApplication;
@SpringBootApplication
@MapperScan("com.bolingcavalry.relatedoperation.mapper")
public class RelatedOperationApplication {
public static void main(String[] args) {
SpringApplication.run(RelatedOperationApplication.class, args);
}
}
```
8. 使用者表的實體類:
```java
package com.bolingcavalry.relatedoperation.entity;
import io.swagger.annotations.ApiModel;
import io.swagger.annotations.ApiModelProperty;
import lombok.Data;
import lombok.NoArgsConstructor;
@Data
@NoArgsConstructor
@ApiModel(description = "使用者實體類")
public class User {
@ApiModelProperty(value = "使用者ID")
private Integer id;
@ApiModelProperty(value = "使用者名稱", required = true)
private String name;
@ApiModelProperty(value = "使用者地址", required = false)
private Integer age;
}
```
9. 日誌表的實體類:
```java
package com.bolingcavalry.relatedoperation.entity;
import io.swagger.annotations.ApiModel;
import io.swagger.annotations.ApiModelProperty;
import lombok.Data;
import lombok.NoArgsConstructor;
import java.sql.Date;
@Data
@NoArgsConstructor
@ApiModel(description = "日誌實體類")
public class Log {
@ApiModelProperty(value = "日誌ID")
private Integer id;
@ApiModelProperty(value = "使用者ID")
private Integer userId;
@ApiModelProperty(value = "日誌內容")
private String action;
@ApiModelProperty(value = "建立時間")
private Date createTime;
}
```
- 以上就是本篇的準備程式碼,接下來在此基礎上實現各種多表關聯查詢
### 最簡單的聯表
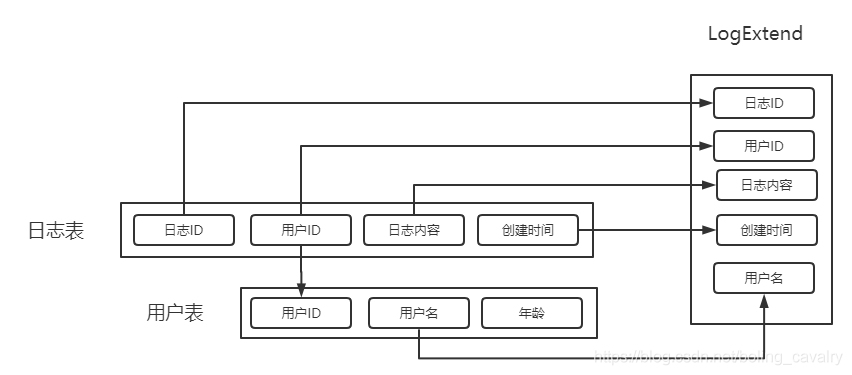
- 先實戰的是最普通的聯表,如下圖所示,查詢結果是名為LogExtend的實體類,這個類有5個欄位,其中四個來自日誌表log,一個來自使用者表user:

- 下圖是開發步驟:

1. 實體類LogExtend的原始碼如下,可見和Log相比多了個userName欄位:
```java
package com.bolingcavalry.relatedoperation.entity;
import io.swagger.annotations.ApiModel;
import io.swagger.annotations.ApiModelProperty;
import lombok.Data;
import lombok.NoArgsConstructor;
@Data
@NoArgsConstructor
@ApiModel(description = "日誌實體類(含使用者表的欄位)")
public class LogExtend extends Log {
@ApiModelProperty(value = "使用者名稱")
private String userName;
}
```
2. 新建log表對應的對映檔案LogMapper.xml,如下所示,裡面是通過left join語法執行的簡單的聯表查詢,以及查詢結果對應的resultMap定義:
```xml
```
3. mapper介面程式碼:
```java
package com.bolingcavalry.relatedoperation.mapper;
import com.bolingcavalry.relatedoperation.entity.LogAssociateUser;
import com.bolingcavalry.relatedoperation.entity.LogExtend;
import org.springframework.stereotype.Repository;
@Repository
public interface LogMapper {
LogExtend oneObjectSel(int id);
}
```
4. service層的程式碼在LogService.java檔案中:
```java
package com.bolingcavalry.relatedoperation.service;
import com.bolingcavalry.relatedoperation.entity.LogAssociateUser;
import com.bolingcavalry.relatedoperation.entity.LogExtend;
import com.bolingcavalry.relatedoperation.mapper.LogMapper;
import org.springframework.beans.factory.annotation.Autowired;
import org.springframework.stereotype.Service;
@Service
public class LogService {
@Autowired
LogMapper logMapper;
public LogExtend oneObjectSel(int id){
return logMapper.oneObjectSel(id);
}
}
```
5. controller層的程式碼在LogController.java檔案中:
```java
@RestController
@RequestMapping("/log")
@Api(tags = {"LogController"})
public class LogController {
@Autowired
private LogService logService;
@ApiOperation(value = "根據ID查詢日誌記錄,帶userName欄位,該欄位通過聯表查詢實現", notes="根據ID查詢日誌記錄,帶userName欄位,該欄位通過聯表查詢實現")
@ApiImplicitParam(name = "id", value = "日誌ID", paramType = "path", required = true, dataType = "Integer")
@RequestMapping(value = "/aggregate/{id}", method = RequestMethod.GET)
public LogExtend oneObjectSel(@PathVariable int id){
return logService.oneObjectSel(id);
}
```
6. 編寫單元測試的程式碼ControllerTest.java,由於今天的測試涉及到user和log兩個表,因此在測試類ControllerTest的內部準備了兩個內部類,分別用於測試user和log表:
```java
package com.bolingcavalry.relatedoperation.controller;
import lombok.extern.slf4j.Slf4j;
import org.junit.jupiter.api.*;
import org.springframework.beans.factory.annotation.Autowired;
import org.springframework.boot.test.autoconfigure.web.servlet.AutoConfigureMockMvc;
import org.springframework.boot.test.context.SpringBootTest;
import org.springframework.http.MediaType;
import org.springframework.test.context.ActiveProfiles;
import org.springframework.test.web.servlet.MockMvc;
import org.springframework.test.web.servlet.request.MockMvcRequestBuilders;
import static org.springframework.test.web.servlet.result.MockMvcResultHandlers.print;
import static org.springframework.test.web.servlet.result.MockMvcResultMatchers.jsonPath;
import static org.springframework.test.web.servlet.result.MockMvcResultMatchers.status;
@SpringBootTest
@DisplayName("Web介面的單元測試")
@AutoConfigureMockMvc
@ActiveProfiles("test")
@Slf4j
public class ControllerTest {
/**
* 查詢方式:聯表
*/
final static String SEARCH_TYPE_LEFT_JOIN = "leftjoin";
/**
* 查詢方式:巢狀
*/
final static String SEARCH_TYPE_NESTED = "nested";
final static int TEST_USER_ID = 3;
final static String TEST_USER_NAME = "tom";
@Autowired MockMvc mvc;
@Nested
@TestMethodOrder(MethodOrderer.OrderAnnotation.class)
@DisplayName("使用者服務")
class User {
}
@Nested
@TestMethodOrder(MethodOrderer.OrderAnnotation.class)
@DisplayName("日誌服務")
class Log {
final static int TEST_LOG_ID = 5;
@Test
@DisplayName("通過日誌ID獲取日誌資訊,帶userName欄位,該欄位通過聯表查詢實現")
@Order(1)
void oneObjectSel() throws Exception {
mvc.perform(MockMvcRequestBuilders.get("/log/aggregate/" + TEST_LOG_ID)
.accept(MediaType.APPLICATION_JSON))
.andExpect(status().isOk())
.andExpect(jsonPath("$.id").value(TEST_LOG_ID))
.andExpect(jsonPath("$.userName").value(TEST_USER_NAME))
.andDo(print());
}
}
}
```
7. 執行上述單元測試方法,結果如下圖,紅框中就是controller層返回的資料,可見已通過Mybatis成功取得LogExtend例項:

- 下一站是一對一聯表查詢;
### 關於一對一關聯的兩種方式
- 前面的查詢有個特點:儘管查詢了兩個表,但結果都在同一實體類的不同欄位,而更符合業務邏輯的關係應該是log類中有個user類的成員變數,即如下形式:
```java
@Data
@NoArgsConstructor
@ApiModel(description = "日誌實體類")
public class LogAssociateUser {
@ApiModelProperty(value = "日誌ID")
private Integer id;
@ApiModelProperty(value = "使用者物件")
private User user;
@ApiModelProperty(value = "日誌內容")
private String action;
@ApiModelProperty(value = "建立時間")
private Date createTime;
}
```
- 接下來的實戰就是如何用MyBatis查詢得到上述LogAssociateUser 型別的結果;
- 一對一關聯的實現有聯表和巢狀查詢兩種,它們的差異在Mybatis中體現在association的子節點上:
1. 聯表時,association內使用result子節點,將聯表查詢的結果對映到關聯物件;
2. 巢狀時,association內使用select子節點,觸發一次新的查詢;
### 一對一(聯表)
所謂一對一,就是一個物件關聯了另一個物件,例如一條log記錄中,帶有對應的user資訊;
1. 下面是新的實體類LogAssociateUser,該類對應的是log表記錄,有個user欄位,型別是User物件:
```java
@Data
@NoArgsConstructor
@ApiModel(description = "日誌實體類")
public class LogAssociateUser {
@ApiModelProperty(value = "日誌ID")
private Integer id;
@ApiModelProperty(value = "使用者物件")
private User user;
@ApiModelProperty(value = "日誌內容")
private String action;
@ApiModelProperty(value = "建立時間")
private Date createTime;
}
```
2. 對映檔案LogMapper.xml中,sql和resultMap如下,可見查詢的時候將user表的欄位都查出來了,然後在resultMap中用association節點去處理sql中查出的user表的資料,通過javaType屬性轉為User類的例項:
```xml
```
3. 以上就是一對一(聯表)的關鍵點,接下來按部就班的在LogMapper、LogService、LogController中新增方法即可,下面是LogController中對應的web介面,稍後會在單元測試中呼叫這個介面進行驗證:
```java
@ApiOperation(value = "根據ID查詢日誌記錄,帶使用者物件,聯表查詢實現", notes="根據ID查詢日誌記錄,帶使用者物件,聯表查詢實現")
@ApiImplicitParam(name = "id", value = "日誌ID", paramType = "path", required = true, dataType = "Integer")
@RequestMapping(value = "/leftjoin/{id}", method = RequestMethod.GET)
public LogAssociateUser leftJoinSel(@PathVariable int id){
return logService.leftJoinSel(id);
}
```
4. 最後是單元測試的程式碼(ControllerTest.java檔案),用來測試上述程式碼是否有效,注意下面的queryAndCheck私有方法,該方法中發起請求並驗證結果:
```java
/**
* 通過日誌ID獲取日誌資訊有兩種方式:聯表和巢狀查詢,
* 從客戶端來看,僅一部分path不同,因此將請求和檢查封裝到一個通用方法中,
* 呼叫方法只需要指定不同的那一段path
* @param subPath
* @throws Exception
*/
private void queryAndCheck(String subPath) throws Exception {
String queryPath = "/log/" + subPath + "/" + TEST_LOG_ID;
log.info("query path [{}]", queryPath);
mvc.perform(MockMvcRequestBuilders.get(queryPath)
.accept(MediaType.APPLICATION_JSON))
.andExpect(status().isOk())
.andExpect(jsonPath("$.id").value(TEST_LOG_ID))
.andExpect(jsonPath("$.user.id").value(TEST_USER_ID))
.andDo(print());
}
@Test
@DisplayName("通過日誌ID獲取日誌資訊(關聯了使用者),聯表查詢")
@Order(2)
void leftJoinSel() throws Exception {
queryAndCheck(SEARCH_TYPE_LEFT_JOIN);
}
```
5. 執行單元測試結果如下,可見:內部嵌套了一個json物件,就是user表的資料:

### 一對一(巢狀)
1. 接下來試試巢狀的方式;
2. LogMapper.xml中對應的sql:
```xml
```
3. 上述sql對應的resultMap如下,可見association節點中有個select屬性,這就是MyBatis支援巢狀查詢的關鍵,該屬性的值是個select節點:
```java
```
4. 上述節點中select屬性的值,對應一個select節點,如下:
```xml
```
5. 以上就是一對一(巢狀)的關鍵點,接下來按部就班的在LogMapper、LogService、LogController中新增方法即可,下面是LogController中對應的web介面,稍後會在單元測試中呼叫這個介面進行驗證:
```java
@ApiOperation(value = "根據ID查詢日誌記錄,帶使用者物件,巢狀查詢實現", notes="根據ID查詢日誌記錄,帶使用者物件,巢狀查詢實現")
@ApiImplicitParam(name = "id", value = "日誌ID", paramType = "path", required = true, dataType = "Integer")
@RequestMapping(value = "/nested/{id}", method = RequestMethod.GET)
public LogAssociateUser nestedSel(@PathVariable int id){
return logService.nestedSel(id);
}
```
6. 最後是單元測試的程式碼(ControllerTest.java檔案),用來測試上述程式碼是否有效,如下可見,直接呼叫了前面的queryAndCheck來驗證:
```java
@Test
@DisplayName("通過日誌ID獲取日誌資訊(關聯了使用者),巢狀查詢")
@Order(3)
void nestedSel() throws Exception {
queryAndCheck(SEARCH_TYPE_NESTED);
}
```
7. 執行上述單元測試程式碼,結果如下,可見巢狀查詢的方式也能將user表的資料成功獲取,放入log例項的成員變數中:

8. 最後是對比聯表和巢狀查詢的差異,先看聯表查詢的MyBatis日誌,如下圖紅框所示,只有一次sql查詢:

9. 再看巢狀查詢的日誌,如下圖,紅框是第一次查詢,結果中的userid作為綠框中的第二次查詢的條件:

- 至此,一對一的多表查詢實戰就完成了,本篇的邏輯是一條log記錄關聯一條user記錄,下一篇文章,咱們學習一對多關聯,即一個user有多條log記錄;
### 你不孤單,欣宸原創一路相伴
1. [Java系列](https://xinchen.blog.csdn.net/article/details/105068742)
2. [Spring系列](https://xinchen.blog.csdn.net/article/details/105086498)
3. [Docker系列](https://xinchen.blog.csdn.net/article/details/105086732)
4. [kubernetes系列](https://xinchen.blog.csdn.net/article/details/105086794)
5. [資料庫+中介軟體系列](https://xinchen.blog.csdn.net/article/details/105086850)
6. [DevOps系列](https://xinchen.blog.csdn.net/article/details/105086920)
### 歡迎關注公眾號:程式設計師欣宸
> 微信搜尋「程式設計師欣宸」,我是欣宸,期待與您一同暢遊Java世界...
[https://github.com/zq2599/blog_demos](https://github.com/zq2599/blog_demos)
