
[譯]Rxjs&Angular-退訂可觀察物件的n中方式
阿新 • • 發佈:2021-02-06
> 原文/出處: [RxJS & Angular — Unsubscribe Like a Pro](https://medium.com/swlh/rxjs-angular-unsubscribe-like-a-pro-ffeedec60aa7)
在angular專案中我們不可避免的要使用`RxJS`可觀察物件(`Observables`)來進行訂閱(`Subscribe`)和退訂(`Unsubscribe`)操作;
## 概述
我們的每個angular專案中都會用到`RxJS`, `RxJS`在我們的angular app中對資料流和效能有非常大的影響。
為了避免記憶體洩漏,在適當的時機對可觀察物件進行退訂是非常重要的; 本文會向你展示各種在angular元件中退訂可觀察物件的方法!
首先,我們建立一個幫助類來幫我們建立的訂閱物件(`Subscription`)
```ts
@Injectable({
providedIn: 'root',
})
export class DummyService {
getEmissions(scope: string): Observable {
return Observable.create((observer) => {
console.log(`${scope} Subscribed`);
const subscription: Subscription = timer(0, 1000)
.pipe(
map((n) => `${scope} Emission #${n}`),
tap(console.log)
)
.subscribe(observer);
return () => {
subscription.unsubscribe();
console.log(`${scope} Unsubscribed`);
};
});
}
}
```
我們的幫助類有一個`getEmissions`方法, 它接受一個`scope`引數來記錄日誌, 它的返回值是一個會每秒發出 `${scope} Emission #n`字串的可觀察物件.
## 方式一 "常規"的取消訂閱的方式
最簡單的訂閱和取消訂閱一個可觀察物件的方式是在 `ngOnInit` 方法中訂閱可觀察物件(`Observable`), 然後在元件類中建立一個類屬性用來儲存這個訂閱(`Subscription`), 並在 `ngOnDestroy` 中取消對可觀察物件對訂閱. 簡單起見, 我們可以使用`Subscription.EMPTY`來初始化一個訂閱物件(`Subscription`), 這樣可以防止在取消訂閱時遇到空引用對問題.
```ts
@Component({
selector: 'app-regular',
template: `{{ emission }}`,
})
export class RegularComponent implements OnInit, OnDestroy {
emission: string;
/*
Note: we initialize to Subscription.EMPTY to avoid null checking within ngOnDestroy
*/
private subscription: Subscription = Subscription.EMPTY;
constructor(private dummyService: DummyService) {}
ngOnInit(): void {
this.subscription = this.dummyService
.getEmissions('Regular')
.subscribe((emission) => (this.emission = emission));
}
ngOnDestroy(): void {
this.subscription.unsubscribe();
}
}
```
為了驗證程式碼有效我們在三秒後從`DOM`中移除這個元件

如上所述, 這是最基本對取消訂閱的方式, 如果我們的元件類中只有一個訂閱物件(`Subscription`), 這種方式沒什麼問題. 但是當我們有多個訂閱物件(`Subscription`)時, 針對每一個我們都需要在元件類中建立一個欄位儲存這個物件的的引用並在 `ngOnDestroy` 中呼叫 `unsubscribe`來取消訂閱.
## 方式二 使用 Subscription.add 方法
RxJS的訂閱類(`Subscription`)內建了 [Subscription.add](https://rxjs.dev/api/index/class/Subscription#add-) 方法允許我們使用單個訂閱物件的例項(`Subscription instance`)來簡化我們操作多個訂閱物件的.
首先, 在元件類中使用`new Subscription()`例項化建立一個欄位, 然後呼叫該例項的 `Subscription.add` 方法, 最後在 `ngOnDestroy` 中取消訂閱.
```ts
@Component({
selector: 'app-add',
template: `
{{ emissionA }}
{{ emissionB }}
`,
})
export class AddComponent implements OnInit, OnDestroy {
emissionA: string;
emissionB: string;
private subscription: Subscription = new Subscription();
constructor(private dummyService: DummyService) {}
ngOnInit(): void {
this.subscription.add(
this.dummyService
.getEmissions('[Add A]')
.subscribe((emission) => (this.emissionA = emission))
);
this.subscription.add(
this.dummyService
.getEmissions('[Add B]')
.subscribe((emission) => (this.emissionB = emission))
);
}
ngOnDestroy(): void {
this.subscription.unsubscribe();
}
}
```
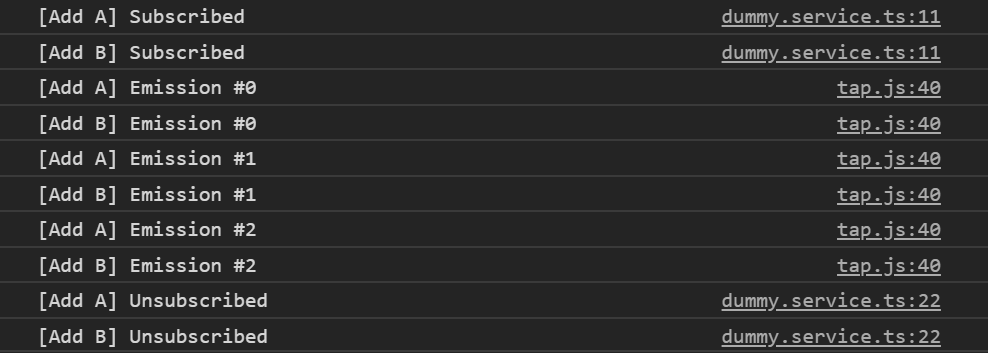
開啟瀏覽器控制檯, 我們可以看到兩個訂閱物件:
使用這種方式, 我們可以使用RsJS內建的方法輕鬆的取消訂閱多個可觀察物件而不必在元件類建立多個欄位儲存訂閱物件的引用.
## 方式三 AsyncPipe
Angular內建了許多非常有用的管道(pipe), 其中一個就是[AsyncPipe](https://angular.io/api/common/AsyncPipe). `AsyncPipe`接受一個可觀察物件並在元件生命週期結束時(`ngOnDestroy`)自動取消訂閱.
與前兩個示例不同, 這裡我們**不需要在元件中手動取消訂閱**, 而是將可觀察物件(`Observable`)傳遞個 `AsyncPipe`:
```ts
@Component({
selector: 'app-async',
template: `{{ emissions$ | async }}`
})
export class AsyncComponent implements OnInit {
emissions$: Observable;
constructor(private dummyService: DummyService) {}
ngOnInit(): void {
this.emissions$ = this.dummyService.getEmissions('[Async]');
}
}
```

在我看來, 這是在Angular中使用可觀察物件(`Observables`)最簡明的方式. 你只需建立可觀察物件(`Observables`)然後Angular會幫助你進行訂閱和取消訂閱.
## 方式4 takeUntil 操作符
RxJS包含許多有用的操作符, [takeUntil](https://www.learnrxjs.io/learn-rxjs/operators/filtering/takeuntil)就是其中之一. 像這個操作符的簽名一樣, takeUntil 接受一個會發出取消訂閱源可觀察物件通知的可觀察物件(`notifier`).
在我們的示例中, 我們希望在元件被銷燬後發出通知, 所以我們給元件類新增一個叫 `componentDestroyed$` 的欄位, 它的型別是 `Subject`, 這個欄位承擔了`通知人(notifier)`的角色.
然後我們只需在`ngOnDestroy`發出"通知"即可, 最終的程式碼像下面這樣:
```ts
@Component({
selector: 'app-until',
template: `{{ emission }}`,
})
export class UntilComponent implements OnInit, OnDestroy {
emission: string;
private componentDestroyed$: Subject = new Subject();
constructor(private dummyService: DummyService) {}
ngOnInit(): void {
this.dummyService
.getEmissions('takeUntil')
.pipe(takeUntil(this.componentDestroyed$))
.subscribe((emission) => (this.emission = emission));
}
ngOnDestroy(): void {
this.componentDestroyed$.next();
}
}
```

與之前`常規`的方式相比, 這種方式在我們有多個訂閱物件時不必在元件類中建立多個欄位儲存對訂閱物件的引用. 我們只需在管道中加入 `takeUntil(componentDestroyed$)` 即可, 剩下的RxJS會幫我們完成.
## 方式五 SubSink 庫
[SubSink](https://github.com/wardbell/subsink)是[Ward Bell](https://github.com/wardbell)寫的一個很棒的庫, 它使你可以優雅的在你的元件中取消對可觀察物件的訂閱.
首先, 通過`npm i subsink`或`yarn add subsink`安裝SubSink. 然後在元件類中建立一個`SubSink`型別的欄位.
SubSink有兩種方式, 一種是簡單技術(使用`sink`屬性設定器), 另一種是 陣列/新增(Array/Add)技術.
使用簡單技術只需要使用`sink`設定器屬性即可. 使用_陣列/新增(Array/Add)技術_的話程式碼類似RxJS原生的`Subscription.add`
為每一種方式建立一個訂閱物件, 我們的元件類看起來像下面這樣
```ts
@Component({
selector: 'app-sink',
template: `
{{ easyEmission }}
{{ arrayAddEmission }}
`,
})
export class SinkComponent implements OnInit, OnDestroy {
easyEmission: string;
arrayAddEmission: string;
private subs = new SubSink();
constructor(private dummyService: DummyService) {}
ngOnInit(): void {
/* 使用簡單技術 */
this.subs.sink = this.dummyService
.getEmissions('[Easy Technique]')
.subscribe((emission) => (this.easyEmission = emission));
/* 使用陣列/新增(Array/Add)技術 */
this.subs.add(
this.dummyService
.getEmissions('[Array/Add Technique]')
.subscribe((emission) => (this.easyEmission = emission))
);
}
ngOnDestroy(): void {
this.subs.unsubscribe();
}
}
```

## 方式六 until-destroy 庫
> 注意: 這個庫在Pre Ivy Angular上行為不同, 更多資訊請訪問[文件](https://github.com/ngneat/until-destroy#use-with-view-engine-pre-ivy)
[until-destroy](https://github.com/ngneat/until-destroy)是[ngneat](https://github.com/ngneat)許多很棒的庫之一, 它使用`UntilDestroy`裝飾器來確認哪些欄位的是訂閱物件(`Subscriptions`)並在元件銷燬時取消訂閱它們;
我們還可以不通過元件類欄位, 而是使用_until-destroy_定義的叫`untilDestroyed`的RxJS操作符來取消訂閱.
要使用它我們需要給元件類加上 `UntilDestroy` 裝飾器, 然後在可觀察物件管道中加入 `untilDestroyed` 操作符:
```ts
@UntilDestroy()
@Component({
selector: 'app-destroyed',
template: `{{ emission }} `,
})
export class DestroyedComponent implements OnInit {
emission: string;
constructor(private dummyService: DummyService) {}
ngOnInit(): void {
this.dummyService
.getEmissions('[UntilDestroy]')
.pipe(untilDestroyed(this))
.subscribe((emission) => (this.emission = emission));
}
}
```

總的來說, until-destroy是個非常強大的庫, 他可以幫你自動取消對可觀察物件的訂閱.
此外, until-destroy還有許多其他在本文中沒有進行說明的特性, 所以趕快去看看它們的[github倉庫](https://github.com/ngneat/until-destroy)吧!
## 總結
上面我們已經看到來許多訂閱和退訂可觀察物件方式, 每個都各有各的優劣並且有著不同的編碼風格.
但是最重要是不管我們選擇那種方式, 我們都要**保持編碼風格的