
Android中Context樣式分析
阿新 • • 發佈:2021-03-01
[toc]
本文基於SDK 28, android studio 4.1.1
# 1、樣式定義以及使用
## 1.1、預設樣式
建立一個簡單的專案, 其AndroidManifest.xml配置如下:
```
```
其中android:theme指定應用的樣式Theme.MyApplication, 在values和values-night資料夾的themes.xml中定義,分別表示白色模式和暗黑模式。
values資料夾下themes.xml定義如下:
```
```
Theme.MyApplication樣式繼承自Theme.materialComponents.DayNight.DarkActionBar, 定義了白色風格下狀態列顏色、背景色等;同樣地,values-night資料夾下themes.xml中Theme.MyApplication定義了黑色風格下狀態列顏色、背景色等。
轉到colorPrimary定義(Ctrl + 滑鼠左鍵),在appcompat-xxx下的values.xml中定義如下:
```
...
...
```
分別在values和values-night資料夾下的theme.xml中定義activity的樣式activity_theme, 並分別定義color_background為#FFAAAAAA、#FF333333
...
...
...
```
在activity_theme樣式中新增對應屬性
```
```
可通過如下程式碼獲取對應屬性:
```
int[] attrs = R.styleable.custom;
TypedArray array = MainActivity.this.getTheme().obtainStyledAttributes(attrs);
for (int i = 0; i < array.getIndexCount(); i++) {
int attr = array.getIndex(i);
if (attr == R.styleable.custom_string1) {
String string1 = array.getString(attr);
Log.d("MainActivity", "R.styleable.custom_string1屬性: " + string1);
} else if (attr == R.styleable.custom_color1) {
int color1 = array.getColor(attr, Color.BLACK);
Log.d("MainActivity", "R.styleable.custom_color1屬性: #" + Integer.toHexString(color1));
}
}
```
# 2、Activity中Theme的初始化流程
Activity中主題設定方法為setTheme,獲取主題方法為getTheme,下面分別分析setTheme和getTheme()
## 2.1、系統呼叫setTheme以及setTheme邏輯
在MainActivity中重寫setTheme, 並增加斷點, 啟動除錯,則可獲得如下呼叫堆疊:
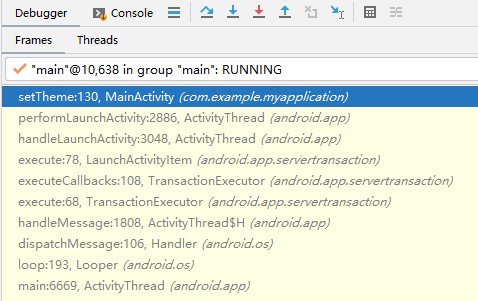
點到上一步performLaunchActivity:
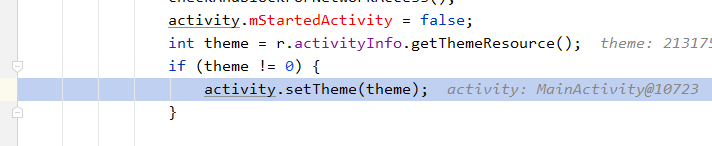
ActivityInfo型別的變數r.activityInfo的getThemeResource()方法如下:
```
public final int getThemeResource() {
return theme != 0 ? theme : applicationInfo.theme;
}
```
表示:**如果當前activity有對應的theme,就設定,否則就使用application的theme,這兩個theme分別設定在activity標籤和application標籤下。**
setTheme程式碼如下:
```
@Override
public void setTheme(int resid) {
if (mThemeResource != resid) {
mThemeResource = resid;
initializeTheme();
}
}
private void initializeTheme() {
final boolean first = mTheme == null;
if (first) {
mTheme = getResources().newTheme();
final Resources.Theme theme = getBaseContext().getTheme();
if (theme != null) {
mTheme.setTo(theme);
}
}
onApplyThemeResource(mTheme, mThemeResource, first);
}
protected void onApplyThemeResource(Resources.Theme theme, int resId, boolean first) {
theme.applyStyle(resId, true);
}
```
首先判斷設定的resId和mThemeResource是不是一樣,如果不一樣就對mThemeResource賦值,檢查並初始化mTheme,然後呼叫Resources.Theme#applyStyle方法 --> ResourceImpl.ThemeImpl#applyStyle
```
void applyStyle(int resId, boolean force) {
synchronized (mKey) {
mAssets.applyStyleToTheme(mTheme, resId, force);
mThemeResId = resId;
mKey.append(resId, force);
}
}
```
mAssets型別為AssetManager,applyStyleToTheme方法呼叫native方法nativeThemeApplyStyle,這個方法將樣式中的屬性鍵值對複製到mTheme中,這一過程**類似於Map的put方法,存在就更新,不存在就存入**。再建立一個樣式activity_theme1, color_background屬性定義為#ffffff, 可通過如下程式碼驗證:
```
setTheme(R.style.activity_theme);
context.getTheme().resolveAttribute(R.attr.color_background, typedValue, true);
Log.d("MainActivity", "R.attr.color_background屬性:" + typedValue.coerceToString());
setTheme(R.style.activity_theme1);
context.getTheme().resolveAttribute(R.attr.color_background, typedValue, true);
Log.d("MainActivity", "R.attr.color_background屬性:" + typedValue.coerceToString());
int[] attrs = R.styleable.custom;
//string1和color1還是activity_theme樣式中定義的值
TypedArray array = context.getTheme().obtainStyledAttributes(attrs);
for (int i = 0; i < array.getIndexCount(); i++) {
int attr = array.getIndex(i);
if (attr == R.styleable.custom_string1) {
String string1 = array.getString(attr);
Log.d("MainActivity", "R.styleable.custom_string1屬性: " + string1);
} else if (attr == R.styleable.custom_color1) {
int color1 = array.getColor(attr, Color.BLACK);
Log.d("MainActivity", "R.styleable.custom_color1屬性: #" + Integer.toHexString(color1));
}
}
```
如果將application標籤下的android:theme="@style/Theme.MyApplication"移除,程式依舊可以執行,再將activity_theme中的 parent="Theme.MaterialComponents.DayNight.DarkActionBar"去掉,執行程式,程式就會報異常:
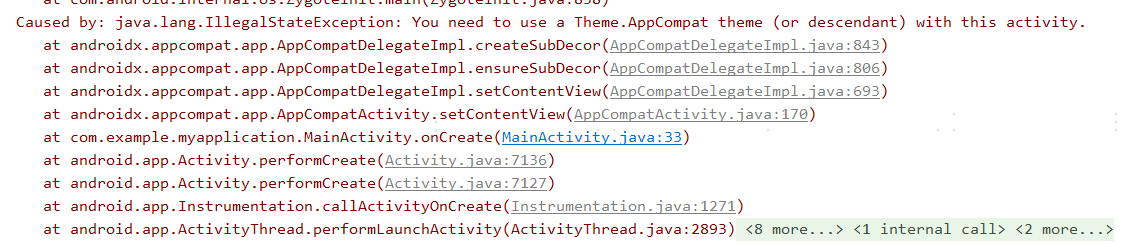
AppCompatDelegateImpl類中異常丟擲的程式碼如下:
```
private ViewGroup createSubDecor() {
TypedArray a = mContext.obtainStyledAttributes(R.styleable.AppCompatTheme);
if (!a.hasValue(R.styleable.AppCompatTheme_windowActionBar)) {
a.recycle();
throw new IllegalStateException(
"You need to use a Theme.AppCompat theme (or descendant) with this activity.");
}
...
return subDecor;
}
```
這就是樣式繼承的意義所在:**提供一些預設的屬性**。
```
```
以上樣式繼承在效果上等價於activity_theme去掉parent,然後程式碼中先後呼叫
```
setTheme(R.style.Theme_MaterialComponents_DayNight_DarkActionBar);
setTheme(R.style.activity_theme);
```
如果想要改變一些屬性,如狀態列顏色,可以在對應樣式中進行修改:
```
```
## 2.2、getTheme()邏輯
Activity的getTheme方法來自於android.view.ContextThemeWrapper類,程式碼如下:
```
@Override
public Resources.Theme getTheme() {
if (mTheme != null) {
return mTheme;
}
mThemeResource = Resources.selectDefaultTheme(mThemeResource,
getApplicationInfo().targetSdkVersion);
initializeTheme();
return mTheme;
}
```
主要邏輯是:如果mTheme已經初始化過,就返回mTheme,如果沒有,就呼叫Resources.selectDefaultTheme,根據mThemeResource和sdk版本號選擇對應的樣式id(mThemeResource不為0就返回mThemeResource),通過initializeTheme初始化mTheme。
# 3、定義特殊需求的樣式
定義一個Toast的樣式:
```
```
如果需要獲取該樣式下的屬性值,可以通過構建Context來完成。一般地,可以通過如下程式碼來獲取該樣式下的屬性值:
```
ContextThemeWrapper contextThemeWrapper = new ContextThemeWrapper(getApplication(), R.style.activity_theme);
TypedValue typedValue = new TypedValue();
contextThemeWrapper.getTheme().resolveAttribute(R.attr.color_background, typedValue, true);
Log.d("Test", typedValue.coerceToString().toString());
```
以上構建的contextThemeWrapper可以用來載入View、顯示Toast等(Activity實際上就是一個ContextThemeWrapper)。Toast也可以儲存下來複用,改變文字、字型顏色、背景等等,它實際引用的是Application,不會造成記憶體洩露。
```
Toast toast = new Toast(contextThemeWrapper);
View contentView = LayoutInflater.from(contextThemeWrapper).inflate(R.layout.toast_text, null);
TextView textView = (TextView) contentView;
textView.setText("Hello, World!");
toast.setView(contentView);
toast.show();
```
其中R.layout.toast_text如下:
```
```
Application也可以通過呼叫setTheme來賦予其一些屬性值,它繼承自ContextWrapper, 內部的mBase是android.app.ContextImpl的例項, android.app.ContextImpl#setTheme實現了和android.view.ContextThemeWrapper#setTheme同樣的邏輯,可以用於載入View、顯示Toast等等。
```
Application application = getApplication();
application.setTheme(R.style.toast_theme);
Toast toast = new Toast(application);
View contentView = LayoutInflater.from(application).inflate(R.layout.toast_text, null);
TextView textView = (TextView) contentView;
textView.setText("Hello, World!");
toast.setView(contentView);
toast.show();
```
# 總結
(1) AndroidManifest.xml中activity標籤下android:theme優先順序更高,application標籤下的android:theme次之,直接在程式碼中設定setTheme優先順序最高。對Activity,系統預設設定AndroidManifest.xml中配置的theme;對Application, 系統沒有設定過主題。
(2) 樣式類似於Map,key是attr的id值,value是對應的屬性值,可以進行繼承、覆蓋等。