
《Asp.Net Core3 + Vue3入坑教程》 - 3.AutoMapper & Restful API & DI
阿新 • • 發佈:2021-03-02
# 簡介
《Asp.Net Core3 + Vue3入坑教程》 此教程適合新手入門或者前後端分離嘗試者。可以根據圖文一步一步進操作編碼也可以選擇直接檢視原始碼。每一篇文章都有對應的原始碼
> 教程後期會將 .Net Core 3升級成 .Net Core 5
# 目錄
#### 《Asp.Net Core3 + Vue3入坑教程》系列教程目錄
Asp.Net Core後端專案
1. [後端專案搭建與Swagger配置步驟](https://www.cnblogs.com/Iannnnnnnnnnnnn/p/14435589.html)
2. [配置CROS策略解決跨域問題](https://www.cnblogs.com/Iannnnnnnnnnnnn/p/14438539.html)
3. [**(本文)AutoMapper & Restful API & DI**](https://www.cnblogs.com/Iannnnnnnnnnnnn/p/14438949.html)
4. (暫未發表敬請期待...)[EF Core & Postgresql](https://www.cnblogs.com/Iannnnnnnnnnnnn/p/14438885.html)
5. (暫未發表敬請期待...)[.Net Core 3升級成 .Net Core 5](https://www.cnblogs.com/Iannnnnnnnnnnnn/p/14444048.html)
6. (暫未發表敬請期待...)[JWT](https://www.cnblogs.com/Iannnnnnnnnnnnn/p/14444048.html)
Vue3 前端專案
暫未發表敬請期待...
# 本文簡介
本文為《Asp.Net Core3 + Vue3入坑教程》系列教程的後端第三篇 - AutoMapper & Restful API & DI。本文將利用AutoMapper與依賴注入等內容實現一個簡單的Restful API。
# 實現一個簡單的Restful API
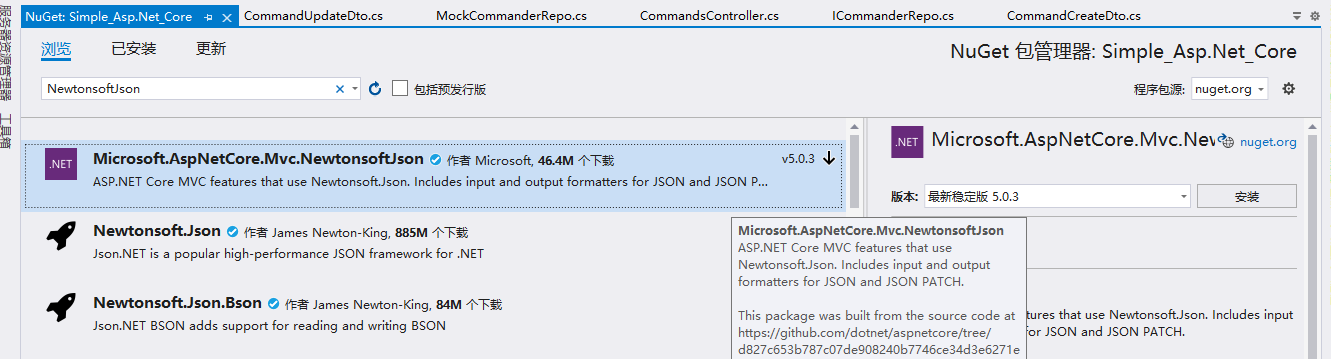
#### 引入NewtonsoftJson==3.1.12版本==的Nuget包
> 當前專案使用的SKD是 .net core 3後續將SDK升級之後再升級此Nuget包的版本

#### 配置Startup.cs
程式碼如下:
```
using Microsoft.AspNetCore.Builder;
using Microsoft.AspNetCore.Hosting;
using Microsoft.Extensions.DependencyInjection;
using Microsoft.Extensions.Hosting;
using Newtonsoft.Json.Serialization;
using Simple_Asp.Net_Core.Data;
using Simple_Asp.Net_Core.ServiceProvider;
using System;
namespace Simple_Asp.Net_Core
{
public class Startup
{
// This method gets called by the runtime. Use this method to add services to the container.
// For more information on how to configure your application, visit https://go.microsoft.com/fwlink/?LinkID=398940
public void ConfigureServices(IServiceCollection services)
{
services.AddCORS();
services.AddMvc();
services.AddSwagger();
services.AddControllers().AddNewtonsoftJson(s =>
{
s.SerializerSettings.ContractResolver = new CamelCasePropertyNamesContractResolver();
});
}
// This method gets called by the runtime. Use this method to configure the HTTP request pipeline.
public void Configure(IApplicationBuilder app, IWebHostEnvironment env)
{
if (env.IsDevelopment())
{
app.UseDeveloperExceptionPage();
app.UseSwagger();
app.UseSwaggerUI(c =>
{
c.SwaggerEndpoint("/swagger/v1/swagger.json", "ApiHelp V1");
});
}
app.UseCors("CorsTest");
app.UseRouting();
app.UseEndpoints(endpoints => endpoints.MapDefaultControllerRoute());
}
}
}
```
#### 新建資料夾Models,新建實體Command.cs

程式碼如下:
```
using System.ComponentModel.DataAnnotations;
namespace Simple_Asp.Net_Core.Models
{
public class Command
{
[Key]
[Required]
public int Id { get; set; }
[Required]
[MaxLength(250)]
public string HowTo { get; set; }
[Required]
public string Line { get; set; }
[Required]
public string Platform { get; set; }
}
}
```
#### 新建Data資料夾 新建 ICommanderRepo 倉儲層介面,用來定義與資料庫互動的介面
```
using Simple_Asp.Net_Core.Models;
using System.Collections.Generic;
namespace Simple_Asp.Net_Core.Data
{
public interface ICommanderRepo
{
IEn