SpringBoot啟動流程原理解析(二)
阿新 • • 發佈:2021-03-08
>在上一章我們分析了SpingBoot啟動流程中例項化SpingApplication的過程。
`return new SpringApplication(primarySources).run(args);`
這篇文章咱麼說下`run()`方法開始之後都做了那些事情。
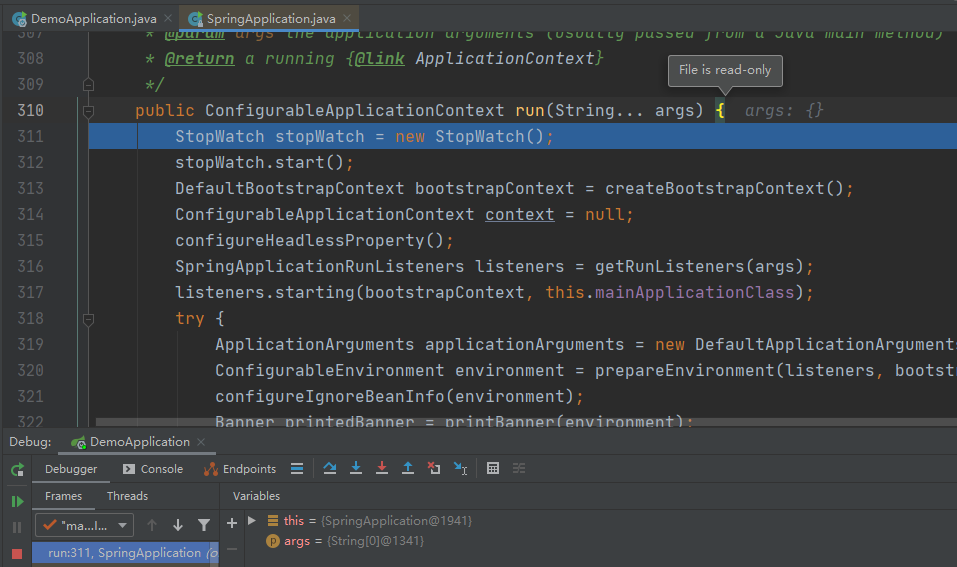
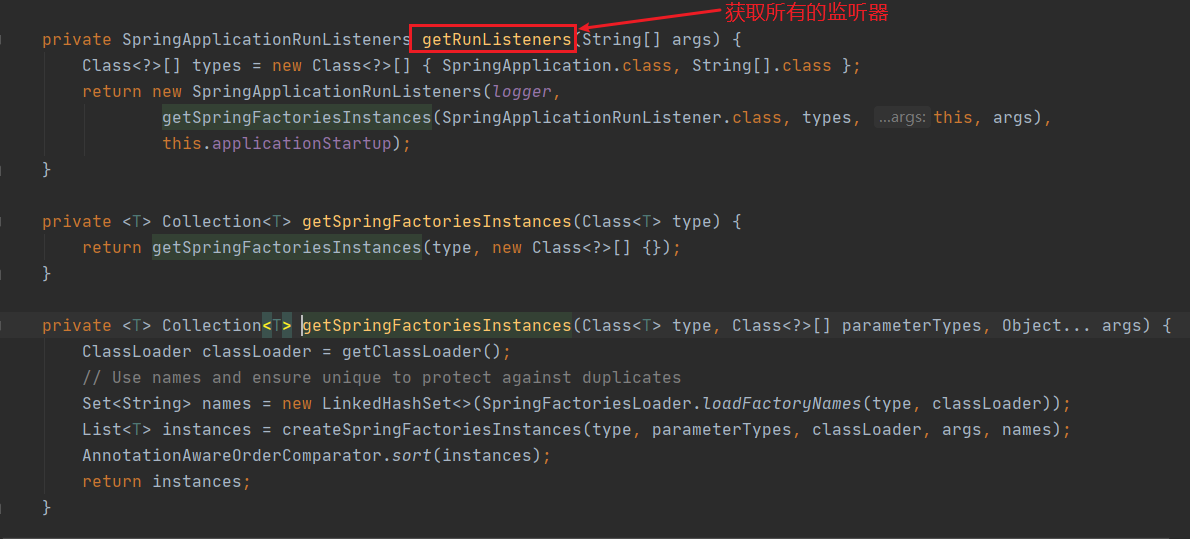
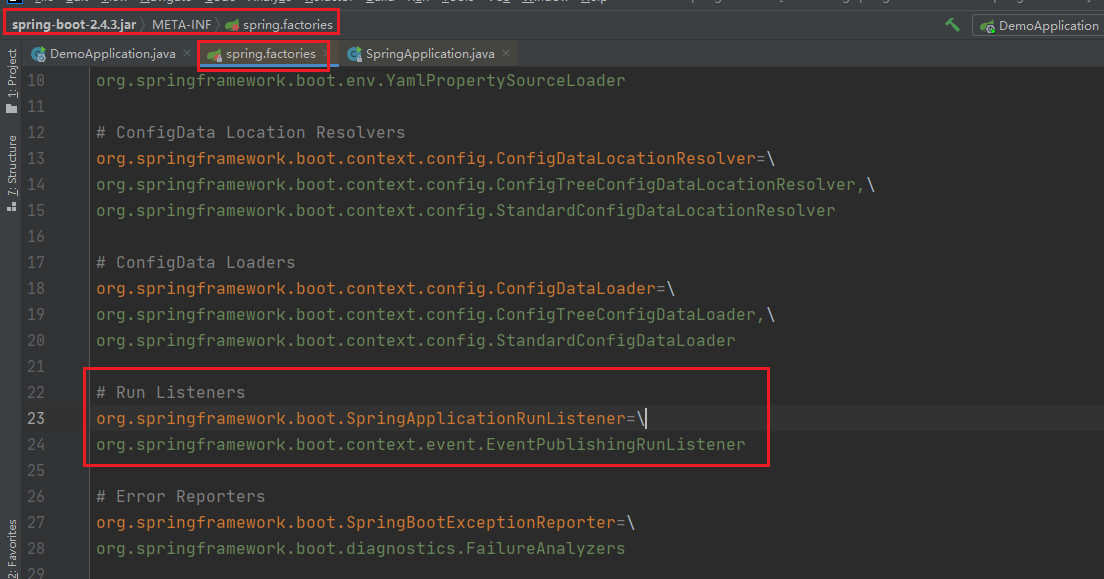
繼續往下跟著原始碼進入到`run()`這個是比較核心的一個方法了  ``` public ConfigurableApplicationContext run(String... args) { StopWatch stopWatch = new StopWatch(); // 計時器開始 stopWatch.start(); // 建立啟動上下文物件 DefaultBootstrapContext bootstrapContext = createBootstrapContext(); ConfigurableApplicationContext context = null; // 配置Handless模式,是在缺少顯示屏、鍵盤或滑鼠時的系統配置 // 預設為true configureHeadlessProperty(); //獲取並啟動監聽器 SpringApplicationRunListeners listeners = getRunListeners(args); // 啟動監聽器 listeners.starting(bootstrapContext, this.mainApplicationClass); try { ApplicationArguments applicationArguments = new DefaultApplicationArguments(args); // 準備環境 ConfigurableEnvironment environment = prepareEnvironment(listeners, bootstrapContext, applicationArguments); // 忽略配置的bean configureIgnoreBeanInfo(environment); // 列印banner,就是啟動的時候在控制檯的spring圖案 Banner printedBanner = printBanner(environment); // 建立容器 context = createApplicationContext(); context.setApplicationStartup(this.applicationStartup); // 準備應用上下文(spring容器前置處理) prepareContext(bootstrapContext, context, environment, listeners, applicationArguments, printedBanner); // 重新整理容器 refreshContext(context); // 重新整理容器後的擴充套件介面(spring容器後置處理) afterRefresh(context, applicationArguments); // 結束計時器並列印,這就是我們啟動後console的顯示的時間 stopWatch.stop(); if (this.logStartupInfo) { new StartupInfoLogger(this.mainApplicationClass).logStarted(getApplicationLog(), stopWatch); } // 釋出監聽應用上下文啟動完成(發出啟動結束事件) listeners.started(context); // 執行runner callRunners(context, applicationArguments); } catch (Throwable ex) { // 異常處理,如果run過程發生異常 handleRunFailure(context, ex, listeners); throw new IllegalStateException(ex); } try { // 監聽應用上下文執行中 listeners.running(context); } catch (Throwable ex) { handleRunFailure(context, ex, null); throw new IllegalStateException(ex); } // 返回最終構建的容器物件 return context; } ``` 接下來就對上面的關鍵步驟一一解釋 ### 1. 獲取所有的監聽器  這段程式碼我們比較熟悉了,上一篇咱麼詳細介紹過,它的主要作用就是去`META-INFO/spring.factories` 中載入配置SpringApplicationRunListener的監聽器如下  顯然只有一個事件釋出監聽器類,拿到了`EventPublishingRunListener`啟動事件釋出監聽器,下一步就是開始啟動了`listeners.starting()`;我們往下跟原始碼看 ``` @Override public void starting(ConfigurableBootstrapContext bootstrapContext) { this.initialMulticaster .multicastEvent(new ApplicationStartingEvent(bootstrapContext, this.application, this.args)); } ``` 啟動的時候實際上是又建立了一個`ApplicationStartingEvent`物件,其實就是監聽應用啟動事件。 其中 `initialMulticaster`是一個`SimpleApplicationEventMuticaster` ``` public void multicastEvent(ApplicationEvent event, @Nullable ResolvableType eventType) { ResolvableType type = eventType != null ? eventType : this.resolveDefaultEventType(event); // 獲取執行緒池,為每個監聽事件建立一個執行緒 Executor executor = this.getTaskExecutor(); // 根據ApplicationStartingEvent事件型別找到對應的監聽器,並迭代 Iterator var5 = this.getApplicationListeners(event, type).iterator(); while(var5.hasNext()) { ApplicationListener listener = (ApplicationListener)var5.next(); if (executor != null) { // executor.execute(() -> { this.invokeListener(listener, event); }); } else { this.invokeListener(listener, event); } } } ``` ### 2.準備環境 `ConfigurableEnvironment environment = prepareEnvironment(listeners, bootstrapContext, applicationArguments);` ``` private ConfigurableEnvironment prepareEnvironment(SpringApplicationRunListeners listeners, DefaultBootstrapContext bootstrapContext, ApplicationArguments applicationArguments) { // Create and configure the environment // 這裡我們加入了web依賴所以是一個servlet容器 ConfigurableEnvironment environment = getOrCreateEnvironment(); // 配置環境 configureEnvironment(environment, applicationArguments.getSourceArgs()); // 環境準備完成 ConfigurationPropertySources.attach(environment); listeners.environmentPrepared(bootstrapContext, environment); DefaultPropertiesPropertySource.moveToEnd(environment); configureAdditionalProfiles(environment); bindToSpringApplication(environment); if (!this.isCustomEnvironment) { environment = new EnvironmentConverter(getClassLoader()).convertEnvironmentIfNecessary(environment, deduceEnvironmentClass()); } ConfigurationPropertySources.attach(environment); return environment; } ``` 由於我們是添加了web的依賴 `getOrCreateEnvironment()`返回的是一個`standardservletEnviroment` 標準的servlet環境 #### 2.1 配置環境 ``` protected void configureEnvironment(ConfigurableEnvironment environment, String[] args) { if (this.addConversionService) { // 嵌入式的轉換器 ConversionService conversionService = ApplicationConversionService.getSharedInstance(); environment.setConversionService((ConfigurableConversionService) conversionService); } // 配置屬性資原始檔 configurePropertySources(environment, args); // 配置檔案 configureProfiles(environment, args); } ``` 應用嵌入的轉換器`ApplicationConversionService` ``` public static void configure(FormatterRegistry registry) { DefaultConversionService.addDefaultConverters(registry); DefaultFormattingConversionService.addDefaultFormatters(registry); // 格式轉換 addApplicationFormatters(registry); // 型別轉換 addApplicationConverters(registry); } ===============格式轉換================= public static void addApplicationFormatters(FormatterRegistry registry) { registry.addFormatter(new CharArrayFormatter()); registry.addFormatter(new InetAddressFormatter()); registry.addFormatter(new IsoOffsetFormatter()); } ========================型別轉換=================== public static void addApplicationConverters(ConverterRegistry registry) { addDelimitedStringConverters(registry); registry.addConverter(new StringToDurationConverter()); registry.addConverter(new DurationToStringConverter()); registry.addConverter(new NumberToDurationConverter()); registry.addConverter(new DurationToNumberConverter()); registry.addConverter(new StringToPeriodConverter()); registry.addConverter(new PeriodToStringConverter()); registry.addConverter(new NumberToPeriodConverter()); registry.addConverter(new StringToDataSizeConverter()); registry.addConverter(new NumberToDataSizeConverter()); registry.addConverter(new StringToFileConverter()); registry.addConverter(new InputStreamSourceToByteArrayConverter()); registry.addConverterFactory(new LenientStringToEnumConverterFactory()); registry.addConverterFactory(new LenientBooleanToEnumConverterFactory()); if (registry instanceof ConversionService) { addApplicationConverters(registry, (ConversionService) registry); } } ``` #### 2.2 環境準備完成 >同上面啟動監聽事件,這次的環境準備也是同樣的程式碼 ``` @Override public void environmentPrepared(ConfigurableBootstrapContext bootstrapContext, ConfigurableEnvironment environment) { this.initialMulticaster.multicastEvent( // 建立一個應用環境準備事件物件 new ApplicationEnvironmentPreparedEvent(bootstrapContext, this.application, this.args, environment)); } ``` debug進去之後程式碼跟AppLicationstrigevent 事件物件是一樣的。不再贅述。 不過這裡是7個監聽器物件 #### 3.配置忽略的bean `configureIgnoreBeanInfo(environment);` #### 4.列印banner >這是SpringBoot預設的啟動時的圖示 `Banner printedBanner = printBanner(environment);`  >這個是可以自定義的,也可以是圖篇或是文字檔案中的圖形 ### 5.建立容器 緊接著上一篇,接下來就是建立容器 ``` protected ConfigurableApplicationContext createApplicationContext() { return this.applicationContextFactory.create(this.webApplicationType); } ``` ### 6.準備應用上下文 ``` private void prepareContext(DefaultBootstrapContext bootstrapContext, ConfigurableApplicationContext context, ConfigurableEnvironment environment, SpringApplicationRunListeners listeners, ApplicationArguments applicationArguments, Banner printedBanner) { // 設定環境引數 context.setEnvironment(environment); // 設定後處理應用上下文 postProcessApplicationContext(context); //把從spring.factories中載入的org.springframework.bt.context.ConfigurationwarningsApplicationContextIitiaLizer,進行初始化操作 applyInitializers(context); //EventPubLishingRunListener釋出應用上下文事件 listeners.contextPrepared(context); // 列印啟動日誌 bootstrapContext.close(context); if (this.logStartupInfo) { logStartupInfo(context.getParent() == null); logStartupProfileInfo(context); } // Add boot specific singleton beans ConfigurableListableBeanFactory beanFactory = context.getBeanFactory(); beanFactory.registerSingleton("springApplicationArguments", applicationArguments); if (printedBanner != null) { //註冊一個字是springAppLicationArguments單例的bean beanFactory.registerSingleton("springBootBanner", printedBanner); } if (beanFactory instanceof DefaultListableBeanFactory) { ((DefaultListableBeanFactory) beanFactory) .setAllowBeanDefinitionOverriding(this.allowBeanDefinitionOverriding); } if (this.lazyInitialization) { context.addBeanFactoryPostProcessor(new LazyInitializationBeanFactoryPostProcessor()); } // Load the sources 獲取所有資源 Set
繼續往下跟著原始碼進入到`run()`這個是比較核心的一個方法了  ``` public ConfigurableApplicationContext run(String... args) { StopWatch stopWatch = new StopWatch(); // 計時器開始 stopWatch.start(); // 建立啟動上下文物件 DefaultBootstrapContext bootstrapContext = createBootstrapContext(); ConfigurableApplicationContext context = null; // 配置Handless模式,是在缺少顯示屏、鍵盤或滑鼠時的系統配置 // 預設為true configureHeadlessProperty(); //獲取並啟動監聽器 SpringApplicationRunListeners listeners = getRunListeners(args); // 啟動監聽器 listeners.starting(bootstrapContext, this.mainApplicationClass); try { ApplicationArguments applicationArguments = new DefaultApplicationArguments(args); // 準備環境 ConfigurableEnvironment environment = prepareEnvironment(listeners, bootstrapContext, applicationArguments); // 忽略配置的bean configureIgnoreBeanInfo(environment); // 列印banner,就是啟動的時候在控制檯的spring圖案 Banner printedBanner = printBanner(environment); // 建立容器 context = createApplicationContext(); context.setApplicationStartup(this.applicationStartup); // 準備應用上下文(spring容器前置處理) prepareContext(bootstrapContext, context, environment, listeners, applicationArguments, printedBanner); // 重新整理容器 refreshContext(context); // 重新整理容器後的擴充套件介面(spring容器後置處理) afterRefresh(context, applicationArguments); // 結束計時器並列印,這就是我們啟動後console的顯示的時間 stopWatch.stop(); if (this.logStartupInfo) { new StartupInfoLogger(this.mainApplicationClass).logStarted(getApplicationLog(), stopWatch); } // 釋出監聽應用上下文啟動完成(發出啟動結束事件) listeners.started(context); // 執行runner callRunners(context, applicationArguments); } catch (Throwable ex) { // 異常處理,如果run過程發生異常 handleRunFailure(context, ex, listeners); throw new IllegalStateException(ex); } try { // 監聽應用上下文執行中 listeners.running(context); } catch (Throwable ex) { handleRunFailure(context, ex, null); throw new IllegalStateException(ex); } // 返回最終構建的容器物件 return context; } ``` 接下來就對上面的關鍵步驟一一解釋 ### 1. 獲取所有的監聽器  這段程式碼我們比較熟悉了,上一篇咱麼詳細介紹過,它的主要作用就是去`META-INFO/spring.factories` 中載入配置SpringApplicationRunListener的監聽器如下  顯然只有一個事件釋出監聽器類,拿到了`EventPublishingRunListener`啟動事件釋出監聽器,下一步就是開始啟動了`listeners.starting()`;我們往下跟原始碼看 ``` @Override public void starting(ConfigurableBootstrapContext bootstrapContext) { this.initialMulticaster .multicastEvent(new ApplicationStartingEvent(bootstrapContext, this.application, this.args)); } ``` 啟動的時候實際上是又建立了一個`ApplicationStartingEvent`物件,其實就是監聽應用啟動事件。 其中 `initialMulticaster`是一個`SimpleApplicationEventMuticaster` ``` public void multicastEvent(ApplicationEvent event, @Nullable ResolvableType eventType) { ResolvableType type = eventType != null ? eventType : this.resolveDefaultEventType(event); // 獲取執行緒池,為每個監聽事件建立一個執行緒 Executor executor = this.getTaskExecutor(); // 根據ApplicationStartingEvent事件型別找到對應的監聽器,並迭代 Iterator var5 = this.getApplicationListeners(event, type).iterator(); while(var5.hasNext()) { ApplicationListener listener = (ApplicationListener)var5.next(); if (executor != null) { // executor.execute(() -> { this.invokeListener(listener, event); }); } else { this.invokeListener(listener, event); } } } ``` ### 2.準備環境 `ConfigurableEnvironment environment = prepareEnvironment(listeners, bootstrapContext, applicationArguments);` ``` private ConfigurableEnvironment prepareEnvironment(SpringApplicationRunListeners listeners, DefaultBootstrapContext bootstrapContext, ApplicationArguments applicationArguments) { // Create and configure the environment // 這裡我們加入了web依賴所以是一個servlet容器 ConfigurableEnvironment environment = getOrCreateEnvironment(); // 配置環境 configureEnvironment(environment, applicationArguments.getSourceArgs()); // 環境準備完成 ConfigurationPropertySources.attach(environment); listeners.environmentPrepared(bootstrapContext, environment); DefaultPropertiesPropertySource.moveToEnd(environment); configureAdditionalProfiles(environment); bindToSpringApplication(environment); if (!this.isCustomEnvironment) { environment = new EnvironmentConverter(getClassLoader()).convertEnvironmentIfNecessary(environment, deduceEnvironmentClass()); } ConfigurationPropertySources.attach(environment); return environment; } ``` 由於我們是添加了web的依賴 `getOrCreateEnvironment()`返回的是一個`standardservletEnviroment` 標準的servlet環境 #### 2.1 配置環境 ``` protected void configureEnvironment(ConfigurableEnvironment environment, String[] args) { if (this.addConversionService) { // 嵌入式的轉換器 ConversionService conversionService = ApplicationConversionService.getSharedInstance(); environment.setConversionService((ConfigurableConversionService) conversionService); } // 配置屬性資原始檔 configurePropertySources(environment, args); // 配置檔案 configureProfiles(environment, args); } ``` 應用嵌入的轉換器`ApplicationConversionService` ``` public static void configure(FormatterRegistry registry) { DefaultConversionService.addDefaultConverters(registry); DefaultFormattingConversionService.addDefaultFormatters(registry); // 格式轉換 addApplicationFormatters(registry); // 型別轉換 addApplicationConverters(registry); } ===============格式轉換================= public static void addApplicationFormatters(FormatterRegistry registry) { registry.addFormatter(new CharArrayFormatter()); registry.addFormatter(new InetAddressFormatter()); registry.addFormatter(new IsoOffsetFormatter()); } ========================型別轉換=================== public static void addApplicationConverters(ConverterRegistry registry) { addDelimitedStringConverters(registry); registry.addConverter(new StringToDurationConverter()); registry.addConverter(new DurationToStringConverter()); registry.addConverter(new NumberToDurationConverter()); registry.addConverter(new DurationToNumberConverter()); registry.addConverter(new StringToPeriodConverter()); registry.addConverter(new PeriodToStringConverter()); registry.addConverter(new NumberToPeriodConverter()); registry.addConverter(new StringToDataSizeConverter()); registry.addConverter(new NumberToDataSizeConverter()); registry.addConverter(new StringToFileConverter()); registry.addConverter(new InputStreamSourceToByteArrayConverter()); registry.addConverterFactory(new LenientStringToEnumConverterFactory()); registry.addConverterFactory(new LenientBooleanToEnumConverterFactory()); if (registry instanceof ConversionService) { addApplicationConverters(registry, (ConversionService) registry); } } ``` #### 2.2 環境準備完成 >同上面啟動監聽事件,這次的環境準備也是同樣的程式碼 ``` @Override public void environmentPrepared(ConfigurableBootstrapContext bootstrapContext, ConfigurableEnvironment environment) { this.initialMulticaster.multicastEvent( // 建立一個應用環境準備事件物件 new ApplicationEnvironmentPreparedEvent(bootstrapContext, this.application, this.args, environment)); } ``` debug進去之後程式碼跟AppLicationstrigevent 事件物件是一樣的。不再贅述。 不過這裡是7個監聽器物件 #### 3.配置忽略的bean `configureIgnoreBeanInfo(environment);` #### 4.列印banner >這是SpringBoot預設的啟動時的圖示 `Banner printedBanner = printBanner(environment);`  >這個是可以自定義的,也可以是圖篇或是文字檔案中的圖形 ### 5.建立容器 緊接著上一篇,接下來就是建立容器 ``` protected ConfigurableApplicationContext createApplicationContext() { return this.applicationContextFactory.create(this.webApplicationType); } ``` ### 6.準備應用上下文 ``` private void prepareContext(DefaultBootstrapContext bootstrapContext, ConfigurableApplicationContext context, ConfigurableEnvironment environment, SpringApplicationRunListeners listeners, ApplicationArguments applicationArguments, Banner printedBanner) { // 設定環境引數 context.setEnvironment(environment); // 設定後處理應用上下文 postProcessApplicationContext(context); //把從spring.factories中載入的org.springframework.bt.context.ConfigurationwarningsApplicationContextIitiaLizer,進行初始化操作 applyInitializers(context); //EventPubLishingRunListener釋出應用上下文事件 listeners.contextPrepared(context); // 列印啟動日誌 bootstrapContext.close(context); if (this.logStartupInfo) { logStartupInfo(context.getParent() == null); logStartupProfileInfo(context); } // Add boot specific singleton beans ConfigurableListableBeanFactory beanFactory = context.getBeanFactory(); beanFactory.registerSingleton("springApplicationArguments", applicationArguments); if (printedBanner != null) { //註冊一個字是springAppLicationArguments單例的bean beanFactory.registerSingleton("springBootBanner", printedBanner); } if (beanFactory instanceof DefaultListableBeanFactory) { ((DefaultListableBeanFactory) beanFactory) .setAllowBeanDefinitionOverriding(this.allowBeanDefinitionOverriding); } if (this.lazyInitialization) { context.addBeanFactoryPostProcessor(new LazyInitializationBeanFactoryPostProcessor()); } // Load the sources 獲取所有資源 Set
