
webrtc windows編譯+vs2017
webrtc windows編譯+vs2017
1、 下載depot-tools
下載depot-tools之後解壓,把解壓目錄設定到環境變數裡面 (PATH)
2、 安裝vs2017
至少需要包含以下模組: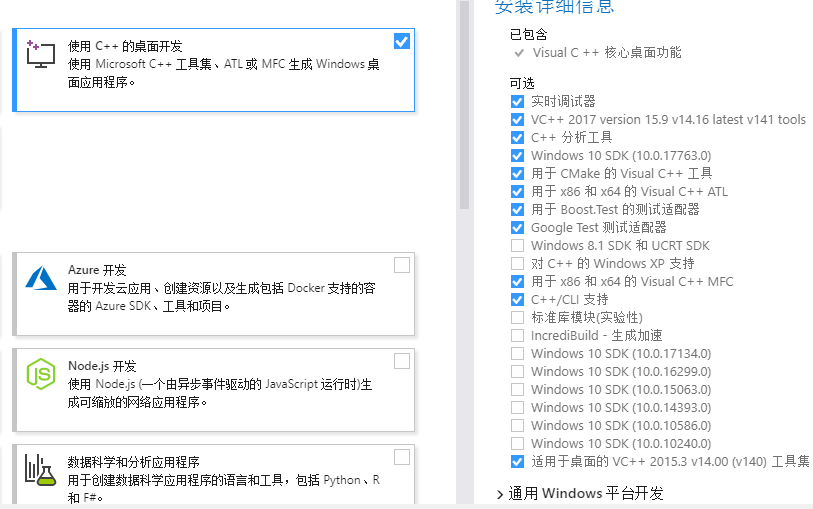
安裝完VS2017後,必須安裝SDK除錯工具。開啟控制面板->程式與功能,找到剛才安裝的Windows Software Development Kit,滑鼠右鍵->change。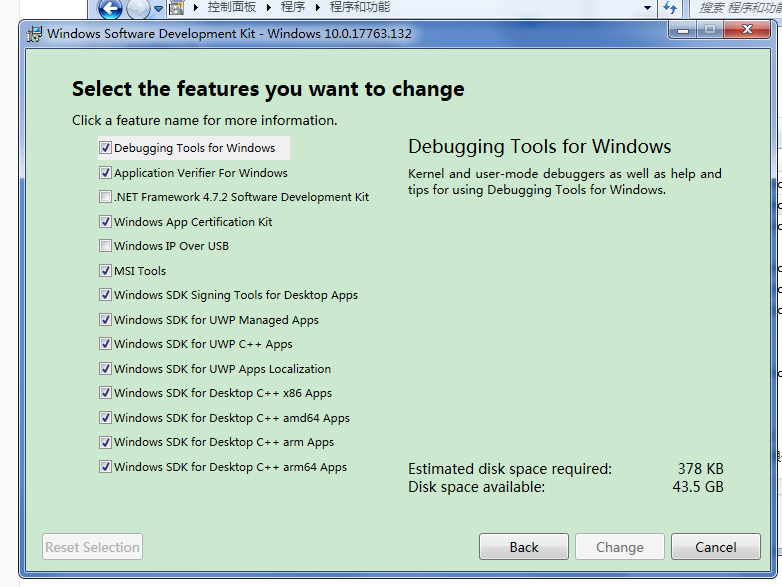
3、原始碼編譯
開啟cmd設定臨時環境變數:
Copy
set GYP_MSVS_VERSION=2017 set GYP_MSVS_OVERRIDE_PATH=D:\Program Files (x86)\Microsoft Visual Studio\2017\Professional set GYP_GENERATORS=msvs-ninja,ninja set WINDOWSSDKDIR=D:\Windows Kits\10 #vs不在C盤 set DEPOT_TOOLS_WIN_TOOLCHAIN=0 也可以直接設定環境變數,告訴depot_tools使用我們本機的VS進行編譯。
然後執行:
Copy
mkdir webrtc-checkout cd webrtc-checkout fetch --nohooks webrtc #獲取程式碼,需要v*n gclient sync
當代碼獲取完成後,cd到原始碼目錄,繼續輸入指令來生成解決方案 (default)
Copy
cd src gn gen out/Default --ide=vs2017 ninja -C out/Default
編譯支援h264:
Copy
gn gen out/Debug_h264_ffmpeg --args="is_component_build=false rtc_use_h264=true proprietary_codecs=true is_component_ffmpeg=true ffmpeg_branding=\"Chrome\"" --ide=vs2017 ninja -C out/Debug_h264_ffmpeg
Copy
gn gen out/Debug_h264 --args="is_component_build=false rtc_use_h264=true proprietary_codecs=true ffmpeg_branding=\"Chrome\"" --ide=vs2017 ninja -C out/Debug_h264
| is_debug | 是否是Debug版,預設true,false:表示編譯Release版。 |
|---|---|
| target_os | 平臺型別,可以取值win、android、ios、linux等,這裡取win,表示Windows平臺。 |
| target_cpu | cpu型別,Windows下可以取x86、x64 |
| is_component_build | 是否使用動態執行期庫,這裡取false,使用靜態執行期庫,Release版本將對應MT,Debug版將對應MTd。 |
| proprietary_codecs | 是否使用版權編碼,也就是H264,這裡取true。 |
| rtc_use_h264 | 是否使用H264,這裡取true,注意Windows平臺編碼使用OpenH264,解碼使用ffmpeg。 |
| ffmpeg_branding | ffmpeg的分支名,這裡採用Chrome的分支。 |
| rtc_build_ssl | 是否編譯BoringSSL,這裡取false,因為後面我們要替換成OpenSSL。 |
| rtc_ssl_root | OpenSSL的標頭檔案路徑,會被寫到生成的ninja檔案中。 |
gn help args可以檢視args的幫助檔案
gn args out/Debug_h264可以得到指定編譯輸出目錄下的args配置檔案
作者: cbhxutt
出處:https://www.cnblogs.com/bloglearning/p/12021001.html
版權:本文采用「署名-非商業性使用-相同方式共享 4.0 國際」知識共享許可協議進行許可。