
SNMP 原理與實戰詳解
SNMP 原理與實戰詳解
轉載自:https://blog.csdn.net/bbwangj/article/details/80981098
大綱
一、什麼是SNMP
二、SNMP背景
三、SNMP結構概述
四、SNMP支援的網管操作
五、SNMP的實現結構
六、SNMP的技術內容
七、SNMP的發展歷史
八、SNMP的技術術語
九、綜合上述(總結)
十、Net-SNMP詳解
十一、SNMP的MIB詳解
注,實驗環境 CentOS 6.4 x86_64 軟體版本 net-snmp 5.5。(說明:本博文的一些圖片自於開源社群與官方網站並不是所有內容全是原創)
一、什麼是SNMP
SNMP:“簡單網路管理協議”,用於網路管理的協議。SNMP用於網路裝置的管理。SNMP的工作方式:管理員需要向裝置獲取資料,所以SNMP提供了“讀”操作;管理員需要向裝置執行設定操作,所以SNMP提供了“寫”操作;裝置需要在重要狀況改變的時候,向管理員通報事件的發生,所以SNMP提供了“Trap”操作。
二、SNMP背景
SNMP的基本思想:為不同種類的裝置、不同廠家生產的裝置、不同型號的裝置,定義為一個統一的介面和協議,使得管理員可以是使用統一的外觀面對這些需要管理的網路裝置進行管理。通過網路,管理員可以管理位於不同物理空間的裝置,從而大大提高網路管理的效率,簡化網路管理員的工作。
三、SNMP結構概述
SNMP被設計為工作在TCP/IP協議族上。SNMP基於TCP/IP協議工作,對網路中支援SNMP協議的裝置進行管理。所有支援SNMP協議的裝置都提供SNMP這個統一介面,使得管理員可以使用統一的操作進行管理,而不必理會裝置是什麼型別、是哪個廠家生產的。如下圖,
四、SNMP支援的網管操作
對於網路管理,我們面對的資料是裝置的配置、引數、狀態等資訊,面對的操作是讀取和設定;同時,因為網路裝置眾多,為了能及時得到裝置的重要狀態,還要求裝置能主動地彙報重要狀態,這就是報警功能。如下圖,
-
Get:讀取網路裝置的狀態資訊。
-
Set:遠端配置裝置引數。
-
Trap:管理站及時獲取裝置的重要資訊。
五、SNMP的實現結構
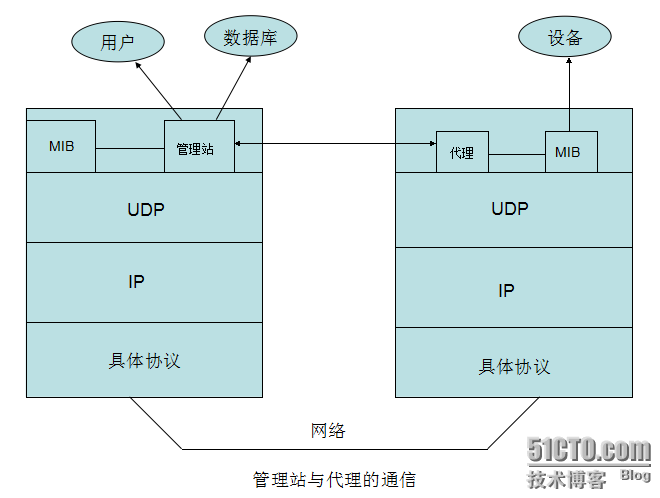
在具體實現上,SNMP為管理員提供了一個網管平臺(NMS),又稱為管理站,負責網管命令的發出、資料儲存、及資料分析。被監管的裝置上執行一個SNMP代理(Agent)),代理實現裝置與管理站的SNMP通訊。如下圖,
Amanagement information base(MIB) is a database used for managing the entities in a communication network. Most often associated with theSimple Network Management Protocol(SNMP), the term is also used more generically in contexts such as in OSI/ISO Network management model.
管理站與代理端通過MIB進行介面統一,MIB定義了裝置中的被管理物件。管理站和代理都實現了相應的MIB物件,使得雙方可以識別對方的資料,實現通訊。管理站向代理申請MIB中定義的資料,代理識別後,將管理裝置提供的相關狀態或引數等資料轉換為MIB定義的格式,應答給管理站,完成一次管理操作。
已有的裝置,只要新加一個SNMP模組就可以實現網路支援。舊的帶擴充套件槽的裝置,只要插入SNMP模組插卡即可支援網路管理。網路上的許多裝置,路由器、交換機等,都可以通過新增一個SNMP網管模組而增加網管功能。伺服器可以通過執行一個網管程序實現。其他服務級的產品也可以通過網管模組實現網路管理,如Oracle、WebLogic都有SNMP程序,執行後就可以通過管理站對這些系統級服務進行管理。
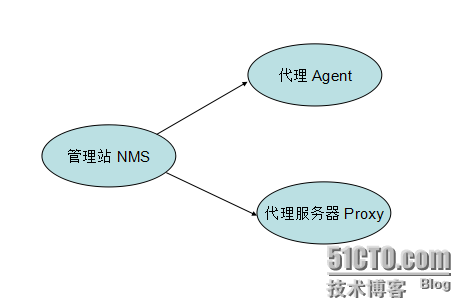
根據管理者和被管理的裝置在網路管理操作中的不同職責,SNMP定義了3種角色。如下圖,
網路管理系統:又稱管理站、NMS。是系統的控制檯,向管理員提供介面以獲取與改變裝置的配置、資訊、狀態、操作等資訊。管理站與Agent進行通訊,執行相應的Set和Get操作,並接收代理髮過來的警報(Trap)。
代理:Agent是網路管理的代理人,負責管理站和裝置SNMP操作的傳遞。介於管理站和裝置之間,與管理站通訊並相應管理站的請求,從裝置獲取相應的資料,或對裝置進行相應的設定,來響應管理站的請求。代理也需要具有根據裝置的相應狀態使用MIB中定義的Trap向管理站傳送報告的能力。
代理伺服器:Proxy是一種特殊的代理,在不能直接使用SNMP協議的地方,如:異種網路、不同版本的SNMP代理等情況,Proxy代替相關裝置向管理站提供一種外觀,為裝置代理SNMP協議的實現。Proxy做了異種網路或不同版本代理和相應SNMP資料請求的轉換工作。如下圖,
附:管理資訊庫MIB:定義了裝置上可以使用的管理資訊。代理和管理站使用MIB作為統一的資料介面通訊。
六、SNMP的技術內容
如下圖,
七、SNMP的發展歷史
-
1989年------ SNMPv1
-
1991年------ RMON(Remote Network Monitoring 遠端網路監視),它擴充了SNMP的功能,包括對LAN的管理及對依附於這些網路的裝置的管理。RMON 沒有修改和增加SNMPv1,只是增加了SNMP監視子網的能力。
-
1993年------ SNMPv2(SNMPv1的升級版)
-
1995年------ SNMPv2正式版,其中規定了如何在基於OSI的網路中使用SNMP
-
1995年------ RMON擴充套件為RMON2
-
1998年------ SNMPv3,一系列文件定義了SNMP的安全性,並定義了將來改進的總體結構,SNMPv3可以和SNMPv2、SNMPv1一起使用。
八、SNMP的技術術語
-
SNMP:Simple Network Management Protocol(簡單網路管理協議),是一個標準的用於管理基於IP網路上裝置的協議。
-
MIB:Management Information Base(管理資訊庫),定義代理程序中所有可被查詢和修改的引數。
-
SMI:Structure of Management Information(管理資訊結構),SMI定義了SNMP中使用到的ASN.1型別、語法,並定義了SNMP中使用到的型別、巨集、符號等。SMI用於後續協議的描述和MIB的定義。每個版本的SNMP都可能定義自己的SMI。
-
ASN.1:Abstract Syntax Notation One(抽象語法定義)。用於定義語法的正式語言,在SNMP中定義SNMP的協議資料單元PDU和管理物件MIB的格式。SNMP只使用了ASN.1中的一部分,而且使用ASN.1的語言特性定義了一些自定義型別和型別巨集 ,這些組成了SMI。
-
PDU: Protocol Data Unit(協議資料單元),它是網路中傳送的資料包。每一種SNMP操作,物理上都對應一個PDU。
-
NMS: Network Management System,網路管理系統,又名網路管理站,簡稱“管理站”。它是SNMP的總控機,提供統一的使用者介面訪問支援SNMP的裝置,一般提供UI介面,並有統計、分析等功能,是網管系統的總控制檯。NMS是網路管理操作的發起者。
-
Agent: 是SNMP的訪問代理,簡稱“代理”,為裝置提供SNMP能力,負責裝置與NMS的通訊。
-
Proxy: 代理伺服器,對實現不同協議的裝置進行協議轉換,使非IP協議的裝置也能被管理。
-
Trap: 是由裝置主動發出的報警資料,用於提示重要的狀態的改變。
-
BER: Basic Encoding Rule,基本編碼規格。描述如何將ASN.1型別的值編碼為字串的方法。它是ASN.1標準的一部分。BER編碼將資料分成TLV三部分,T為Tag的縮寫,是型別標識;L為Length的縮寫,標識型別的長度;V為Value的縮寫,標識資料內容。按照TLV的順序對資料進行編碼,生成位元組流。SNMP使用BER將SNMP的操作請求和應答編碼後進行傳輸,並用於接收端進行解碼。
九、綜合上述(總結)
1.SNMP現有幾個版本
SNMP共有v1,v2,v3這三個版本:
-
v1和v2都具有基本的讀、寫MIB功能。
-
v2增加了警報、批量資料獲取、管理站和管理站通訊能力。
-
v3在v2的基礎上增加了USM,使用加密的資料和使用者驗證技術,提高了安全性。
-
另外,RMON是SNMP的一個重要擴充套件,為SNMP增加了子網流量、統計、分析能力。現有兩個版本: Rmon:提供了OSI七層網路結構中網路層和資料鏈路層監視能力。Rmon2:提供了OSI七層網路結構中網路層之上各層的監視能力。
2.ASN.1、BER、SMI、MIB、PDU的關係
-
ASN.1:高階的資料描述語言。描述資料的型別、結構、組織、及編碼方法。包括符號和語法兩部分。SNMP使用ASN.1描述PDU和管理學物件資訊庫MIB。
-
BER:ASN.1的基本編碼規則。描述具體的ASN.1物件如何編碼為位元流在網路上傳輸。SNMP使用BER作為編碼方案,資料首先先經過BER編碼,再經由傳輸層協議(一邊是UDP)發往接收方。接收方在SNMP埠上收到PDU後,經過BER解碼後,得到具體的SNMP操作資料。
-
SMI:是SNMP的描述方法。規定了使用ASN.1子型別、符號。ASN.1功能強大,但SNMP只用到了其中很小一部分,對於這一部分內容的描述,限定了範圍,即為SMI。SMI規定了使用到的ASN.1型別、巨集、符號等。SMI是ASN.1的一個子集和超集。
-
MIB:是SNMP中使用到的管理資訊庫。定義了資料格式、型別、順序、意義等,使用SMI中定義的型別和ASN.1中的基本型別對物件進行描述,是一個使用SMI描述的管理資訊庫。每一類關心的事件都有一組MIB,比如網路介面有一顆MIB樹,TCP有一顆MIB樹,UDP也有一顆MIB樹。
-
PDU:是SNMP的協議資料單元。PDU是基本的通訊格式,使用ASN.1描述,使用BER編碼,通過傳輸層協議傳送。
3.比較規範的SNMP背景
SNMP作為一種過渡技術以其簡單易用的特性被廣泛使用,使用的網路產品提供對SNMP的支援。SNMP還擴充套件了具有遠端管理功能的RMON,使得管理人員可以對整個子網進行管理,而不是對整個子網內的裝置進行管理。
十、Net-SNMP
1.net-snmp簡介
使用net-snmp作為學習SNMP的工具,搭建一個net-snmp環境。Net-snmp是一個開源的SNMP專案。最新版本為:5.7.2。net-snmp支援snmpv1、snmpv2、snmpv3,支援基於IPv4和IPv6的SNMP應用程式。
-
Net-snmp提供完整的API用於SNMP應用程式開發,包括C和Perl的API 。
-
一個功能強大且可擴充套件的SNMP代理:snmpd開發者可以開發動態模組擴充套件snmpd,net-snmp內建擴充套件子代理與主代理的通訊協議。
-
提供眾多命令列工具檢查和使用SNMP協議
-
一個圖形化的MIB瀏覽工具
-
一個Trap接收程序,用於接收和顯示Trap,並將Trap記錄到日誌檔案中。
2.net-snmp的安裝與配置
官方網站:http://www.net-snmp.org/download.html,net-snmp被很多商業化的Linux包含,但是大多數的Linux使用net-snmp的主代理實現Linux的SNMP支援。
3.支援的平臺
net-snmp可以在BSD UNIX、Linux、Windows等作業系統上編譯執行。Windows下可以安裝一個VMWare虛擬機器軟體,新建一個虛擬機器,在虛擬機器上安裝Linux用來學習。
4.實驗環境
-
作業系統,CentOS 6.4 X86_64
-
軟體版本,net-snmp 5.5
5.同步時間
[root@snmp ~]# ntpdate 202.120.2.101
|
6.安裝yum源
[root@node1 ~]# rpm -ivh http://download.fedoraproject.org/pub/epel/6/x86_64/epel-release-6-8.noarch.rpm
[root@node1 ~]# rpm -ivh http://pkgs.repoforge.org/rpmforge-release/rpmforge-release-0.5.3-1.el6.rf.x86_64.rpm
|
7.檢視一下net-snmp相關軟體包
[root@node1 ~]# yum list all | grep net-snmp*
net-snmp.x86_64 1:5.5-44.el6_4.4 updates
net-snmp-devel.i686 1:5.5-44.el6_4.4 updates
net-snmp-devel.x86_64 1:5.5-44.el6_4.4 updates
net-snmp-libs.i686 1:5.5-44.el6_4.4 updates
net-snmp-libs.x86_64 1:5.5-44.el6_4.4 updates
net-snmp-perl.x86_64 1:5.5-44.el6_4.4 updates
net-snmp-python.x86_64 1:5.5-44.el6_4.4 updates
net-snmp-utils.x86_64 1:5.5-44.el6_4.4 updates
|
注,有兩個重要的安裝,net-snmp.x86_64 、net-snmp-utils.x86_64 一個是net-snmp軟體包,另一個是snmp的工具包。下面我們來安裝一下,
[root@node1 ~]# yum install -y net-snmp net-snmp-utils
|
8.檢視一下安裝的軟體包
[root@node1 ~]# rpm -qa | grep net-snmp*
net-snmp-5.5-44.el6_4.4.x86_64
net-snmp-utils-5.5-44.el6_4.4.x86_64
net-snmp-libs-5.5-44.el6_4.4.x86_64
|
9.檢視一下軟體包具體安裝的內容
下面是snmp軟體包的內容,
[root@node1 ~]# rpm -ql net-snmp-5.5-44.el6_4.4.x86_64
/etc/rc.d/init.d/snmpd#snmp的啟動指令碼
/etc/rc.d/init.d/snmptrapd
/etc/snmp#snmp配置檔案目錄
/etc/snmp/snmpd.conf#snmp配置檔案
/etc/snmp/snmptrapd.conf
/etc/sysconfig/snmpd
/etc/sysconfig/snmptrapd
/usr/bin/net-snmp-create-v3-user
/usr/bin/snmpconf
/usr/sbin/snmpd
/usr/sbin/snmptrapd
/usr/share/doc/net-snmp-5.5
/usr/share/doc/net-snmp-5.5/AGENT.txt
/usr/share/doc/net-snmp-5.5/COPYING
/usr/share/doc/net-snmp-5.5/ChangeLog.trimmed
/usr/share/doc/net-snmp-5.5/EXAMPLE.conf
/usr/share/doc/net-snmp-5.5/FAQ
/usr/share/doc/net-snmp-5.5/NEWS
/usr/share/doc/net-snmp-5.5/PORTING
/usr/share/doc/net-snmp-5.5/README
/usr/share/doc/net-snmp-5.5/README.agent-mibs
/usr/share/doc/net-snmp-5.5/README.agentx
/usr/share/doc/net-snmp-5.5/README.krb5
/usr/share/doc/net-snmp-5.5/README.mib2c
/usr/share/doc/net-snmp-5.5/README.snmpv3
/usr/share/doc/net-snmp-5.5/README.thread
/usr/share/doc/net-snmp-5.5/TODO
/usr/share/doc/net-snmp-5.5/ipf-mod.pl
/usr/share/doc/net-snmp-5.5/passtest
/usr/share/man/man1/net-snmp-create-v3-user.1.gz#幫助檔案
/usr/share/man/man1/snmpconf.1.gz
/usr/share/man/man5/snmp_config.5.gz
/usr/share/man/man5/snmpd.conf.5.gz
/usr/share/man/man5/snmpd.examples.5.gz
/usr/share/man/man5/snmpd.internal.5.gz
/usr/share/man/man5/snmptrapd.conf.5.gz
/usr/share/man/man5/variables.5.gz
/usr/share/man/man8/snmpd.8.gz
/usr/share/man/man8/snmptrapd.8.gz
/usr/share/snmp
/usr/share/snmp/snmpconf-data
/usr/share/snmp/snmpconf-data/snmp-data
/usr/share/snmp/snmpconf-data/snmp-data/authopts
/usr/share/snmp/snmpconf-data/snmp-data/debugging
/usr/share/snmp/snmpconf-data/snmp-data/mibs
/usr/share/snmp/snmpconf-data/snmp-data/output
/usr/share/snmp/snmpconf-data/snmp-data/snmpconf-config
/usr/share/snmp/snmpconf-data/snmpd-data
/usr/share/snmp/snmpconf-data/snmpd-data/acl
/usr/share/snmp/snmpconf-data/snmpd-data/basic_setup
/usr/share/snmp/snmpconf-data/snmpd-data/extending
/usr/share/snmp/snmpconf-data/snmpd-data/monitor
/usr/share/snmp/snmpconf-data/snmpd-data/operation
/usr/share/snmp/snmpconf-data/snmpd-data/snmpconf-config
/usr/share/snmp/snmpconf-data/snmpd-data/system
/usr/share/snmp/snmpconf-data/snmpd-data/trapsinks
/usr/share/snmp/snmpconf-data/snmptrapd-data
/usr/share/snmp/snmpconf-data/snmptrapd-data/authentication
/usr/share/snmp/snmpconf-data/snmptrapd-data/formatting
/usr/share/snmp/snmpconf-data/snmptrapd-data/logging
/usr/share/snmp/snmpconf-data/snmptrapd-data/runtime
/usr/share/snmp/snmpconf-data/snmptrapd-data/snmpconf-config
/usr/share/snmp/snmpconf-data/snmptrapd-data/traphandle
/var/run/net-snmp
|
下面是snmp的常用操作工具,
[root@node1 ~]# rpm -ql net-snmp-utils-5.5-44.el6_4.4.x86_64
/usr/bin/encode_keychange
/usr/bin/snmpbulkget#下面是snmp常用工具,下面我們會詳細講解
/usr/bin/snmpbulkwalk
/usr/bin/snmpdelta
/usr/bin/snmpdf
/usr/bin/snmpget
/usr/bin/snmpgetnext
/usr/bin/snmpinform
/usr/bin/snmpnetstat
/usr/bin/snmpset
/usr/bin/snmpstatus
/usr/bin/snmptable
/usr/bin/snmptest
/usr/bin/snmptranslate
/usr/bin/snmptrap
/usr/bin/snmpusm
/usr/bin/snmpvacm
/usr/bin/snmpwalk
/usr/share/man/man1/encode_keychange.1.gz
/usr/share/man/man1/snmpbulkget.1.gz
/usr/share/man/man1/snmpbulkwalk.1.gz
/usr/share/man/man1/snmpcmd.1.gz
/usr/share/man/man1/snmpconf.1.gz
/usr/share/man/man1/snmpdelta.1.gz
/usr/share/man/man1/snmpdf.1.gz
/usr/share/man/man1/snmpget.1.gz
/usr/share/man/man1/snmpgetnext.1.gz
/usr/share/man/man1/snmpinform.1.gz
/usr/share/man/man1/snmpnetstat.1.gz
/usr/share/man/man1/snmpset.1.gz
/usr/share/man/man1/snmpstatus.1.gz
/usr/share/man/man1/snmptable.1.gz
/usr/share/man/man1/snmptest.1.gz
/usr/share/man/man1/snmptranslate.1.gz
/usr/share/man/man1/snmptrap.1.gz
/usr/share/man/man1/snmpusm.1.gz
/usr/share/man/man1/snmpvacm.1.gz
/usr/share/man/man1/snmpwalk.1.gz
/usr/share/man/man5/snmp.conf.5.gz
/usr/share/man/man5/variables.5.gz
|
10.檢視一下預設配置檔案
注,大家可以看到預設配置檔案有很多內容,但其實大部分都是註釋。下面我們來講解一下常用的配置選項,
[root@node1 ~]# cat /etc/snmp/snmpd.conf
###############################################################################
#
# snmpd.conf:
# An example configuration file for configuring the ucd-snmp snmpd agent.
#
###############################################################################
#
# This file is intended to only be as a starting point. Many more
# configuration directives exist than are mentioned in this file. For
# full details, see the snmpd.conf(5) manual page.
#
# All lines beginning with a '#' are comments and are intended for you
# to read. All other lines are configuration commands for the agent.
###############################################################################
# Access Control
###############################################################################
# As shipped, the snmpd demon will only respond to queries on the
# system mib group until this file is replaced or modified for
# security purposes. Examples are shown below about how to increase the
# level of access.
# By far, the most common question I get about the agent is "why won't
# it work?", when really it should be "how do I configure the agent to
# allow me to access it?"
#
# By default, the agent responds to the "public" community for read
# only access, if run out of the box without any configuration file in
# place. The following examples show you other ways of configuring
# the agent so that you can change the community names, and give
# yourself write access to the mib tree as well.
#
# For more information, read the FAQ as well as the snmpd.conf(5)
# manual page.
####
# First, map the community name "public" into a "security name"
# sec.name source community
com2sec notConfigUser default public
####
# Second, map the security name into a group name:
# groupName securityModel securityName
group notConfigGroup v1 notConfigUser
group notConfigGroup v2c notConfigUser
####
# Third, create a view for us to let the group have rights to:
# Make at least snmpwalk -v 1 localhost -c public system fast again.
# name incl/excl subtree mask(optional)
view systemview included .1.3.6.1.2.1.1
view systemview included .1.3.6.1.2.1.25.1.1
####
# Finally, grant the group read-only access to the systemview view.
# group context sec.model sec.level prefix read write notif
access notConfigGroup""any noauth exact systemview none none
# -----------------------------------------------------------------------------
#下面的是一個例子,具體是關於怎麼對本機或其他網路主機賦予許可權
# Here is a commented out example configuration that allows less
# restrictive access.
# YOU SHOULD CHANGE THE "COMMUNITY" TOKEN BELOW TO A NEW KEYWORD ONLY
# KNOWN AT YOUR SITE. YOU *MUST* CHANGE THE NETWORK TOKEN BELOW TO
# SOMETHING REFLECTING YOUR LOCAL NETWORK ADDRESS SPACE.
## sec.name source community
#com2sec local localhost COMMUNITY
#com2sec mynetwork NETWORK/24 COMMUNITY
## group.name sec.model sec.name
#group MyRWGroup any local
#group MyROGroup any mynetwork
#
#group MyRWGroup any otherv3user
#...
## incl/excl subtree mask
#view all included .1 80
## -or just the mib2 tree-
#view mib2 included .iso.org.dod.internet.mgmt.mib-2 fc
## context sec.model sec.level prefix read write notif
#access MyROGroup "" any noauth 0 all none none
#access MyRWGroup "" any noauth 0 all all all
###############################################################################
# Sample configuration to make net-snmpd RFC 1213.
# Unfortunately v1 and v2c don't allow any user based authentification, so
# opening up the default config is not an option from a security point.
#
# WARNING: If you uncomment the following lines you allow write access to your
# snmpd daemon from any source! To avoid this use different names for your
# community or split out the write access to a different community and
# restrict it to your local network.
# Also remember to comment the syslocation and syscontact parameters later as
# otherwise they are still read only (see FAQ for net-snmp).
#
# First, map the community name "public" into a "security name"
# sec.name source community
#com2sec notConfigUser default public
# Second, map the security name into a group name:
# groupName securityModel securityName
#group notConfigGroup v1 notConfigUser
#group notConfigGroup v2c notConfigUser
# Third, create a view for us to let the group have rights to:
# Open up the whole tree for ro, make the RFC 1213 required ones rw.
# name incl/excl subtree mask(optional)
#view roview included .1
#view rwview included system.sysContact
#view rwview included system.sysName
#view rwview included system.sysLocation
#view rwview included interfaces.ifTable.ifEntry.ifAdminStatus
#view rwview included at.atTable.atEntry.atPhysAddress
#view rwview included at.atTable.atEntry.atNetAddress
#view rwview included ip.ipForwarding
#view rwview included ip.ipDefaultTTL
#view rwview included ip.ipRouteTable.ipRouteEntry.ipRouteDest
#view rwview included ip.ipRouteTable.ipRouteEntry.ipRouteIfIndex
#view rwview included ip.ipRouteTable.ipRouteEntry.ipRouteMetric1
#view rwview included ip.ipRouteTable.ipRouteEntry.ipRouteMetric2
#view rwview included ip.ipRouteTable.ipRouteEntry.ipRouteMetric3
#view rwview included ip.ipRouteTable.ipRouteEntry.ipRouteMetric4
#view rwview included ip.ipRouteTable.ipRouteEntry.ipRouteType
#view rwview included ip.ipRouteTable.ipRouteEntry.ipRouteAge
#view rwview included ip.ipRouteTable.ipRouteEntry.ipRouteMask
#view rwview included ip.ipRouteTable.ipRouteEntry.ipRouteMetric5
#view rwview included ip.ipNetToMediaTable.ipNetToMediaEntry.ipNetToMediaIfIndex
#view rwview included ip.ipNetToMediaTable.ipNetToMediaEntry.ipNetToMediaPhysAddress
#view rwview included ip.ipNetToMediaTable.ipNetToMediaEntry.ipNetToMediaNetAddress
#view rwview included ip.ipNetToMediaTable.ipNetToMediaEntry.ipNetToMediaType
#view rwview included tcp.tcpConnTable.tcpConnEntry.tcpConnState
#view rwview included egp.egpNeighTable.egpNeighEntry.egpNeighEventTrigger
#view rwview included snmp.snmpEnableAuthenTraps
# Finally, grant the group read-only access to the systemview view.
# group context sec.model sec.level prefix read write notif
#access notConfigGroup "" any noauth exact roview rwview none
###############################################################################
# System contact information
#聯絡人資訊
# It is also possible to set the sysContact and sysLocation system
# variables through the snmpd.conf file:
syslocation Unknown (edit/etc/snmp/snmpd.conf)
syscontact Root <root@localhost> (configure/etc/snmp/snmp.local.conf)
# Example output of snmpwalk:
# % snmpwalk -v 1 localhost -c public system
# system.sysDescr.0 = "SunOS name sun4c"
# system.sysObjectID.0 = OID: enterprises.ucdavis.ucdSnmpAgent.sunos4
# system.sysUpTime.0 = Timeticks: (595637548) 68 days, 22:32:55
# system.sysContact.0 = "Me <[email protected]>"
# system.sysName.0 = "name"
# system.sysLocation.0 = "Right here, right now."
# system.sysServices.0 = 72
###############################################################################
# Logging
#日誌資訊
# We do not want annoying "Connection from UDP: " messages in syslog.
# If the following option is commented out, snmpd will print each incoming
# connection, which can be useful for debugging.
dontLogTCPWrappersConnectsyes
# -----------------------------------------------------------------------------
###############################################################################
# Process checks.
#關於檢測程序數目的有個OIDs,可以在enterprises.ucdavis.procTable檢視
# The following are examples of how to use the agent to check for
# processes running on the host. The syntax looks something like:
#
# proc NAME [MAX=0] [MIN=0]
#
# NAME: the name of the process to check for. It must match
# exactly (ie, http will not find httpd processes).
# MAX: the maximum number allowed to be running. Defaults to 0.
# MIN: the minimum number to be running. Defaults to 0.
#
# Examples (commented out by default):
#
# Make sure mountd is running
#proc mountd
# Make sure there are no more than 4 ntalkds running, but 0 is ok too.
#proc ntalkd 4
# Make sure at least one sendmail, but less than or equal to 10 are running.
#proc sendmail 10 1
# A snmpwalk of the process mib tree would look something like this:
#
# % snmpwalk -v 1 localhost -c public .1.3.6.1.4.1.2021.2
# enterprises.ucdavis.procTable.prEntry.prIndex.1 = 1
# enterprises.ucdavis.procTable.prEntry.prIndex.2 = 2
# enterprises.ucdavis.procTable.prEntry.prIndex.3 = 3
# enterprises.ucdavis.procTable.prEntry.prNames.1 = "mountd"
# enterprises.ucdavis.procTable.prEntry.prNames.2 = "ntalkd"
# enterprises.ucdavis.procTable.prEntry.prNames.3 = "sendmail"
# enterprises.ucdavis.procTable.prEntry.prMin.1 = 0
# enterprises.ucdavis.procTable.prEntry.prMin.2 = 0
# enterprises.ucdavis.procTable.prEntry.prMin.3 = 1
# enterprises.ucdavis.procTable.prEntry.prMax.1 = 0
# enterprises.ucdavis.procTable.prEntry.prMax.2 = 4
# enterprises.ucdavis.procTable.prEntry.prMax.3 = 10
# enterprises.ucdavis.procTable.prEntry.prCount.1 = 0
# enterprises.ucdavis.procTable.prEntry.prCount.2 = 0
# enterprises.ucdavis.procTable.prEntry.prCount.3 = 1
# enterprises.ucdavis.procTable.prEntry.prErrorFlag.1 = 1
# enterprises.ucdavis.procTable.prEntry.prErrorFlag.2 = 0
# enterprises.ucdavis.procTable.prEntry.prErrorFlag.3 = 0
# enterprises.ucdavis.procTable.prEntry.prErrMessage.1 = "No mountd process running."
# enterprises.ucdavis.procTable.prEntry.prErrMessage.2 = ""
# enterprises.ucdavis.procTable.prEntry.prErrMessage.3 = ""
# enterprises.ucdavis.procTable.prEntry.prErrFix.1 = 0
# enterprises.ucdavis.procTable.prEntry.prErrFix.2 = 0
# enterprises.ucdavis.procTable.prEntry.prErrFix.3 = 0
#
# Note that the errorFlag for mountd is set to 1 because one is not
# running (in this case an rpc.mountd is, but thats not good enough),
# and the ErrMessage tells you what's wrong. The configuration
# imposed in the snmpd.conf file is also shown.
#
# Special Case: When the min and max numbers are both 0, it assumes
# you want a max of infinity and a min of 1.
#
# -----------------------------------------------------------------------------
###############################################################################
# Executables/scripts
#snmpd可以執行一個指令碼,並可以得到他的返回值(最後一個)在enterprises.ucdavis.extTable下檢視
#
# You can also have programs run by the agent that return a single
# line of output and an exit code. Here are two examples.
#
# exec NAME PROGRAM [ARGS ...]
#
# NAME: A generic name. The name must be unique for each exec statement.
# PROGRAM: The program to run. Include the path!
# ARGS: optional arguments to be passed to the program
# a simple hello world
#exec echotest /bin/echo hello world
# Run a shell script containing:
#
# #!/bin/sh
# echo hello world
# echo hi there
# exit 35
#
# Note: this has been specifically commented out to prevent
# accidental security holes due to someone else on your system writing
# a /tmp/shtest before you do. Uncomment to use it.
#
#exec shelltest /bin/sh /tmp/shtest
# Then,
# % snmpwalk -v 1 localhost -c public .1.3.6.1.4.1.2021.8
# enterprises.ucdavis.extTable.extEntry.extIndex.1 = 1
# enterprises.ucdavis.extTable.extEntry.extIndex.2 = 2
# enterprises.ucdavis.extTable.extEntry.extNames.1 = "echotest"
# enterprises.ucdavis.extTable.extEntry.extNames.2 = "shelltest"
# enterprises.ucdavis.extTable.extEntry.extCommand.1 = "/bin/echo hello world"
# enterprises.ucdavis.extTable.extEntry.extCommand.2 = "/bin/sh /tmp/shtest"
# enterprises.ucdavis.extTable.extEntry.extResult.1 = 0
# enterprises.ucdavis.extTable.extEntry.extResult.2 = 35
# enterprises.ucdavis.extTable.extEntry.extOutput.1 = "hello world."
# enterprises.ucdavis.extTable.extEntry.extOutput.2 = "hello world."
# enterprises.ucdavis.extTable.extEntry.extErrFix.1 = 0
# enterprises.ucdavis.extTable.extEntry.extErrFix.2 = 0
# Note that the second line of the /tmp/shtest shell script is cut
# off. Also note that the exit status of 35 was returned.
# -----------------------------------------------------------------------------
###############################################################################
# disk checks
#硬碟分割槽的定義,語法如下,只有定義了才會取抓值。單位KB
# The agent can check the amount of available disk space, and make
# sure it is above a set limit.
# disk PATH [MIN=100000]
#
# PATH: mount path to the disk in question.
# MIN: Disks with space below this value will have the Mib's errorFlag set.
# Default value = 100000.
# Check the / partition and make sure it contains at least 10 megs.
#disk / 10000
# % snmpwalk -v 1 localhost -c public .1.3.6.1.4.1.2021.9
# enterprises.ucdavis.diskTable.dskEntry.diskIndex.1 = 0
# enterprises.ucdavis.diskTable.dskEntry.diskPath.1 = "/" Hex: 2F
# enterprises.ucdavis.diskTable.dskEntry.diskDevice.1 = "/dev/dsk/c201d6s0"
# enterprises.ucdavis.diskTable.dskEntry.diskMinimum.1 = 10000
# enterprises.ucdavis.diskTable.dskEntry.diskTotal.1 = 837130
# enterprises.ucdavis.diskTable.dskEntry.diskAvail.1 = 316325
# enterprises.ucdavis.diskTable.dskEntry.diskUsed.1 = 437092
# enterprises.ucdavis.diskTable.dskEntry.diskPercent.1 = 58
# enterprises.ucdavis.diskTable.dskEntry.diskErrorFlag.1 = 0
# enterprises.ucdavis.diskTable.dskEntry.diskErrorMsg.1 = ""
# -----------------------------------------------------------------------------
###############################################################################
# load average checks
#這個是定義cpu任務的負載資訊的,值是平均最大值
# load [1MAX=12.0] [5MAX=12.0] [15MAX=12.0]
#
# 1MAX: If the 1 minute load average is above this limit at query
# time, the errorFlag will be set.
# 5MAX: Similar, but for 5 min average.
# 15MAX: Similar, but for 15 min average.
# Check for loads:
#load 12 14 14
# % snmpwalk -v 1 localhost -c public .1.3.6.1.4.1.2021.10
# enterprises.ucdavis.loadTable.laEntry.loadaveIndex.1 = 1
# enterprises.ucdavis.loadTable.laEntry.loadaveIndex.2 = 2
# enterprises.ucdavis.loadTable.laEntry.loadaveIndex.3 = 3
# enterprises.ucdavis.loadTable.laEntry.loadaveNames.1 = "Load-1"
# enterprises.ucdavis.loadTable.laEntry.loadaveNames.2 = "Load-5"
# enterprises.ucdavis.loadTable.laEntry.loadaveNames.3 = "Load-15"
# enterprises.ucdavis.loadTable.laEntry.loadaveLoad.1 = "0.49" Hex: 30 2E 34 39
# enterprises.ucdavis.loadTable.laEntry.loadaveLoad.2 = "0.31" Hex: 30 2E 33 31
# enterprises.ucdavis.loadTable.laEntry.loadaveLoad.3 = "0.26" Hex: 30 2E 32 36
# enterprises.ucdavis.loadTable.laEntry.loadaveConfig.1 = "12.00"
# enterprises.ucdavis.loadTable.laEntry.loadaveConfig.2 = "14.00"
# enterprises.ucdavis.loadTable.laEntry.loadaveConfig.3 = "14.00"
# enterprises.ucdavis.loadTable.laEntry.loadaveErrorFlag.1 = 0
# enterprises.ucdavis.loadTable.laEntry.loadaveErrorFlag.2 = 0
# enterprises.ucdavis.loadTable.laEntry.loadaveErrorFlag.3 = 0
# enterprises.ucdavis.loadTable.laEntry.loadaveErrMessage.1 = ""
# enterprises.ucdavis.loadTable.laEntry.loadaveErrMessage.2 = ""
# enterprises.ucdavis.loadTable.laEntry.loadaveErrMessage.3 = ""
# -----------------------------------------------------------------------------
###############################################################################
# Extensible sections.
# 與enterprises.ucdavis.extTable的區別
# This alleviates the multiple line output problem found in the
# previous executable mib by placing each mib in its own mib table:
# Run a shell script containing:
#
# #!/bin/sh
# echo hello world
# echo hi there
# exit 35
#
# Note: this has been specifically commented out to prevent
# accidental security holes due to someone else on your system writing
# a /tmp/shtest before you do. Uncomment to use it.
#
# exec .1.3.6.1.4.1.2021.50 shelltest /bin/sh /tmp/shtest
# % snmpwalk -v 1 localhost -c public .1.3.6.1.4.1.2021.50
# enterprises.ucdavis.50.1.1 = 1
# enterprises.ucdavis.50.2.1 = "shelltest"
# enterprises.ucdavis.50.3.1 = "/bin/sh /tmp/shtest"
# enterprises.ucdavis.50.100.1 = 35
# enterprises.ucdavis.50.101.1 = "hello world."
# enterprises.ucdavis.50.101.2 = "hi there."
# enterprises.ucdavis.50.102.1 = 0
# Now the Output has grown to two lines, and we can see the 'hi
# there.' output as the second line from our shell script.
#
# Note that you must alter the mib.txt file to be correct if you want
# the .50.* outputs above to change to reasonable text descriptions.
# Other ideas:
#
# exec .1.3.6.1.4.1.2021.51 ps /bin/ps
# exec .1.3.6.1.4.1.2021.52 top /usr/local/bin/top
# exec .1.3.6.1.4.1.2021.53 mailq /usr/bin/mailq
#可以執行多個指令碼
# -----------------------------------------------------------------------------
###############################################################################
# Pass through control.
#
# Usage:
# pass MIBOID EXEC-COMMAND
#
# This will pass total control of the mib underneath the MIBOID
# portion of the mib to the EXEC-COMMAND.
#
# Note: You'll have to change the path of the passtest script to your
# source directory or install it in the given location.
#
# Example: (see the script for details)
# (commented out here since it requires that you place the
# script in the right location. (its not installed by default))
# pass .1.3.6.1.4.1.2021.255 /bin/sh /usr/local/local/passtest
# % snmpwalk -v 1 localhost -c public .1.3.6.1.4.1.2021.255
# enterprises.ucdavis.255.1 = "life the universe and everything"
# enterprises.ucdavis.255.2.1 = 42
# enterprises.ucdavis.255.2.2 = OID: 42.42.42
# enterprises.ucdavis.255.3 = Timeticks: (363136200) 42 days, 0:42:42
# enterprises.ucdavis.255.4 = IpAddress: 127.0.0.1
# enterprises.ucdavis.255.5 = 42
# enterprises.ucdavis.255.6 = Gauge: 42
#
# % snmpget -v 1 localhost public .1.3.6.1.4.1.2021.255.5
# enterprises.ucdavis.255.5 = 42
#
# % snmpset -v 1 localhost public .1.3.6.1.4.1.2021.255.1 s "New string"
# enterprises.ucdavis.255.1 = "New string"
#
# For specific usage information, see the man/snmpd.conf.5 manual page
# as well as the local/passtest script used in the above example.
###############################################################################
# Further Information
#
# See the snmpd.conf manual page, and the output of "snmpd -H".
|
下面是常用的配置選項,
主配置檔案:/etc/snmp/snmpd.conf
常用定義項:
(1).首選是定義一個共同體名(community),這裡是public(多數SNMP裝置或服務預設都是是用public),及可以訪問這個public的使用者名稱(sec name),這裡是notConfigUser。Public相當於使用者notConfigUser的密碼:) ,source 在net-snmp中用來對來源IP加以控制,即哪些可以獲取SNMP資訊
# sec.name source community
com2sec notConfigUser default public
|
(2).定義一個組名(groupName)這裡是notConfigGroup,及組的安全級別,把notConfigGroup這個使用者加到這個組中。
sec.model:安全模式,可選值為v1/v2c/usm。
# groupName securityModel securityName
group notConfigGroup v1 notConfigUser
group notConfigGroup v2c notConfigUser
|
(3).定義一個可操作的範圍(view)名, 這裡是all,範圍是 .1
# name incl/excl subtree mask(optional)
view all included .1#表示可以檢視.1節點下的所有裝置資訊
|
注:
-
incl/excl:對下面的MIB子樹是包括還是排除。
-
subtree:檢視中涉及的MIB子樹。
-
mask:掩碼
(4).定義notConfigUser這個組在all這個view範圍內可做的操作(即許可權),這時定義了notConfigUser組的成員可對.1這個範圍做只讀操作。
| 1 2 |
# group context sec.model sec.level prefix read write notif
access notConfigGroup""any noauth exact all none none
|
注:
-
context:上下文,v1、v2c中始終為空。
-
sec.model:安全模式,可選值為v1/v2c/usm。
-
sec.level:安全級別,可選值為auth/noauth/priv,v1、v2c中只能為noauth。
-
prefix:字首,指定context如何與PDU中的context匹配,v3使用。
-
read:授權的讀檢視。
-
write:授權的寫檢視。
-
notif:授權的trap檢視。
(5).埠: 標準的SNMP服務使用161和162埠,廠商私有的實現一般使用199、391、705和1993埠,net-snmp用udp 161。
11.啟動snmp
[root@node1 ~]# service snmpd start
正在啟動 snmpd: [確定]
[root@node1 ~]# netstat -ntulp
Active Internet connections (only servers)
Proto Recv-Q Send-Q Local Address Foreign Address State PID/Programname
tcp 0 0 0.0.0.0:22 0.0.0.0:* LISTEN 1045/sshd
tcp 0 0 127.0.0.1:25 0.0.0.0:* LISTEN 1122/master
tcp 0 0 127.0.0.1:6010 0.0.0.0:* LISTEN 2149/sshd
tcp 0 0 127.0.0.1:6011 0.0.0.0:* LISTEN 1582/sshd
tcp 0 0 127.0.0.1:199 0.0.0.0:* LISTEN 12252/snmpd
tcp 0 0 :::22 :::* LISTEN 1045/sshd
tcp 0 0 ::1:25 :::* LISTEN 1122/master
tcp 0 0 ::1:6010 :::* LISTEN 2149/sshd
tcp 0 0 ::1:6011 :::* LISTEN 1582/sshd
udp 0 0 0.0.0.0:161 0.0.0.0:* 12252/snmpd
|
12.測試一下
[root@node1 ~]# snmpd -v #檢視一下net-snmp版本
NET-SNMP version: 5.5
Web: http://www.net-snmp.org/
Email: [email protected]
|
注,啟動代理時也可以使用如下引數使snmpd使用【配置檔案】啟動:
[root@node1 ~]# snmpd –C –c /etc/snmp/snmpd.conf
-C 不讀取預設配置檔案
-c 讀取指定的配置檔案
|
使用這個引數,我們可以配置很多的配置檔案,設定不同的執行環境,便於我們開發和學習。
下面來測試一下,
從代理中讀取一個管理物件驗證代理是否正常執行。讀取MIB庫中的RFC1213->system->sysDescr 物件,該物件表示裝置的描述資訊。使用net-snmp提供的snmp工具讀取,命令如下:
[root@node1 ~]# snmpget -v 2c -c public localhost sysDescr.0
SNMPv2-MIB::sysDescr.0 = STRING: Linux node1.test.com 2.6.32-358.el6.x86_64#1 SMP Fri Feb 22 00:31:26 UTC 2013 x86_64
|
注,如果得到了資訊,表示net-snmp安裝成功。
13.net-snmp工具介紹
[root@node1 ~]# snmp
snmpbulkget snmpd snmpget snmpnetstat snmptable snmptrap snmpvacm
snmpbulkwalk snmpdelta snmpgetnext snmpset snmptest snmptrapd snmpwalk
snmpconf snmpdf snmpinform snmpstatus snmptranslate snmpusm
|
-
snmpget 模擬snmp的GetRequest操作的工具。用來獲取一個或幾個管理資訊。用來讀取管理資訊的內容。
-
snmpgetnext 模擬snmp的GetNextRequest操作的工具。用來獲取一個管理資訊例項的下一個可用例項資料。一般用來遍歷SNMP中的表格資料。
-
snmpset 模擬snmp的SetRequest操作的工具。用來設定可以寫的管理資訊。一般用來配置裝置或對裝置執行操作。
-
snmpbulkget 模擬snmp的GetBulkRequest操作的工具。用來獲取大塊的資料。一般在大量讀取大塊資料時使用,以提高頻寬利用率,並且比使用snmpget、snmpgetnext及snmpwalk有更強的容錯能力,代理會返回儘可能多的資料,比其它命令更有保證。
-
snmpwalk 利用GetNextRequest對給定的管理樹進行遍歷的工具。一般用來對錶格型別管理資訊進行遍歷。
-
snmptrap 模擬trap的工具。用來發送模擬trap。一般用來測試管理站安裝和配置是否正確,或者用來驗證開發的Trap接收程式是否可以正常工作。
-
snmptrapd 接收並顯示trap的工具。一般在代理的開發過程中,接收代理髮來的Trap,並將PDU細節打印出來,也來測試Trap傳送功能是否正常。
-
snmpinform 模擬傳送InformRequest的工具。跟snmptrap類似,用來發送模擬的帶應答的Trap,以測試管理站或自己開發的接收程式。
-
snmptable 使用GetNextRequest 和 GetBulkRequest操作讀取表資訊,以列表形式顯示的工具。
-
snmpstatus 從SNMP實體讀取幾個重要的管理資訊以確定裝置狀態的工具。用來簡單測定裝置狀態。
-
snmpbulkwalk 利用GetBulkRequest實現對給定管理樹進行遍歷的工具。對錶格型別的管理資訊進行遍歷讀取。
-
snmpdelta 用來監視Integer型別的管理物件,會及時報告值改變情況的工具。用於監測一個裝置或開發中的代理。
-
snmptest 是一個複雜的工具,可以監測和管理一個網路實體的資訊,通過SNMP請求操作與管理實體通訊。
-
snmptranslate 將物件名字和識別符號相互轉換的工具。用於資料格式的物件標識和可讀式字串的資料名稱的轉換。類似於域名與IP地址的關係。
-
snmpusm SNMPv3 USM配置工具。用於SNMPv3的使用者管理。
-
snmpvacm 為一個網路實體建立和維護SNMPv3的基於檢視訪問控制引數的工具。用於維護SNMPv3的檢視訪問控制。
-
snmpconf 生成snmpd配置檔案的工具。用於生成snmpd的各種配置檔案,用作模板,以生成使用者級配置檔案。
-
snmpd Net-snmp開發的主代理程式,包括眾多標準MIB的實現。還可以使用子代理對其進行擴充套件,是一個功能強大的SNMP代理。Linux、Unix和Windows系統執行snmpd後,直接具備了SNMP協議支援,可以被管理站管理。許多商業化的Linux中使用snmpd作為系統的SNMP代理。
-
snmpdf 通過SNMP訪問並顯示網路實體磁碟利用情況的工具。用來監測網路實體的磁碟。
下面我們來說幾個最常用的net-snmp工具,
常用命令:
(1).snmpget命令
snmpget [OPTIONS] AGENT OID [OID]...
選項:
-v1|2c|3 指定SNMP版本
-c COMMUNITY 指定community string
-m MIB[:...] 指定MIB檔案
|
注,snmpget 不同於 snmpwalk ,必須在命令列給出 <object>.<instance> 的格式,不能只給出 object。
案例,snmpget -v 2c -c public localhost system.sysDescr.0 #獲取裝置的描述資訊。
[root@node1 ~]# snmpget -v 2c -c public localhost system.sysDescr.0
SNMPv2-MIB::sysDescr.0 = STRING: Linux node1.test.com 2.6.32-358.el6.x86_64#1 SMP Fri Feb 22 00:31:26 UTC 2013 x86_64
|
(2).snmpwalk/snmpbulkwalk 命令
snmpwalk/snmpbulkwalk[OPTIONS] AGENT [OID]
選項:
-v1|2c|3 指定SNMP版本
-c COMMUNITY 指定community string
-m MIB[:...] 指定MIB檔案
|
注,snmpbulkwalk命令: 獲取snmp伺服器的mib-2各種資訊,snmpbulkwalk用於通過SNMPv2 的SNMP GET BULK請求命令與其它網路實體通訊,只能用於snmpv2,速度快於snmpwalk
案例,snmpbulkwalk -v 2c -c public 127.0.0.1 .1.3.6.1.2.1.1 #獲取mib-2的system的資料。
[root@node1 ~]# snmpbulkwalk -v 2c -c public 127.0.0.1 .1.3.6.1.2.1.1
SNMPv2-MIB::sysDescr.0 = STRING: Linux node1.test.com 2.6.32-358.el6.x86_64#1 SMP Fri Feb 22 00:31:26 UTC 2013 x86_64
SNMPv2-MIB::sysObjectID.0 = OID: NET-SNMP-MIB::netSnmpAgentOIDs.10
DISMAN-EVENT-MIB::sysUpTimeInstance = Timeticks: (264551) 0:44:05.51
SNMPv2-MIB::sysContact.0 = STRING: Root <root@localhost> (configure/etc/snmp/snmp.local.conf)
SNMPv2-MIB::sysName.0 = STRING: node1.test.com
SNMPv2-MIB::sysLocation.0 = STRING: Unknown (edit/etc/snmp/snmpd.conf)
SNMPv2-MIB::sysORLastChange.0 = Timeticks: (10) 0:00:00.10
SNMPv2-MIB::sysORID.1 = OID: SNMP-MPD-MIB::snmpMPDMIBObjects.3.1.1
SNMPv2-MIB::sysORID.2 = OID: SNMP-USER-BASED-SM-MIB::usmMIBCompliance
SNMPv2-MIB::sysORID.3 = OID: SNMP-FRAMEWORK-MIB::snmpFrameworkMIBCompliance
SNMPv2-MIB::sysORID.4 = OID: SNMPv2-MIB::snmpMIB
SNMPv2-MIB::sysORID.5 = OID: TCP-MIB::tcpMIB
SNMPv2-MIB::sysORID.6 = OID: IP-MIB::ip
SNMPv2-MIB::sysORID.7 = OID: UDP-MIB::udpMIB
SNMPv2-MIB::sysORID.8 = OID: SNMP-VIEW-BASED-ACM-MIB::vacmBasicGroup
SNMPv2-MIB::sysORDescr.1 = STRING: The MIBforMessage Processing and Dispatching.
SNMPv2-MIB::sysORDescr.2 = STRING: The MIBforMessage Processing and Dispatching.
SNMPv2-MIB::sysORDescr.3 = STRING: The SNMP Management Architecture MIB.
SNMPv2-MIB::sysORDescr.4 = STRING: The MIB moduleforSNMPv2 entities
SNMPv2-MIB::sysORDescr.5 = STRING: The MIB moduleformanaging TCP implementations
SNMPv2-MIB::sysORDescr.6 = STRING: The MIB moduleformanaging IP and ICMP implementations
SNMPv2-MIB::sysORDescr.7 = STRING: The MIB moduleformanaging UDP implementations
SNMPv2-MIB::sysORDescr.8 = STRING: View-based Access Control ModelforSNMP.
SNMPv2-MIB::sysORUpTime.1 = Timeticks: (9) 0:00:00.09
SNMPv2-MIB::sysORUpTime.2 = Timeticks: (9) 0:00:00.09
SNMPv2-MIB::sysORUpTime.3 = Timeticks: (9) 0:00:00.09
SNMPv2-MIB::sysORUpTime.4 = Timeticks: (9) 0:00:00.09
SNMPv2-MIB::sysORUpTime.5 = Timeticks: (9) 0:00:00.09
SNMPv2-MIB::sysORUpTime.6 = Timeticks: (10) 0:00:00.10
SNMPv2-MIB::sysORUpTime.7 = Timeticks: (10) 0:00:00.10
SNMPv2-MIB::sysORUpTime.8 = Timeticks: (10) 0:00:00.10
|
(3).snmpwalk命令
注,獲取snmp伺服器的HOST-RESOURCES的各種資訊。
案例,snmpwalk -v 2c -c public localhost system #這條指令用於檢視本機系統資訊。
[root@node1 ~]# snmpwalk -v 2c -c public localhost system
SNMPv2-MIB::sysDescr.0 = STRING: Linux node1.test.com 2.6.32-358.el6.x86_64#1 SMP Fri Feb 22 00:31:26 UTC 2013 x86_64
SNMPv2-MIB::sysObjectID.0 = OID: NET-SNMP-MIB::netSnmpAgentOIDs.10
DISMAN-EVENT-MIB::sysUpTimeInstance = Timeticks: (3335125) 9:15:51.25
SNMPv2-MIB::sysContact.0 = STRING: Root <root@localhost> (configure/etc/snmp/snmp.local.conf)
SNMPv2-MIB::sysName.0 = STRING: node1.test.com
SNMPv2-MIB::sysLocation.0 = STRING: Unknown (edit/etc/snmp/snmpd.conf)
SNMPv2-MIB::sysORLastChange.0 = Timeticks: (10) 0:00:00.10
SNMPv2-MIB::sysORID.1 = OID: SNMP-MPD-MIB::snmpMPDMIBObjects.3.1.1
SNMPv2-MIB::sysORID.2 = OID: SNMP-USER-BASED-SM-MIB::usmMIBCompliance
SNMPv2-MIB::sysORID.3 = OID: SNMP-FRAMEWORK-MIB::snmpFrameworkMIBCompliance
SNMPv2-MIB::sysORID.4 = OID: SNMPv2-MIB::snmpMIB
SNMPv2-MIB::sysORID.5 = OID: TCP-MIB::tcpMIB
SNMPv2-MIB::sysORID.6 = OID: IP-MIB::ip
SNMPv2-MIB::sysORID.7 = OID: UDP-MIB::udpMIB
SNMPv2-MIB::sysORID.8 = OID: SNMP-VIEW-BASED-ACM-MIB::vacmBasicGroup
SNMPv2-MIB::sysORDescr.1 = STRING: The MIBforMessage Processing and Dispatching.
SNMPv2-MIB::sysORDescr.2 = STRING: The MIBforMessage Processing and Dispatching.
SNMPv2-MIB::sysORDescr.3 = STRING: The SNMP Management Architecture MIB.
SNMPv2-MIB::sysORDescr.4 = STRING: The MIB moduleforSNMPv2 entities
SNMPv2-MIB::sysORDescr.5 = STRING: The MIB moduleformanaging TCP implementations
SNMPv2-MIB::sysORDescr.6 = STRING: The MIB moduleformanaging IP and ICMP implementations
SNMPv2-MIB::sysORDescr.7 = STRING: The MIB moduleformanaging UDP implementations
SNMPv2-MIB::sysORDescr.8 = STRING: View-based Access Control ModelforSNMP.
SNMPv2-MIB::sysORUpTime.1 = Timeticks: (9) 0:00:00.09
SNMPv2-MIB::sysORUpTime.2 = Timeticks: (9) 0:00:00.09
SNMPv2-MIB::sysORUpTime.3 = Timeticks: (9) 0:00:00.09
SNMPv2-MIB::sysORUpTime.4 = Timeticks: (9) 0:00:00.09
SNMPv2-MIB::sysORUpTime.5 = Timeticks: (9) 0:00:00.09
SNMPv2-MIB::sysORUpTime.6 = Timeticks: (10) 0:00:00.10
SNMPv2-MIB::sysORUpTime.7 = Timeticks: (10) 0:00:00.10
SNMPv2-MIB::sysORUpTime.8 = Timeticks: (10) 0:00:00.10
|
(4).snmpdelta命令
注,監控網絡卡流量等資訊, 指定共同體為public,協議為snmpv1,以表格的方式輸出結果,顯示時間戳。
案例,
| 1 2 |
snmpdelta -c public -v1 -Cs -CT 127.0.0.1 IF-MIB::ifInUcastPkts.2 IF-MIB::ifOutUcastPkts.2#監控IF-MIB::ifInUcastPkts(輸入流量),IF-MIB::ifOutUcastPkts(輸出流量),如監控本地的第二塊網絡卡instance為2。
snmpdelta -c public -v1 -Cs -CT 127.0.0.1 ifInDiscards.2#監控ifInDiscards(已經丟棄的收到的資料包的總數),格式同上。
|
(5).snmpnetstat命令
注,檢視snmp伺服器的埠連線資訊, 協議為snmp 2c。
案例,
| 1 |
snmpnetstat -v2c -c public -Can -Cp tcp 127.0.0.1#獲取127.0.0.1的TCP協議的開放埠狀態
|
(6).snmptranslate 命令
注,在MIB OID 在數字和文字名稱之間進行轉換。
例子,
-
snmptranslate -On -IR HOST-RESOURCES-MIB::hrSystem #用snmptranslate把symbol 格式的HOST-RESOURCES-MIB::hrSystem 轉換為 numberic 格式的oid,用-On(輸出數字格式的oid),使用 -IR(允許“隨機”訪問 MIB)
1 2 [root@node1 ~]# snmptranslate -On -IR HOST-RESOURCES-MIB::hrSystem.1.3.6.1.2.1.25.1 -
snmptranslate -Onf -IR HOST-RESOURCES-MIB::hrSystem #用snmptranslate把symbol 格式的HOST-RESOURCES-MIB::hrSystem 轉換為symbol 格式的 oid,用-Onf(輸出符號格式的oid)
1 2 [root@node1 ~]# snmptranslate -Onf -IR HOST-RESOURCES-MIB::hrSystem.iso.org.dod.internet.mgmt.mib-2.host.hrSystem -
snmptranslate -Td iso.org.dod.internet.mgmt.mib-2 #用snmptranslate輸出該物件(iso.org.dod.internet.mgmt.mib-2)的詳細定義,用-Td(包括文字名稱、所屬 MIB、型別、狀態、讀寫許可權、描述資訊,數字格式的 OID)
[root@node1 ~]# snmptranslate -Td iso.org.dod.internet.mgmt.mib-2SNMPv2-SMI::mib-2mib-2 OBJECT-TYPE-- FROM SNMPv2-SMI, RFC1213-MIB::= { iso(1) org(3) dod(6) internet(1) mgmt(2) 1 }
-
snmptranslate -Tp iso.org.dod.internet.mgmt.mib-2 #用snmptranslate列印從指定OID(.1.3.6.1.2.1)開始一直到該OID(.1.3.6.1.2.1)所屬的 MIB 子樹末端的樹型結構資訊
-
snmptranslate -Ta #用snmptranslate匯出所有已經載入的 MIB 的資料,每個物件一行
-
snmptranslate -Tl #用snmptranslate匯出所有已經載入的 MIB 的物件,並且輸出完整的 oid 路徑
-
snmptranslate -To #用snmptranslate匯出已經載入的所有 MIB 的數字格式的 oid ,不含值和型別,僅僅有 oid 而已
-
snmptranslate -Ts #用snmptranslate只輸出文字格式的 OID 名稱而已
十一、SNMP的MIB詳解
1.MIB管理資訊庫
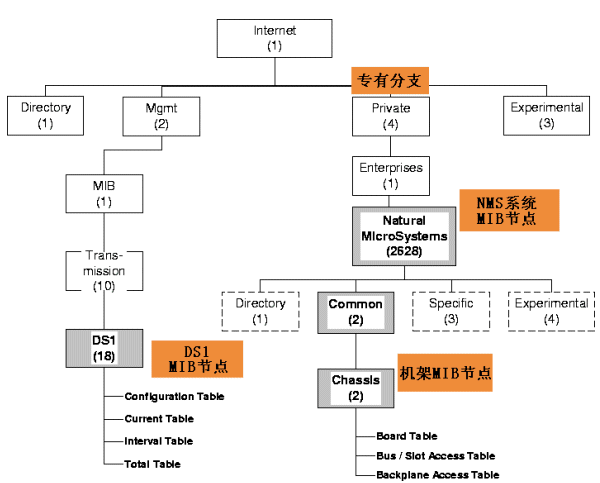
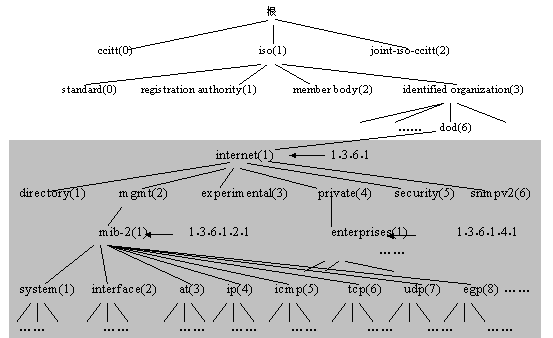
IETF規定的管理資訊庫MIB(由中定義了可訪問的網路裝置及其屬性,由物件識別符(OID:Object Identifier)唯一指定。MIB是一個樹形結構,SNMP協議訊息通過遍歷MIB樹形目錄中的節點來訪問網路中的裝置。下圖給出了NMS系統中SNMP可訪問網路裝置的物件識別樹(OID:Object Identifier)結構。
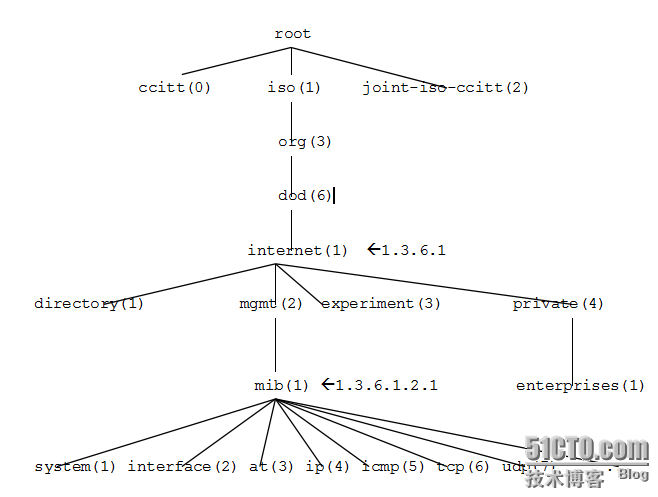
上圖中的節點是從internet開始的,其實上面還有幾個節點請看下圖。
2.SNMP訊息型別
SNMP中定義了五種訊息型別:Get-Request、Get-Response、Get-Next-Request、Set-Request、Trap
-
Get-Request 、Get-Next-Request與Get-Response
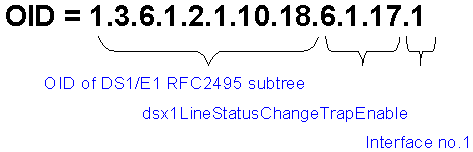
SNMP管理站用Get-Request訊息從擁有SNMP代理的網路裝置中檢索資訊,而SNMP代理則用Get-Response訊息響應。Get- Next-Request用於和Get-Request組合起來查詢特定的表物件中的列元素。如:首先通過下面的原語獲得所要查詢的裝置的介面數:
{iso org(3) dod(6) internet(1) mgmt(2) mib(1) interfaces(2) ifNumber(2)}
後再通過下面的原語,進行查詢(其中第一次用Get-Request,其後用Get-Next-Request):
{iso org(3) dod(6) internet(1) mgmt(2) mib(1) interfaces(2) ifTable(2)} -
Set-Request
SNMP管理站用Set-Request 可以對網路裝置進行遠端配置(包括裝置名、裝置屬性、刪除裝置或使某一個裝置屬性有效/無效等)。 -
Trap
SNMP代理使用Trap向SNMP管理站傳送非請求訊息,一般用於描述某一事件的發生。
3.SNMP管理資訊庫MIB
管理資訊庫MIB指明瞭網路元素所維持的變數(即能夠被管理程序查詢和設定的資訊)。MIB給出了一個網路中所有可能的被管理物件的集合的資料結構。SNMP的管理資訊庫採用和域名系統DNS相似的樹型結構,它的根在最上面,根沒有名字。下圖畫的是管理資訊庫的一部分,它又稱為物件命名(objectnamingtree)。
管理資訊庫的物件命名舉例,物件命名樹的頂級物件有三個,即ISO、ITU-T和這兩個組織的聯合體。在ISO的下面有4個結點,其中的一個(標號3)是被標識的組織。在其下面有一個美國國防部(Department of Defense)的子樹(標號是6),再下面就是Internet(標號是1)。在只討論Internet中的物件時,可只畫出Internet以下的子樹(圖中帶陰影的虛線方框),並在Internet結點旁邊標註上{1.3.6.1}即可。在Internet結點下面的第二個結點是mgmt(管理),標號是2。再下面是管理資訊庫,原先的結點名是mib。1991年定義了新的版本MIB- II,故結點名現改為mib-2,其標識為{1.3.6.1.2.1},或{Internet(1) .2.1}。這種標識為物件識別符號。最初的結點mib將其所管理的資訊分為8個類別,見下圖,現在mib-2所包含的資訊類別已超過40個。
應當指出,MIB的定義與具體的網路管理協議無關,這對於廠商和使用者都有利。廠商可以在產品(如路由器)中包含SNMP代理軟體,並保證在定義新的MIB專案後該軟體仍遵守標準。使用者可以使用同一網路管理客戶軟體來管理具有不同版本的MIB的多個路由器。當然,一個沒有新的MIB專案的路由器不能提供這些專案的資訊。
這裡要提一下MIB中的物件{1.3.6.1.4.1},即enterprises(企業),其所屬結點數已超過3000。例如IBM為 11.3.6.1.4.1.2},Cisco為{1.3.6.1.4.1.9},Novell為{1.3.6.1.4.1.23}等。世界上任何一個公司、學校只要用電子郵件發往[email protected]進行申請即可獲得一個結點名。這樣各廠家就可以定義自己的產品的被管理物件名,使它能用 SNMP進行管理。