Angular10教程--1.0 環境搭建
阿新 • • 發佈:2021-01-07
技術標籤:angular教程typescriptangular
從這篇文章開始,我將在這裡記錄學習angular10的全部過程。這是一條艱辛的路,希望我能堅持走下去~(原文檢視)
1.安裝全域性ANGULAR CLI
npm install -g @angular/[email protected]  // windows
sudo npm install -g @angular/[email protected]  // macOS
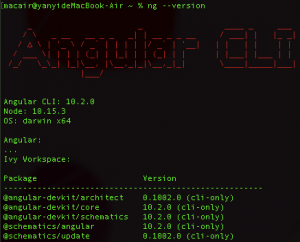
安裝成功後執行ng --version,出現下圖則表示安裝成功

2.建立專案
確定一個你專案需要安裝的目錄,用終端開啟資料夾,執行ng new hero(hero是你的專案名稱)。
ng new <name> [options]
ng n <name> [options] // 簡寫

// options具體引數詳見 https://angular.cn/cli/new
// 這裡給出我這個專案的ng new指令
ng new hero --routing=true --style=scss --skipTests
// 含義是,新增routing路由檔案,採用scss作為預設預處理樣式,不安裝單元測試檔案
執行了上面指令,cli將自動安裝依賴到你的專案。專案預設結構如下:

為了方便開發,我們先修改下package.json 檔案
// "scripts" 啟動專案
npm run start
如果一切正常,瀏覽器將正常開啟http://localhost:4200/
3.安裝BOOTSTRAP
為了減少樣式的書寫,本專案將使用bootstrap(v4.5.3)。
// 因為bootstrap依賴jquery跟popper.js,所以安裝的時候一併安裝

npm install bootstrap jquery popper.js -S
安裝成功後需要引入boot的樣式檔案,修改***styles.scss*** 檔案:
// styles.scss
// 新增下面程式碼到檔案頂部
@import '~bootstrap'
引入JS檔案,在***main.ts***中引入bootstrap:
import 'bootstrap';
清空src/app/app.component.html檔案,並新增下面程式碼,來驗證bootstrap是否安裝成功:
<!-- app.component.html -->
<div class="alert alert-primary" role="alert">
  A simple primary alert—check it out!
</div>

<div class="dropdown">
  <button class="btn btn-secondary dropdown-toggle" type="button" id="dropdownMenuButton" data-toggle="dropdown" aria-haspopup="true" aria-expanded="false">
    Dropdown button
  </button>
  <div class="dropdown-menu" aria-labelledby="dropdownMenuButton">
    <a class="dropdown-item" href="#">Action</a>
    <a class="dropdown-item" href="#">Another action</a>
    <a class="dropdown-item" href="#">Something else here</a>
  </div>
</div>
頁面已經運用上bootstrap的樣式則安裝成功

至此,angular10 的環境配置全部完成,順便還裝了一個bootstrap~
還有一件重要的事,歡迎大家關注我的公眾號:

