
客車網上售票系統——購票
1|0一、MyBatis概述
首先就是之前Java web中的三層結構
介面層: 和使用者打交道的, 接收使用者的請求引數, 顯示處理結果的。(jsp ,html ,servlet)
業務邏輯層: 接收了介面層傳遞的資料,計算邏輯,呼叫資料庫,獲取資料
資料訪問層: 就是訪問資料庫, 執行對資料的查詢,修改,刪除等等的
三層中對應的包:
介面層: controller包 (servlet)
業務邏輯層: service 包(XXXService類)
資料訪問層: dao包(XXXDao類)
三層中類的互動
使用者使用介面層--> 業務邏輯層--->資料訪問層(持久層)-->資料庫(mysql)
三層對應的處理框架
- 介面層---servlet---springmvc(框架)
- 業務邏輯層---service類--spring(框架)
- 資料訪問層---dao類--mybatis(框架)
1|11. MyBatis 解決的主要問題
減輕使用 JDBC 的複雜性,不用編寫重複的建立 Connetion , Statement ; 不用編寫關閉資原始碼。
直接使用 java 物件,表示結果資料。讓開發者專注 SQL 的處理。 其他分心的工作由 MyBatis 代勞
總的來說,mybatis就是增強版的JDBC
2|0二、快速開始一個 MyBatis
首先就是搭建MyBatis的環境
2|11. 建立mysql資料庫和表
資料庫名:ssm,表名:student
2|22. 建立maven工程
這個就不詳細的說了,可以看之前寫的文章
https://www.cnblogs.com/mengd/p/13436355.html
2|33. 在pom.xml檔案中新增資訊
主要就是mybatis依賴,和mysql驅動
還有就是在build標籤裡新增maven外掛,方便之後使用
2|44. 編寫對應的實體類
建立包com.md.domain,建立Student類
package com.md.domain; /** * @author MD * @create 2020-08-05 9:04 */ // 和資料庫的表名一樣, public class Student { // 定義屬性,屬性名和列名一致 private Integer id; private String name; private String email; private Integer age; public Student() { } public Student(Integer id, String name, String email, Integer age) { this.id = id; this.name = name; this.email = email; this.age = age; } // 對應的set和get方法以及toString() }2|55. 編寫Dao介面:StudentDao
建立包:com.md.dao
package com.md.dao; import com.md.domain.Student; import java.util.List; /** * @author MD * @create 2020-08-05 9:07 */ public interface StudentDao { // 查詢Student表中所有資料 public List<Student> selectStudents(); }2|66. 編寫 Dao 介面 Mapper 對映檔案 StudentDao.xml
注意:
在介面所在的包:com.md.dao裡建立檔案 StudentDao.xml這個對映檔案的名稱要和介面的名稱一樣
特別注意裡面寫的備註資訊
2|77. 建立 MyBatis 主配置檔案
注意:
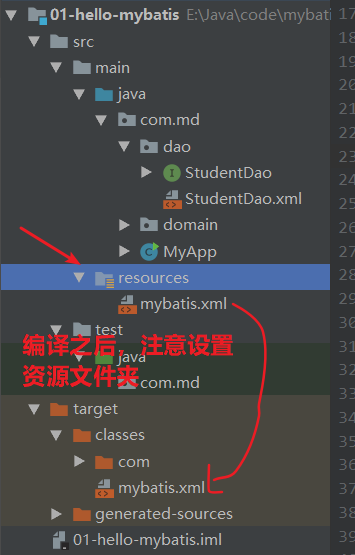
在專案 src/main 下建立 resources 目錄,設定 resources 目錄為 resources root- 建立主配置檔案:名稱為 mybatis.xml
特別注意裡面寫的備註資訊
如果是高版本的mysql,中文亂碼可以使用下面的
支援中文的 url
jdbc:mysql://localhost:3306/ssm?useUnicode=true&characterEncoding=utf-8
2|88. 建立測試類 TestMybatis
在src/test/java/com/md/ 建立TestMybatis
特別注意裡面寫的備註資訊
主要關心第六步和第七步,前面的都是一樣的,後面直接封裝方法
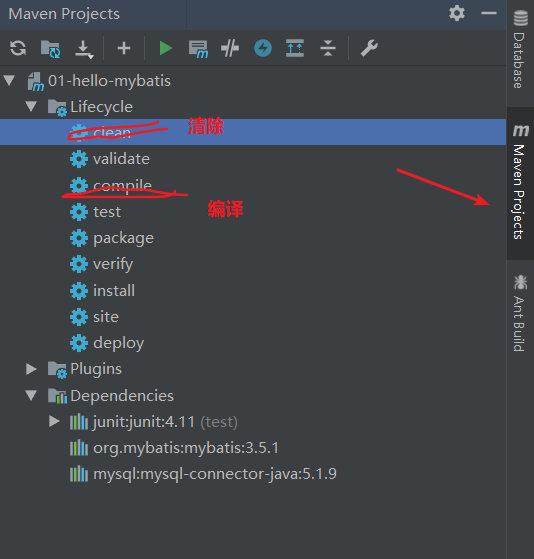
package com.md; import com.md.domain.Student; import org.apache.ibatis.io.Resources; import org.apache.ibatis.session.SqlSession; import org.apache.ibatis.session.SqlSessionFactory; import org.apache.ibatis.session.SqlSessionFactoryBuilder; import org.junit.Test; import java.io.IOException; import java.io.InputStream; import java.util.List; /** * @author MD * @create 2020-08-05 10:27 */ public class TestMybatis { // 測試方法 @Test public void testSelect() throws IOException { // 訪問mybatis讀取student資料 //1.定義mybatis主配置檔案的名稱, 從類路徑的根開始(target/clasess),編譯之後的目錄 String config = "mybatis.xml"; //2.讀取這個config表示的檔案 InputStream in = Resources.getResourceAsStream(config); //3.建立了SqlSessionFactoryBuilder物件 SqlSessionFactoryBuilder builder = new SqlSessionFactoryBuilder(); //4.建立SqlSessionFactory物件 SqlSessionFactory factory = builder.build(in); //5.獲取SqlSession物件,從SqlSessionFactory中獲取SqlSession SqlSession sqlSession = factory.openSession(); //6.【重要】指定要執行的sql語句的標識。 sql對映檔案中的namespace + "." + 標籤的id值 // String sqlId = "com.md.dao.StudentDao"+"."+"selectStudents"; String sqlId = "com.md.dao.StudentDao.selectStudents"; //7.【重要】執行sql語句,通過sqlId找到語句 List<Student> studentList = sqlSession.selectList(sqlId); //8.輸出結果 studentList.forEach( stu -> System.out.println(stu)); //9.關閉SqlSession物件 sqlSession.close(); } }如果執行找不到mybatis.xml檔案,先檢查是否在pom.xml中配置下面的資訊沒,
在pom.xml下的build標籤中
<resources> <resource> <directory>src/main/java</directory><!--所在的目錄--> <includes><!--包括目錄下的.properties,.xml 檔案都會掃描到--> <include>**/*.properties</include> <include>**/*.xml</include> </includes> <filtering>false</filtering> </resource> </resources>不行的話就重啟專案,通常就可以解決問題
2|99. 配置日誌功能
mybatis.xml 檔案加入日誌配置,可以在控制檯輸出執行的 sql 語句和引數
在根標籤裡面新增
<settings> <!-- 設定mybatis的輸出日誌--> <setting name="logImpl" value="STDOUT_LOGGING" /> </settings>然後執行專案,就可以在控制檯看到輸出了
3|0三、總結
實現步驟
- 新建一個student表
- 加入maven的mybatis座標,以及mysql驅動的座標,看pom.xml檔案中的資訊
- 建立實體類,Student,儲存表中一行的資料
- 建立持久層的dao介面,定義操作資料庫的方法
- 建立一個mybatis使用的配置檔案,叫做sql對映檔案(mapper檔案),一般一個表一個sql的對映檔案,是xml檔案,並且這個檔案是在介面所在的目錄,檔名和介面名一致
- 建立mybatis的主配置檔案,一個專案就一個主配置檔案,主配置檔案提供了資料庫的連線資訊和sql對映檔案的位置資訊
- 建立測試類,使用mybatis訪問資料庫
4|0四、insert
4|11. StudentDao 介面中增加方法
// 插入方法 public int insertStudent(Student student);4|22. StudentDao.xml 加入 sql 語句
<!-- 插入的時候要注意佔位符,就是你傳入物件的屬性值--> <insert id="insertStudent" > insert into student values(#{id},#{name},#{email},#{age}) </insert>4|33. 增加測試方法
前面的都一樣,主要就是第六步之後的
package com.md; public class TestMybatis { // 測試方法需要注意,mybatis預設不是自動提交事務,所以在寫完insert、update、delete之後,手動的提交事務
5|0五、update
和上面的都差不多,就直接寫主要的步驟
1. StudentDao 介面中增加方法
int updateStudent(Student student);2. StudentDao.xml 增加 sql 語句
<update id="updateStudent"> update student set age = #{age} where id=#{id} </update>3. 增加測試方法
//5. 建立儲存資料的物件 Student student = new Student(); student.setId(1005);// 要修改的 id student.setAge(30); // 要修改的年齡值 //6. 執行 更新 update int rows = session.update( "com.bjpowernode.dao.StudentDao.updateStudent",student); //7. 提交事務 session.commit(); System.out.println(" 修改記錄的行數:"+rows); //8. 關閉 SqlSession session.close();6|0六、delete
1. StudentDao 介面中增加方法
int deleteStudent(int id);2. StudentDao.xml 增加 sql 語句
<delete id="deleteStudent"> delete from student where id=#{studentId} </delete>3. 增加測試方法
//5. 刪除的 id int id = 1001; //6. 執行刪除 delete int rows = session.delete( "com.bjpowernode.dao.StudentDao.deleteStudent",id); //7. 提交事務 session.commit(); System.out.println(" 修改記錄的行數:"+rows); //8. 關閉 SqlSession session.close();