[Fibre Channle 實戰之二] FC Target的創建和使用
基於最近Fibre channel的相關工作,整理了下關於創建和使用target、實現fail-over過程中碰到的問題和解決方法。
0.準備好合適的後端targetcli工具
0.1安裝後端工具
主要有兩個庫要裝,rtslib和targetcli,可以參考下面的兩種方法進行安裝:
python-rtslib.noarch : API for Linux kernel LIO SCSI target
方法一:通過yum安裝
yum install python-rtslib.noarch targetcli
yum
install python-netifaces-0.10.4-3.el7.x86_64
python-prettytable.noarch
yum install python-configshell.noarch
方法二:用git從github上下載支持FB的targetcli和rtslib版本
git clone https://github.com/Datera/targetcli
git clone https://github.com/Datera/rtslib
然後分別進入目錄,運行:
./setup.py build
/setup.py install
這個過程中,可能遇到依賴的問題,可以嘗試通過安裝下面的依賴包解決:
yum
install python-netifaces-0.10.4-3.el7.x86_64
python-prettytable.noarch
yum install python-configshell.noarch
0.2檢查配置文件
需要確保當前targetcli至少支持iscsi,要求/var/target/fabric至少有iscsi.spec和qla2xxx.spec。
[[email protected] fabric]# pwd
/var/target/fabric
You have new mail in /var/spool/mail/root
[[email protected] fabric]# ls
ib_srpt.spec
iscsi.spec loopback.spec qla2xxx.spec tcm_fc.spec
usb_gadget.spec vhost.spec
此外,為了讓後端存儲設備通過Fibre channel建立target的時候能夠自動找到WWN,需要確保qla2xxx.spec裏面文件裏能自動過濾得到HBA的WWN,這是通過修改:
wwn_from_files_filter = "sed -e s/0x// -e ‘s/../&:/g‘ -e s/:$//" 實現的。
[[email protected] fabric]# cat qla2xxx.spec
# The qla2xxx fabric module uses the default feature set.
features = acls
# Non-standard module naming scheme
kernel_module = tcm_qla2xxx
# The module uses hardware addresses from there
wwn_from_files = /sys/class/fc_host/host*/port_name
# Transform ‘0x1234567812345678‘ WWN notation to ‘12:34:56:78:12:34:56:78‘
wwn_from_files_filter = "sed -e s/0x// -e ‘s/../&:/g‘ -e s/:$//"
# The configfs group is default
# configfs_group = qla2xxx
1.實現通過Fibre Channel導出後端存儲設備的腳本
可以參考筆者的一個簡單實現:
[[email protected] myfc]# cat create_fc_volume.sh
#!/bin/bash
fc_target_name="naa.2100000e1e1b0190"
## initiator wwn can be get by following command""
#cat /sys/class/fc_host/host*/port_name | sed -e s/0x// -e ‘s/../&:/g‘ -e s/:$//
acl_host0="21:00:00:0e:1e:c2:3e:a0"
acl_host1="21:00:00:0e:1e:c2:3e:a1"
# step 1: create back-end storage
targetcli /backstores/block create my_lun0 /dev/md1287
targetcli /backstores/block create my_lun1 /dev/md0
# step 2: create target
targetcli /qla2xxx create 21:00:00:0e:1e:1b:01:90
#targetcli /qla2xxx create 21:00:00:0e:1e:1b:01:91
# step 3: export the back-end storage
targetcli /qla2xxx/${fc_target_name}/luns create /backstores/block/my_lun0
targetcli /qla2xxx/${fc_target_name}/luns create /backstores/block/my_lun1
# step 3: set ACL controlling list
targetcli /qla2xxx/${fc_target_name}/acls create ${acl_host0}
targetcli /qla2xxx/${fc_target_name}/acls create ${acl_host1}
# step 4: save configration
targetcli saveconfig myfc_lun.lio
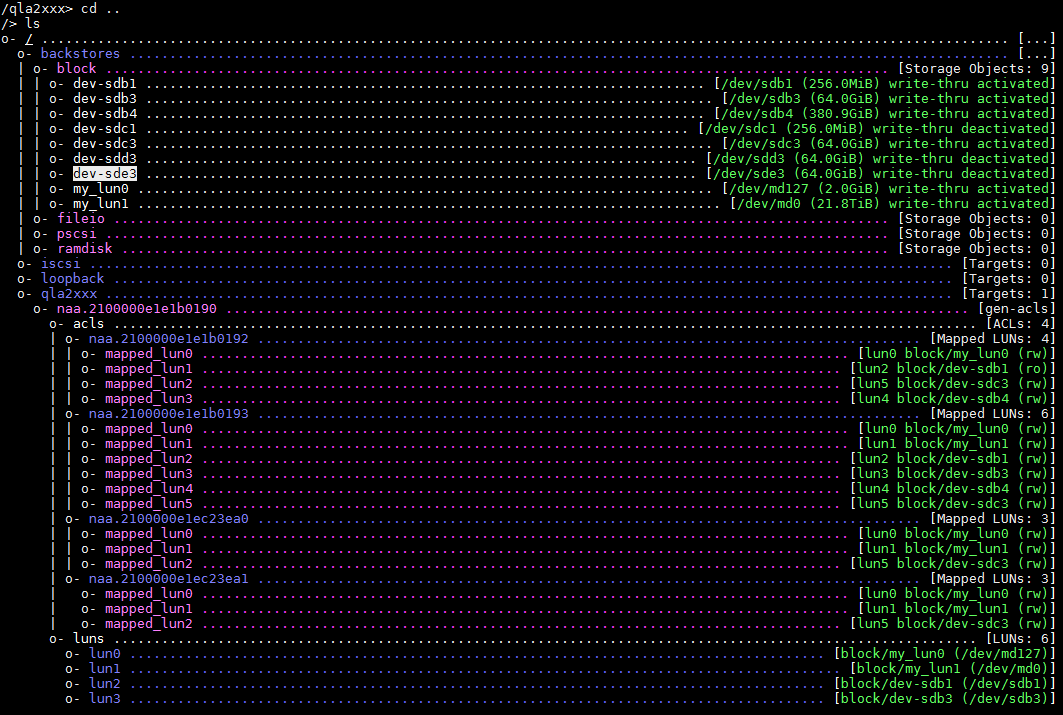
運行上面的腳本,成功之後用targetcli可以看到後端存儲target已經建立起來了:

2.發現並連接FC
Target
在上面ACL列出的WWN所對應的HBA卡的host的操作系統上, 運行下面的命令:
echo 1 > /sys/class/fc_host/hostX/issue_lip 就能自動發現並連接上後端存儲設備,此時會發現host /dev下面多了
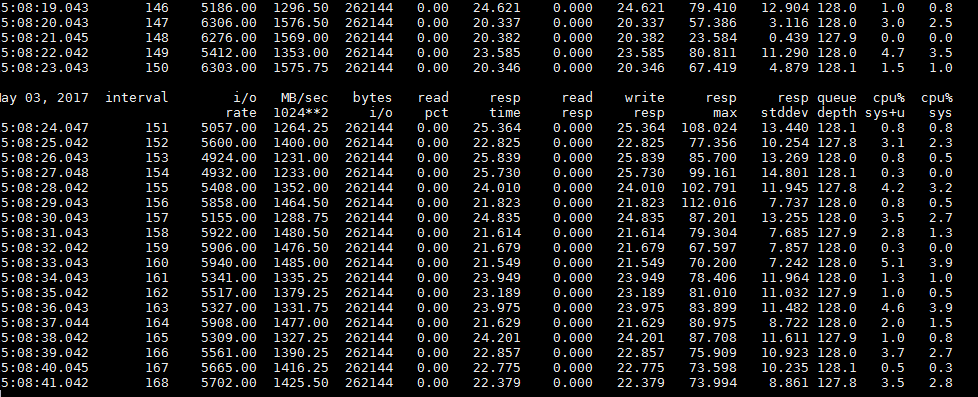
一塊設備,可以通過host上的vdbench對它進行簡單性能測試:

可以看到,上面的帶寬確實很快。
本文出自 “存儲之廚” 博客,請務必保留此出處http://xiamachao.blog.51cto.com/10580956/1927791
[Fibre Channle 實戰之二] FC Target的創建和使用
