ELK學習筆記(一)---安裝ELK 5.x版
ELK日誌平臺是一個完整的日誌分析系統,有三個開源工具構建組成,分別是:Elasticsearch、Logstash和Kibana。Elasticsearch用於數據分析和深度搜索;Logstash作用是從其他服務器上傳輸和轉發日誌,對其集中管理,進行分析;Kibana則是提供了強大的UI展示,將數據可視化。
安裝ELK日誌平臺
ELK基礎環境需要java環境,官網要求5.x版本要大於java8。而且安裝方式多樣化,支持zip、tar.gz、rpm包、deb包、window環境還有docker環境。根據自己喜好選擇吧。
我選擇的是yum安裝,簡單方便,系統要求的話沒有辣麽嚴格,官網說yum安裝方式不再支持centos5.x系列了,非要用centos5.x就去使用tar.gz包吧,官網有具體方法,不再復述。yum安裝方式centos6.x和centos7.x都可以,但是我推薦用centos7.x安裝,不知道為啥,感覺centos7.x支持更好,centos6.x裝完經常會出問題。
還有一點需要說下就是,ELK各個組件版本要一致,官網要求的!
在一個就是安裝順序,為的是確保每個組件相互調用時都能正常運行:
1、Elasticsearch
X-Pack for Elasticsearch
Kibana
X-Pack for Kibana
LogstashBeatsElasticsearch Hadoop
安裝Elasticsearch
1、導入Elasticsearch安裝包PGP Key
rpm --import
https://artifacts.elastic.co/GPG-KEY-elasticsearch
2、創建yum源
[[email protected] ~]# cat >> /etc/yum.repos.d/elasticsearch.repo <<EOF > [elasticsearch-5.x] > name=Elasticsearch repository for 5.x packages > baseurl=https://artifacts.elastic.co/packages/5.x/yum > gpgcheck=1 > gpgkey=https://artifacts.elastic.co/GPG-KEY-elasticsearch > enabled=1 > autorefresh=1 > type=rpm-md > EOF
3、安裝、啟動Elasticsearch進程並開機啟動
[[email protected] ~]$ sudo yum install elasticsearch [[email protected] ~]$ sudo /bin/systemctl daemon-reload [[email protected] ~]$ sudo /bin/systemctl enable elasticsearch.service [[email protected] ~]$ sudo systemctl start elasticsearch.service
4、檢查Elasticsearch是否已經啟動
查看9200、9300是否已經啟動
[[email protected] ~]$ curl http://localhost:9200
{
"name" : "F5Mw8Pp",
"cluster_name" : "elasticsearch",
"cluster_uuid" : "zVEeXtPNTaeH-TKah7Buzw",
"version" : {
"number" : "5.4.0",
"build_hash" : "780f8c4",
"build_date" : "2017-04-28T17:43:27.229Z",
"build_snapshot" : false,
"lucene_version" : "6.5.0"
},
"tagline" : "You Know, for Search"
}5、配置Elasticsearch
rpm包配置文件在/etc/elasticsearch下面的elasticsearch.yml
vim /etc/elasticsearch/elasticsearch.yml
cluster.name: elasticsearch-test
node.name: node-1
path.data: /var/lib/elasticsearch
path.logs: /var/log/elasticsearch
network.host: 0.0.0.0
[[email protected] ~]$ sudo systemctl restart elasticsearch.service
[[email protected] ~]$ curl http://localhost:9200
{
"name" : "node-1",
"cluster_name" : "elasticsearch-test",
"cluster_uuid" : "zVEeXtPNTaeH-TKah7Buzw",
"version" : {
"number" : "5.4.0",
"build_hash" : "780f8c4",
"build_date" : "2017-04-28T17:43:27.229Z",
"build_snapshot" : false,
"lucene_version" : "6.5.0"
},
"tagline" : "You Know, for Search"
}6、將/etc/elasticsearch/配置拷貝到/usr/share/elasticsearch/config下面
[[email protected] ~]$ sudo mkdir /usr/local/elasticsearch/config [[email protected] ~]$ sudo ln -sf /etc/elasticsearch/* /usr/local/elasticsearch/config/ [[email protected] ~]$ sudo chown -R elasticsearch:elasticsearch /usr/local/elasticsearch [[email protected] ~]$ sudo systemctl restart elasticsearch.service
註意:這一點好多人不會註意,因為你不修復也不會啟動失敗,但是就是寫不進數據進去,這個坑好久才發現,看下日誌會報錯,但是卻能啟動,我也是服了!~
7、裝個head插件
這個插件5.X官網不再支持了,插件命令沒有了,因為它有自己x-pack插件了,但是我裝了x-pack發現著實讓人吐血,有安全認證方面的問題,導致elk各種問題出現,目前還沒研究明白,時間不充裕。
這個head插件我是直接抄的網上大神制作,略有改動。
7.1、下載並配置nodejs
由於head插件本質上還是一個nodejs的工程,因此需要安裝node,使用npm來安裝依賴的包。(npm可以理解為maven)
去官網下載nodejs,https://nodejs.org/en/download/
wget https://nodejs.org/dist/v8.1.1/node-v8.1.1-linux-x64.tar.xz
tar xf node-v8.1.1-linux-x64.tar.xz
mv node-v8.1.1-linux-x64 /usr/local/node
chown -R elasticsearch:elasticsearch node/
ln -sf /usr/local/node/bin/node /usr/bin/node
ln -sf /usr/local/node/bin/npm /usr/bin/npm
7.2、安裝grunt
npm install -g grunt-cli
ln -sf /usr/local/node/bin/grunt /usr/bin/grunt cd /var/lib/elasticsearch
7.3、下載、安裝並配置head
yum -y install git
cd /var/lib/elasticsearch
git clone git://github.com/mobz/elasticsearch-head.git
chown -R elasticsearch:elasticsearch elasticsearch-head/
cd elasticsearch-head/
npm install
7.4、配置head文件
[[email protected] ~]# cd /var/lib/elasticsearch/elasticsearch-head/
vim Gruntfile.js
connect: {
server: {
options: {
port: 9100,
hostname: "0.0.0.0",
base: ‘.‘,
keepalive: true
}
}
}
[[email protected] elasticsearch-head]# cd _site/
[[email protected] _site]# vim app.js把localhost修改成你es的服務器地址:
this.base_uri = this.config.base_uri || this.prefs.get("app-base_uri") || "http://10.10.10.10:9200";7.5、啟動head插件
grunt server &
安裝Kibana
1、yum安裝Kibana
[[email protected] ~]$ sudo yum install kibana
rpm包配置文件在/etc/kibana下面的kibana.yml
/etc/kibana/kibana.yml
2、配置Kibana文件
[[email protected] ~]$ vim /etc/kibana/kibana.yml server.port: 5601 server.host: "0.0.0.0" elasticsearch.url: "http://localhost:9200"
3、啟動並設置開機啟動
[[email protected] ~]$ sudo systemctl enable kibana.service Created symlink from /etc/systemd/system/multi-user.target.wants/kibana.service to /etc/systemd/system/kibana.service [[email protected] ~]$ sudo systemctl start kibana.service
安裝Logstash
1、yum安裝Logstash
[[email protected] ~]$ sudo yum -y install logstash [[email protected] ~]$ sudo systemctl start logstash.service [[email protected] ~]$ sudo ln -s /usr/share/logstash/bin/logstash /usr/bin/logstash [[email protected] ~]$ sudo -u logstash sh -c ‘mkdir -pv /usr/share/logstash/config‘ [[email protected] ~]$ sudo -u logstash sh -c ‘ln -s /etc/logstash/* /usr/share/logstash/config/‘
2、測試Logstash是否能正常運行
[[email protected] ~]$ sudo logstash -e ‘input {stdin{}}output { stdout{}}‘
hello world
2017-06-02T07:14:13.130Z localhost hello world
[[email protected] ~]$ sudo logstash -e ‘input {stdin{}}output {
stdout{codec=>rubydebug}}‘
hello world
The stdin plugin is now waiting for input:
{
"@timestamp" => 2017-06-02T07:17:44.053Z,
"@version" => "1",
"host" => "localhost",
"message" => "hello world"
}3、寫個測試文件,測試一下es是否能夠接受數據
[[email protected] ~]$ vim /etc/logstash/conf.d/test.conf
input{
stdin{}
}
output{
elaticsearch{
hosts => "127.0.0.1:9200"
index => "test-messages-%{+YYYY.MM.dd}"
}
}
[[email protected] ~]$ logstash -f /etc/logstash/conf.d/test.conf -t
Sending Logstash‘s logs to /var/log/logstash which is now configured via log4j2.properties
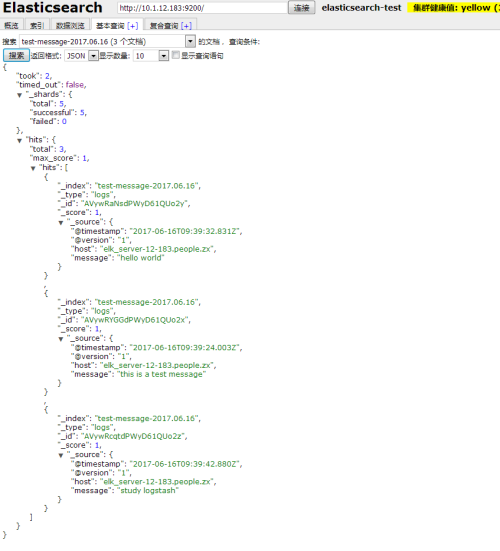
Configuration OK[[email protected] ~]$ logstash -f /etc/logstash/conf.d/test.conf Sending Logstash‘s logs to /var/log/logstash which is now configured via log4j2.properties The stdin plugin is now waiting for input: hello world this is test message study logstash 這是es顯示的索引內容了

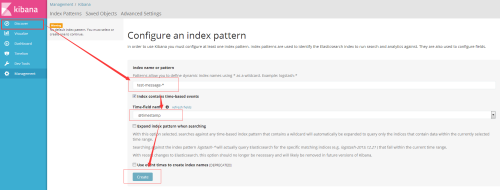
4、Kibana裏添加該索引(測試),只要es裏面能產生索引,Kibana就能加在上去


本文出自 “LINUX” 博客,請務必保留此出處http://wangpengtai.blog.51cto.com/3882831/1939138
ELK學習筆記(一)---安裝ELK 5.x版
