
Rebound-Android的彈簧動畫庫
簡介
官方網站
github
Rebound是facebook出品的一個彈簧動畫庫,與之對應的iOS版本有一個pop動畫庫,也是非常的強大給力。Facebook真是互聯網企業中的楷模,開源了很多的實用開源庫,大贊一個!!!
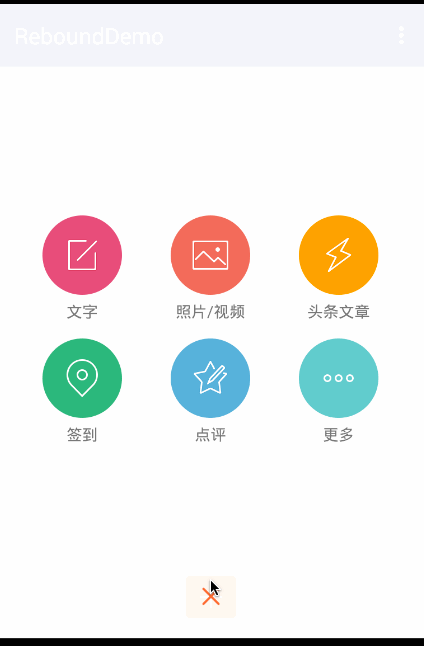
講解Rebound之前,先看看我們根據Rebound高仿的新浪微博彈出菜單,看效果圖:
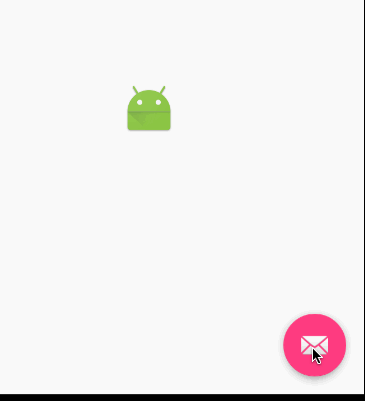
話說回來,facebook為啥推出這個庫呢?主要就是現有的動畫離真實物理世界差別比較明顯,為了讓動畫看起來真實自然,帶有力量的效果,Rebound應運而生。兩個比較重要的參數,一個是拉力Tension,一個是摩擦力Friction,拉力越大,彈簧效果越明顯;摩擦力越大,彈框效果阻力越大、越不明顯。如果這個摩擦力的值設置為0,就像真實世界中處於真空狀態,一點摩擦力都沒有,這個彈簧效果會一直無限制重復下去,根本停不下來,不信看效果圖:

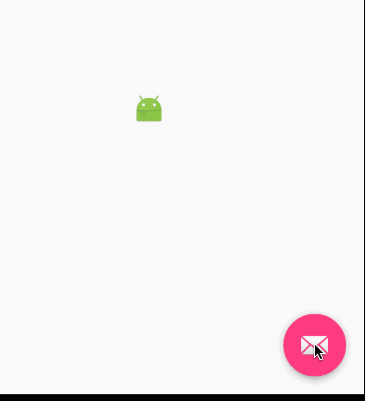
我們把摩擦力的值改成1試試:
初級用法
Rebound提供了非常簡潔的api方法來供我們調用,我們只需要配置一些簡單的參數就可以使用了,下面看看官網給出的例子:
// Create a system to run the physics loop for a set of springs.
SpringSystem springSystem = SpringSystem.create();

// Add a spring to the system.
Spring spring = springSystem.createSpring();

// Add a listener to observe the motion of the spring.
spring.addListener(new SimpleSpringListener() {

  @Override
  public void onSpringUpdate(Spring spring) {
    // You can observe the updates in the spring
    // state by asking its current value in onSpringUpdate.
    float value = (float) spring.getCurrentValue();
    float scale = 1f - (value * 0.5f);
    myView.setScaleX(scale);
    myView.setScaleY(scale);
  }
});

// Set the spring in motion; moving from 0 to 1
spring.setEndValue(1);
我們看下對應的效果圖:
你們發現,好像彈簧效果不明顯,Rebound默認的拉力和摩擦力參數分別是40和7,我們看下Rebound裏面有個defaultConfig
public static SpringConfig defaultConfig = SpringConfig.fromOrigamiTensionAndFriction(40, 7);
為了讓彈簧效果更明顯,我們修改下SpringConfig的值,代碼如下:
spring.setSpringConfig(SpringConfig.fromOrigamiTensionAndFriction(100,1));
我們將拉力值改成100,摩擦力值改成1,效果圖如下:
效果很贊了吧!
高級用法:多個view連鎖動畫
如果想要做很多view的連鎖動畫怎麽辦?Rebound也提供了SpringChain這個接口。直接看代碼吧:
SpringChain springChain = SpringChain.create(40,6,50,7);

int childCount = viewGroup.getChildCount();
for (int i = 0; i < childCount; i++) {
    final View view = viewGroup.getChildAt(i);

    springChain.addSpring(new SimpleSpringListener() {
        @Override
        public void onSpringUpdate(Spring spring) {
            view.setTranslationY((float) spring.getCurrentValue());
        }
    });
}

List<Spring> springs = springChain.getAllSprings();
for (int i = 0; i < springs.size(); i++) {
    springs.get(i).setCurrentValue(400);
}

springChain.setControlSpringIndex(2).getControlSpring().setEndValue(0);
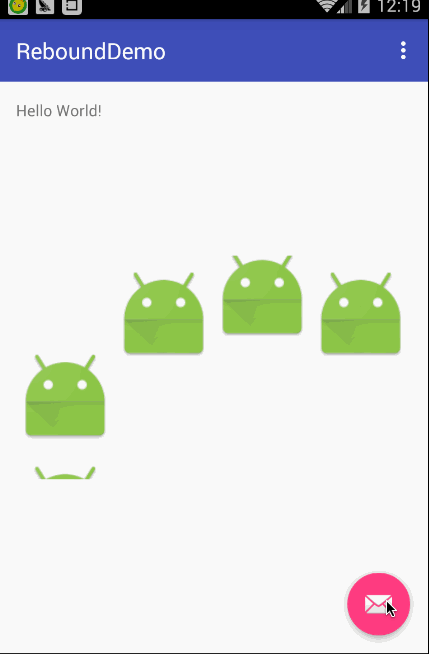
效果圖如下:
我們來看看SpringChain這個類,創建它有兩個create方法:
- 默認無參數create()
- 有參數的create(int mainTension,int mainFriction,int attachmentTension,int attachmentFriction)
其中帶參數的第一個參數表示起主導作用spring的拉力系數,第二個參數表示起主導作用Spring的摩擦力系數,第三個和第四個表示附屬的拉力和摩擦力系數
SpringChain需要設置一個起主導控制作用的Spring,通過setControlSpringIndex方法來設置
高仿新浪彈出菜單
先看下高仿後的效果圖:
這裏給出示例代碼:
PopMenu popMenu = new PopMenu.Builder().attachToActivity(MainActivity.this)
                .addMenuItem(new PopMenuItem("文字", getResources().getDrawable(R.drawable.tabbar_compose_idea)))
                .addMenuItem(new PopMenuItem("照片/視頻", getResources().getDrawable(R.drawable.tabbar_compose_photo)))
                .addMenuItem(new PopMenuItem("頭條文章", getResources().getDrawable(R.drawable.tabbar_compose_headlines)))
                .addMenuItem(new PopMenuItem("簽到", getResources().getDrawable(R.drawable.tabbar_compose_lbs)))
                .addMenuItem(new PopMenuItem("點評", getResources().getDrawable(R.drawable.tabbar_compose_review)))
                .addMenuItem(new PopMenuItem("更多", getResources().getDrawable(R.drawable.tabbar_compose_more)))
                .setOnItemClickListener(new PopMenuItemListener() {
                    @Override
                    public void onItemClick(PopMenu popMenu, int position) {
                        Toast.makeText(MainActivity.this, "你點擊了第" + position + "個位置", Toast.LENGTH_SHORT).show();
                    }
                })
                .build();
popMenu.show();
這裏由於篇幅原因,就暫時先不講解實現原理了,如需要看源碼去我的github上下載,下載地址為:高仿新浪彈出菜單
Rebound-Android的彈簧動畫庫