Varnish基礎配置實現動靜分離web站點
由於一個web站點的程序的訪問具有局部性特征:時間上的局部性:一個數據被訪問過之後,可能很快會被再次訪問到;空間局部性:一個數據被訪問時,其周邊的數據也有可能被訪問到;varnish可將這部分數據緩存下來.
緩存的數據存在被訪問較頻繁的數據可以稱其為熱區:緩存同樣存在局部性;時效性:如果緩存空間耗盡:則采用LRU,最近最少使用算法;將過期的緩存清理掉
varnish的基本工作原理:
Varnish通過類似於HTPP反向代理的方式將可以用來緩存的數據緩存下來直接響應給客戶端的緩存數據,如果緩存中
沒有相應的數據,它將會把請求指向後端機器,獲取響應的數據進行響應客戶端。
當varnish有緩存的時候響應通常只需要極短的時間,比直接訪問後端機器通常要快幾個量級,所以要盡可能的將可緩存的頁面緩存到varnish中。
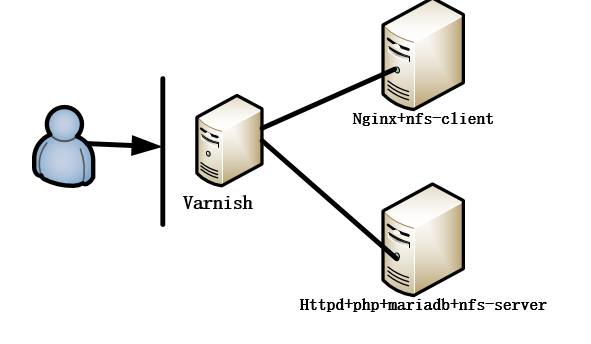
varnish工作模式圖:

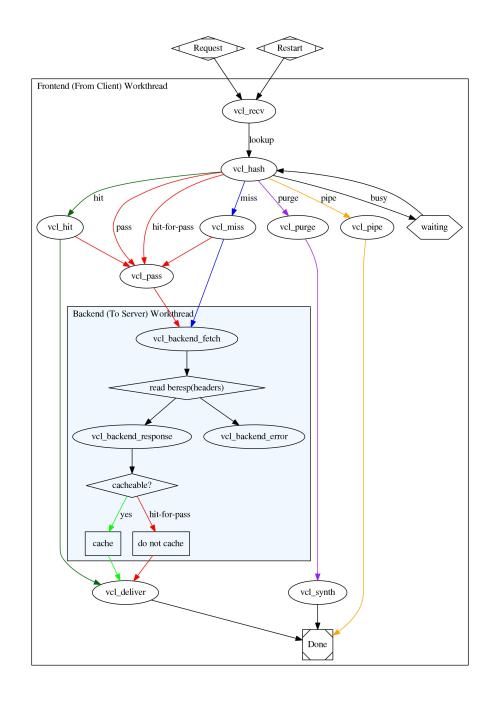
varnish的處理機制圖:
哪些數據可以緩存或是不可緩存:1.盡量將站點公共的數據緩存下來;2.用排除用戶的私有數據.
配置一個wordperss站點使用varnish緩存服務器並做動靜分離
基礎拓撲圖:

varnish的配置(基於cenots7,整個配置過程應避免iptables和selinux的影響):
ntpdata 172.16.0.1 同步時間
安裝varnish程序:
yum install varnish
編輯varnish的主配置文件:
vim /etc/varnish/varnish.params
    添加最後一行:
    DAEMON_OPTS="-p thread_pools=3 -p thread_pool_min=5 -p thread_pool_max=1000 -p thread_pool_timeout=300"
啟動varnish程序:
systemctl restart varnish
編輯varnish的vcl配置文件:
vim /etc/varnish/default.vcl
作出如下基礎配置:
vcl 4.0;

# Default backend definition. Set this to point to your content server.
backend default {      #定義後端動態主機(apm)
    .host = "192.168.5.109";
    .port = "80";
}
backend nginxsrvs {    #定義後端靜態主機(nignx)
  .host = "192.168.5.108";
   .port = "80";
}

sub vcl_recv {
    # Happens before we check if we have this in cache already.
    #
    # Typically you clean up the request here, removing cookies you don‘t need,
    # rewriting the request, etc.
    if (req.method == "PURGE") {       #指明何時可以用PURGE請求裁剪緩存數據
         return(purge);
}
    if (req.url ~ "(?i)^/(login|admin)") {   #指定一些私用數據不查找緩存數據
                                        return(pass);
                                }
    if (req.url ~ "(?i)\.(html|htm|css|svg|js|jpg|jpeg|png|gif|pdf)") { #指定的內容由靜態服務器響應,其他的為動態服務器響應
         set req.backend_hint = nginxsrvs;   #指明響應的後端主機
    } else {
         set req.backend_hint =   default;   #指明響應的前端主機
    }

}

sub vcl_purge {
        return (synth(200,"Purged"));   #指明可以執行的PURGE操作
}

sub vcl_deliver {
    if (obj.hits>0) {       #可以用來做緩存是否被命中,obj.hits用於統計緩存命中的次數
        set resp.http.X-Cache = "HIT via " + server.ip;
    } else {
        set resp.http.X-Cache = "Miss via " + server.ip;
}
將default.vcl文件編譯加載至varnish程序:
varnishadm -S secret
     進入varnish配置的cli界面,執行編譯加載:
     vcl.load test1 default.vcl   #編譯
     vcl.use test1                 #加載
     quit                          #退出
配置apm動態服務器:
yum install httpd
mkdir -p /apps/data (需要考慮權限)
將wordpress的源碼文件cp至目錄下
編輯httpd的站點配置文件
vim /etc/httpd/conf.d/wordpress.conf
<VirtualHost *:80>
    DirectoryIndex index.php index.html
    ServerName www.abc.com
    DocumentRoot /apps/data/wordpress
    <Directory "/apps/data/">
            Options FollowSymLinks
            AllowOverride None
            Require all granted
    </Directory>
</VirtualHost>
啟動httpd程序:
systemctl restart httpd
配置nfs服務用於共享網站文件
yum install nfs-utils
vim /etc/exports
/apps/data *(rw,all_squash,anonuid=48)
配置nginx靜態服務器:
yum install nginx #這裏要用到nginx官方提供的yum源
配置/etc/nginx/conf.d/default.conf文件,作出如下修改
vim /etc/nginx/conf.d/default.conf
location / {
    root   /apps/data/wordpress;   #指明web程序的路徑
    index  index.html index.htm;
}
啟動nginx服務程序
systemctl restart nginx
更改hosts文件即可做訪問測試.

varnish的基礎配置實現已完成.
本文出自 “老城小敘” 博客,請務必保留此出處http://cityx.blog.51cto.com/9857477/1943841
Varnish基礎配置實現動靜分離web站點

