TensorFlow conv2d原理及實踐
tf.nn.conv2d(input, filter, strides, padding, use_cudnn_on_gpu=None, data_format=None, name=None)
官方教程說明:
給定四維的input和filter tensor,計算一個二維卷積
Args:
input: ATensor. type必須是以下幾種類型之一:half,float32,float64.filter: ATensor. type和input必須相同strides: A list ofints.一維,長度4, 在input上切片采樣時,每個方向上的滑窗步長,必須和format指定的維度同階padding: Astringfrom:"SAME", "VALID". padding 算法的類型use_cudnn_on_gpu: An optionalbool. Defaults toTrue.data_format: An optionalstringfrom:"NHWC", "NCHW", 默認為"NHWC"。
指定輸入輸出數據格式,默認格式為"NHWC", 數據按這樣的順序存儲:[batch, in_height, in_width, in_channels]
也可以用這種方式:"NCHW", 數據按這樣的順序存儲:[batch, in_channels, in_height, in_width]name: 操作名,可選.
Returns:
A Tensor. type與input相同
Given an input tensor of shape [batch, in_height, in_width, in_channels]
and a filter / kernel tensor of shape[filter_height, filter_width, in_channels, out_channels]
conv2d實際上執行了以下操作:
- 將filter轉為二維矩陣,shape為
[filter_height * filter_width * in_channels, output_channels]. - 從input tensor中提取image patches,每個patch是一個virtual tensor,shape
[batch, out_height, out_width, filter_height * filter_width * in_channels]. - 將每個filter矩陣和image patch向量相乘
具體來講,當data_format為NHWC時:
output[b, i, j, k] =
    sum_{di, dj, q} input[b, strides[1] * i + di, strides[2] * j + dj, q] *
                    filter[di, dj, q, k]
input 中的每個patch都作用於filter,每個patch都能獲得其他patch對filter的訓練
需要滿足strides[0] = strides[3] = 1. 大多數水平步長和垂直步長相同的情況下:strides = [1, stride, stride, 1].
下面舉例來進行說明
在最基本的例子中,沒有padding和stride = 1。讓我們假設你的input和kernel有:

當您的內核您將收到以下輸出: ,它按以下方式計算:
- 14 = 4 * 1 + 3 * 0 + 1 * 1 + 2 * 2 + 1 * 1 + 0 * 0 + 1 * 0 + 2 * 0 + 4 * 1
- 6 = 3 * 1 + 1 * 0 + 0 * 1 + 1 * 2 + 0 * 1 + 1 * 0 + 2 * 0 + 4 * 0 + 1 * 1
- 6 = 2 * 1 + 1 * 0 + 0 * 1 + 1 * 2 + 2 * 1 + 4 * 0 + 3 * 0 + 1 * 0 + 0 * 1
- 12 = 1 * 1 + 0 * 0 + 1 * 1 + 2 * 2 + 4 * 1 + 1 * 0 + 1 * 0 + 0 * 0 + 2 * 1
TF的conv2d函數批量計算卷積,並使用稍微不同的格式。對於一個輸入,它是[batch, in_height, in_width, in_channels]內核的[filter_height, filter_width, in_channels, out_channels]。所以我們需要以正確的格式提供數據:
import tensorflow as tf
k = tf.constant([
    [1, 0, 1],
    [2, 1, 0],
    [0, 0, 1]
], dtype=tf.float32, name=‘k‘)
i = tf.constant([
    [4, 3, 1, 0],
    [2, 1, 0, 1],
    [1, 2, 4, 1],
    [3, 1, 0, 2]
], dtype=tf.float32, name=‘i‘)
kernel = tf.reshape(k, [3, 3, 1, 1], name=‘kernel‘)
image  = tf.reshape(i, [1, 4, 4, 1], name=‘image‘)
之後,卷積用下式計算:
res = tf.squeeze(tf.nn.conv2d(image, kernel, [1, 1, 1, 1], "VALID"))
# VALID means no padding
with tf.Session() as sess:
   print sess.run(res)
並將相當於我們手工計算的,輸出結果:
[[ 14. 6.]
[ 6. 12.]]
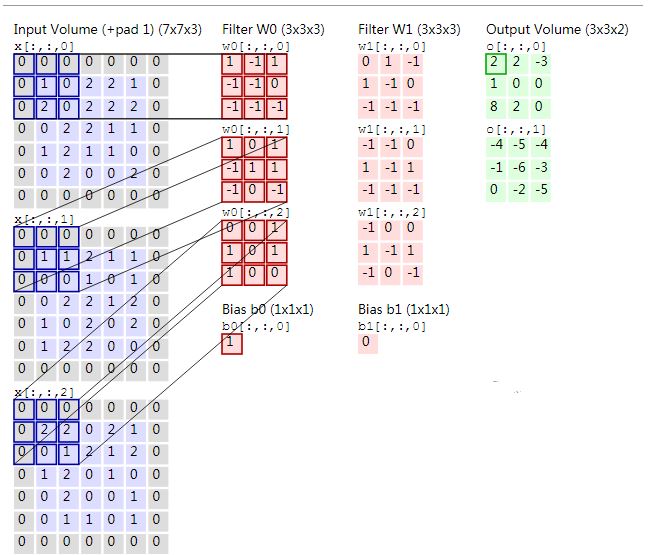
附上一張圖:

區別SAME和VALID
VALID
input = tf.Variable(tf.random_normal([1,5,5,5]))

filter = tf.Variable(tf.random_normal([3,3,5,1]))

op = tf.nn.conv2d(input, filter, strides=[1, 1, 1, 1], padding=‘VALID‘)
輸出圖形:
.....
.xxx.
.xxx.
.xxx.
.....
SAME
input = tf.Variable(tf.random_normal([1,5,5,5]))
filter = tf.Variable(tf.random_normal([3,3,5,1]))

op = tf.nn.conv2d(input, filter, strides=[1, 1, 1, 1], padding=‘SAME‘)
輸出圖形:
xxxxx
xxxxx
xxxxx
xxxxx
xxxxx
參考鏈接
-
Tensorflow 中 conv2d 都幹了啥
-
TensorFlow 深度學習筆記 卷積神經網絡
TensorFlow conv2d原理及實踐
