httpd, php, mariadb分離式的部署在三臺主機上測試性能
CentOS7, amp + xcache,編譯安裝,php-fpm;
a) 分別深度:httpd, php, mariadb分別部署在一個單獨的主機上,以及都在同一主機;
b) 一個虛擬主機提供phpMyAdmin,另一個虛擬主機提供wordpress;
c) 為phpMyAdmim提供https服務;
對以上所有部署做壓力測試,並對比測試結果,寫出測試報告;
環境:
此處用三臺主機分別分離提供不同服務:
172.16.1.4------->提供httpd服務
172.16.1.3------->提供mariadb-server服務
172.16.1.2------->提供php-fpm php-mysql xcache服務
一、172.16.1.2服務器部署httpd服務:
1、安裝httpd服務程序
[[email protected]~]# yum -y install httpd
[[email protected]~]# vim /etc/httpd/conf/httpd.conf
2、建立虛擬主機
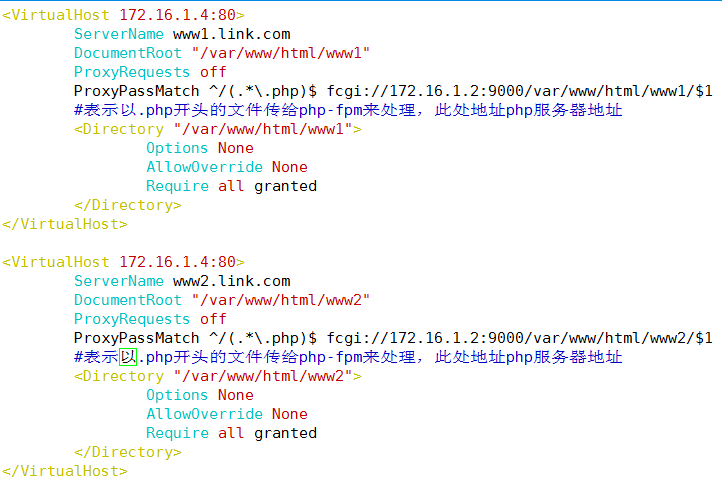
3、建立網頁及相關路徑
[[email protected]~]# mkdir -p /var/www/html/www1
[[email protected]~]# mkdir -p /var/www/html/www2
[[email protected]~]# echo "www1.link.com" > /var/www/html/www1/index.html
[[email protected]~]# echo "www2.link.com" > /var/www/html/www2/index.html
4、啟動下服務我們測試下虛擬主機是否正常
[[email protected]~]# curl www1.link.com
www1.link.com
[[email protected]~]# curl www2.link.com
www2.link.com
二、在172.16.1.2服務器上部署安裝php-fpm
1、安裝php-fpm php-mysql php-mbstring程序
[[email protected]~]# yum -y install php-fpm php-mysql php-mbstring
2、編輯/etc/php-fpm.d/www.conf
[[email protected]~]# vim /etc/php-fpm.d/www.conf
修改以下內容:
listen= 172.16.1.2:9000 #設置php服務器監聽地址即監聽本地能夠與外部通信的地址
listen.allowed_clients= 172.16.1.4 #監聽具有httpd服務的IP地址
3、建立以下文件並且啟動php-fpm服務,查看下是否已經監聽
[[email protected]~]# mkdir /var/lib/php/session
[[email protected]~]# chown apache.apache /var/lib/php/session/
[[email protected]~]# ls -ld /var/lib/php/session/
drwxrwx---.3 apache apache 21 9月 10 20:31 /var/lib/php/session/
[[email protected]~]# systemctl start php-fpm.service
[[email protected]~]# ss -tnl
State Recv-Q Send-Q Local Address:Port Peer Address:Port
LISTEN 0 128 172.16.1.2:9000 *:*
以上已經顯示監聽在php地址
4、在php服務器上建立與http服務器上網頁DocumentRoot路徑,並且編寫php測試也,看看是否能夠與http連接
[[email protected]~]# mkdir -p /var/www/html/www{1,2}
[[email protected]~]# vim /var/www/html/www1/index.php #虛擬主機1的php和httpd連接測試
Thisis ge de vhost1
<?php
phpinfo();
?>
[[email protected]~]# vim /var/www/html/www1/index.php #虛擬主機2的php和httpd連接測試
Thisis ge de vhost2
<?php
phpinfo();
?>
5、加載服務訪問站點測試php和httpd連接是否正常
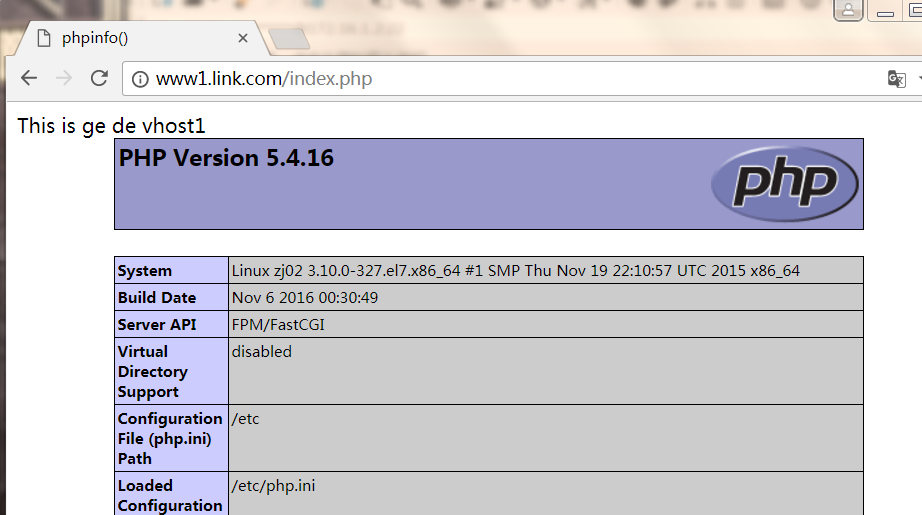
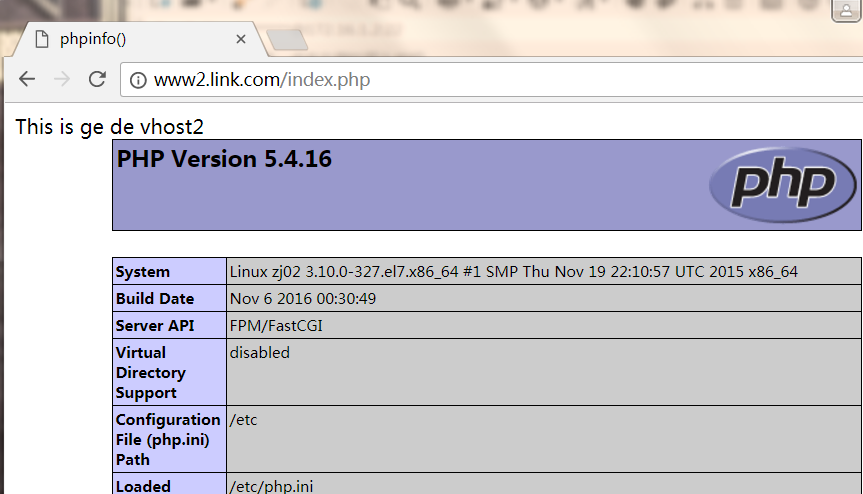
正常連接,所有我的PHP和httpd服務器連接成功。
三、在172.16.1.3服務器上部署mariadb服務
1.安裝數據庫,開啟服務
[[email protected]~]# yum -y install mariadb-server
[[email protected]~]# systemctl start mariadb.service
2、創建數據庫和授權等相關操作
MariaDB[(none)]> create database wpsdb; #創建WordPress所用數據庫
MariaDB[(none)]> grant all on wpsdb.* TO ‘wpuser‘@‘172.16.%.%‘IDENTIFIED BY‘123456‘; #授權WordPress用戶
MariaDB[(none)]> create database pma; #授權phpmyadmin所用數據庫
MariaDB[(none)]> grant all on pma.* TO ‘pmauser‘@‘172.16.%.%‘IDENTIFIED BY‘123456‘; #授權phpmyadmin的用戶
3、在php服務器上建立php測試頁,測試php是否可以正常連接數據
[[email protected]~]# vim /var/www/html/www1/index.php
Thisis ge de vhost1
<?php
$conn = mysql_connect(‘172.16.1.3‘,‘wpuser‘,‘123456‘);
if ($conn)
echo "ok";
else
echo "NO";
phpinfo();
?>
[[email protected]~]# vim /var/www/html/www2/index.php
Thisis ge de vhost2
<?php
$conn =mysql_connect(‘172.16.1.3‘,‘wpuser‘,‘123456‘);
if ($conn)
echo "ok";
else
echo "NO";
phpinfo();
?>
4、測試
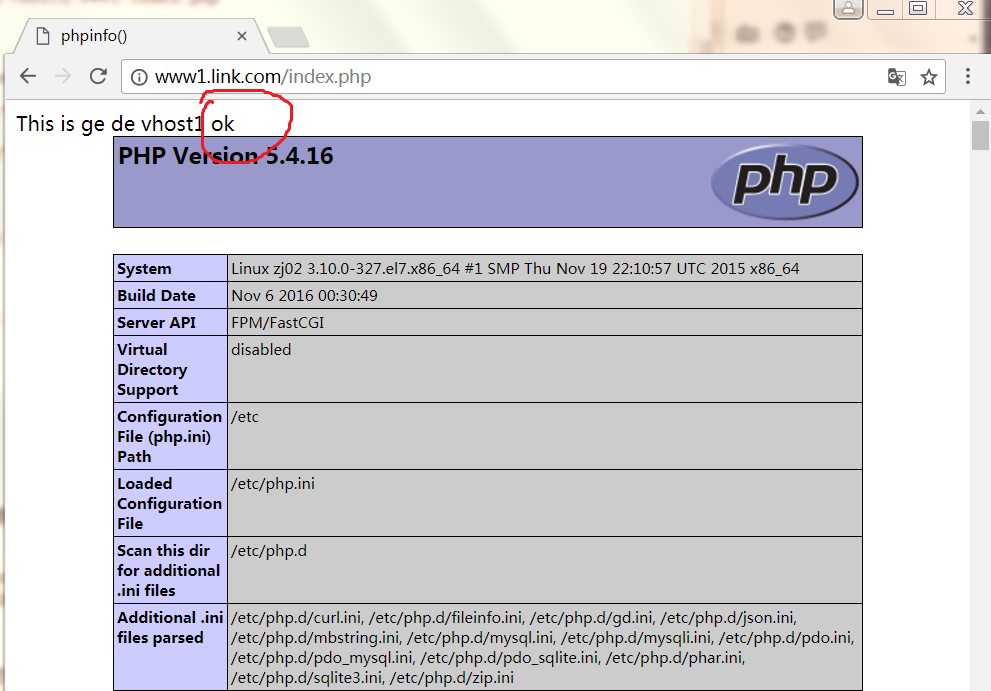
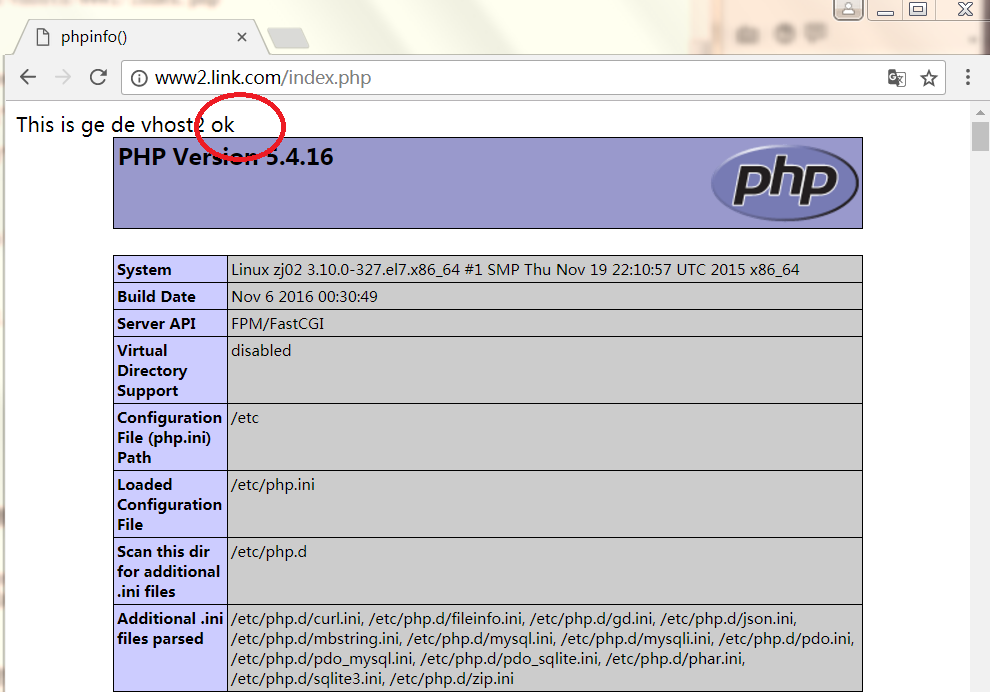
顯示OK,所以mariadb數據可以同php連接了,而且到現在分離式的LAMP平臺就構建完成了!
四、部署下WordPress和phpMyadmin
部署WordPress:
1、將下載好的WordPress壓縮包傳到php主機上,解壓縮,配置連接用戶和密碼,數據庫地址
[[email protected]~]# unzip wordpress-3.9-zh_CN.zip
[[email protected]~]# mv wordpress /var/www/html/www1/
[[email protected]~]# cd /var/www/html/www1/wordpress/
[[email protected]]# mv wp-config-sample.php wp-config.php
[[email protected]]# vim wp-config.php
修改如下:
define(‘DB_NAME‘,‘wpsdb‘);
/**MySQL數據庫用戶名 */
define(‘DB_USER‘,‘wpuser‘);
/**MySQL數據庫密碼 */
define(‘DB_PASSWORD‘,‘123456‘);
/**MySQL主機 */
define(‘DB_HOST‘,‘172.16.1.3‘);
2、把WordPress這個目錄個傳到http服務器主頁訪問的路徑下
[[email protected]]# scp -r wordpress/ [email protected]:/var/www/html/www1/
這裏需要根據提示輸入“yes”和root密碼
部署phpMyadmin:
1、將下載好的phpMyadmin壓縮包傳到php主機上,解壓縮,配置連接用戶和密碼,數據庫地址
[[email protected]~]# tar -zxvf phpMyAdmin-4.0.10.20.tar.gz
[[email protected]~]# mv phpMyAdmin-4.0.10.20 /var/www/html/www2/
[[email protected]]# mv phpMyAdmin-4.0.10.20/ phpmyadmin
2、進入phpmyadmin目錄下的libraries目錄,編輯這個文件:
[[email protected]]# vim config.default.php
$cfg[‘blowfish_secret‘]= ‘V40VdxxM0rPrx8k2KYE‘; #添加隨機字符
$cfg[‘Servers‘][$i][‘host‘]= ‘172.16.1.3‘; #數據庫服務器地址
$cfg[‘Servers‘][$i][‘user‘]= ‘pmauser‘;
$cfg[‘Servers‘][$i][‘password‘]= ‘123456‘;
3、將配置好了的phpmyadmin目錄傳一份給httpd服務器虛擬主機對應的訪問路徑下
[[email protected]]# scp -r phpmyadmin/ [email protected]:/var/www/html/www2/
測試:
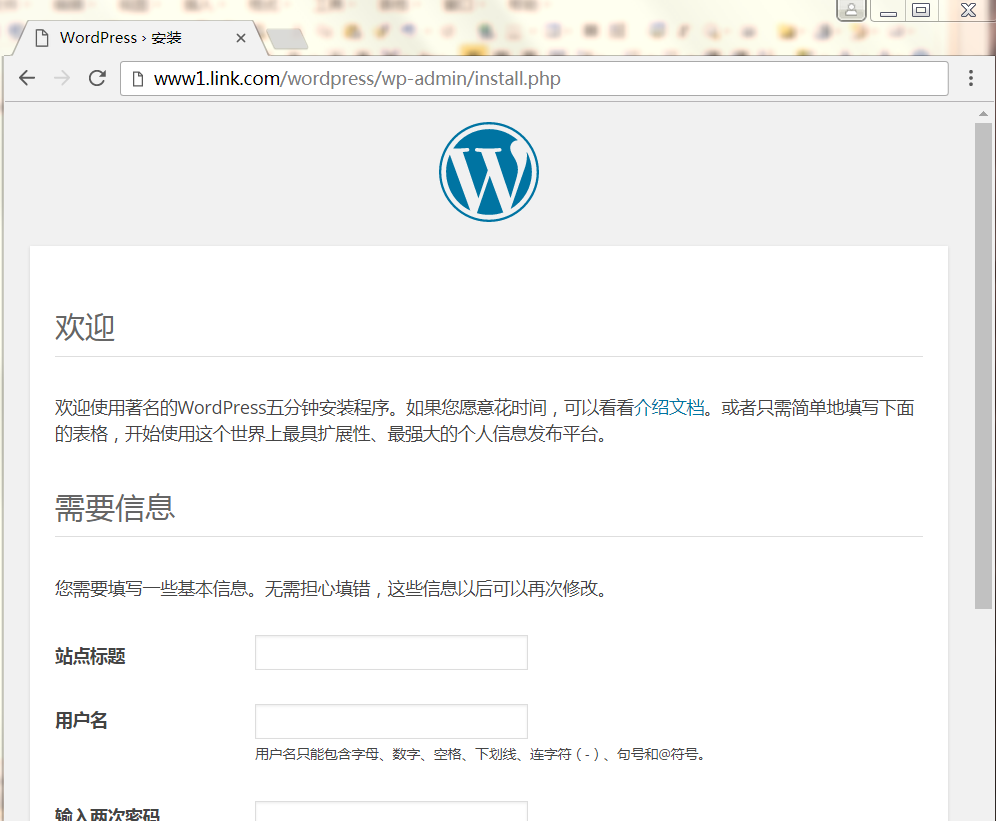
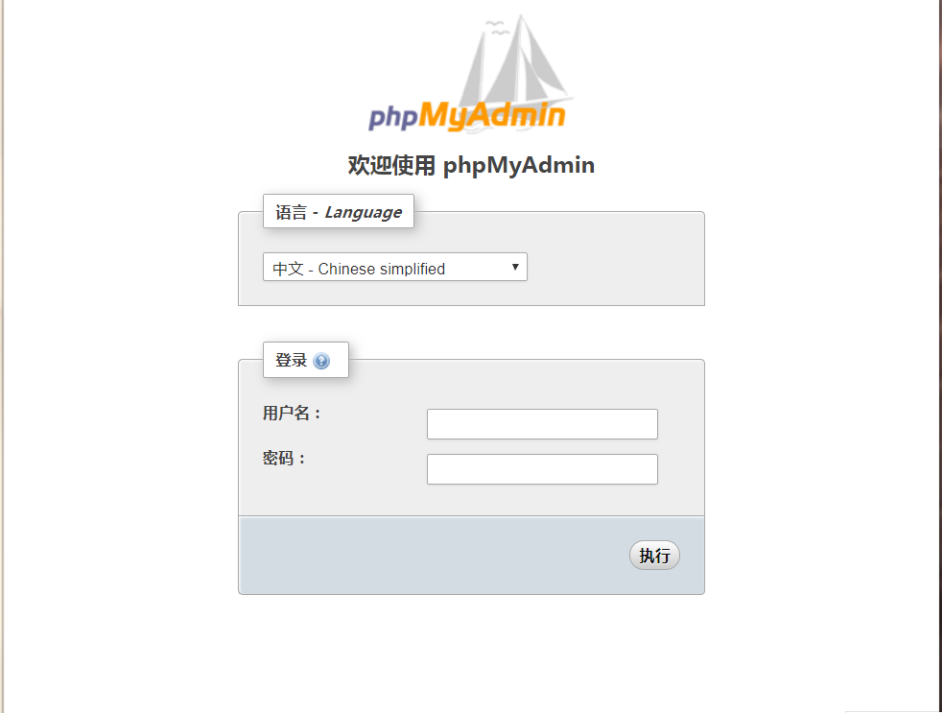
成功!下面進行壓力測試:
[[email protected]~]# ab -c 1000 -n 10000 http://www1.link.com/wordpress
Thisis ApacheBench, Version 2.3 <$Revision:1430300 $>
Copyright1996 Adam Twiss, Zeus Technology Ltd, http://www.zeustech.net/
Licensedto The Apache Software Foundation, http://www.apache.org/
Benchmarkingwp.linuxidc.com (be patient)
Completed1000 requests
Completed2000 requests
Completed3000 requests
Completed4000 requests
Completed5000 requests
Completed6000 requests
Completed7000 requests
Completed8000 requests
Completed9000 requests
Completed10000 requests
Finished10000 requests
ServerSoftware: Apache/2.4.6
ServerHostname: www1.link.com
ServerPort: 80
DocumentPath: /wordpress
DocumentLength: 239 bytes
ConcurrencyLevel: 1000
Timetaken for tests: 3.081 seconds
Completerequests: 10000
Failedrequests: 0
Writeerrors: 0
Non-2xxresponses: 10002
Totaltransferred: 4690938 bytes
HTMLtransferred: 2390478 bytes
Requestsper second: 3245.20 [#/sec] (mean)
Timeper request: 308.147 [ms] (mean)
Timeper request: 0.308 [ms] (mean,across all concurrent requests)
Transferrate: 1486.63 [Kbytes/sec] received
從這段測試可以看出,沒用加速比我們之前的測試的都要快!
五、在php服務器172.16.1.2上安裝xcache進行緩存加速
1、安裝php-xache
[[email protected]~]# yum -y install php-xcache
[[email protected]~]# systemctl restart php-fpm.service
2、編輯配置文件,把緩存大小調大測試效果
[[email protected]~]# vim /etc/php.d/xcache.ini
xcache.size = 300M
3、壓力測試:
[[email protected]~]# ab -c 1000 -n 10000 http://www1.link.com/wordpress
Thisis ApacheBench, Version 2.3 <$Revision:1430300 $>
Copyright1996 Adam Twiss, Zeus Technology Ltd, http://www.zeustech.net/
Licensedto The Apache Software Foundation, http://www.apache.org/
Benchmarkingwp.linuxidc.com (be patient)
Completed1000 requests
Completed2000 requests
Completed3000 requests
Completed4000 requests
Completed5000 requests
Completed6000 requests
Completed7000 requests
Completed8000 requests
Completed9000 requests
Completed10000 requests
Finished10000 requests
ServerSoftware: Apache/2.4.6
ServerHostname: www1.link.com
ServerPort: 80
DocumentPath: /wordpress
DocumentLength: 239 bytes
ConcurrencyLevel: 1000
Timetaken for tests: 3.076 seconds
Completerequests: 10000
Failedrequests: 0
Writeerrors: 0
Non-2xxresponses: 10012
Totaltransferred: 4695628 bytes
HTMLtransferred: 2392868 bytes
Requestsper second: 3250.70 [#/sec] (mean)
Timeper request: 307.626 [ms] (mean)
Timeper request: 0.308 [ms] (mean,across all concurrent requests)
Transferrate: 1490.63 [Kbytes/sec]received
ConnectionTimes (ms)
min mean[+/-sd] median max
Connect: 0 46 208.7 2 3011
Processing: 0 69191.8 31 1575
Waiting: 0 68 191.7 31 1574
Total: 21 115 337.5 34 3040
通過測試對比,可以看到apache請求該頁面的吞吐率,發現啟用xcache後Requests per second有所提高,所以性能更好!
本文出自 “12657170” 博客,請務必保留此出處http://12667170.blog.51cto.com/12657170/1965820
httpd, php, mariadb分離式的部署在三臺主機上測試性能
