
Database 2 Day DBA guide_Chapter2
website:http://www.oracle.com/webfolder/technetwork/tutorials/obe/db/11g/r2/2day_dba/install/install.htm
Chapter 2: Installing Oracle Software and Building the Database
第二章:安裝Oracle軟件和建造數據庫。
Purpose
目的
This chapter shows you how to use the Oracle Universal Installer (OUI) to install your Oracle database software and create a starter database. You will also learn how you can use the Database Configuration Assistant (DBCA) to create additional databases.
這個章節展示你如何的使用oracle通用安裝安裝你的數據庫軟件和創建一個啟動數據庫。你也會學習到如何使用數據庫配置助手(DBCA)創建另外的數據庫。
Approximately 2 hours
大約2小時。
This tutorial covers the following topics: 這個手冊覆蓋到下面的主題。
| Prerequisites 前期準備 | |
| Installing the Software Using the Oracle Universal Installer (OUI) 使用oracle通用安裝(OUI)安裝軟件 |
|
|
Using the Database Configuration Assistant (DBCA) to Create a Database 使用數據庫配置助手創建一個數據庫。 |
|
| Summary 總結 |
Viewing Screenshots 查看屏幕截圖
![]() Place the cursor over this icon to load and view all the screenshots for this tutorial. (Caution: This action loads all screenshots simultaneously, so response time may be slow depending on your Internet connection.)
Place the cursor over this icon to load and view all the screenshots for this tutorial. (Caution: This action loads all screenshots simultaneously, so response time may be slow depending on your Internet connection.)
放置那個關標通過圖表為了加載所有這個手冊的屏幕截圖。(註意:這個動作加載所有的屏幕截圖同時的,所以響應時間可以好是慢的依賴於你的網絡連接。)
Note: Alternatively, you can place the cursor over an individual icon in the following steps to load and view only the screenshot associated with that step. You can hide an individual screenshot by clicking it.
註意:選擇性的,你可以放置你的光標通過一個單個的圖標,在下面的步驟為了加載和查看唯一的關聯的屏幕截圖。你可以隱藏當個屏幕截圖通過點擊它。
Prerequisites 前期準備。
Before you perform this tutorial, you should: 在完成這個手冊之前,你應該:
| 1. |
General computer knowledge. 常規的電腦知識。 |
|
| 2. |
Familiarity with basic product installs. 相似的基礎產品安裝。 |
|
Back to Topic List
返回的主題。
You can use the Oracle Universal Installer (OUI) to install your Oracle software . The OUI is a GUI tool that enables you to view the Oracle software that is installed on your machine, install new Oracle
software, and delete Oracle software that you no longer intend to use. There are two methods that you can use to install the Oracle software: basic and advanced. Choose the basic installation method to
quickly the install the software with minimal user input. The advanced installation method enables you to perform a custom installation.
你可以使用orcle 通用安裝為了安裝你的oracle軟件。那個oracle通用安裝是一個圖形用戶工具使你能夠觀看安裝在你的機器oracle軟件那個是,安裝新的oracle軟件和刪除oracle軟件那個你不在打算使用它。這裏有兩種方法那個你可以使用為了安裝那個oracle數據庫的軟件:基礎和高級。選擇基礎安裝方法為了快速的安裝那個軟件伴隨著用戶最小的輸入。
| A | Basic Installation 基礎安裝。 |
| B. | Advanced Installation 高級安裝。 |
Back to Topic List
Basic Installation 基礎安裝。
Follow the steps below to install the Oracle software and create a database using the basic installation method.
順著那個下面的步驟為了安裝你的oracle軟件和創建一個數據庫使用基本的安裝方法。
(Note: The Sample Schemas are not installed by default using the Basic Installation option): 註意這個示例模式不是被安裝通過默認使用的基本安裝選項。
| 1. |
Log onto you computer as a member of the administrative group that is authorized to install Oracle software and create and run the database. 登進你的電腦成為一個管理組的成員那個是被授權安裝oracle軟件和創建和運行那個數據庫。
|
|
| 2. |
Insert the distribution CD for the database into your CD drive. The Autorun window will appear automatically. 插入那個分布式的CD為了數據庫進入CD驅動。那個自動的運行窗口會出現自動的。 Note: If you are downloading from Oracle’s download site, follow the instructions given on the Web site. 註意:如果你是下載從oracle下載網站,下面的指導給那個網址。
|
|
| 3. |
At the Configure Security Updates window, enter your e-mail address and Oracle Support password and click Next. 在那個配置安全更新窗口,輸入你的電子郵箱和oracle支持的密碼和點擊下一步。 If you choose to not supply your email address and Oracle Support password, uncheck the check box, leave both text boxes empty, then click Next. When prompted, click Yes. 如果你選擇不提供你的電子郵箱地址和oracle支持密碼,未檢查那個檢查盒子,離開兩個文本盒子是空的,然後點擊下一步,當被提醒點擊是。
|
|
| 4. |
At the Installation Option window, select Create and configure a database and click Next. 在安裝選擇窗口,選擇創建和配置一個數據庫並且點擊下一步。
|
|
| 5. |
At the System Class window, select Server Class and click Next. 在系統級別窗口,選擇服務器並且點擊下一步。
|
|
| 6. |
At the Grid Options window, select Single instance database installation and click Next. 在網格選項窗口,選擇單實例數據庫安裝並且點擊下一步。
|
|
| 7. |
At the Install Type window, select Typical install and click Next. 在安裝類型窗口,選擇典型安裝和點擊下一步。
|
|
| 8. |
At the Typical Installation window, enter an Administrative Password. Enter it a second time to confirm the password and click Next. 在典型安裝窗口,輸入管理員的密碼,第二次輸入為了確認密碼和點擊下一步。 Note that the password is evaluated to make sure that it conforms to Oracle recommended standards. If it is not, you will receive an error window asking if you would like to proceed. 註意:那個密碼是評估確保它一致的與oracle推薦的密碼。如果他不是你會收到一個錯誤窗口是否你想要繼續。
|
|
| 9. |
At the Create Inventory window, accept the defaults and click Next. 在創建詳細目錄窗口,接受默認的和點擊繼續。
|
|
| 10. |
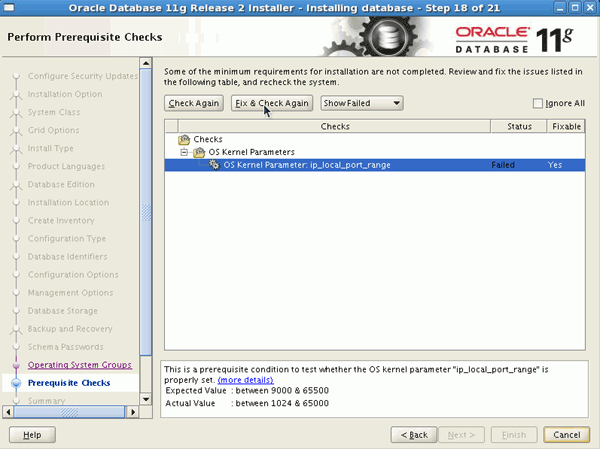
At the Prerequisite Checks window, you see a list of issues that were not met. Issues which can be resolved by the OUI are listed with Yes in the Fixable column. To allow the OUI to generate a script to fix the fixable issues, click Fix and Check Again. 在那個前期準備窗口,你看問題的列表那個不是滿足的。問題那個可以被解決通過oracle通用安裝是那個列表伴隨著是在fixable列。為了允許oracle通用安裝生成一個腳本修復那個可固定的問題,點擊修復和檢查在一次。
|
|
| 11. |
The Execute Fixup Scripts window will appear, providing instructions. 執行修正腳本窗口會出現下面的,提供指示。
|
|
| 12. |
Open a terminal. Change to the OS user root. Then execute the script. 打開終端設備,改變那個操作系統用戶使用root,然後執行那個腳本。 su - root /tmp/CVU_11.2.0.0.2_oracle/runfixup.sh
|
|
| 13. |
Return to the Execute Fixup Scripts window and click OK. 返回修復腳本窗口,點擊OK
|
|
| 14. |
At the Summary window, click Finish. 在那個總結窗口,點擊完成。
|
|
| 15. |
A progress window will appear. 那個進程窗口會出現。
|
|
| 16. |
After the software is installed, the Database Configuration Assistant will begin and create your database. 之後軟件被安裝,那個數據庫配置助手會開始和創建你的數據庫。
|
|
| 17. |
The database was created successfully. Click Close. 數據庫被創建完成點擊關閉。
|
|
| 18. |
You need to execute a couple of scripts as the root user. 你需要執行一些腳本當成root用戶。
|
|
| 19. |
Open a terminal window and execute the following commands: 打開終端窗口和執行下面的命令。 su -
|
|
| 20. |
Return to the Execute Configuration Script window and click OK. 返回執行配置腳本窗口和點擊OK
|
|
| 21. |
Your installation and database creation completed successfully. click Close. 你安裝和數據庫創建完成成功的,點擊關閉
|
|


Back to Topic
Advanced Installation 高級安裝
Follow the steps below to install the Oracle software and create a database using the advanced installation method.
跟著下面的步驟安裝oracle軟件和創建一個數據庫使用高級的安裝方法。
Note: If you performed the Basic Installation steps, you do not need to complete this section. 註意:如果你完成那個基礎的安裝步驟,你不需要完成下面這部分。
| 1. |
Log onto you computer as a member of the administrative group that is authorized to install Oracle software and create and run the database. 登進你的計算機是一個成員管理員組的那個是被授權為了安裝oracle軟件 創建和運行數據庫。
|
|
| 2. |
Insert the distribution CD for the database into your CD drive. The Autorun window will appear automatically. 插入那個分布CD為了那個數據庫進入你的CD驅動。那個自動窗口會出現自動的。 Note: If you are downloading from Oracle’s download site, follow the instructions given on the Web site. 註意:如果你是下載從oracle的下載地址,遵循那個網站上的指導。
|
|
| 3. |
At the Configure Security Updates window, enter your e-mail address and Oracle Support password and click Next. If you choose to not supply your email address and Oracle Support password, uncheck the check box, leave both text boxes empty, then click Next. When prompted, click Yes. 在配置安全更新窗口中,鍵入你的電子郵件地址和oracle支持的密碼點擊下一步。如果你選擇不提供你的電子郵件和oracle支持的密碼,不選那個選擇窗口。離開文本盒子空的,然後點擊下一步。當提醒的時候,點擊是。
|
|
| 4. |
At the Installation Option window, select Create and configure a database and click Next. 在安裝選項窗口,選擇創建和配置一個數據庫點擊下一步。
|
|
| 5. |
At the System Class window, select Server Class and click Next. 在系統級窗口,選擇服務級別和點擊下一步。
|
|
| 6. |
At the Grid Options window, select Single instance database installation and click Next. 在網格選擇窗口,選擇單實例數據庫安裝和點擊下一步。
|
|
| 7. |
At the Install Type window, select Advanced install and click Next. 在那個安裝類型窗口,選擇高級安裝和點擊下一步。
|
|
| 8. |
At the Product Languages window, select the Move All button to select all the languages. 在產品語言窗口,選擇那個移動所有的按鈕to選擇所有的語言。
|
|
| 9. |
Click Next. 點擊下一步。
|
|
| 10. |
At the Database Edition window, make sure that Enterprise Edition is selected and click Next. 在數據庫版本窗口,確保企業版本被選擇和點擊下一步。
|
|
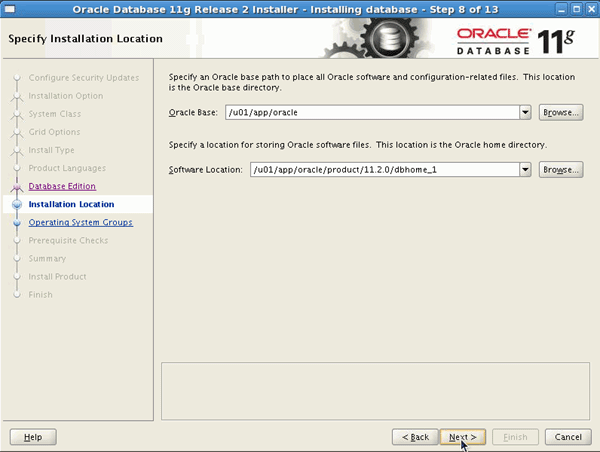
| 11. |
At the Installation Location window, accept the defaults and click Next. 在那個安裝定位窗口,接受默認和點擊下一步。
|
|
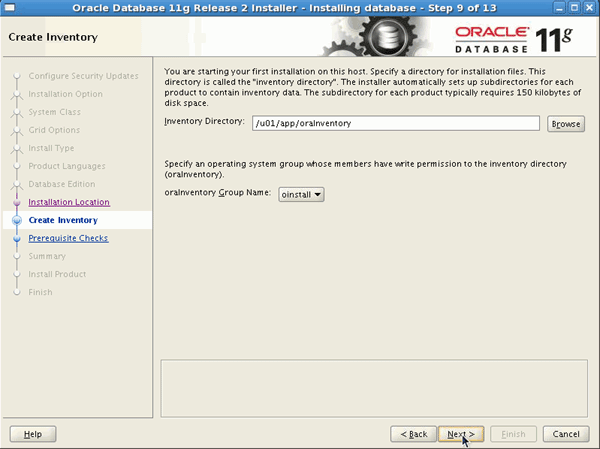
| 12. |
At the Create Inventory window, accept the defaults and click Next. 在創建詳細目錄窗口,接受默認和點擊下一步。
|
|
| 13. |
At the Configuration Type window, make sure the type of database is set to General Purpose / Transaction Processing and click Next. 在配置類型窗口,確保那個數據庫類型是集合為了常規的目的/事物的進程和點擊下一步。
|
|
| 14. |
At the Database Identifier window, accept the defaults and click Next. 在數據庫標識符窗口,接收默認和點擊下一步。
|
|
| 15. |
At the Configuration Options window, for the memory tab, you will accept the defaults. Click the Character sets tab. 在配置選項窗口,為了存儲標簽欄,你會接受那個默認的。點擊那個字符集合頁簽。
|
|
| 16. |
Change the setting to Use Unicode (AL32UTF8) and click the Security tab. 選擇那個集合為AL32UTF8和點擊安全標簽。
|
|
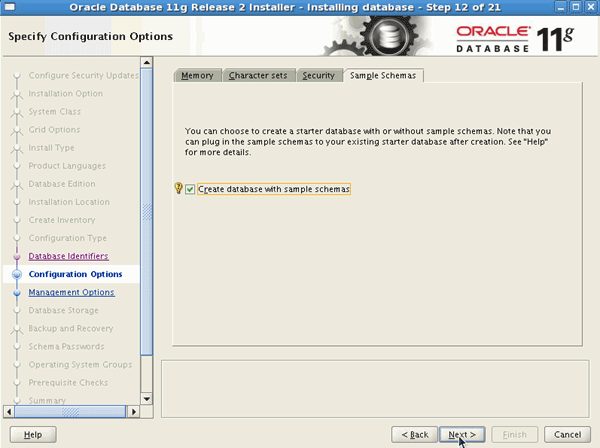
| 17. |
Accept the default and click the Sample Schema tab. 接受默認的和點擊示例模式標簽。
|
|
| 18. |
Select the Create database with sample schema check box and click Next. 選擇那個創建數據庫示例模式驗證盒子和點擊下一步。
|
|
| 19. |
At the Management Options window, accept the defaults and click Next. 在那個管理選項窗口,接受那個默認和點擊下一步。
|
|
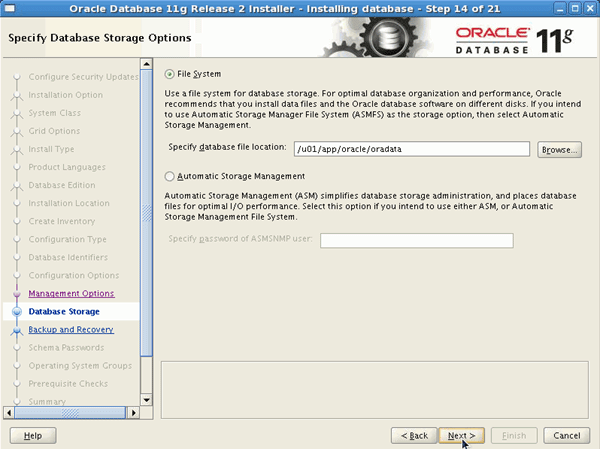
| 20. |
At the Database Storage window, accept the defaults and click Next. 在數據庫存儲窗口,接受那個默認的和點擊下一步。
|
|
| 21. |
At the Backup and Recovery window, accept the defaults and click Next. 在那個恢復和備份窗口,接受默認的和點擊下一步。
|
|
| 22. |
At the Schema Passwords window, select Use the same password for all accounts and enter an Oracle Recommended password and confirm password and click Next. 在那個模式密碼窗口,選擇使用相同的密碼為了所有的賬號和輸入一個oracle推薦的密碼並且確認密碼和點擊下一步。
|
|
| 23. |
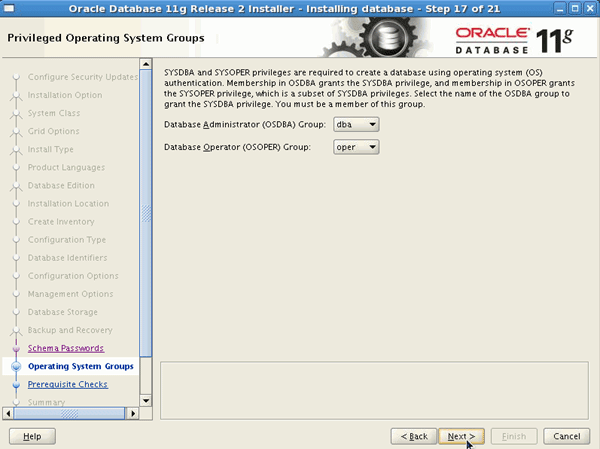
At the Operating System Groups window, accept the defaults and click Next. 在操作系統組窗口,接受默認的和點擊下一步。
|
|
| 24. |
At the Prerequisite Checks window, you see a list of issues that were not met. Issues which can be resolved by the OUI are listed with Yes in the Fixable column. To allow the OUI to generate a script to fix the fixable issues, click Fix and Check Again. 在那個先決條件窗口,你看問題列表不滿足的。問題可以被解決通過oracle列表帶著是在能夠修復字段裏面。允許oracle通用安裝生成腳本為了修復那個可修復的問題。點擊修復和檢查在一次。
|
|
| 25. |
The Execute Fixup Scripts window will appear, providing instructions. 執行修復腳本窗口會出現,提供指導。
|
|
| 26. |
Open a terminal. Change to the OS user root. Then execute the script. 打開終端,改變你的操作系統用戶root然後執行下面腳本。 su - root /tmp/CVU_11.2.0.0.2_oracle/runfixup.sh
|
|
| 27. |
Return to the Execute Fixup Scripts window and click OK. 返回執行修正腳本窗口和點擊OK
|
|
| 28. |
At the Summary window, click Finish. 在總結窗口,點擊完成。
|
|
| 29. |
A progress window will appear. 一個進程窗口會出現。
|
|
| 30. |
After the software is installed, the Database Configuration Assistant will begin and create your database. 軟件安裝之後,數據庫配置助手會開始和創建你的數據庫。
|
|
| 31. |
The database was created successfully. Click Close. 那個數據庫被創建成功。點擊關閉。
|
|
| 32. |
You need to execute a couple of scripts as the root user. 你需要執行一些腳本使用那個root用戶。
|
|
| 33. |
Open a terminal window and execute the following commands: 打開那個終端和執行下面的命令。 su -
|
|
| 34. |
Return to the Execute Configuration Script window and click OK. 返回執行配置腳本窗口和點擊OK
|
|
| 35. |
Your installation and database creation completed successfully. click Close. 你安裝和數據庫創建被完成成功的,點擊關閉。
|
|


Back to Topic
If you choose to install software only and later create a database, or if you want to create additional databases using the software that you just installed, you can do so by using the Database Configuration Assistant (DBCA).
如果你選擇安裝軟件僅僅稍後創建數據庫,或者你想要創建另一個數據庫使用那個軟件你僅僅安裝的。你可以如此的做通過使用數據庫配置助手。
Note: If you created a database as part of the Basic Installation or Advanced Installation, you do not need to complete this section.
註意:如果你創建一個數據庫是基礎安裝和高級安裝的部分,你不需要完成這個部分。
Follow the steps below to create a new database or a second database if you created a database as part of the software installation:
隨著下面的步驟為了創建一個新的數據庫或者第二個數據庫如果你創建一個數據庫成為軟件安裝的部分。
| 1. |
Log onto your computer as a member of the administrative group that is authorized to install Oracle software and create and manage the database. 搭建你的電腦成為管理員的組那個是被授權為了安裝oracle軟件,創建和管理那個數據庫。 |
| 2. |
Launch the DBCA on a Linux or UNIX operating system by entering the following at a command prompt: 開啟那個數據庫配置助手在linux或者unix操作系統通過鍵入下面的提醒的命令。 dbca
|
| 3. |
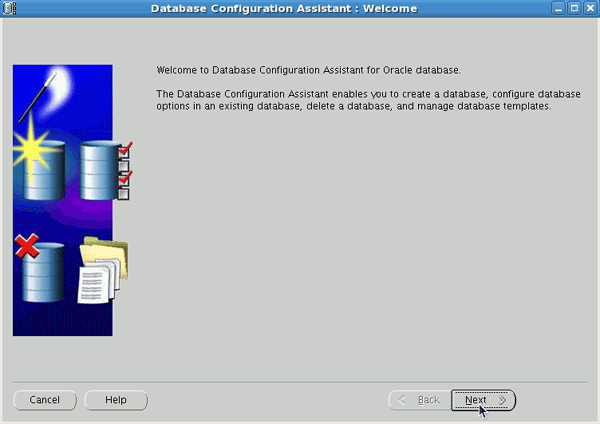
The Welcome window appears. Click Next. 歡迎窗口出現,點擊下一步。
|
| 4. |
Select Create a Database in the Operations window to begin a process that enables you to configure and create a database. Click Next. 選擇創建一個數據庫在那個操作系統窗口,開始那個進程使你能夠配置和創建一個數據庫。點擊下一步。
|
| 5. |
On the Database Templates window, select the type of database template to be used in creating the database. You can click Show Details to see the configuration for each type of database. Choose the template suited to the type of workload your database will support. If you are not sure, select the default General Purpose or Transaction Processing template. Click Next. 在數據庫模板窗口,選擇那個數據庫模板類型使用創建那個數據庫。你可以點擊顯示詳細看那個配置每一個數據庫的類型。選擇那個適合的你會支持數據庫工作量類型。如果你不確信你需要什麽樣的數據庫,選擇那個默認的常規目的或者事物處理的模板。點擊下一步。
|
| 6. |
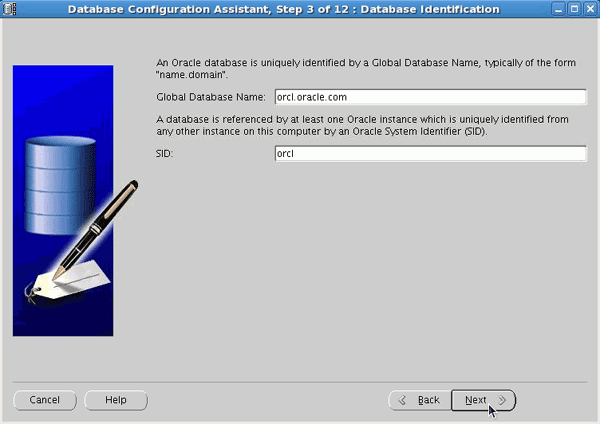
On the Database Identification window, enter a Global Database Name and SID. Click Next. 在數據庫驗證窗口,鍵入全庫名字和系統ID。點擊下一步。 Note: If you created a database as part of your installation of the Oracle software and you are creating a second database with DBCA, you must choose a different global database name and SID for your second database. 註意:如果你創建一個數據庫作為一部分安裝oracle軟件。你創建第二個數據庫使用數據庫配置助手。你必須是不一樣的SID名字為了你的第二個庫。
|
| 7. |
The Management Options window appears. To use Enterprise Manager, select Configure Enterprise Manager. Select Configure Database Control for local management to manage your database locally as appropriate to your configuration. Click Next. 那個管理選項窗口出現,為了使用企業管理,選擇配置企業管理。選擇配置數據庫控制關於本地管理,管理你的數據庫本地地是恰當的對於你的配置。點擊下一步。
|
| 8. |
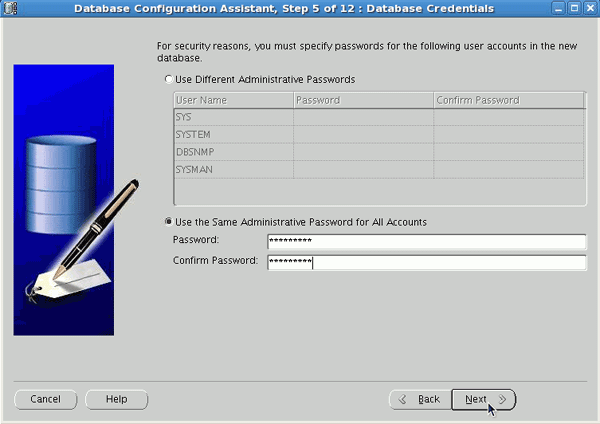
On the Database Credentials window, you can choose to use different administrative passwords or use the same password for all accounts. Select one of the options and enter your password data. Click Next. 在數據庫憑證窗口,你可以選擇使用不同的管理的密碼或者使用相同的密碼為了所有的賬號。選擇選項之一和鍵入你的密碼。點擊下一步。
|
| 9. |
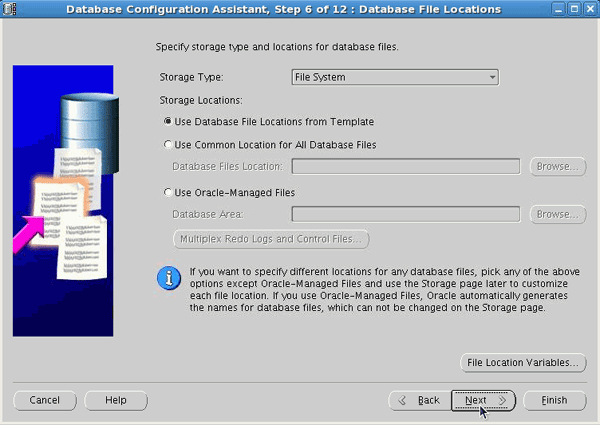
For storage options, select File System, Automatic Storage Management, or Raw Devices as appropriate to your environment. Click Next. 關於存儲選項,選擇文件系統,自動存儲管理,或者裸設備成為你恰當對於你的環境。點擊下一步。
|
| 10. |
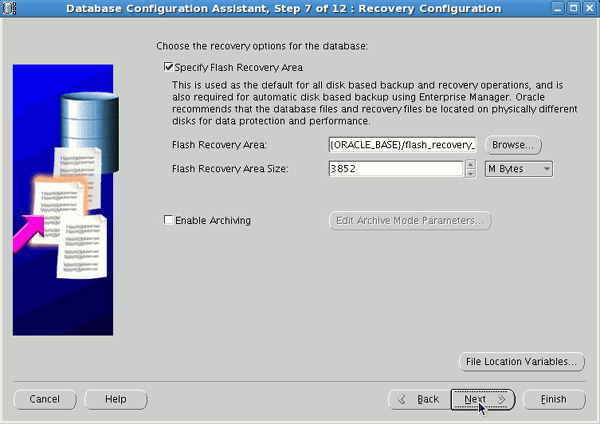
Select Specify Flash Recovery Area and enter a directory location and size. You may also choose to Enable Archiving to place your database in ARCHIVELOG mode. Click Next. 選擇指定閃回區域和鍵入目錄位置和大小。你也可以選擇啟動歸檔放置你的數據庫在歸檔日誌模式。點擊下一步。
|
| 11. |
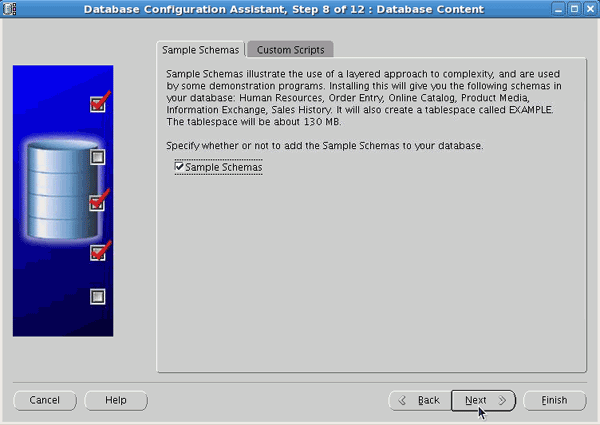
Select Sample Schemas if you want to include the Sample Schemas (EXAMPLE) tablespace in your database. Click Next. 選擇示例模式如果你想要包括那個示例模式(例如)表空間在你的數據庫。點擊下一步。
|
| 12. |
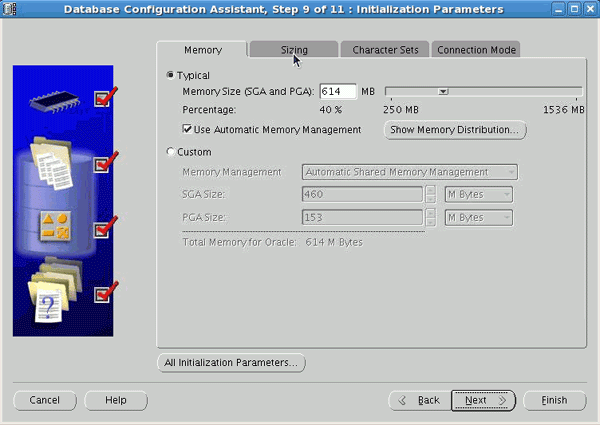
The Memory window appears. Select Typical and enter a Memory Size (SGA and PGA). Click the Sizing tab. 內存窗口出現。選擇典型和鍵入你的內存大小(系統全局域和程序全局域)。點擊那個大小標簽。
|
| 13. |
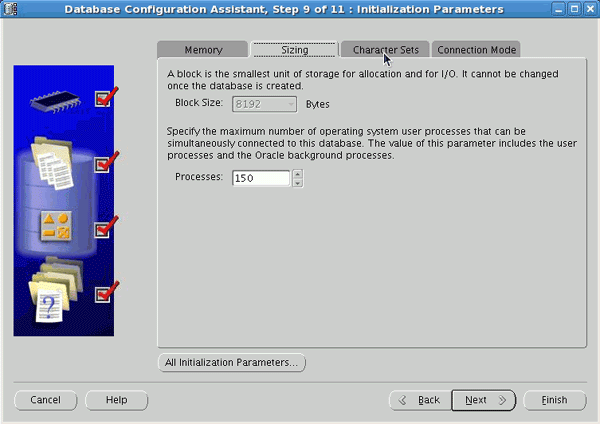
The Sizing window appears. Specify the smallest block size and the maximum number of operating system user processes that can simultaneously connect to the database. 那個大小窗口出現。指定那個最小的塊大小和最大數量操作系統進程那個你可以同時的連接到那個數據庫。 Note: You cannot specify the block size if you are using a template. 註意:如果不能指定那個塊的大小你可以使用那個模板。 Click the Character Sets tab. 點擊那個字符集標簽。
|
| 14. |
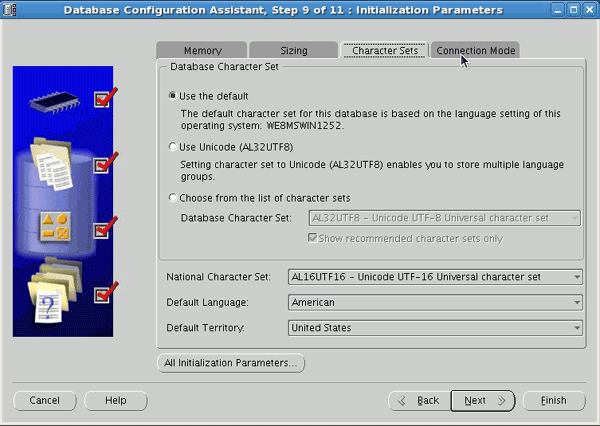
The Character Sets window appears. Select the character set for your database. Click the Connection Mode tab. 那個字符集窗口出現。選擇那個字符集對於你的數據庫。點擊那個連接模式標簽。
|
| 15. |
The Connection Mode window appears. Select Dedicated Server Mode or Shared Server Mode as appropriate for your environment. Click Next. 連接模式窗口出現。選擇指定服務器模式或者共享服務器模式成為合適的對於你的環境。點擊下一步。
|
| 16. |
On the Database Storage window, you can specify storage parameters for the database creation. Accept the default values. Click Next. 在數據庫存儲窗口,你可以指定存儲參數為了你的數據庫創建。接受那個默認的值。點擊下一步。
|
| 17. |
On the Creation Options window, select Create Database to create your database. You can also select Save as a Database Template to save your configuration. Click Finish. 在創建選擇窗口,選擇創建數據庫創建一個你的數據庫。你也可以選擇保存成為數據庫模板為了保存你的配置。點擊完成。
|
| 18. |
At the Confirmation window, confirm the options that will be installed and click OK. 在那個確認窗口,確認選項那個會被安裝點擊OK。
|
| 19. |
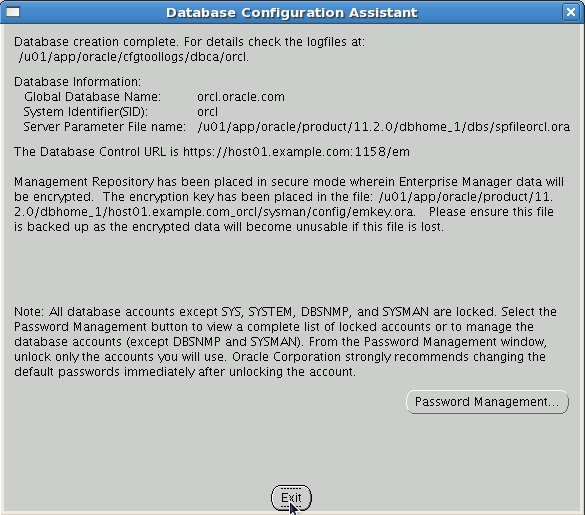
Your database is now being created. 你的數據庫現在被創建了。
After the database is created, you can change or unlock your passwords or click Exit. 之後數據庫被創建,你可以改變或者解鎖你的密碼或者點擊退出。
|


Back to Topic List
In this tutorial, you learned how to: 在這個手冊中你學會了如何的:
| Install the basic version of the database. 安裝數據庫的基本版本。 | ||
|
Install the advanced version of the database including running the Database Configuration Assistant. 安裝高級版本數據庫包括運行那個數據庫配置助手。 |
||
|
Create a database using the Database Configuration Assistant. 創建數據庫使用數據庫配置助手。 |
||
Back to Topic List
 Place the cursor over this icon to hide all screenshots. 放置光標通過這個圖標為了隱藏你所有的屏幕截圖。
Database 2 Day DBA guide_Chapter2