mybatis學習(十一)——springmvc++spring+mybatis整合
做任何一個項目都以一個需求,這裏先定義一下需求:利用三大框架查詢酒店列表。
一、搭建開發環境
1、創建一個web項目

我這裏用的是 jdk1.8+tomact7.0
2、創建hotel表
CREATE TABLE `hotel` ( `id` int(11) NOT NULL, `hotel_name` varchar(20) NOT NULL, `hotel_address` varchar(20) DEFAULT NULL, `city_code` int(3) DEFAULT NULL, `price` int(11) NOT NULL, `creat_time`timestamp NOT NULL DEFAULT CURRENT_TIMESTAMP ON UPDATE CURRENT_TIMESTAMP, `update_time` timestamp NOT NULL DEFAULT CURRENT_TIMESTAMP, PRIMARY KEY (`id`), ) ENGINE=InnoDB DEFAULT CHARSET=utf8;
添加一些數據

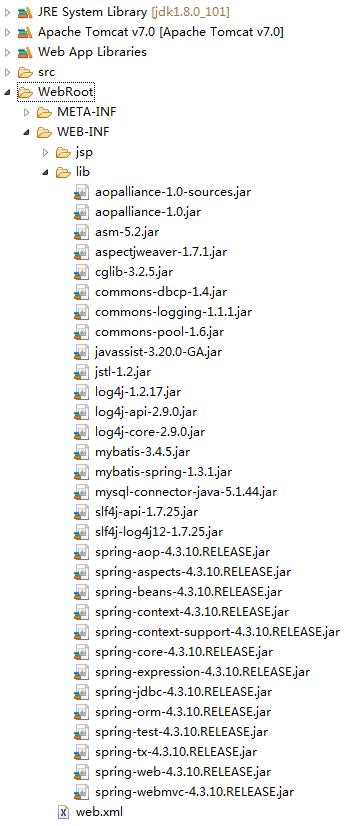
3、添加Springmvc+Spring+mybatis+sql的jar包,新建一個lib目錄

二、編寫配置文件
主要有以下配置文件web.xml,Springmvc的配置文件,mybatis的配置文件,數據源配置文件
這裏沒使用maven,不然還有pom.xml文件
1、web.xml
<?xml version="1.0" encoding="UTF-8"?> <web-app xmlns:xsi="http://www.w3.org/2001/XMLSchema-instance" xmlns="http://java.sun.com/xml/ns/javaee" xsi:schemaLocation="http://java.sun.com/xml/ns/javaee http://java.sun.com/xml/ns/javaee/web-app_3_0.xsd" version="3.0"> <!-- 加載spring容器 --> <context-param> <param-name>contextConfigLocation</param-name> <param-value>/WEB-INF/classes/config/root-context.xml</param-value> </context-param> <listener> <listener-class>org.springframework.web.context.ContextLoaderListener</listener-class> </listener> <!-- spring mvc --> <servlet> <!--前端控制器配置 --> <servlet-name>ssm</servlet-name> <servlet-class>org.springframework.web.servlet.DispatcherServlet</servlet-class> <init-param> <param-name>contextConfigLocation</param-name> <!-- springmvc配置文件地址 --> <param-value>classpath:config/springmvc-context.xml</param-value> </init-param> <!-- 啟動優先級配置 --> <load-on-startup>1</load-on-startup> <async-supported>true</async-supported> </servlet> <servlet-mapping> <servlet-name>ssm</servlet-name> <url-pattern>/</url-pattern> </servlet-mapping> </web-app>
2、springmvc-context.xml配置
<?xml version="1.0" encoding="UTF-8"?>
<beans xmlns="http://www.springframework.org/schema/beans"
    xmlns:xsi="http://www.w3.org/2001/XMLSchema-instance" xmlns:context="http://www.springframework.org/schema/context"
    xmlns:mvc="http://www.springframework.org/schema/mvc" xmlns:task="http://www.springframework.org/schema/task"
    xmlns:jee="http://www.springframework.org/schema/jee" xmlns:aop="http://www.springframework.org/schema/aop"
    xsi:schemaLocation="
    http://www.springframework.org/schema/beans http://www.springframework.org/schema/beans/spring-beans-4.3.xsd
    http://www.springframework.org/schema/context http://www.springframework.org/schema/context/spring-context-4.3.xsd
    http://www.springframework.org/schema/mvc  http://www.springframework.org/schema/mvc/spring-mvc-4.3.xsd
    http://www.springframework.org/schema/task http://www.springframework.org/schema/task/spring-task-4.3.xsd
     http://www.springframework.org/schema/aop http://www.springframework.org/schema/aop/spring-aop-4.3.xsd
    http://www.springframework.org/schema/jee http://www.springframework.org/schema/jee/spring-jee-4.3.xsd">
    <!--掃描controller組件 -->
    <context:component-scan base-package="com.pjf.ssm.controller" />
    <!-- 視圖解析器配置 -->
    <bean
        class="org.springframework.web.servlet.view.InternalResourceViewResolver" />
    <!-- 控制器映射器控制器適配器配置 -->
    <mvc:annotation-driven></mvc:annotation-driven>
</beans>
3、mybatis-context.xml
因為是和spring的結合,這裏大部分的配置都省略了,在Spring配置文件中配置。
<?xml version="1.0" encoding="UTF-8"?>
<!DOCTYPE configuration
    PUBLIC "-//mybatis.org//DTD Config 3.0//EN"
    "http://mybatis.org/dtd/mybatis-3-config.dtd">
<configuration>

    <!-- 配置mapper 使用spring和mybatis的整合包進行掃描,這裏不需要配置 必須遵循mapper.xml文件和mapper.java同名 -->

    <!-- 全局的setting配置 比如二級緩存的時候這裏就需要配置 -->

    <!-- 別名的配置 -->
    <typeAliases>
        <package name="com.tuniu.ssm.po" />
    </typeAliases>

</configuration>
4、db.properties配置
在Spring配置文件之前,必須先要配置數據源
jdbc.driver=com.mysql.jdbc.Driver
jdbc.url=jdbc:mysql://localhost:3306/spring_mybatis
jdbc.name=root
jdbc.password=pjf520
5、spring配置文件 root-context.xml
<?xml version="1.0" encoding="UTF-8"?>
<beans xmlns="http://www.springframework.org/schema/beans"
    xmlns:xsi="http://www.w3.org/2001/XMLSchema-instance" xmlns:context="http://www.springframework.org/schema/context"
    xmlns:mvc="http://www.springframework.org/schema/mvc" xmlns:task="http://www.springframework.org/schema/task"
    xmlns:tx="http://www.springframework.org/schema/tx" xmlns:jee="http://www.springframework.org/schema/jee"
    xmlns:aop="http://www.springframework.org/schema/aop"
    xsi:schemaLocation="
    http://www.springframework.org/schema/beans http://www.springframework.org/schema/beans/spring-beans-4.3.xsd
    http://www.springframework.org/schema/context http://www.springframework.org/schema/context/spring-context-4.3.xsd
    http://www.springframework.org/schema/mvc  http://www.springframework.org/schema/mvc/spring-mvc-4.3.xsd
    http://www.springframework.org/schema/task http://www.springframework.org/schema/task/spring-task-4.3.xsd
    http://www.springframework.org/schema/tx http://www.springframework.org/schema/tx/spring-tx-4.3.xsd
     http://www.springframework.org/schema/aop http://www.springframework.org/schema/aop/spring-aop-4.3.xsd
    http://www.springframework.org/schema/jee http://www.springframework.org/schema/jee/spring-jee-4.3.xsd">

    <!-- 配置組件掃描器 -->
    <context:component-scan base-package="com.pjf.ssm.service"></context:component-scan>

    <context:property-placeholder location="classpath:db.properties" />

    <!-- 配置數據源 dbcp -->
    <bean id="dataSource" class="org.apache.commons.dbcp.BasicDataSource"
        destroy-method="close">
        <property name="driverClassName" value="${jdbc.driver}" />
        <property name="url" value="${jdbc.url}" />
        <property name="username" value="${jdbc.name}" />
        <property name="password" value="${jdbc.password}" />
        <property name="maxActive" value="30" />
        <property name="maxIdle" value="5" />
    </bean>

    <!-- 配置sqlSessionFactory
             dataSource  數據源配置
             configLocation  mybatis配置文件地址
    -->
    <bean id="sqlSessionFactory" class="org.mybatis.spring.SqlSessionFactoryBean">
        <property name="dataSource" ref="dataSource"></property>
        <property name="configLocation" value="classpath:config/mybatis-context.xml"></property>
    </bean>

    <!-- 配置mapper掃描器
          basePackage  mapper接口和mapper.xml文件的類全名
          sqlSessionFactoryBeanName  sqlsession工廠
    -->
    <bean class="org.mybatis.spring.mapper.MapperScannerConfigurer">
        <!-- s掃描包的路徑,如果有多個,中間用逗號隔開 -->
        <property name="basePackage" value="com.pjf.ssm.dao"></property>
        <property name="sqlSessionFactoryBeanName" value="sqlSessionFactory"></property>
    </bean>

    <!-- 事物管理器 對mybatis操作數據庫的事物控制,spring使用jdbc的事物控制 -->
    <bean id="transactionManager"
        class="org.springframework.jdbc.datasource.DataSourceTransactionManager">
        <!-- 數據源的配置 dataSource在orm-context.xml中配置了 -->
        <property name="dataSource" ref="dataSource"></property>
    </bean>

    <!-- 配置通知 -->
    <tx:advice id="txAdvice" transaction-manager="transactionManager">
        <tx:attributes>
            <tx:method name="query*" propagation="REQUIRED" />
            <tx:method name="add" propagation="REQUIRED" />
            <tx:method name="update" propagation="REQUIRED" />
            <tx:method name="insert*" propagation="REQUIRED" />
            <tx:method name="delete*" propagation="REQUIRED" />
            <tx:method name="find*" propagation="SUPPORTS" read-only="true" />
            <tx:method name="get*" propagation="SUPPORTS" read-only="true" />
            <tx:method name="set*" propagation="SUPPORTS" read-only="true" />
        </tx:attributes>
    </tx:advice>

    <!-- 配置aop -->
    <aop:config>
        <aop:advisor advice-ref="txAdvice"
            pointcut="execution(* com.pjf.ssm.service.impl.*.*(..))" />
    </aop:config>

</beans>
三、編寫代碼

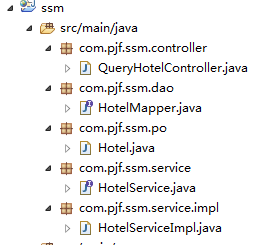
1、hotel.java
package com.pjf.ssm.po;

public class Hotel {
    private int hotelId;
    private String hotelName;
    private String hotelAddress;
    private int price;

    public int getHotelId() {
        return hotelId;
    }

    public void setHotelId(int hotelId) {
        this.hotelId = hotelId;
    }

    public String getHotelName() {
        return hotelName;
    }

    public void setHotelName(String hotelName) {
        this.hotelName = hotelName;
    }

    public String getHotelAddress() {
        return hotelAddress;
    }

    public void setHotelAddress(String hotelAddress) {
        this.hotelAddress = hotelAddress;
    }

    public int getPrice() {
        return price;
    }

    public void setPrice(int price) {
        this.price = price;
    }

}
2、hotel.service接口和實現類
通過@Service("hotelService")在Spring工廠中註冊,就不需要編寫xml文件配置了
通過@Autowired註入hotelMapper類
package com.pjf.ssm.service;

import java.util.List;

import com.pjf.ssm.po.Hotel;

public interface HotelService {

    public List<Hotel> queryHotelList();

}
package com.pjf.ssm.service.impl;

import java.util.List;

import org.springframework.beans.factory.annotation.Autowired;
import org.springframework.stereotype.Service;

import com.pjf.ssm.dao.HotelMapper;
import com.pjf.ssm.po.Hotel;
import com.pjf.ssm.service.HotelService;

//註冊組件
@Service("hotelService")
public class HotelServiceImpl implements HotelService {

    // 自動註入
    @Autowired
    private HotelMapper hotelMapper;

    public List<Hotel> queryHotelList() {

        return hotelMapper.queryHotelList();

    }
}
3、hotelMapper接口和hotelMapper.xml文件
寫了個簡單的查詢語句,這兩個文件必須保吃同名,且在同一個目錄下。
package com.pjf.ssm.dao;

import java.util.List;

import com.pjf.ssm.po.Hotel;

public interface HotelMapper {

    public List<Hotel> queryHotelList();

}
<?xml version="1.0" encoding="UTF-8" ?>
<!DOCTYPE mapper PUBLIC "-//mybatis.org//DTD Mapper 3.0//EN" "http://mybatis.org/dtd/mybatis-3-mapper.dtd" >
<mapper namespace="com.pjf.ssm.dao.HotelMapper">
    <resultMap id="HotelMap" type="com.pjf.ssm.po.Hotel">
        <id column="id" property="hotelId" jdbcType="INTEGER" />
        <result column="hotel_name" property="hotelName" jdbcType="VARCHAR" />
        <result column="hotel_address" property="hotelAddress" jdbcType="VARCHAR" />
        <result column="price" property="price" jdbcType="INTEGER" />
    </resultMap>

   <select id="queryHotelList" resultMap="HotelMap">
    select id,hotel_name,hotel_address,price from hotel
   </select>

</mapper>
4、QueryHotelController .java
package com.pjf.ssm.controller;

import java.util.ArrayList;
import java.util.List;

import com.pjf.ssm.po.Hotel;
import com.pjf.ssm.service.HotelService;

import org.springframework.beans.factory.annotation.Autowired;
import org.springframework.stereotype.Controller;
import org.springframework.web.bind.annotation.RequestMapping;
import org.springframework.web.bind.annotation.RequestMethod;
import org.springframework.web.servlet.ModelAndView;
//使用Controller這個註解來標識這是一個控制器
@Controller
public class QueryHotelController {
    @Autowired
    private HotelService hotelService;

    //酒店列表查詢
    //@RequestMapping實現queryHotelList方法和url進行映射
    //建議將url和方法名一樣,一個方法對應一個url
    @RequestMapping(value = "/queryHotelList", method = RequestMethod.GET)
    public ModelAndView queryHotelList()throws Exception{

        List<Hotel> hotelList = hotelService.queryHotelList();
        ModelAndView modelAndView = new ModelAndView();
        modelAndView.addObject("hotelList",hotelList);
        modelAndView.setViewName("/WEB-INF/jsp/hotel/hotelList.jsp");

        return modelAndView;
    }
}
5、jsp文件編寫
主要是前端的展示,不熟悉html的可以網上copy一份修改下就行了
<%@ page language="java" contentType="text/html; charset=UTF-8"
    pageEncoding="UTF-8"%>
<%@taglib uri="http://java.sun.com/jsp/jstl/core" prefix="c" %>
<%@taglib uri="http://java.sun.com/jsp/jstl/fmt" prefix="fmt" %>
<!DOCTYPE html PUBLIC "-//W3C//DTD HTML 4.01 Transitional//EN" "http://www.w3.org/TR/html4/loose.dtd">
<html>
<head>
<meta http-equiv="Content-Type" content="text/html; charset=UTF-8">
<title>酒店列表</title>
</head>
<body>
<form action="${pageContext.request.contextPath }/queryHotelDetail.action" method="get">


酒店列表:
<table border=1>
<tr>
    <td>酒店id</td>
    <td width=100>酒店名</td>
    <td>酒店地址</td>
    <td>起價</td>
    <td ></td>
</tr>
<c:forEach items="${hotelList}" var="hotel">
<tr>
    <td>${hotel.hotelId }</td>
    <td>${hotel.hotelName }</td>
    <td>${hotel.hotelAddress }</td>
    <td>${hotel.price }</td>
    <td ><input type="submit" value="查看詳情"></td>
</tr>
</c:forEach>
</table>
</form>

</body>
</html>
四、在tomact中測試

在tomact中添加工程ssm,然後右鍵點擊tomact,點擊debug運行,debug模式下修改文件,不需要重啟tomact就可以生效
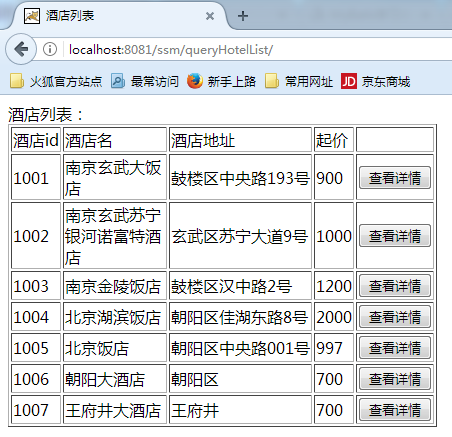
然後在前端輸入地址
http://localhost:8081/ssm/queryHotelList
這裏之所以是8081端口,是因為我本地之前裝了tomact8.0,避免沖突所以修改了默認的8080端口,大家測試可以使用8080.
結果:

mybatis學習(十一)——springmvc++spring+mybatis整合
