初識hibernate——環境搭建
一 配置過程
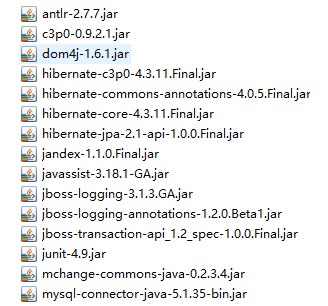
1. 創建一個項目
2. 導包
required裏的包
optional裏的c3p0連接池的三個包
數據庫驅動包
Junit
3.創建Hibernate的配置文件(hibernate.cfg.xml)
4.創建持久化的實體類對象User
5.創建對象與關系型數據庫之間的映射(user.hbm.xml或使用註解)
6.通過Hibernate訪問數據庫
二 示例
配置文件實現:
1.創建項目hibernate-01
2.導入需要的包

3.創建Hibernate的配置文件(hibernate.cfg.xml)
<?xml version="1.0" encoding="UTF-8"?>
<!DOCTYPE hibernate-configuration PUBLIC
    "-//Hibernate/Hibernate Configuration DTD//EN"
    "http://hibernate.sourceforge.net/hibernate-configuration-3.0.dtd">
<hibernate-configuration>
   <session-factory>
        <!-- 數據庫連接 -->
        <property name="connection.driver_class">com.mysql.jdbc.Driver</property>
        <property name="connection.url">jdbc:mysql://localhost:3306/work</property>
        <property name="connection.username">root</property>
        <property name="connection.password">root</property>

        <property name="current_session_context_class">thread</property>

        <!-- 連接池Jdbc connection pool C3P0-->
        <property name="connection.pool_size">1</property>
        <!-- 方言dialect -->
        <property name="dialect">org.hibernate.dialect.MySQLDialect</property>

        <!-- 是否顯示sql語句Echo all executed SQL to stdout -->
        <property name="show_sql">true</property>
		<property name="format_sql">true</property>

		<!-- 同步程序與數據庫中的表 -->
		<property name="hbm2ddl.auto">update</property>

		<!-- 映射文件配置,配置文件名必須包含其相對於根的全路徑 -->
		<mapping resource="com/jn/pojo/user.hbm.xml"/>
    </session-factory>
</hibernate-configuration>
4.創建持久化的實體類對象User
package com.jn.pojo;

public class User {

	private int id;
	private String name;
	private int age;

	public int getId() {
		return id;
	}

	public void setId(int id) {
		this.id = id;
	}

	public String getName() {
		return name;
	}

	public void setName(String name) {
		this.name = name;
	}

	public int getAge() {
		return age;
	}

	public void setAge(int age) {
		this.age = age;
	}

	@Override
	public String toString() {
		return "User [id=" + id + ", name=" + name + ", age=" + age + "]";
	}
}
5.創建對象與關系型數據庫之間的映射(user.hbm.xml)
<?xml version="1.0" encoding="UTF-8"?>
<!DOCTYPE hibernate-mapping PUBLIC "-//Hibernate/Hibernate Mapping DTD 3.0//EN"
"http://hibernate.sourceforge.net/hibernate-mapping-3.0.dtd">

<hibernate-mapping>
	<!-- 配置User類與數據庫表user之間的映射關系 -->
	<class name="com.jn.pojo.User" table="user">
		<!-- 主鍵的配置需要使用id標簽
			在配置主鍵時: 實體類中屬性名, 實體類中屬性的類型
					指定主鍵的創建規則
		 -->
		<id name="id" type="int">
			<column name="id"></column>
			<generator class="native"></generator>
		</id>
		<!-- 配置普通屬性 -->
		<property name="name" type="java.lang.String">
			<column name="name" ></column>
		</property>

		<property name="age" type="int">
			<column name="age" ></column>
		</property>

	</class>
</hibernate-mapping>
6.通過Hibernate訪問數據庫:測試類MainTest.java
package com.jn.test;

import org.hibernate.Session;
import org.hibernate.SessionFactory;
import org.hibernate.boot.registry.StandardServiceRegistryBuilder;
import org.hibernate.cfg.Configuration;
import org.hibernate.service.ServiceRegistry;
import org.junit.Test;

import com.jn.pojo.User;

public class MainTest {

	@Test
	public void test(){

		//1. 加載配置文件, 創建配置對象
		/**
		 * 默認情況下, 如果configure方法調用的是無參的, 則會加載SRC文件夾下的名字為hibernate.cfg.xml的配置文件
		 * 如果配置文件名不是hibernate.cfg.xml, 那麽可以在configure方法中指定配置文件
		 */
		Configuration configuration = new Configuration().configure("hibernate.cfg.xml");

		//2. 創建SessionFactory
		ServiceRegistry sr = new StandardServiceRegistryBuilder().applySettings(configuration.getProperties()).build();

		SessionFactory sessionFactory = configuration.buildSessionFactory(sr);

		//3. 獲取Session對象
		/**
		 * sessionFactory.getCurrentSession(), 獲取當前線程的Session對象
		 */
		Session session = sessionFactory.openSession();

		//4. 操作數據庫
		// 開啟事務
		session.beginTransaction();

		// 創建實體類對象
		User user = new User();

		user.setName("my");
		user.setAge(23);

		// 將實體類對象保存到數據庫中
		/**
		 * save方法會將實體類對象, 保存到數據庫的中表中.
		 * 在這個過程中, 代碼中不需要寫SQL語句, 它的insert語句是由Hibernate根據ORM的關系映射自動創建了
		 */
		session.save(user);

		// 提交事務
		session.getTransaction().commit();

		//5. 關閉對象
		session.close();

		sessionFactory.close();

	}
}
7.項目結構:

註解實現:
1.創建項目hibernate-02
2.導入需要的包

3.創建Hibernate的配置文件(hibernate.cfg.xml)
<?xml version="1.0" encoding="UTF-8"?>
<!DOCTYPE hibernate-configuration PUBLIC
    "-//Hibernate/Hibernate Configuration DTD//EN"
    "http://hibernate.sourceforge.net/hibernate-configuration-3.0.dtd">
<hibernate-configuration>
   <session-factory>
        <!-- 數據庫連接 -->
        <property name="connection.driver_class">com.mysql.jdbc.Driver</property>
        <property name="connection.url">jdbc:mysql://localhost:3306/work</property>
        <property name="connection.username">root</property>
        <property name="connection.password">root</property>

        <property name="current_session_context_class">thread</property>

        <!-- 連接池Jdbc connection pool C3P0-->
        <property name="connection.pool_size">1</property>
        <!-- 方言dialect -->
        <property name="dialect">org.hibernate.dialect.MySQLDialect</property>

        <!-- 是否顯示sql語句Echo all executed SQL to stdout -->
        <property name="show_sql">true</property>
		<property name="format_sql">true</property>

		<!-- 同步程序與數據庫中的表 -->
		<property name="hbm2ddl.auto">update</property>

		<!-- 映射文件配置,配置文件名必須包含其相對於根的全路徑 -->
		<mapping class="com.jn.pojo.User"/>
    </session-factory>
</hibernate-configuration>
4.創建持久化的實體類對象User
package com.jn.pojo;

import javax.persistence.Column;
import javax.persistence.Entity;
import javax.persistence.GeneratedValue;
import javax.persistence.GenerationType;
import javax.persistence.Id;
import javax.persistence.Table;

@Entity
@Table(name="user")
public class User {

	private int id;
	private String name;
	private int age;

	@Id
	@Column(name="id")
	@GeneratedValue(strategy=GenerationType.AUTO)
	public int getId() {
		return id;
	}

	public void setId(int id) {
		this.id = id;
	}

	@Column(nullable=true)
	public String getName() {
		return name;
	}

	public void setName(String name) {
		this.name = name;
	}

	@Column(nullable=true)
	public int getAge() {
		return age;
	}

	public void setAge(int age) {
		this.age = age;
	}

	@Override
	public String toString() {
		return "User [id=" + id + ", name=" + name + ", age=" + age + "]";
	}
}
5.創建對象與關系型數據庫之間的映射(User中註解實現)
6.通過Hibernate訪問數據庫:測試類MainTest.java
package com.jn.test;

import org.hibernate.Session;
import org.hibernate.SessionFactory;
import org.hibernate.boot.registry.StandardServiceRegistryBuilder;
import org.hibernate.cfg.Configuration;
import org.hibernate.service.ServiceRegistry;
import org.junit.Test;

import com.jn.pojo.User;

public class MainTest {

	@Test
	public void test(){

		//1. 加載配置文件, 創建配置對象
		/**
		 * 默認情況下, 如果configure方法調用的是無參的, 則會加載SRC文件夾下的名字為hibernate.cfg.xml的配置文件
		 * 如果配置文件名不是hibernate.cfg.xml, 那麽可以在configure方法中指定配置文件
		 */
		Configuration configuration = new Configuration().configure("hibernate.cfg.xml");

		//2. 創建SessionFactory
		ServiceRegistry sr = new StandardServiceRegistryBuilder().applySettings(configuration.getProperties()).build();

		SessionFactory sessionFactory = configuration.buildSessionFactory(sr);

		//3. 獲取Session對象
		/**
		 * sessionFactory.getCurrentSession(), 獲取當前線程的Session對象
		 */
		Session session = sessionFactory.openSession();

		//4. 操作數據庫
		// 開啟事務
		session.beginTransaction();
		User user = (User) session.get(User.class, 1);  //獲取id為1的user
		System.out.println(user);
		user.setAge(21);
		System.out.println(user);
		// 提交事務
		session.getTransaction().commit();

		//5. 關閉對象
		session.close();

		sessionFactory.close();

	}
}
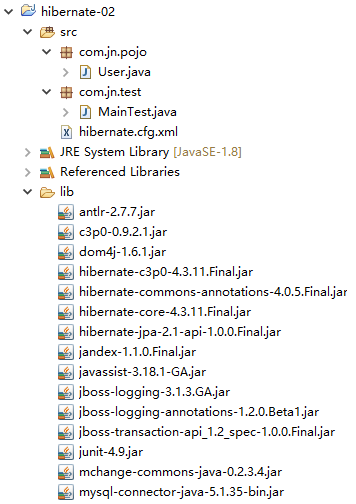
7.項目結構:

三 Hibernate開發步驟—API應用步驟
l 創建hibernate配置,讀取Hibernate配置文件及信息
l 用讀取的配置信息生成SessionFactory對象
l 從SessionFactory對象獲取 一個Session對象
l 用Session對象生成事務
l 通過Session對象的方法進行操作
l 提交或回滾事務
l 釋放session and session factory資源
四 hibernate的優點
(1)首先是開源和免費的License,方便功能定制,需要時可以查看源碼或者修改源碼。
(2)其次它是一個輕量級封裝框架,避免引入過多復雜代碼,減輕程序員調試負擔。
(3)再次它是一個有可擴展性、API開放的框架,可以在功能不夠用時進行其功能的擴展。
(4)最後就是Hibernate的程序開發使用者眾多,促使產品有穩定的發展保證。
初識hibernate——環境搭建
