
Vue框架的使用。
阿新 • • 發佈:2017-11-17
meta 文件名 lose 連接 路由 viewport 分享圖片 測試 對象 
使用VUE首先需要下載安裝一些列的環境。
第一步:
安裝Node.js
下載並安裝:node-v8.9.0-x64.msi
第二步:
安裝Vue腳手架:
cmd以管理員身份執行
npm install vue-cli -g 或者安裝淘寶版 cnpm install vue-cli -g
vue -V 查看是否安裝成功
第三步:
創建項目:
vue init webpack myProject (項目名字)
提示內容:
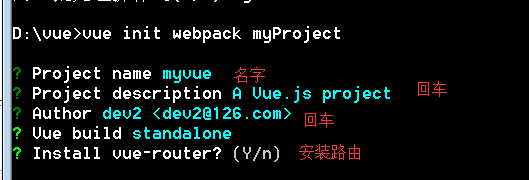
然後初始化:
vue init webpack myProject
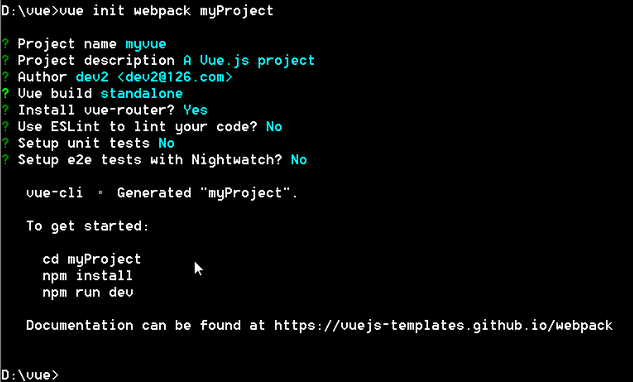
第四步:
切換到項目目錄下,安裝依賴包。
cd myProject
npm install 安裝
安裝之後 查看瀏覽器localhost:8080 是否有 welcome to You Vue.js App字樣。
有就代表環境配置以及項目創建成功了。
接下來準備敲代碼。。。。
稍等,講解一下Vue框架的邏輯。
Vue 單頁面應用。 一個項目,只能創建一個new Vue。 vue項目創建成功之後, 測試npm run dev ,查看localhost 8080 能否查看,測試成功之後, 用pycharm打開項目目錄, 項目目錄內,node_modules目錄一般是放依賴包,安裝的依賴包去這裏查看是否安裝成功。 src一般放項目需要的程序以及組件等等。 Vue項目的一般邏輯是: 用戶直接訪問的是index.html index.html下面是 App.vue 和 main.js 通過路由的方式(index.js) 連接組件components ,目錄中的組件,渲染具體內容。
所以編寫思路就是:
1 創建組件(Vue文件)
2 配置路由
3 編寫路徑 (router-link)
然後是代碼:
在src目錄下的components目錄下創建組件:
duanzi.vue
1 <template> 2 <div class="hello"> 3 <h1>{{ temp }}</h1> //渲染msg變量 4 <h2>hey girl</h2> 5 <ul> 6 <li v-for="item in arr"> //循環arr數組 7 姓名:{{item.name}} 8 性別:{{item.sex}} 9 年齡:{{item.age}} 10 </li> 11 </ul> 12 <div> 13 <ul> 14 <li> 15 姓名:<input type="text" v-model="username"> //input框輸入信息 16 </li> 17 <li> 18 年齡:<input type="text" v-model="userage"> 19 </li> 20 <li> 21 性別:<select v-model="usersex"> //select下拉框 22 <option value="男" selected>男</option> 23 <option value="女" >女</option> 24 </select> 25 </li> 26 </ul> 27 </div> 28 <input type="button" value="增加" v-on:click="addStu"> //button 綁定事件 addStu函數 29 </div> 30 31 </template> 32 33 <script> 34 export default { 35 name: ‘duanzi‘, 36 data () { 37 return { 38 temp: ‘我是duanzi頁面‘, //定義temp需要渲染的內容 39 arr:[], //methods內的函數需要的變量需要現在data中定義,避免函數內是window對象。 40 username:‘‘, 41 usersex:‘男‘, 42 userage:‘‘ 43 } 44 }, 45 mounted:function () { //mounted函數指的頁面一渲染首先執行的函數。 這裏首先執行showlist函數 46 this.showList() 47 }, 48 methods:{ //函數一般都寫在這裏,可以寫多個函數。 49 showList(){ //這裏是寫死一個數組,data裏的空列表實際就是為了這個數組而聲明一下,不然this指的是window對象,而不是data中的列表。 50 this.arr = [{ 51 name:‘tom‘,age:18,sex:‘male‘}, 52 {name:‘jerry‘,age:19,sex:‘male‘}] 53 }, 54 addStu(){ //綁定事件的函數,在arr數組中添加用戶在input框中輸入的內容。提交之後就能實時渲染到頁面了。 55 this.arr.push({name:this.username,age:this.userage,sex:this.usersex}) 56 }} 57 } 58 </script> 59 60 <!-- Add "scoped" attribute to limit CSS to this component only --> 61 <style scoped> //下面是一些默認的css樣式。 62 h1, h2 { 63 font-weight: normal; 64 } 65 ul { 66 list-style-type: none; 67 padding: 0; 68 } 69 li { 70 /*display: inline-block;*/ 71 margin: 0 10px; 72 margin-bottom: 10px; 73 } 74 a { 75 color: #42b983; 76 } 77 </style>
在創建另一個組件HelloWorld.vue:

 1 <template>
 2     <div class="hello">
 3         <h1>{{ msg }}</h1>
 4         <h2>hey boy</h2>
 5
 6     </div>
 7
 8 </template>
 9
10 <script>
11 export default {
12     name: ‘HelloWorld‘,
13     data () {
14         return {
15             msg: ‘hello world‘
16             }
17         },
18     methods:{
19         showme:function(){
20         alert(this.msg)}
21         }
22     }
23 </script>
24
25 <!-- Add "scoped" attribute to limit CSS to this component only -->
26 <style scoped>
27     h1, h2 {
28     font-weight: normal;
29   }
30     ul {
31     list-style-type: none;
32     padding: 0;
33   }
34     li {
35     display: inline-block;
36     margin: 0 10px;
37 }
38 a {
39     color: #42b983;
40 }
41 </style>
HelloWorld.vue 代碼道理和duanzi.vue一樣,只是輸出內容不一樣,實現兩個頁面。 之後在App.vue中配置具體渲染位置。 在index.js中配置路由。
 1 <template>
 2     <div id="app">   //最外層div,這裏的id很重要,這裏的id和index.html是一致的,代表將渲染到的位置。
 3         <h1>澳門首家在線賭場</h1>   //這裏寫的標簽在兩個組件的頁面都能顯示,類似django模板繼承效果。
 4         <router-link to="/"> helloworld</router-link>
 5         //這裏的router-link 就是將組件渲染到這裏,實際是一個a標簽,to寫的是path路徑,和index.js中是一致的。
 6         <router-link to="/duanzi"> duanzi</router-link>
 7         <router-view/>  //這個router-view 是關鍵點,不能刪除。
 8     </div>
 9 </template>
10
11 <script>
12 export default {
13     name: ‘app‘    //這裏也是寫那個id。
14     }
15 </script>
16
17 <style>                  //下面是默認樣式
18 #app {
19 font-family: ‘Avenir‘, Helvetica, Arial, sans-serif;
20 -webkit-font-smoothing: antialiased;
21 -moz-osx-font-smoothing: grayscale;
22 text-align: center;
23 color: #2c3e50;
24 margin-top: 60px;
25 }
26 </style>
App.vue
面是配置App.vue,下面開始配置index.js路由
 1 import Vue from ‘vue‘     //這裏的導入和python不太一樣需要註意。
 2 import Router from ‘vue-router‘
 3 import HelloWorld from ‘@/components/HelloWorld‘  //導入兩個組件,@代表從根目錄下找。
 4 import duanzi from ‘@/components/duanzi‘
 5
 6 Vue.use(Router)
 7
 8 export default new Router({
 9 //路由除了創建項目的時候安裝,也可以單獨安裝
10     routes: [
11         {
12             path: ‘/‘,    //路徑需要和App.vue中一致,不然找不到。/目錄建議默認一個,不然首頁會為空。
13             name: ‘HelloWorld‘,   //這個名字不是很重要,可寫可不寫,主要是區分組件功能。
14             component: HelloWorld   //寫組件文件名字。
15         },
16         {
17             path: ‘/duanzi‘,
18             name: ‘duanzi‘,
19             component: duanzi
20         }
21      ]
22 })
index.js
如上就是路由的配置。
main.js代碼:
 1 import Vue from ‘vue‘
 2 import App from ‘./App‘
 3 import router from ‘./router‘
 4 import axios from "axios"
 5 Vue.config.productionTip = false
 6 Vue.prototype.axios=axios
 7 /* eslint-disable no-new */
 8 new Vue({
 9     el: ‘#app‘,
10     router,
11     template: ‘<App/>‘,
12     components: { App }
13 })
main.js
index.html代碼:
 1 <!DOCTYPE html>
 2 <html>
 3     <head>
 4         <meta charset="utf-8">
 5         <meta name="viewport" content="width=device-width,initial-scale=1.0">
 6         <title>myvue</title>
 7     </head>
 8 <body>
 9     <div id="app"></div>
10     <h2>我是index.html</h2>  //這裏我寫了個h2標簽,區分一下效果。
11
12
13     <!-- built files will be auto injected -->
14     </body>
15 </html>
index.html 寫完代碼,我們可以通過npm start (npm run dev也可以)在cmd中啟動Vue項目,然後通過http://localhost:8080 訪問內容。 以下為實現效果:
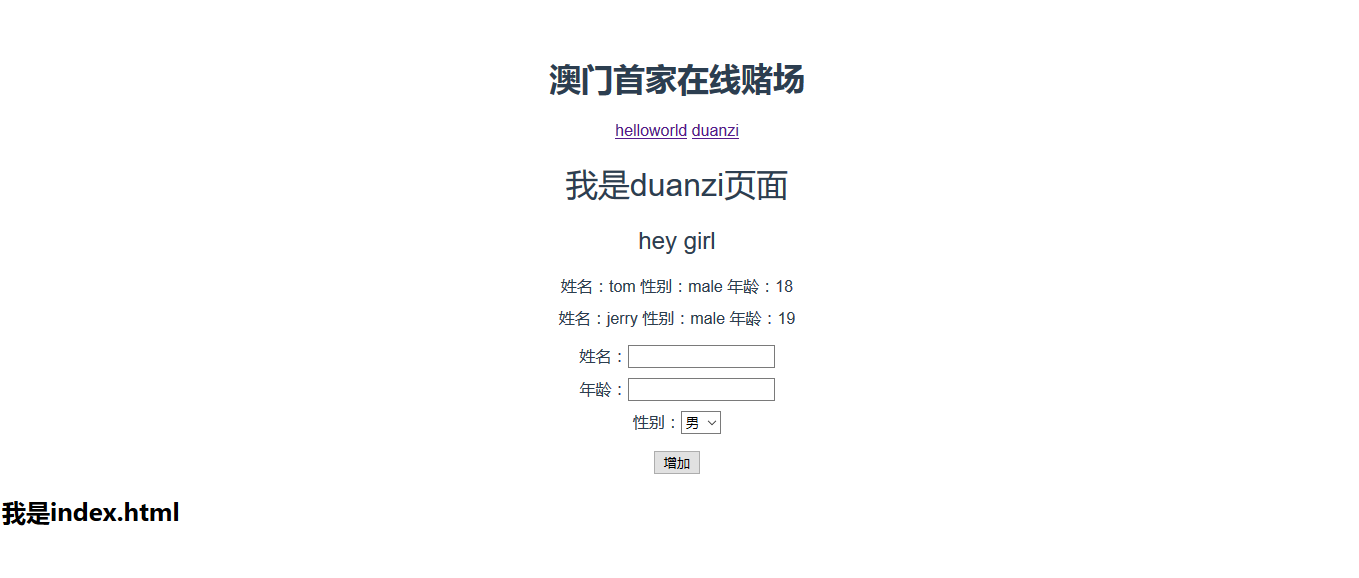
另一個頁面:

完結撒花??ヽ(°▽°)ノ?
Vue框架的使用。