實驗四 圖的實現和應用 實驗報告 20162305
阿新 • • 發佈:2017-11-26
peek 有關 打印 隊列 廣度 dex 是否 深度優先 遍歷
實驗四 圖的實現和應用 實驗報告 20162305
實驗一 鄰接矩陣實現無向圖
實驗要求
- 用鄰接矩陣實現無向圖(邊和頂點都要保存),實現在包含添加和刪除結點的方法,添加和刪除邊的方法,size(),isEmpty(),廣度優先叠代器,深度優先叠代器。給出偽代碼,產品代碼,測試代碼(不少於5條測試)
實驗過程
- 用鄰接矩陣表示無向圖,首先我們先明確什麽是鄰接矩陣。鄰接矩陣就是用矩陣的方式來表示不同結點之間的關系,對於無向圖來說,如果結點(i,j)之間有聯系,則在矩陣中(i,j)所對應的的點的值為1,否則為0。對於鄰接矩陣表示有向圖,有關聯的結點值對應在矩陣上的值為兩者之間的權值,無關聯的對應值為無窮大。想要建立一個鄰接矩陣,我們需要定義好邊和結點,再根據邊的關系確定好對應結點之間的值。下面分析各個方法的實現。
(一)添加和刪除結點
- 首先,我利用Java中的ArrayList類,生成一個vertexList用來存儲結點,這樣就可以利用ArrayList中自帶的add方法和remove方法來實現結點的刪除和添加功能。
- 相關代碼
   //插入結點
    public void insertVertex(Object vertex) {
        vertexList.add(vertex);
    }

    //刪除結點
    public void deleteVertex(Object vertex) {
        vertexList.remove(vertex);
    }
(二)添加和刪除邊
- 首先我先定義了一個int類型數組用來存儲邊,在添加和刪除的方法中定義來了邊的位置參數v1,v2,用來確定添加或刪除的邊的位置,添加一條邊(v1,v2),則這條邊在數組中對應的值為1,刪除一條邊(v1,v2),則這條邊在數組中對應的值為0,若是想要刪除的這條邊不存在,那麽就打印這條邊不存在。
- 相關代碼
    //插入邊
    public void insertEdge(int v1, int v2) {
        edges[v1][v2] = 1;
        numOfEdges++;
    }

    //刪除邊
    public void deleteEdge(int v1, int v2) {
        edges[v1][v2] = 0;
        numOfEdges--;
        if (edges[v1][v2] == Integer.parseInt(null)) {
            System.out.print("該邊不存在。");
        }
    }
(三)size方法
- 返回存儲結點的vertex的規模,確定規模。
- 相關規模
 public int size(){
        return vertexList.size();
    }
(四)isEmpty()方法
- 判斷是否為空,如果存儲結點的vertexList和存儲邊的edges都為空,則返回true,否則返回false。
- 相關代碼
 public boolean isEmpty(){
        if(vertexList == null && edges == null)
            return true;
        else
            return false;
    }
(五)廣度優先叠代器
- 廣度優先遍歷,從一個頂點開始,輻射狀地優先遍歷其周圍較廣的區域,故稱之為廣度優先遍歷。實現廣度優先遍歷,需要一個隊列來保存遍歷過的頂點順序,以便按出隊的順序再去訪問這些頂點的鄰接頂點。我按照老師課堂講義中給出的偽代碼寫出了這個方法。首先定義參數,數組visited中對應的參數位置為1,初始化隊列Q;visited[N]=0;訪問頂點v;visited[v]=1;頂點v入隊列Q;當隊列不為空的時候,彈出得到未訪問的鄰接點,再將得到的鄰接點賦給result再回到隊列,然後再判斷是否隊列中的元素是否都已經標記,最後打印result。
    //進行廣度優先遍歷的內部遞歸調用方法使用
    public void bfs(int i) {
        MyQueue queue = new MyQueue(100);
        System.out.print(i + " ");
        int visited[] = new int[vertexList.size()];
        for(int j= 0;j<visited.length;j++) {
            visited[j] = 0;
            queue.insert(i);
            visited[i] = 1;
            String result = vertexList.get(j) + " ";
            while (!queue.isEmpty()) {
                j = queue.peek();
                // 得到未訪問過的鄰接點
                int unvisitedVertex = getUnvisitedVertex(j);
                if (unvisitedVertex == -1) {
                    queue.remove();
                } else {
                    vertexList.get(unvisitedVertex);
                    result += vertexList.get(unvisitedVertex) + " ";
                    queue.insert(unvisitedVertex);
                }
                for (int i1 = 0; i1 < visited.length; i1++) {
                    if (vertexList.get(i1)!= null)
                        if (visited[i1] != 0) {
                        queue.insert(i1);
                        visited[i1] = 1;
                    }
                }
            }
            System.out.print(result);
        }
    }
- 獲取未訪問頂點的方法,利用for循環判斷,如果邊存在可是結點對應值為null則返回i,循環結束得到為訪問的頂點。
  //bfs中獲取未訪問的
    public int getUnvisitedVertex(int v) {
        for (int i = 0; i < numOfEdges; i++) {
            if(edges[v][i] == 1 && vertexList.get(i) == null) {
                return i;
            }
        }
        return -1;
    }
(六)深度優先叠代器
- 圖的深度優先搜索,類似於樹的先序遍歷,所遵循的搜索策略是盡可能“深”地搜索圖。如果它還有以此為起點而未探測到的邊,就沿此邊繼續探尋下去。一直進行到已發現從源節點可達的所有節點為止。
- 深度優先遍歷的內部遞歸方法,遍歷結點和bian
    //深度優先遍歷
    public void depthFirstSearch(int v) {       //驅動函數
        boolean visited[] = new boolean[vertexList.size()];
        for (int i = 0; i < vertexList.size(); i++) {
            visited[i] = false;
        }
        dfs(v, visited);                         //把每個結點遍歷一次。
        System.out.println();
    }

    //進行深度優先遍歷的內部遞歸方法使用
    private void dfs(int i, boolean visited[]) {  //工作函數
        System.out.print(i + " ");
        visited[i] = true;
        for (int j = 0; j < vertexList.size(); j++) {
            if (edges[i][j] != 0 && edges[i][j] != vertexList.size() && !visited[j]) {
                dfs(j, visited);
            }
        }
    }
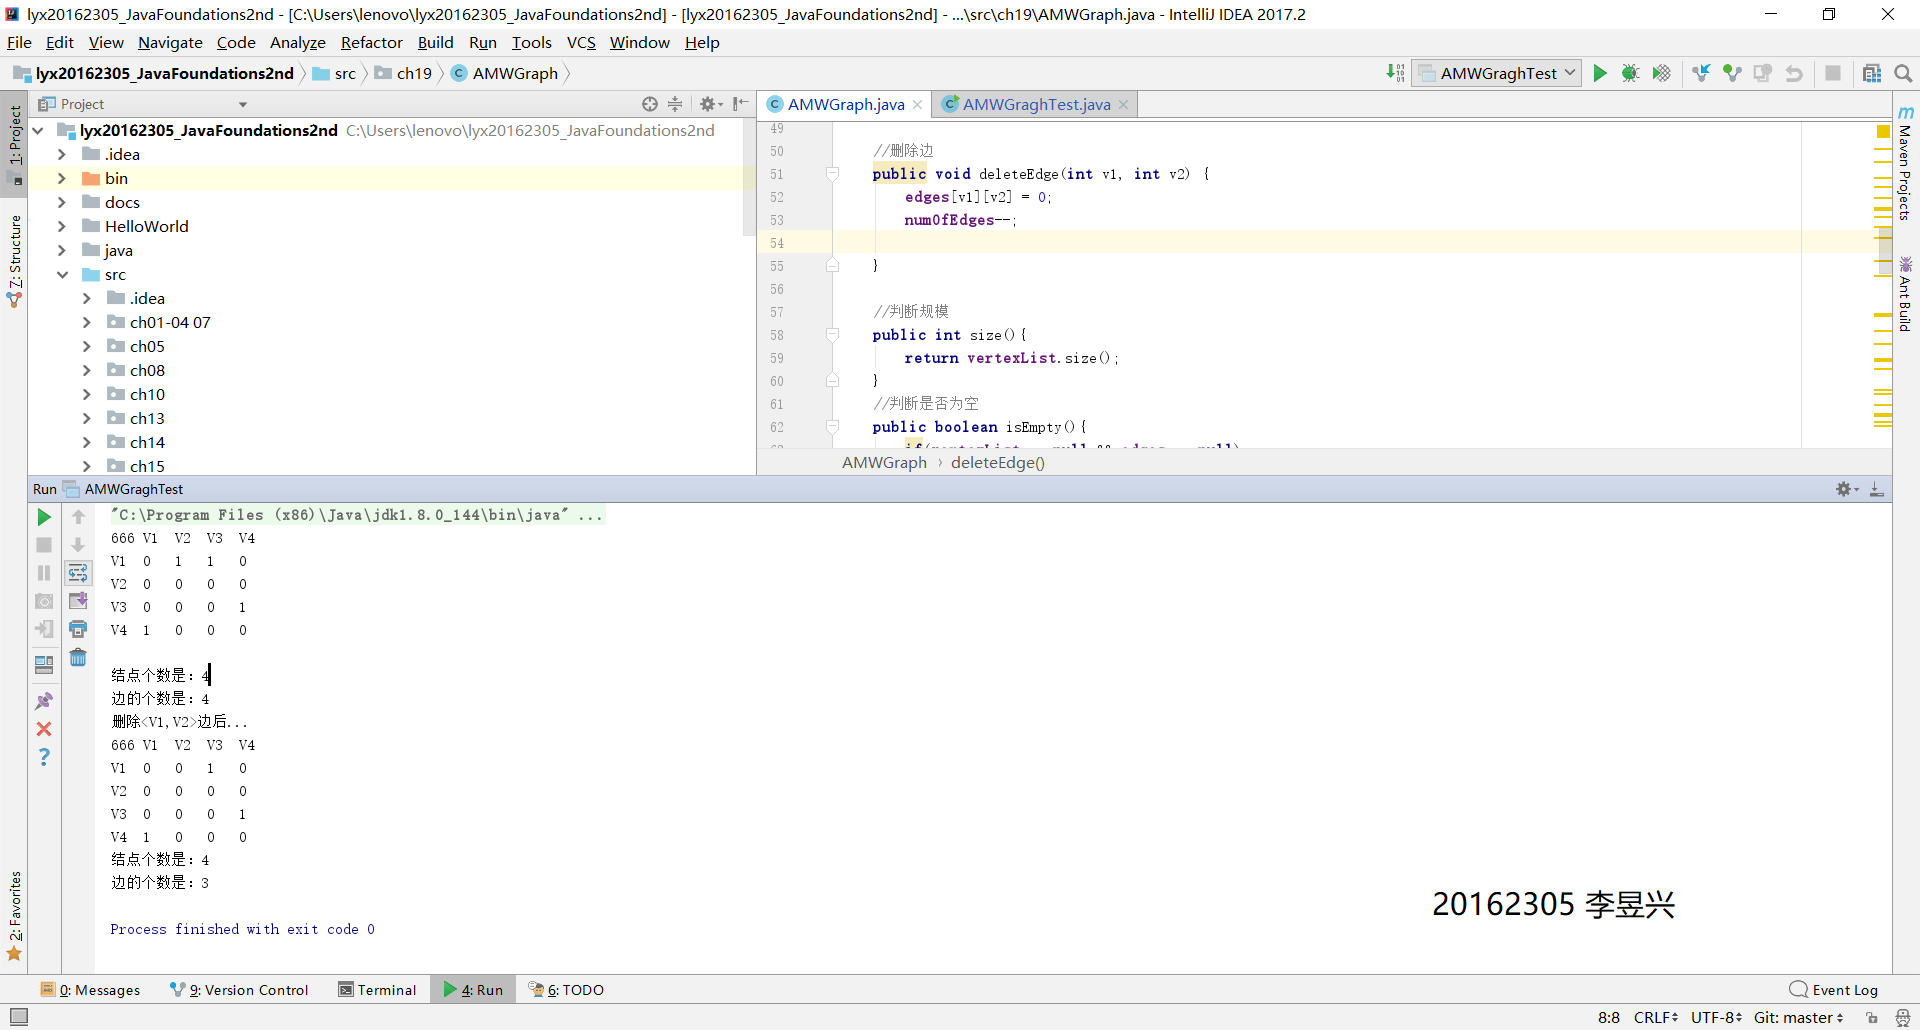
實驗成果截圖
實驗二 十字鏈表實現無向圖
實驗要求
- 用十字鏈表實現無向圖(邊和頂點都要保存),實現在包含添加和刪除結點的方法,添加和刪除邊的方法,size(),isEmpty(),廣度優先叠代器,深度優先叠代器;
給出偽代碼,產品代碼,測試代碼(不少於5條測試)
實驗過程
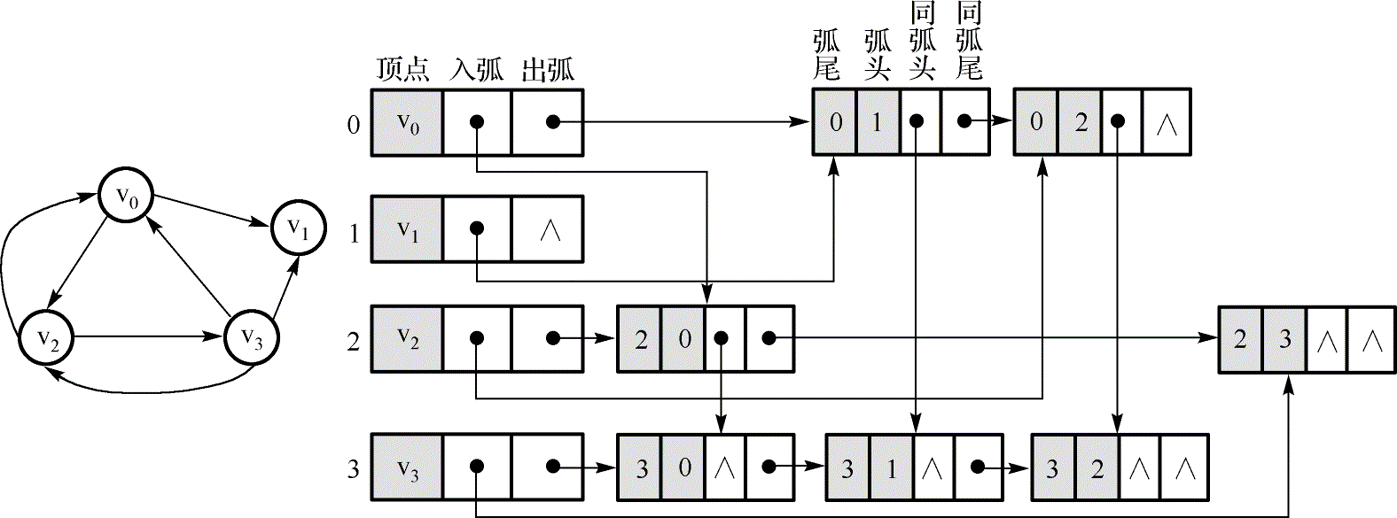
- 十字鏈表是有向圖的另一種存儲結構,目的是將在有向圖的鄰接表和逆鄰接表中兩次出現的同一條弧用一個結點表示,由於在鄰接表和逆鄰接表中的頂點數據是相同的,則在十字鏈表中只需要出現一次,但需保留分別指向第一條"出弧"和第一條"入弧"的指針。
- 十字鏈表除了結構復雜一點外,其創建圖的時間復雜度是和鄰接表相同的,用十字鏈表來存儲稀疏有向圖,可以達到高效存取的效果,因此,在有向圖的應用中,十字鏈表也是非常好的數據結構模型。
(一)添加和刪除結點
- 首先先自己寫一個Node類,定義一個新的結點。再定義一個ArrayList類中的結點node,利用帶有的add方法添加入node,返回添加後的node
   public boolean addNode(Object data){
        Node a = new Node(data);
        return node.add(a);
    }
- 刪除結點,先定義一個boolean類型的result為false,遍歷整個node,如果找到要刪除的結點,則remove刪除,result為true,返回result結束。
 public boolean removeNode(Object data){
       boolean result = false;
       for (int i = 0;i<node.size();i++) {
           if (data == node.get(i).data)
           node.remove(data);
           result = true;
       }
       return result;
   }
(二)添加和刪除邊
- 十字鏈表中的添加邊和刪除邊的操作,比起鄰接矩陣的算法要復雜一些。十字鏈表中的元素由弧頭、弧尾,同弧頭和同弧尾這四個部分,每次刪除和添加,各個部分的指針指向都有變化,都要發生相應的改變。具體操作在偽代碼中顯示。
- 相應代碼
public void add (Edge<Integer> edge){
        int fromVertexIndex = edge.fromVertexIndex;
        int toVertexIndex = edge.toVertexIndex;
        Node <E, T> fromVertex = node.get(fromVertexIndex);
        Node <E, T> toVertex = node.get(toVertexIndex);

        if (fromVertex.firstOut == null) {
            //插入到頂點的出邊屬性

            fromVertex.firstOut = (Edge <T>) edge;
        } else {
            // 插入到edge的nextSameFromVertex屬性

            Edge<Integer> tempEdge = (Edge <Integer>) fromVertex.firstOut;
            //找到最後一個Edge

            while (tempEdge.nextSameFromVertex != null) {
                tempEdge = tempEdge.nextSameFromVertex;
            }
            tempEdge.nextSameFromVertex = edge;
        }
        if (toVertex.firstIn == null) {
            //插入到頂點的入邊屬性

            toVertex.firstIn = (Edge <T>) edge;
        } else {
            // 插入到edge的nextSameToVertex屬性

            Edge<Integer> tempEdge = (Edge <Integer>) toVertex.firstIn;
            //找到最後一個Edge

            while (tempEdge.nextSameToVertex != null) {
                tempEdge = tempEdge.nextSameToVertex;
            }
            tempEdge.nextSameToVertex = edge;
        }
    }

 public void removeEdge(int a,int b){
        Edge <T> node1;
        Edge <T> node2;
        node1 = node.get(a).firstOut;
        node2 = node.get(b).firstIn;
        if(node1.toVertexIndex==b)
            node.get(a).firstOut = node1.nextSameToVertex;
        else {
            while (node1.nextSameToVertex.toVertexIndex!=b){
                node1 = node1.nextSameToVertex;
            }
            node1.nextSameToVertex = (node1.nextSameToVertex).nextSameToVertex;
        }
        if (node2.fromVertexIndex == a){
            node.get(b).firstIn = node1.nextSameFromVertex;
        }else {
            while (node2.nextSameFromVertex.fromVertexIndex != b){
                node2 = node2.nextSameFromVertex;
            }
            node1.nextSameFromVertex = (node1.nextSameFromVertex).nextSameFromVertex;
        }
    }
(三)廣度優先叠代器
- 廣度優先叠代器的實現方式同實驗一的實驗方法類似,本次是在ArrayList的基礎上實現的。
 public ArrayList<E> bfs(int a) {
        //初始化隊列
        LinkedQueue linkedQueue = new LinkedQueue();
        //設立一個訪問標誌數組
        int[] visited = new int[node.size()];
        //設立list
        ArrayList<E> list = new ArrayList<E>();
        int current;
        Edge <T> headNode = null;
        //未訪問的元素標記為0
        for (int i = 0; i<visited.length;i++){
            visited[i] = 0;
        }
        //標記訪問a
        linkedQueue.enqueue(a);
        //訪問後標記為1
        visited[a] = 1;

        while (!linkedQueue.isEmpty()){
            current = (int) linkedQueue.dequeue();
            list.add(node.get(current).data);
            for (int j = 0;j<visited.length;j++)
                headNode = node.get(j).firstOut;
            while (headNode!=null){
                if (visited[headNode.toVertexIndex] == 0) {
                    linkedQueue.enqueue(headNode.toVertexIndex);
                    visited[headNode.toVertexIndex] = 1;
                }
                headNode = headNode.nextSameToVertex;
            }
        }
        return list;
    }
(四)size方法
- 返回node的大小
 public int size(){
        return node.size();
    }
(五)isEmpty方法
- 判斷結點集是否為空,如果為空返回true,不為空返回false。
  public boolean isEmpty(){
        if (node.size() == 0)
            return true;
        else
            return false;
    }
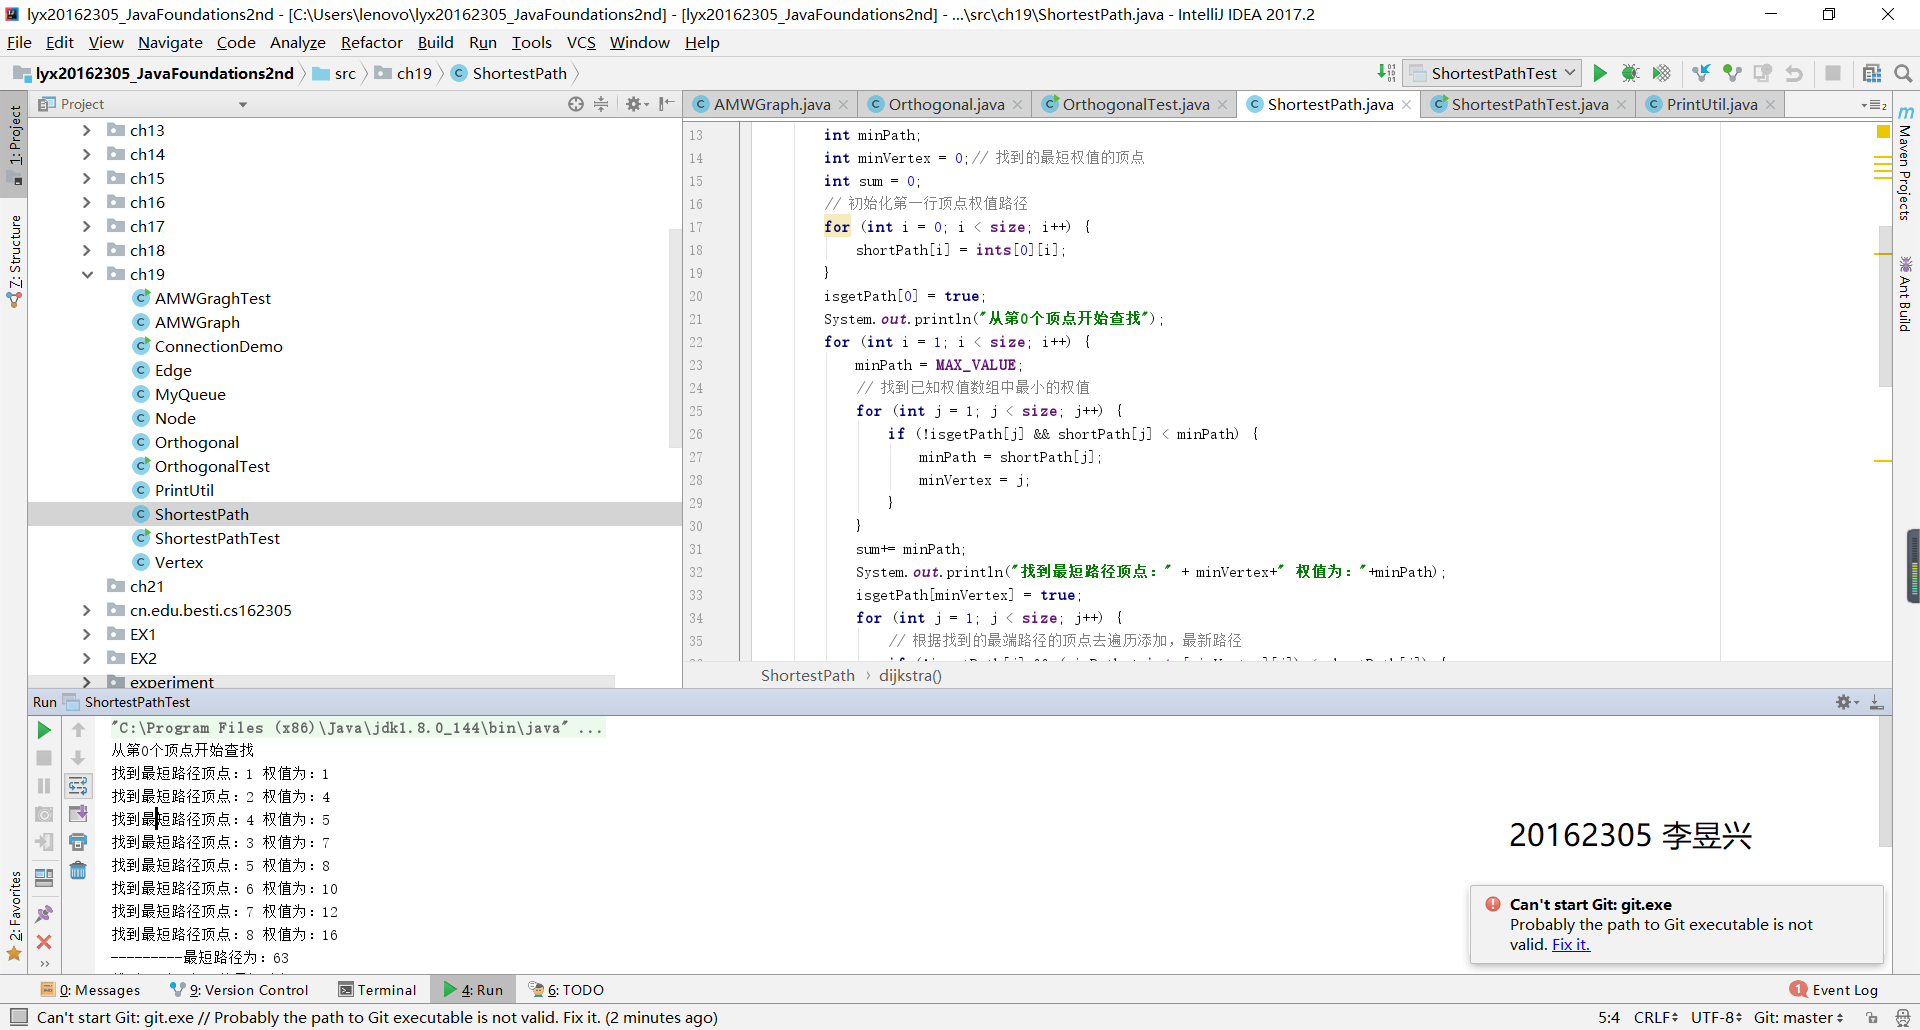
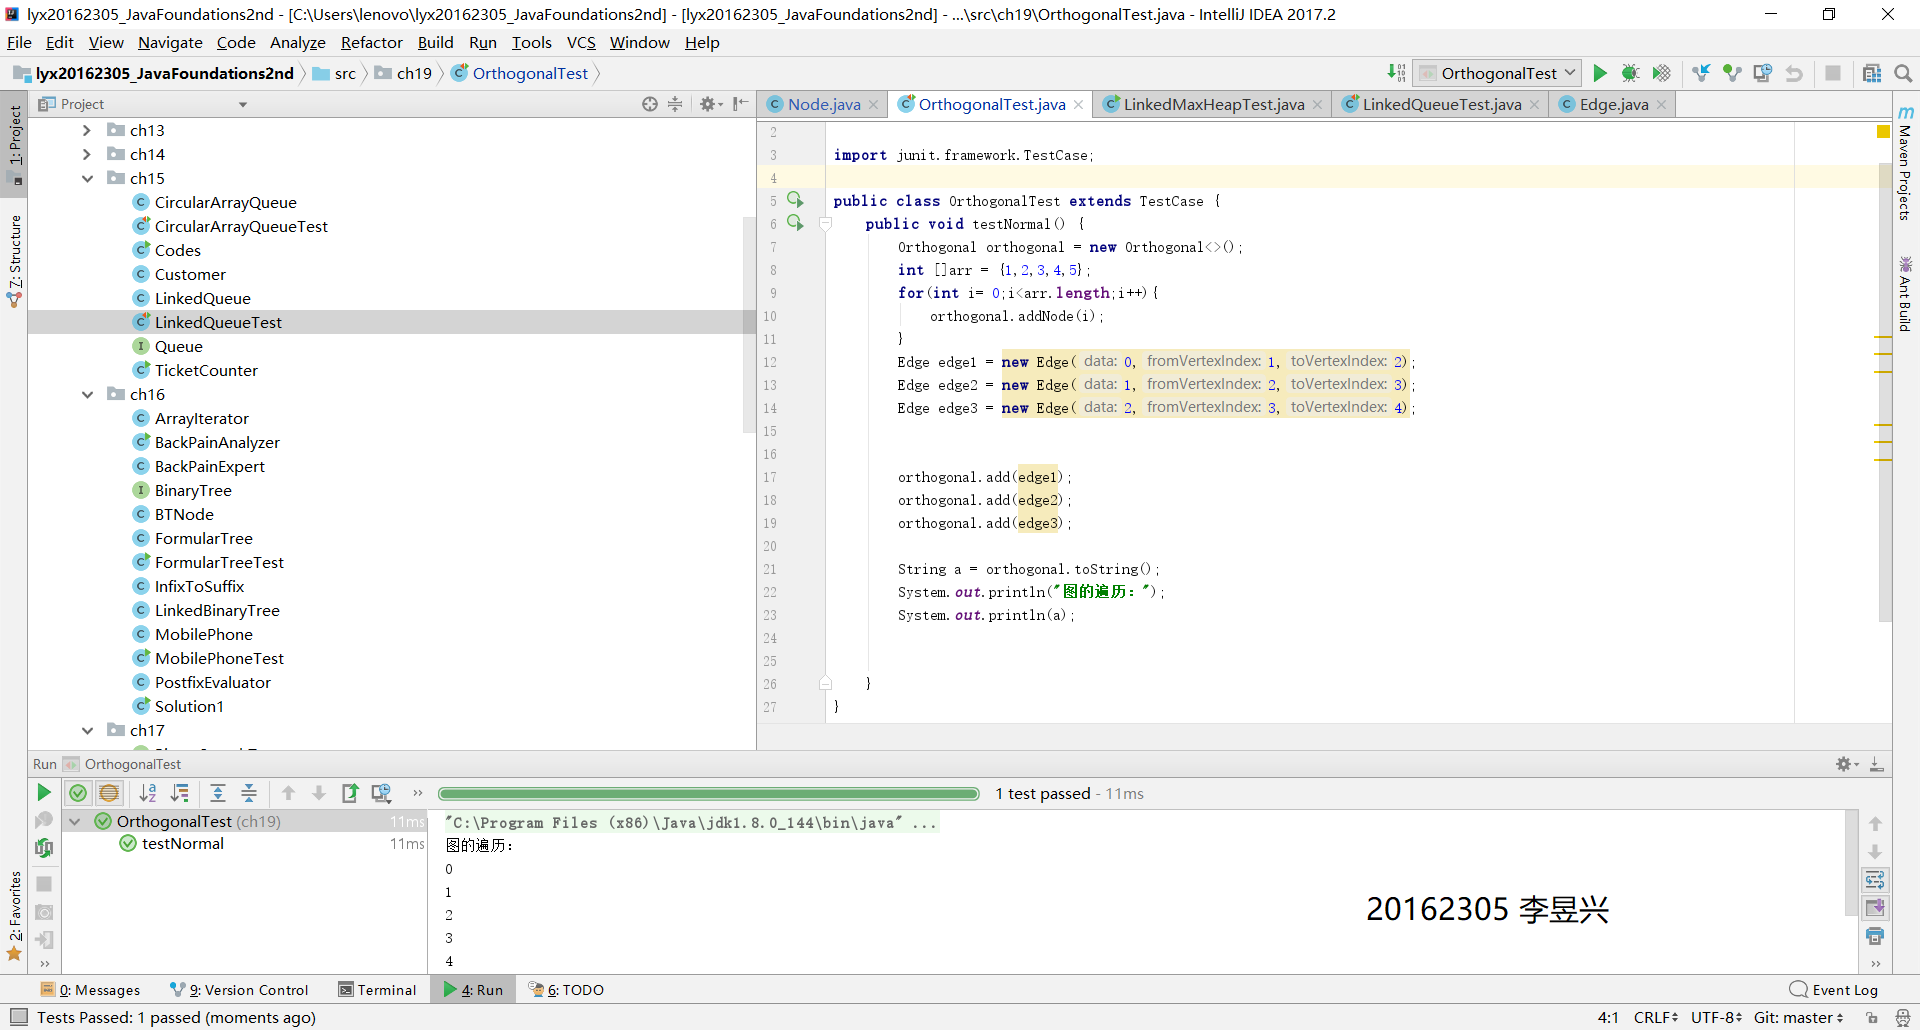
實驗成果截圖
實驗三 最短路徑問題
實驗要求
- 創建計算機路由系統,輸入網絡中點到點的線路,以及每條線路使用的費用,系統輸出網絡中各點之間最便宜的路徑,指出不相通的所有位置
實驗過程
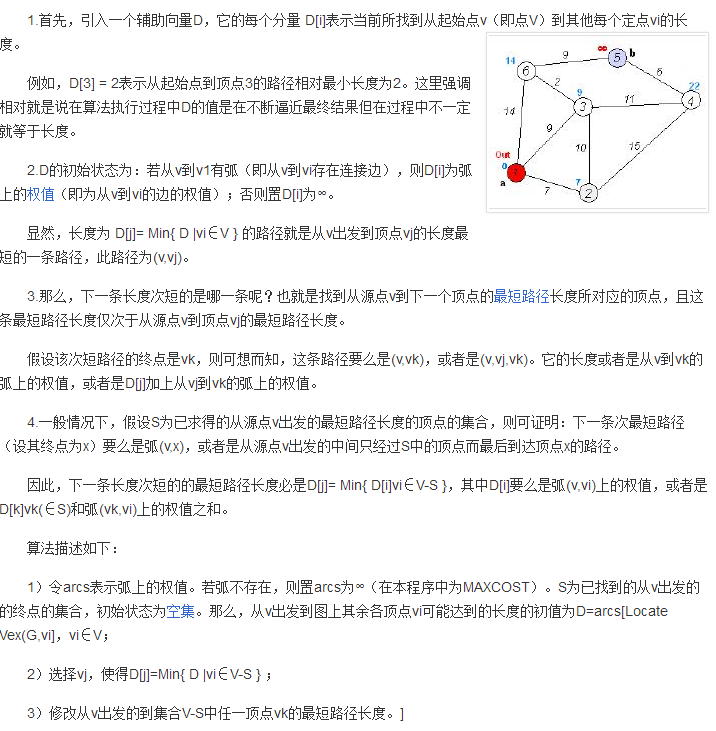
- 這個實驗的要求實質是利用算法實現最短路徑,我用的是dijkstra算法實現的。
- 原理(來自搜狗百科)
- 相關代碼
void dijkstra() {
        int[] shortPath = new int[size];
        boolean[] isgetPath = new boolean[size];
        int minPath;
        int minVertex = 0;// 找到的最短權值的頂點
        int sum = 0;
        // 初始化第一行頂點權值路徑
        for (int i = 0; i < size; i++) {
            shortPath[i] = ints[0][i];
        }
        isgetPath[0] = true;
        System.out.println("從第0個頂點開始查找");
        for (int i = 1; i < size; i++) {
            minPath = MAX_VALUE;
            // 找到已知權值數組中最小的權值
            for (int j = 1; j < size; j++) {
                if (!isgetPath[j] && shortPath[j] < minPath) {
                    minPath = shortPath[j];
                    minVertex = j;
                }
            }
            sum+= minPath;
            System.out.println("找到最短路徑頂點:" + minVertex+" 權值為:"+minPath);
            isgetPath[minVertex] = true;
            for (int j = 1; j < size; j++) {
                // 根據找到的最端路徑的頂點去遍歷添加,最新路徑
                if (!isgetPath[j] && (minPath + ints[minVertex][j]) < shortPath[j]) {
                    shortPath[j] = minPath + ints[minVertex][j];
                }
            }
        }

        System.out.println("---------最短路徑為:"+sum);
        for (int j = 1; j < size; j++) {
            System.out.println("找到V0到頂點V" + j + "的最短路徑:"+shortPath[j]);
        }
    }
實驗成果截圖
實驗四 圖的實現和應用 實驗報告 20162305

