android.animation(5) - PropertyValuesHolder與Keyframe(轉)
前幾篇給大家講了ValueAnimator、ObjectAnimator的知識,講解了它們ofInt(),ofFloat(),ofObject()函數的用法。細心的同學可能會註意到,ValueAnimator、ObjectAnimator除了這些創建Animator實例的方法以外,都還有一個方法:
/** * valueAnimator的 */ public static ValueAnimator ofPropertyValuesHolder(PropertyValuesHolder... values) /** * ObjectAnimator的*/ public static ObjectAnimator ofPropertyValuesHolder(Object target,PropertyValuesHolder... values)
也就是說ValueAnimator和ObjectAnimator除了通過ofInt(),ofFloat(),ofObject()創建實例外,還都有一個ofPropertyValuesHolder()方法來創建實例,這篇文章我就帶大家來看看如何通過ofPropertyValuesHolder()來創建實例的。
由於ValueAnimator和ObjectAnimator都具有ofPropertyValuesHolder()函數,使用方法也差不多,相比而言,ValueAnimator的使用機會不多,這裏我們就只講ObjectAnimator中ofPropertyValuesHolder()的用法。相信大家懂了這篇以後,再去看ValueAnimator的ofPropertyValuesHolder(),也應該是會用的。
在這篇文章的最後,我們通過本篇內容做了一個電話響鈴的效果,效果圖如下:

一、PropertyValuesHolder
1、概述
PropertyValuesHolder這個類的意義就是,它其中保存了動畫過程中所需要操作的屬性和對應的值。我們通過ofFloat(Object target, String propertyName, float… values)構造的動畫,ofFloat()的內部實現其實就是將傳進來的參數封裝成PropertyValuesHolder實例來保存動畫狀態。在封裝成PropertyValuesHolder實例以後,後期的各種操作也是以PropertyValuesHolder為主的。
說到這裏,大家就知道這個PropertyValuesHolder是有多有用了吧,上面我們也說了,ObjectAnimator給我們提供了一個口子,讓我們自己構造PropertyValuesHolder來構造動畫。
public static ObjectAnimator ofPropertyValuesHolder(Object target,PropertyValuesHolder... values)
PropertyValuesHolder中有很多函數,有些函數的api等級是11,有些函數的api等級是14和21;
高api的函數我們就不講了,只講講api 11的函數的用法。有關各個函數的api等級,大家可以參考《Google文檔:PropertyValuesHolder》
首先,我們來看看創建實例的函數:
public static PropertyValuesHolder ofFloat(String propertyName, float... values)
public static PropertyValuesHolder ofInt(String propertyName, int... values)
public static PropertyValuesHolder ofObject(String propertyName, TypeEvaluator evaluator,Object... values)
public static PropertyValuesHolder ofKeyframe(String propertyName, Keyframe... values)
這裏總共有四個創建實例的方法,這一段我們著重講ofFloat、ofInt和ofObject的用法,ofKeyframe我們單獨講。
2、PropertyValuesHolder之ofFloat()、ofInt()
(1)ofFloat()、ofInt()
我們先來看看它們的構造函數:
public static PropertyValuesHolder ofFloat(String propertyName, float... values)
public static PropertyValuesHolder ofInt(String propertyName, int... values)
其中:
- propertyName:表示ObjectAnimator需要操作的屬性名。即ObjectAnimator需要通過反射查找對應屬性的setProperty()函數的那個property.
- values:屬性所對應的參數,同樣是可變長參數,可以指定多個,還記得我們在ObjectAnimator中講過,如果只指定了一個,那麽ObjectAnimator會通過查找getProperty()方法來獲得初始值。不理解的同學請參看《Animation動畫詳解(七)——ObjectAnimator基本使用》
大家看這些參數是不是很眼熟,讓我們看一下ObjectAnimator的ofFloat是怎麽樣的:
public static ObjectAnimator ofFloat(Object target, String propertyName, float... values);
看到沒,在ObjectAnimator.ofFloat中只比PropertyValuesHolder的ofFloat多了一個target,其它都是完全一樣的!
好了,我們在講完PropertyValuesHolder的ofFloat函數以後,我們再來看看如何將構造的PropertyValuesHolder實例設置進ObjectAnimator吧。
(2)、ObjectAnimator.ofPropertyValuesHolder()
在開篇時,我們也講了ObjectAnimator給我們提供了一個設置PropertyValuesHolder實例的入口:
public static ObjectAnimator ofPropertyValuesHolder(Object target,PropertyValuesHolder... values)
其中:
- target:指需要執行動畫的控件
- values:是一個可變長參數,可以傳進去多個PropertyValuesHolder實例,由於每個PropertyValuesHolder實例都會針對一個屬性做動畫,所以如果傳進去多個PropertyValuesHolder實例,將會對控件的多個屬性同時做動畫操作。
(3)、示例
下面我們就舉個例子來如何通過PropertyValuesHolder的ofFloat、ofInt來做動畫的。
效果圖如下:

這個動畫很簡單,就是在點擊按鈕的時候,給textView做動畫,框架代碼就不再講了,我們主要來看看操作textview動畫的代碼。
動畫代碼為:
PropertyValuesHolder rotationHolder = PropertyValuesHolder.ofFloat("Rotation", 60f, -60f, 40f, -40f, -20f, 20f, 10f, -10f, 0f);
PropertyValuesHolder colorHolder = PropertyValuesHolder.ofInt("BackgroundColor", 0xffffffff, 0xffff00ff, 0xffffff00, 0xffffffff);
ObjectAnimator animator = ObjectAnimator.ofPropertyValuesHolder(mTextView, rotationHolder, colorHolder);
animator.setDuration(3000);
animator.setInterpolator(new AccelerateInterpolator());
animator.start();
在這裏,我們創建了兩個PropertyValuesHolder實例,第一個rotationHolder:
PropertyValuesHolder rotationHolder = PropertyValuesHolder.ofFloat("Rotation", 60f, -60f, 40f, -40f, -20f, 20f, 10f, -10f, 0f);
使用ofFloat函數創建,屬性值是Rotation,對應的是View類中SetRotation(float rotation)函數。後面傳進去很多值,讓其左右擺動。
第二是動畫是改變背景色的colorHolder
PropertyValuesHolder colorHolder = PropertyValuesHolder.ofInt("BackgroundColor", 0xffffffff, 0xffff00ff, 0xffffff00, 0xffffffff);
這裏使用的是ofInt函數創建的,它操作的屬性是BackgroundColor,對應的是View類中的setBackgroundColor(int color)函數,後面傳進去的16進制顏色值讓其在這些顏色值間變化。有關顏色值的變化,大家可以參考《Animation動畫詳解(七)——ObjectAnimator基本使用》中第三部分《常用函數》
最後通過ObjectAnimator.ofPropertyValuesHolder將rotationHolder、colorHolder設置給mTextView,構造出ObjectAnimator對象。然後開始動畫即可
ObjectAnimator animator = ObjectAnimator.ofPropertyValuesHolder(mTextView, rotationHolder, colorHolder);
animator.setDuration(3000);
animator.setInterpolator(new AccelerateInterpolator());
animator.start();
好了,到這裏有關PropertyValuesHolder的ofInt和ofFloat函數的用法就講完了,大家可以看到PropertyValuesHolder使用起來也很容易,下面我們再來看看PropertyValuesHolder的ofObject的使用方法。
3、PropertyValuesHolder之ofObject()
(1)、概述
我們先來看一下ofObject的構造函數
public static PropertyValuesHolder ofObject(String propertyName, TypeEvaluator evaluator,Object... values)
- propertyName:ObjectAnimator動畫操作的屬性名;
- evaluator:Evaluator實例,Evaluator是將當前動畫進度計算出當前值的類,可以使用系統自帶的IntEvaluator、FloatEvaluator也可以自定義,有關Evaluator的知識,大家可以參考《Animation動畫詳解(五)——ValueAnimator高級進階(一)》
- values:可變長參數,表示操作動畫屬性的值
它的各個參數與ObjectAnimator.ofObject的類似,只是少了target參數而已
public static ObjectAnimator ofObject(Object target, String propertyName,TypeEvaluator evaluator, Object... values)
(2)、示例
下面我們就講講PropertyValuesHolder.ofObject()函數的用法
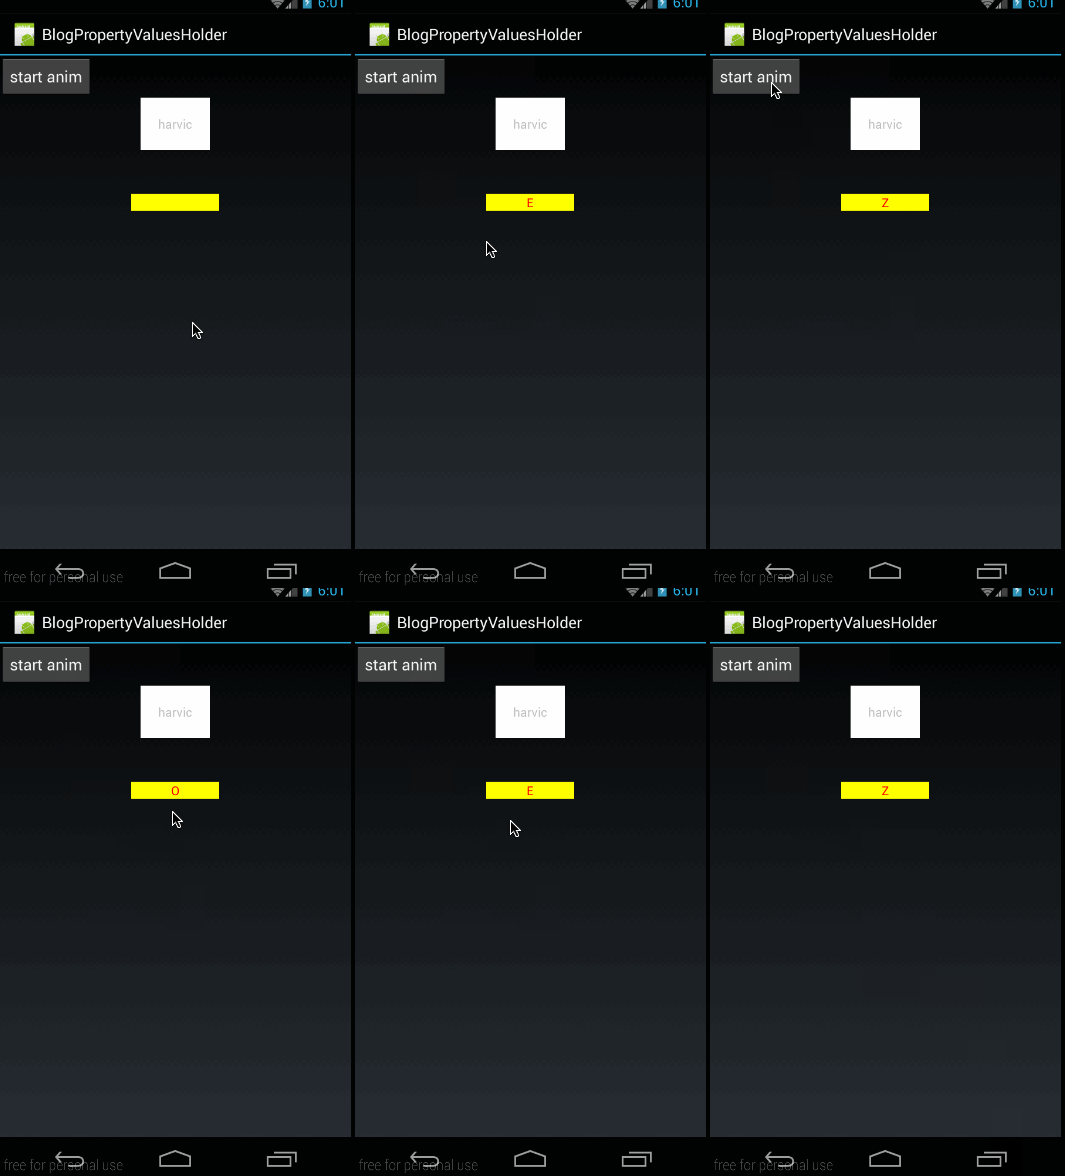
本示例的效果圖如下:

這裏實現的效果與《Animation動畫詳解(六)——ValueAnimator高級進階(二)》實現的效果相同,即通過自字義的CharEvaluator來自動實現字母的改變與計算。
首先是自定義一個CharEvaluator,通過進度值來自動計算出當前的字母:
public class CharEvaluator implements TypeEvaluator<Character> {
    @Override
    public Character evaluate(float fraction, Character startValue, Character endValue) {
        int startInt  = (int)startValue;
        int endInt = (int)endValue;
        int curInt = (int)(startInt + fraction *(endInt - startInt));
        char result = (char)curInt;
        return result;
    }
}
有關數字與字符間轉換的原理已經在《Animation動畫詳解(六)——ValueAnimator高級進階(二)》講述,就不再細講。這個CharEvaluator也是直接從這篇文章中拿過來的,強烈建議大家對這個系列文章從頭開始看。
從CharEvaluator中可以看出,從CharEvaluator中產出的動畫中間值類型為Character類型。TextView中雖然有setText(CharSequence text) 函數,但這個函數的參數類型是CharSequence,而不是Character類型。所以我們要自定義一個類派生自TextView來改變TextView的字符
public class MyTextView extends TextView {
    public MyTextView(Context context, AttributeSet attrs) {
        super(context, attrs);
    }
    public void setCharText(Character character){
        setText(String.valueOf(character));
    }
}
在這裏,我們定義了一個方法setCharText(Character character),參數就是Character類型,我們知道這個方法所對應的屬性是CharText;
最後MyActivity,在點擊按鈕的時候開始動畫,核心代碼為:
public class MyActivity extends Activity {
    private Button btn;
    private TextView mTextView;
    private MyTextView mMyTv;
    @Override
    public void onCreate(Bundle savedInstanceState) {
        super.onCreate(savedInstanceState);
        setContentView(R.layout.main);

        mMyTv = (MyTextView)findViewById(R.id.mytv);
        btn = (Button) findViewById(R.id.btn);
        btn.setOnClickListener(new View.OnClickListener() {
            @Override
            public void onClick(View v) {
                doOfObjectAnim();
            }
        });
    }

    private void doOfObjectAnim(){
        PropertyValuesHolder charHolder = PropertyValuesHolder.ofObject("CharText",new CharEvaluator(),new Character(‘A‘),new Character(‘Z‘));
        ObjectAnimator animator = ObjectAnimator.ofPropertyValuesHolder(mMyTv, charHolder);
        animator.setDuration(3000);
        animator.setInterpolator(new AccelerateInterpolator());
        animator.start();
    }
}
這部分代碼,很好理解,在點擊按鈕的時候執行doOfObjectAnim()方法:
PropertyValuesHolder charHolder = PropertyValuesHolder.ofObject("CharText",new CharEvaluator(),new Character(‘A‘),new Character(‘Z‘));
ObjectAnimator animator = ObjectAnimator.ofPropertyValuesHolder(mMyTv, charHolder);
animator.setDuration(3000);
animator.setInterpolator(new AccelerateInterpolator());
animator.start();
首先是根據PropertyValuesHolder.ofObject生成一個PropertyValuesHolder實例,註意它的屬性就是CharText,所對應的set函數就是setCharText,由於CharEvaluator的中間值是Character類型,所以CharText屬性所對應的完整的函數聲明為setCharText(Character character);這也就是我們為什麽要自定義一個MyTextView原因,就是因為TextView中沒有setText(Character character)這樣的函數。
然後就是利用ObjectAnimator.ofPropertyValuesHolder生成ObjectAnimator實例了,最後就是對animator設置並start了,沒什麽難度,就不再講了。
下面就開始最重要的部分了,有關KeyFrame的知識。
二、Keyframe
1、概述
通過前面幾篇的講解,我們知道如果要控制動畫速率的變化,我們可以通過自定義插值器,也可以通過自定義Evaluator來實現。但如果真的讓我們為了速率變化效果而自定義插值器或者Evaluator的話,恐怕大部分同學會有一萬頭草泥馬在眼前奔過,因為大部分的同學的數學知識已經還給老師了。
為了解決方便的控制動畫速率的問題,谷歌為了我等屁民定義了一個KeyFrame的類,KeyFrame直譯過來就是關鍵幀。
關鍵幀這個概念是從動畫裏學來的,我們知道視頻裏,一秒要播放24幀圖片,對於制作flash動畫的同學來講,是不是每一幀都要畫出來呢?當然不是了,如果每一幀都畫出來,那估計做出來一個動畫片都得要一年時間;比如我們要讓一個球在30秒時間內,從(0,0)點運動到(300,200)點,那flash是怎麽來做的呢,在flash中,我們只需要定義兩個關鍵幀,在動畫開始時定義一個,把球的位置放在(0,0)點;在30秒後,再定義一個關鍵幀,把球的位置放在(300,200)點。在動畫 開始時,球初始在是(0,0)點,30秒時間內就adobe flash就會自動填充,把球平滑移動到第二個關鍵幀的位置(300,200)點;
通過上面分析flash動畫的制作原理,我們知道,一個關鍵幀必須包含兩個原素,第一時間點,第二位置。即這個關鍵幀是表示的是某個物體在哪個時間點應該在哪個位置上。
所以谷歌的KeyFrame也不例外,KeyFrame的生成方式為:
Keyframe kf0 = Keyframe.ofFloat(0, 0);
Keyframe kf1 = Keyframe.ofFloat(0.1f, -20f);
Keyframe kf2 = Keyframe.ofFloat(1f, 0);
上面生成了三個KeyFrame對象,其中KeyFrame的ofFloat函數的聲明為:
public static Keyframe ofFloat(float fraction, float value)
- fraction:表示當前的顯示進度,即從加速器中getInterpolation()函數的返回值;
- value:表示當前應該在的位置
比如Keyframe.ofFloat(0, 0)表示動畫進度為0時,動畫所在的數值位置為0;Keyframe.ofFloat(0.25f, -20f)表示動畫進度為25%時,動畫所在的數值位置為-20;Keyframe.ofFloat(1f,0)表示動畫結束時,動畫所在的數值位置為0;
在理解了KeyFrame.ofFloat()的參數以後,我們來看看PropertyValuesHolder是如何使用KeyFrame對象的:
public static PropertyValuesHolder ofKeyframe(String propertyName, Keyframe... values)
- propertyName:動畫所要操作的屬性名
- values:Keyframe的列表,PropertyValuesHolder會根據每個Keyframe的設定,定時將指定的值輸出給動畫。
所以完整的KeyFrame的使用代碼應該是這樣的:
Keyframe frame0 = Keyframe.ofFloat(0f, 0);
Keyframe frame1 = Keyframe.ofFloat(0.1f, -20f);
Keyframe frame2 = Keyframe.ofFloat(1, 0);
PropertyValuesHolder frameHolder = PropertyValuesHolder.ofKeyframe("rotation",frame0,frame1,frame2);
 Animator animator = ObjectAnimator.ofPropertyValuesHolder(mImage,frameHolder);
animator.setDuration(1000);
animator.start();
第一步:生成Keyframe對象;
第二步:利用PropertyValuesHolder.ofKeyframe()生成PropertyValuesHolder對象
第三步:ObjectAnimator.ofPropertyValuesHolder()生成對應的Animator
2、示例
在了解了Keyframe如何使用以後,下面我們就來用一個例子來看看Keyframe的使用方法。
本例的效果圖如下:

看起來跟開篇的一樣,仔細對比一下,還是有不同的,這裏只是實現了左右震動,但並沒有放大效果。
(1)、main.xml
我們先來看看布局代碼,代碼很簡單,一個btn,一個imageview
<?xml version="1.0" encoding="utf-8"?>
<LinearLayout xmlns:android="http://schemas.android.com/apk/res/android"
              android:orientation="vertical"
              android:layout_width="fill_parent"
              android:layout_height="fill_parent">
    <Button
            android:id="@+id/btn"
            android:layout_width="wrap_content"
            android:layout_height="wrap_content"
            android:text="start anim"/>

    <ImageView
            android:id="@+id/img"
            android:layout_width="150dp"
            android:layout_height="wrap_content"
            android:scaleType="fitCenter"
            android:layout_gravity="center_horizontal"
            android:src="@drawable/phone"/>
</LinearLayout>
這段布局代碼沒什麽難度,就不再講了,下面來看看MyActivity中的處理
(2)、MyActivity.java
public class MyActivity extends Activity {
    private ImageView mImage;
    private Button mBtn;
    @Override
    public void onCreate(Bundle savedInstanceState) {
        super.onCreate(savedInstanceState);
        setContentView(R.layout.main);
        mImage = (ImageView)findViewById(R.id.img);
        mBtn = (Button)findViewById(R.id.btn);
        mBtn.setOnClickListener(new View.OnClickListener() {
            @Override
            public void onClick(View v) {
                doOfFloatAnim();
            }
        });
    }

    private void doOfFloatAnim(){
        Keyframe frame0 = Keyframe.ofFloat(0f, 0);
        Keyframe frame1 = Keyframe.ofFloat(0.1f, -20f);
        Keyframe frame2 = Keyframe.ofFloat(0.2f, 20f);
        Keyframe frame3 = Keyframe.ofFloat(0.3f, -20f);
        Keyframe frame4 = Keyframe.ofFloat(0.4f, 20f);
        Keyframe frame5 = Keyframe.ofFloat(0.5f, -20f);
        Keyframe frame6 = Keyframe.ofFloat(0.6f, 20f);
        Keyframe frame7 = Keyframe.ofFloat(0.7f, -20f);
        Keyframe frame8 = Keyframe.ofFloat(0.8f, 20f);
        Keyframe frame9 = Keyframe.ofFloat(0.9f, -20f);
        Keyframe frame10 = Keyframe.ofFloat(1, 0);
        PropertyValuesHolder frameHolder = PropertyValuesHolder.ofKeyframe("rotation",frame0,frame1,frame2,frame3,frame4,frame5,frame6,frame7,frame8,frame9,frame10);

        Animator animator = ObjectAnimator.ofPropertyValuesHolder(mImage,frameHolder);
        animator.setDuration(1000);
        animator.start();
    }
}
這段代碼難度也不大,在點擊按鈕的時候,執行doOfFloatAnim()函數,關鍵問題在doOfFloatAnim()上:
首先,我們定義了11個keyframe:
Keyframe frame0 = Keyframe.ofFloat(0f, 0);
Keyframe frame1 = Keyframe.ofFloat(0.1f, -20f);
Keyframe frame2 = Keyframe.ofFloat(0.2f, 20f);
Keyframe frame3 = Keyframe.ofFloat(0.3f, -20f);
Keyframe frame4 = Keyframe.ofFloat(0.4f, 20f);
Keyframe frame5 = Keyframe.ofFloat(0.5f, -20f);
Keyframe frame6 = Keyframe.ofFloat(0.6f, 20f);
Keyframe frame7 = Keyframe.ofFloat(0.7f, -20f);
Keyframe frame8 = Keyframe.ofFloat(0.8f, 20f);
Keyframe frame9 = Keyframe.ofFloat(0.9f, -20f);
Keyframe frame10 = Keyframe.ofFloat(1, 0);
在這些keyframe中,首先指定在開始和結束時,旋轉角度為0,即恢復原樣:
Keyframe frame0 = Keyframe.ofFloat(0f, 0);
Keyframe frame10 = Keyframe.ofFloat(1, 0);
然後在過程中,讓它左右旋轉,比如在進度為0.2時,旋轉到左邊20度位置:
Keyframe frame1 = Keyframe.ofFloat(0.1f, -20f);
然後在進度為0.3時,旋轉到右邊20度位置:
Keyframe frame3 = Keyframe.ofFloat(0.3f, -20f);
其它類似。正是因為來回左右的旋轉,所以我們看起來就表現為在震動
然後,根據這些Keyframe生成PropertyValuesHolder對象,指定操作的屬性為rotation
PropertyValuesHolder frameHolder = PropertyValuesHolder.ofKeyframe("rotation",frame0,frame1,frame2,frame3,frame4,frame5,frame6,frame7,frame8,frame9,frame10);

Animator animator = ObjectAnimator.ofPropertyValuesHolder(mImage,frameHolder);
animator.setDuration(1000);
animator.start();
最後,利用ObjectAnimator.ofPropertyValuesHolder(mImage,frameHolder)生成ObjectAnimator對象,並開始動畫。
到這裏想必大家已經對Keyframe有了初步的認識,下面我們就來詳細的講講Keyframe;
3、Keyframe之ofFloat、ofInt與常用函數
(1)、ofFloat、ofInt
上面我們看到Keyframe.ofFloat()函數的用法,其實Keyframe除了ofFloat()以外,還有ofInt()、ofObject()這些創建Keyframe實例的方法,Keyframe.ofObject()我們下部分再講,這部分,我們著重看看ofFloat與ofInt的構造函數與使用方法
/**
 * ofFloat
 */
public static Keyframe ofFloat(float fraction)
public static Keyframe ofFloat(float fraction, float value)
/**
 * ofInt
 */
public static Keyframe ofInt(float fraction)
public static Keyframe ofInt(float fraction, int value)
由於ofFloat和ofInt的構造函數都是一樣的,我們這裏只以ofFloat來例來說。
上面我們已經講了ofFloat(float fraction, float value)的用法,fraction表示當前關鍵幀所在的動畫進度位置,value表示當前位置所對應的值。
而另一個構造函數:
public static Keyframe ofFloat(float fraction)
這個構造函數比較特殊,只有一個參數fraction,表示當前關鍵幀所在的動畫進度位置。那在這個進度時所對應的值要怎麽設置呢?
當然有方法啦,除了上面的構造函數,Keyframe還有一些常用函數來設置fraction,value和interpolator,定義如下:
(2)、常用函數:
/**
 * 設置fraction參數,即Keyframe所對應的進度
 */
public void setFraction(float fraction)
/**
 * 設置當前Keyframe所對應的值
 */
public void setValue(Object value)
/**
 * 設置Keyframe動作期間所對應的插值器
 */
public void setInterpolator(TimeInterpolator interpolator)
這三個函數中,插值器的作用應該是比較難理解,如果給這個Keyframe設置上插值器,那麽這個插值器就是從上一個Keyframe開始到當前設置插值器的Keyframe時,這個過程值的計算是利用這個插值器的,比如:
Keyframe frame0 = Keyframe.ofFloat(0f, 0);
Keyframe frame1 = Keyframe.ofFloat(0.1f, -20f);
frame1.setInterpolator(new BounceInterpolator());
Keyframe frame2 = Keyframe.ofFloat(1f, 20f);
frame2.setInterpolator(new LinearInterpolator());
在上面的代碼中,我們給frame1設置了插值器BounceInterpolator,那麽在frame0到frame1的中間值計算過程中,就是用的就是回彈插值器;
同樣,我們給frame2設置了線性插值器(LinearInterpolator),所以在frame1到frame2的中間值計算過程中,使用的就是線性插值器
很顯然,給Keyframe.ofFloat(0f, 0)設置插值器是無效的,因為它是第一幀
(3)、示例1——沒有插值器
下面我們就舉個例子來看下,如何使用上面的各個函數的用法,同樣是基於上面的電話響鈴的例子,如果我們只保存三幀,代碼如下:
Keyframe frame0 = Keyframe.ofFloat(0f, 0);
Keyframe frame1 = Keyframe.ofFloat(0.5f, 100f);
Keyframe frame2 = Keyframe.ofFloat(1);
frame2.setValue(0f);
PropertyValuesHolder frameHolder = PropertyValuesHolder.ofKeyframe("rotation",frame0,frame1,frame2);

Animator animator = ObjectAnimator.ofPropertyValuesHolder(mImage,frameHolder);
animator.setDuration(3000);
animator.start();
在這段代碼中,總共就只有三個關鍵幀,最後一個Keyframe的生成方法是利用:
Keyframe frame2 = Keyframe.ofFloat(1);
frame2.setValue(0f);
對於Keyframe而言,fraction和value這兩個參數是必須有的,所以無論用哪種方式實例化Keyframe都必須保證這兩個值必須被初始化。
這裏沒有設置插值器,會使用默認的線性插值器(LinearInterpolator)
效果圖如下:

(4)、示例2——使用插值器
下面,我們給上面的代碼加上插值器,著重看一下,插值器在哪部分起做用
Keyframe frame0 = Keyframe.ofFloat(0f, 0);
Keyframe frame1 = Keyframe.ofFloat(0.5f, 100f);
Keyframe frame2 = Keyframe.ofFloat(1);
frame2.setValue(0f);
frame2.setInterpolator(new BounceInterpolator());
PropertyValuesHolder frameHolder = PropertyValuesHolder.ofKeyframe("rotation",frame0,frame1,frame2);

Animator animator = ObjectAnimator.ofPropertyValuesHolder(mImage,frameHolder);
animator.setDuration(3000);
animator.start();
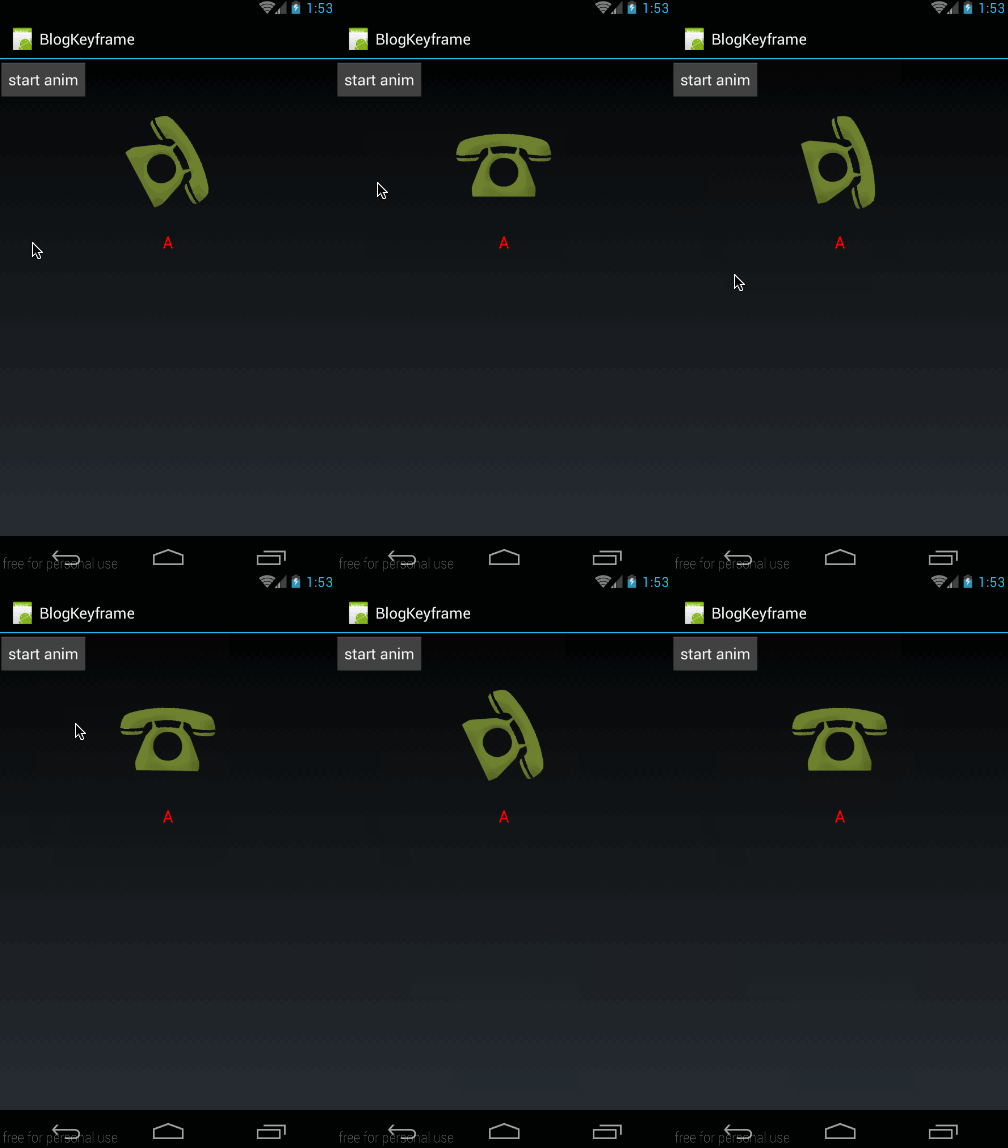
我們給最後一幀frame2添加上回彈插值器(BounceInterpolator),然後看看效果:

從效果圖中可以看出,在frame1到frame2的過程中,使用了回彈插值器,所以從這裏也可驗證我們上面的論述:如果給當前幀添加插值器,那麽在上一幀到當前幀的進度值計算過程中會使用這個插值器。
好了,到這裏有關ofInt,ofFloat和常用的幾個函數的講解就結束了,下面我們再來看看ofObject的使用方法。
4、Keyframe之ofObject
與ofInt,ofFloat一樣,ofObject也有兩個構造函數:
public static Keyframe ofObject(float fraction)
public static Keyframe ofObject(float fraction, Object value)
同樣,如果使用ofObject(float fraction)來構造,也必須使用setValue(Object value)來設置這個關鍵幀所對應的值。
我們還以TextView更改字母的例子來使用下Keyframe.ofObject
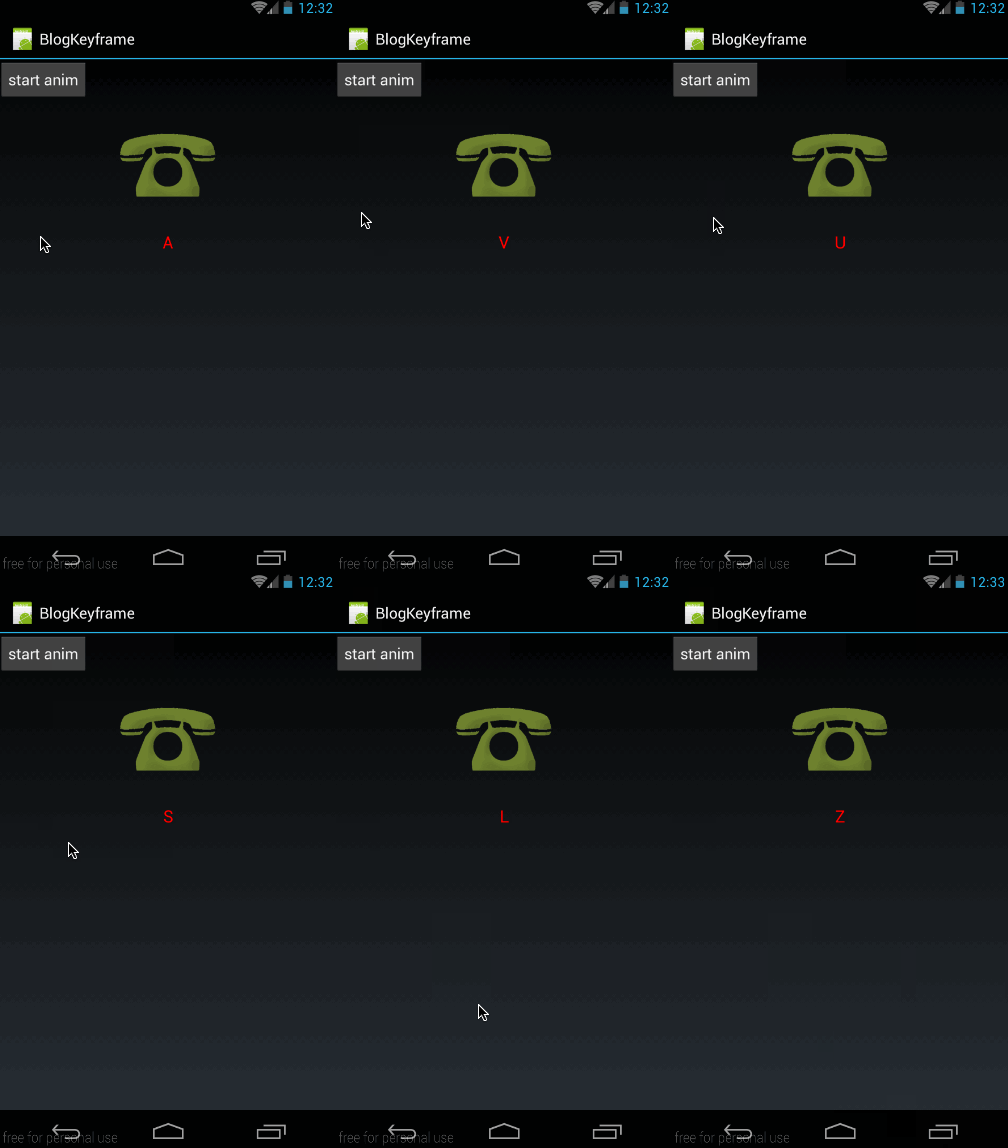
效果圖如下:

明顯L前的12個字母變化的特別快,後面的14個字母變化的比較慢。
我們使用到的MyTextView,CharEvaluator都與上面的一樣,只是動畫部分不同,這裏只列出動畫的代碼:
Keyframe frame0 = Keyframe.ofObject(0f, new Character(‘A‘));
Keyframe frame1 = Keyframe.ofObject(0.1f, new Character(‘L‘));
Keyframe frame2 = Keyframe.ofObject(1,new Character(‘Z‘));

PropertyValuesHolder frameHolder = PropertyValuesHolder.ofKeyframe("CharText",frame0,frame1,frame2);
frameHolder.setEvaluator(new CharEvaluator());
ObjectAnimator animator = ObjectAnimator.ofPropertyValuesHolder(mMyTv,frameHolder);
animator.setDuration(3000);
animator.start();
在這個動畫中,我們定義了三幀:
Keyframe frame0 = Keyframe.ofObject(0f, new Character(‘A‘));
Keyframe frame1 = Keyframe.ofObject(0.1f, new Character(‘L‘));
Keyframe frame2 = Keyframe.ofObject(1,new Character(‘Z‘));
frame0表示在進度為0的時候,動畫的字符是A;frame1表示在進度在0.1的時候,動畫的字符是L;frame2表示在結束的時候,動畫的字符是Z;
利用關鍵幀創建PropertyValuesHolder後,一定要記得設置自定義的Evaluator:
frameHolder.setEvaluator(new CharEvaluator());
凡是使用ofObject來做動畫的時候,都必須調用frameHolder.setEvaluator顯示設置Evaluator,因為系統根本是無法知道,你動畫的中間值Object真正是什麽類型的。
5、疑問:如果沒有設置進度為0或者進度為1時的關鍵幀,展示是怎樣的?
首先,我們以下面這個動畫為例:
Keyframe frame0 = Keyframe.ofFloat(0f, 0);
Keyframe frame1 = Keyframe.ofFloat(0.5f, 100f);
Keyframe frame2 = Keyframe.ofFloat(1,0);
PropertyValuesHolder frameHolder = PropertyValuesHolder.ofKeyframe("rotation", frame0,frame1,frame2);

Animator animator = ObjectAnimator.ofPropertyValuesHolder(mImage, frameHolder);
animator.setDuration(3000);
animator.start();
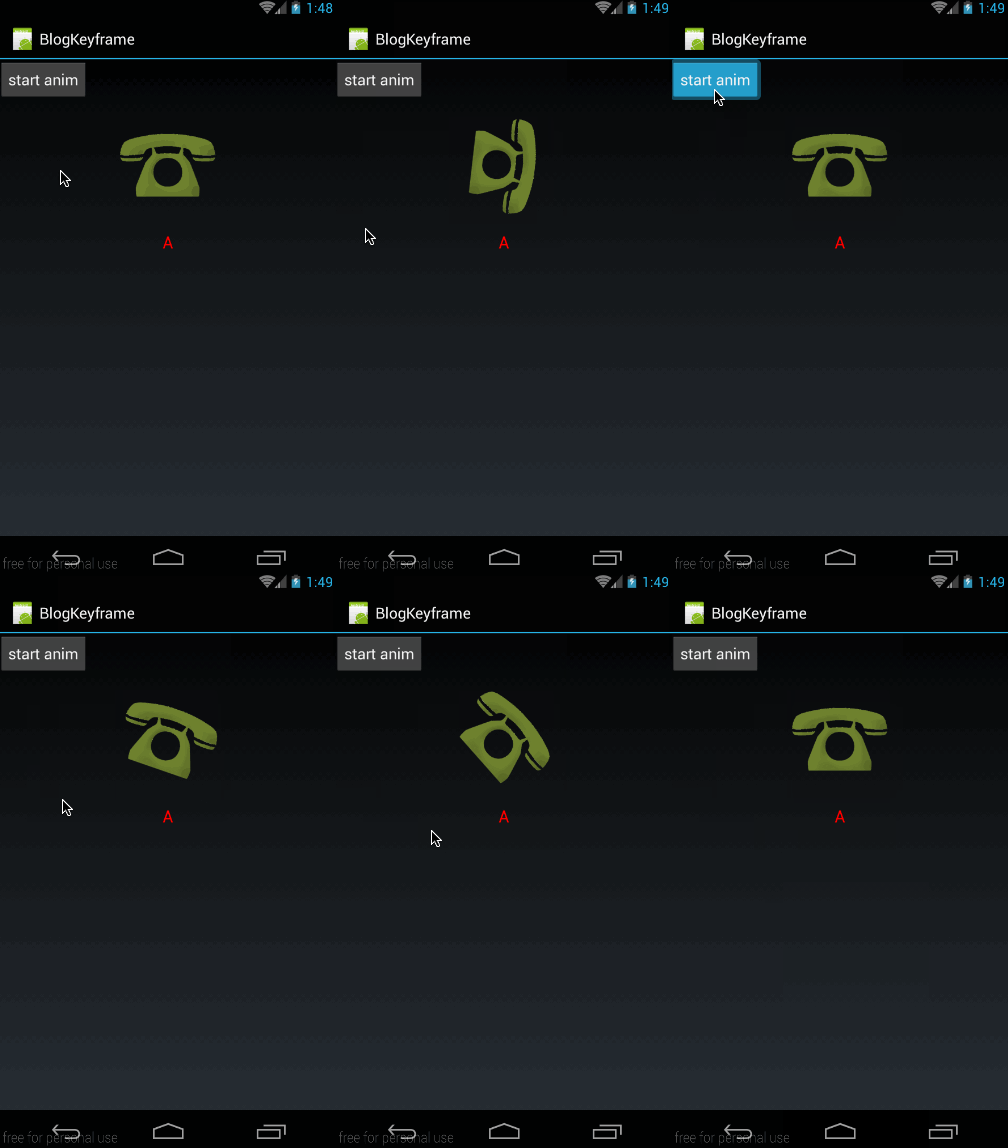
這裏有三個幀,在進度為0.5時,電話向右旋轉100度,然後再轉回來。
效果圖如下:

嘗試一:去掉第0幀,將以第一幀為起始位置
如果我們把第0幀去掉,只保留中間幀和結束幀,看結果會怎樣
Keyframe frame1 = Keyframe.ofFloat(0.5f, 100f);
Keyframe frame2 = Keyframe.ofFloat(1,0);
PropertyValuesHolder frameHolder = PropertyValuesHolder.ofKeyframe("rotation",frame1,frame2);

Animator animator = ObjectAnimator.ofPropertyValuesHolder(mImage, frameHolder);
animator.setDuration(3000);
animator.start();
效果圖如下:

可以看到,動畫是直接從中間幀frame1開始的,即當沒有第0幀時,動畫從最近的一個幀開始。
嘗試二:去掉結束幀,將最後一幀為結束幀
如果我們把結束幀去掉,保留第0幀和中間幀,看結果會怎樣:
Keyframe frame0 = Keyframe.ofFloat(0f, 0);
Keyframe frame1 = Keyframe.ofFloat(0.5f, 100f);
PropertyValuesHolder frameHolder = PropertyValuesHolder.ofKeyframe("rotation", frame0,frame1);

Animator animator = ObjectAnimator.ofPropertyValuesHolder(mImage, frameHolder);
animator.setDuration(3000);
animator.start();
效果圖如下:

嘗試三:只保留一個中間幀,會崩
如果我們把第0幀和結束幀去掉,代碼如下:
PropertyValuesHolder frameHolder = PropertyValuesHolder.ofKeyframe("rotation",frame1);

Animator animator = ObjectAnimator.ofPropertyValuesHolder(mImage, frameHolder);
animator.setDuration(3000);
animator.start();
在點擊按鈕開始動畫時,就直接崩了,報錯信息如下:

報錯問題是數組越界,也就是說,至少要有兩個幀才行。
嘗試四:保留兩個中間幀
再嘗試一下,如果我們把第0幀和結束幀去掉,保留兩個中間幀會怎樣:
我們在上面代碼上再加一個中間幀:
Keyframe frame1 = Keyframe.ofFloat(0.5f, 100f);
Keyframe frame2 = Keyframe.ofFloat(0.7f,50f);
PropertyValuesHolder frameHolder = PropertyValuesHolder.ofKeyframe("rotation",frame1,frame2);

Animator animator = ObjectAnimator.ofPropertyValuesHolder(mImage, frameHolder);
animator.setDuration(3000);
animator.start();
效果圖如下:

可以看到,在保留兩個幀的情況下,是可以運行的,而且,由於去掉了第0幀,所以將frame1做為起始幀,又由於去掉了結束幀,所以將frame2做為結束幀。
下面我們做出結論:
- 如果去掉第0幀,將以第一個關鍵幀為起始位置
- 如果去掉結束幀,將以最後一個關鍵幀為結束位置
- 使用Keyframe來構建動畫,至少要有兩個或兩個以上幀
6、開篇的電話響鈴效果
再重新看看開篇的電話響鈴的效果圖:

發現了沒,除了左右震動,圖標在震動過程中始終是放大的。
上面,我們已經實現了左右震動,下面我們再添加放大效果就好了。
框架的部分就不再講了,與上面一樣,只是動畫部分不同,先貼出動畫的完整代碼:
/**
 * 左右震動效果
 */
Keyframe frame0 = Keyframe.ofFloat(0f, 0);
Keyframe frame1 = Keyframe.ofFloat(0.1f, -20f);
Keyframe frame2 = Keyframe.ofFloat(0.2f, 20f);
Keyframe frame3 = Keyframe.ofFloat(0.3f, -20f);
Keyframe frame4 = Keyframe.ofFloat(0.4f, 20f);
Keyframe frame5 = Keyframe.ofFloat(0.5f, -20f);
Keyframe frame6 = Keyframe.ofFloat(0.6f, 20f);
Keyframe frame7 = Keyframe.ofFloat(0.7f, -20f);
Keyframe frame8 = Keyframe.ofFloat(0.8f, 20f);
Keyframe frame9 = Keyframe.ofFloat(0.9f, -20f);
Keyframe frame10 = Keyframe.ofFloat(1, 0);
PropertyValuesHolder frameHolder1 = PropertyValuesHolder.ofKeyframe("rotation", frame0, frame1, frame2, frame3, frame4,frame5, frame6, frame7, frame8, frame9, frame10);


/**
 * scaleX放大1.1倍
 */
Keyframe scaleXframe0 = Keyframe.ofFloat(0f, 1);
Keyframe scaleXframe1 = Keyframe.ofFloat(0.1f, 1.1f);
Keyframe scaleXframe2 = Keyframe.ofFloat(0.2f, 1.1f);
Keyframe scaleXframe3 = Keyframe.ofFloat(0.3f, 1.1f);
Keyframe scaleXframe4 = Keyframe.ofFloat(0.4f, 1.1f);
Keyframe scaleXframe5 = Keyframe.ofFloat(0.5f, 1.1f);
Keyframe scaleXframe6 = Keyframe.ofFloat(0.6f, 1.1f);
Keyframe scaleXframe7 = Keyframe.ofFloat(0.7f, 1.1f);
Keyframe scaleXframe8 = Keyframe.ofFloat(0.8f, 1.1f);
Keyframe scaleXframe9 = Keyframe.ofFloat(0.9f, 1.1f);
Keyframe scaleXframe10 = Keyframe.ofFloat(1, 1);
PropertyValuesHolder frameHolder2 = PropertyValuesHolder.ofKeyframe("ScaleX",scaleXframe0,scaleXframe1,scaleXframe2,scaleXframe3,scaleXframe4,scaleXframe5,scaleXframe6,scaleXframe7,scaleXframe8,scaleXframe9,scaleXframe10);


/**
 * scaleY放大1.1倍
 */
Keyframe scaleYframe0 = Keyframe.ofFloat(0f, 1);
Keyframe scaleYframe1 = Keyframe.ofFloat(0.1f, 1.1f);
Keyframe scaleYframe2 = Keyframe.ofFloat(0.2f, 1.1f);
Keyframe scaleYframe3 = Keyframe.ofFloat(0.3f, 1.1f);
Keyframe scaleYframe4 = Keyframe.ofFloat(0.4f, 1.1f);
Keyframe scaleYframe5 = Keyframe.ofFloat(0.5f, 1.1f);
Keyframe scaleYframe6 = Keyframe.ofFloat(0.6f, 1.1f);
Keyframe scaleYframe7 = Keyframe.ofFloat(0.7f, 1.1f);
Keyframe scaleYframe8 = Keyframe.ofFloat(0.8f, 1.1f);
Keyframe scaleYframe9 = Keyframe.ofFloat(0.9f, 1.1f);
Keyframe scaleYframe10 = Keyframe.ofFloat(1, 1);
PropertyValuesHolder frameHolder3 = PropertyValuesHolder.ofKeyframe("ScaleY",scaleYframe0,scaleYframe1,scaleYframe2,scaleYframe3,scaleYframe4,scaleYframe5,scaleYframe6,scaleYframe7,scaleYframe8,scaleYframe9,scaleYframe10);

/**
 * 構建動畫
 */
Animator animator = ObjectAnimator.ofPropertyValuesHolder(mImage, frameHolder1,frameHolder2,frameHolder3);
animator.setDuration(1000);
animator.start();
這裏的總共分為四步:
第一步,實現左右震鈴效果;
這部分代碼前面已經講過,這裏就不再贅述
第二步,利用View類中的SetScaleX(float value)方法所對應的ScaleX屬性,在動畫過程中,將圖片橫向放大1.1倍:
Keyframe scaleXframe0 = Keyframe.ofFloat(0f, 1);
Keyframe scaleXframe1 = Keyframe.ofFloat(0.1f, 1.1f);
Keyframe scaleXframe2 = Keyframe.ofFloat(0.2f, 1.1f);
Keyframe scaleXframe3 = Keyframe.ofFloat(0.3f, 1.1f);
Keyframe scaleXframe4 = Keyframe.ofFloat(0.4f, 1.1f);
Keyframe scaleXframe5 = Keyframe.ofFloat(0.5f, 1.1f);
Keyframe scaleXframe6 = Keyframe.ofFloat(0.6f, 1.1f);
Keyframe scaleXframe7 = Keyframe.ofFloat(0.7f, 1.1f);
Keyframe scaleXframe8 = Keyframe.ofFloat(0.8f, 1.1f);
Keyframe scaleXframe9 = Keyframe.ofFloat(0.9f, 1.1f);
Keyframe scaleXframe10 = Keyframe.ofFloat(1, 1);
非常註意的是,在動畫過程中放大1.1倍,在開始動畫和動畫結束時,都要還原狀態,即原大小的1倍值:
Keyframe scaleXframe0 = Keyframe.ofFloat(0f, 1);
Keyframe scaleXframe10 = Keyframe.ofFloat(1, 1);
第三步,同樣利用View類的SetScaleY(float value)方法,在動畫過程中將圖片縱向放大1.1倍。原理與scaleX相同,就不再細講。
第四步:生成ObjectAnimator實例:
Animator animator = ObjectAnimator.ofPropertyValuesHolder(mImage, frameHolder1,frameHolder2,frameHolder3);
我們前面講過,ObjectAnimator ofPropertyValuesHolder(Object target,PropertyValuesHolder… values)中第二個參數是可變長參數,可以傳進去任何多個PropertyValuesHolder對象,這些對象所對應的動畫會同時作用於控件上。這裏我們就將三個屬性動畫同時作用在mImage上,所以圖片的動畫就表現為在左右震動的同時,橫向放大1.1倍,縱向也放大了1.1倍。
所以說,借助Keyframe,不需要使用AnimatorSet,也能實現多個動畫同時播放。這也是ObjectAnimator中唯一一個能實現多動畫同時播放的方法,其它的ObjectAnimator.ofInt,ObjectAnimator.ofFloat,ObjectAnimator.ofObject都只能實現針對一個屬性動畫的操作!
三、PropertyValuesHolder之其它函數
PropertyValuesHolder除了上面的講到的ofInt,ofFloat,ofObject,ofKeyframe以外,api 11的還有幾個函數:
/**
 * 設置動畫的Evaluator
 */
public void setEvaluator(TypeEvaluator evaluator)
/**
 * 用於設置ofFloat所對應的動畫值列表
 */
public void setFloatValues(float... values)
/**
 * 用於設置ofInt所對應的動畫值列表
 */
public void setIntValues(int... values)
/**
 * 用於設置ofKeyframe所對應的動畫值列表
 */
public void setKeyframes(Keyframe... values)
/**
 * 用於設置ofObject所對應的動畫值列表
 */
public void setObjectValues(Object... values)
/**
 * 設置動畫屬性名
 */
public void setPropertyName(String propertyName)
這些函數都比較好理解,setFloatValues(float… values)對應PropertyValuesHolder.ofFloat(),用於動態設置動畫中的數值。setIntValues、setKeyframes、setObjectValues同理;
setPropertyName用於設置PropertyValuesHolder所需要操作的動畫屬性名;
最重要的是setEvaluator(TypeEvaluator evaluator)
/**
 * 設置動畫的Evaluator
 */
public void setEvaluator(TypeEvaluator evaluator)
如果是利用PropertyValuesHolder.ofObject()來創建動畫實例的話,我們是一定要顯示調用 PropertyValuesHolder.setEvaluator()來設置Evaluator的。在上面的字母轉換的例子中,我們已經用過這個函數了。這裏也就沒什麽好講的了。
本文轉自:自定義控件三部曲之動畫篇(八)——PropertyValuesHolder與Keyframe
android.animation(5) - PropertyValuesHolder與Keyframe(轉)
