
Shiro學習之身份驗證
身份驗證,即在應用中誰能證明他就是他本人。一般提供如他們的身份ID一些標識信息來表明他就是他本人,如提供身份證,用戶名/密碼來證明。
在shiro中,用戶需要提供principals (身份)和credentials(證明)給shiro,從而應用能驗證用戶身份:
principals:身份,即主體的標識屬性,可以是任何東西,如用戶名、郵箱等,唯一即可。一個主體可以有多個principals,但只有一個Primary principals,一般是用戶名/密碼/手機號。
credentials:證明/憑證,即只有主體知道的安全值,如密碼/數字證書等。
最常見的principals和credentials組合就是用戶名/密碼了。接下來先進行一個基本的身份認證。
另外兩個相關的概念是之前提到的Subject及Realm,分別是主體及驗證主體的數據源.
2.2 環境準備
本文使用Maven構建,因此需要一點Maven知識。首先準備環境依賴:
<dependencies>
<dependency>
<groupId>junit</groupId>
<artifactId>junit</artifactId>
<version>4.9</version>
</dependency>
<dependency>
<groupId>commons-logging</groupId>
<artifactId>commons-logging</artifactId>
<version>1.1.3</version>
</dependency>
<dependency>
<groupId>org.apache.shiro</groupId>
<artifactId>shiro-core</artifactId>
<version>1.2.2</version>
</dependency>
</dependencies> 添加junit、common-logging及shiro-core依賴即可。
2.3 登錄/退出
1、首先準備一些用戶身份/憑據(shiro.ini)
[users]
zhang=123
wang=123
此處使用ini配置文件,通過[users]指定了兩個主體:zhang/123、wang/123。
2、測試用例(com.github.zhangkaitao.shiro.chapter2.LoginLogoutTest)
@Test public void testHelloworld() { //1、獲取SecurityManager工廠,此處使用Ini配置文件初始化SecurityManagerFactory<org.apache.shiro.mgt.SecurityManager> factory = new IniSecurityManagerFactory("classpath:shiro.ini"); //2、得到SecurityManager實例 並綁定給SecurityUtils org.apache.shiro.mgt.SecurityManager securityManager = factory.getInstance(); SecurityUtils.setSecurityManager(securityManager); //3、得到Subject及創建用戶名/密碼身份驗證Token(即用戶身份/憑證) Subject subject = SecurityUtils.getSubject(); UsernamePasswordToken token = new UsernamePasswordToken("zhang", "123"); try { //4、登錄,即身份驗證 subject.login(token); } catch (AuthenticationException e) { //5、身份驗證失敗 } Assert.assertEquals(true, subject.isAuthenticated()); //斷言用戶已經登錄 //6、退出 subject.logout(); }
2.1、首先通過new IniSecurityManagerFactory並指定一個ini配置文件來創建一個SecurityManager工廠;
2.2、接著獲取SecurityManager並綁定到SecurityUtils,這是一個全局設置,設置一次即可;
2.3、通過SecurityUtils得到Subject,其會自動綁定到當前線程;如果在web環境在請求結束時需要解除綁定;然後獲取身份驗證的Token,如用戶名/密碼;
2.4、調用subject.login方法進行登錄,其會自動委托給SecurityManager.login方法進行登錄;
2.5、如果身份驗證失敗請捕獲AuthenticationException或其子類,常見的如: DisabledAccountException(禁用的帳號)、LockedAccountException(鎖定的帳號)、UnknownAccountException(錯誤的帳號)、ExcessiveAttemptsException(登錄失敗次數過多)、IncorrectCredentialsException (錯誤的憑證)、ExpiredCredentialsException(過期的憑證)等,具體請查看其繼承關系;對於頁面的錯誤消息展示,最好使用如“用戶名/密碼錯誤”而不是“用戶名錯誤”/“密碼錯誤”,防止一些惡意用戶非法掃描帳號庫;
2.6、最後可以調用subject.logout退出,其會自動委托給SecurityManager.logout方法退出.
從如上代碼可總結出身份驗證的步驟:
1、收集用戶身份/憑證,即如用戶名/密碼;
2、調用Subject.login進行登錄,如果失敗將得到相應的AuthenticationException異常,根據異常提示用戶錯誤信息;否則登錄成功;
3、最後調用Subject.logout進行退出操作。
如上測試的幾個問題:
1、用戶名/密碼硬編碼在ini配置文件,以後需要改成如數據庫存儲,且密碼需要加密存儲;
2、用戶身份Token可能不僅僅是用戶名/密碼,也可能還有其他的,如登錄時允許用戶名/郵箱/手機號同時登錄
2.4 身份認證流程
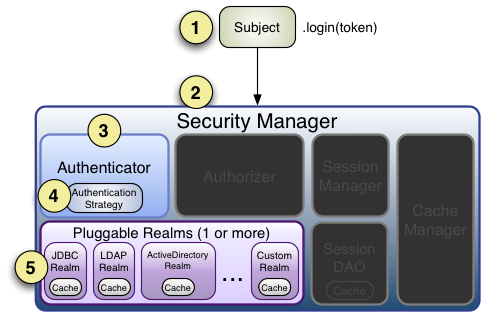
流程如下:
1、首先調用Subject.login(token)進行登錄,其會自動委托給Security Manager,調用之前必須通過SecurityUtils. setSecurityManager()設置;
2、SecurityManager負責真正的身份驗證邏輯;它會委托給Authenticator進行身份驗證;
3、Authenticator才是真正的身份驗證者,Shiro API中核心的身份認證入口點,此處可以自定義插入自己的實現;
4、Authenticator可能會委托給相應的AuthenticationStrategy進行多Realm身份驗證,默認ModularRealmAuthenticator會調用AuthenticationStrategy進行多Realm身份驗證;
5、Authenticator會把相應的token傳入Realm,從Realm獲取身份驗證信息,如果沒有返回/拋出異常表示身份驗證失敗了。此處可以配置多個Realm,將按照相應的順序及策略進行訪問。
2.5 Realm
Realm:域,Shiro從從Realm獲取安全數據(如用戶、角色、權限),就是說SecurityManager要驗證用戶身份,那麽它需要從Realm獲取相應的用戶進行比較以確定用戶身份是否合法;也需要從Realm得到用戶相應的角色/權限進行驗證用戶是否能進行操作;可以把Realm看成DataSource,即安全數據源。如我們之前的ini配置方式將使用org.apache.shiro.realm.text.IniRealm。
org.apache.shiro.realm.Realm接口如下:
String getName(); //返回一個唯一的Realm名字
boolean supports(AuthenticationToken token); //判斷此Realm是否支持此Token
AuthenticationInfo getAuthenticationInfo(AuthenticationToken token)
 throws AuthenticationException;  //根據Token獲取認證信息
單Realm配置
1、自定義Realm實現(com.github.zhangkaitao.shiro.chapter2.realm.MyRealm1):
public class MyRealm1 implements Realm {
    @Override
    public String getName() {
        return "myrealm1";
    }
    @Override
    public boolean supports(AuthenticationToken token) {
        //僅支持UsernamePasswordToken類型的Token
        return token instanceof UsernamePasswordToken;
    }
    @Override
    public AuthenticationInfo getAuthenticationInfo(AuthenticationToken token) throws AuthenticationException {
        String username = (String)token.getPrincipal();  //得到用戶名
        String password = new String((char[])token.getCredentials()); //得到密碼
        if(!"zhang".equals(username)) {
            throw new UnknownAccountException(); //如果用戶名錯誤
        }
        if(!"123".equals(password)) {
            throw new IncorrectCredentialsException(); //如果密碼錯誤
        }
        //如果身份認證驗證成功,返回一個AuthenticationInfo實現;
        return new SimpleAuthenticationInfo(username, password, getName());
    }
}
2、ini配置文件指定自定義Realm實現(shiro-realm.ini)
#聲明一個realm
myRealm1=com.github.zhangkaitao.shiro.chapter2.realm.MyRealm1
#指定securityManager的realms實現
securityManager.realms=$myRealm1
通過$name來引入之前的realm定義
3、測試用例請參考com.github.zhangkaitao.shiro.chapter2.LoginLogoutTest的testCustomRealm測試方法,只需要把之前的shiro.ini配置文件改成shiro-realm.ini即可。
多Realm配置
1、ini配置文件(shiro-multi-realm.ini)
#聲明一個realm
myRealm1=com.github.zhangkaitao.shiro.chapter2.realm.MyRealm1
myRealm2=com.github.zhangkaitao.shiro.chapter2.realm.MyRealm2
#指定securityManager的realms實現
securityManager.realms=$myRealm1,$myRealm2
securityManager會按照realms指定的順序進行身份認證。此處我們使用顯示指定順序的方式指定了Realm的順序,如果刪除“securityManager.realms=$myRealm1,$myRealm2”,那麽securityManager會按照realm聲明的順序進行使用(即無需設置realms屬性,其會自動發現),當我們顯示指定realm後,其他沒有指定realm將被忽略,如“securityManager.realms=$myRealm1”,那麽myRealm2不會被自動設置進去。
2、測試用例請參考com.github.zhangkaitao.shiro.chapter2.LoginLogoutTest的testCustomMultiRealm測試方法
Shiro默認提供的Realm
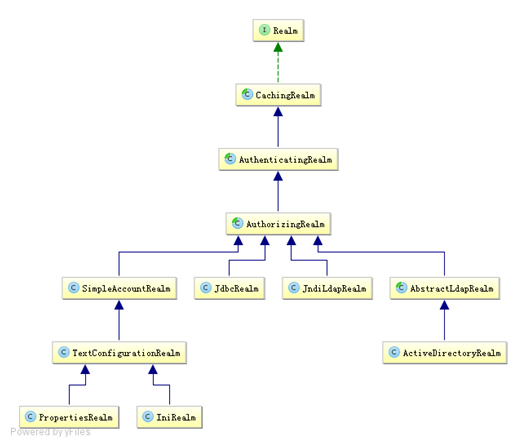
以後一般繼承AuthorizingRealm(授權)即可;其繼承了AuthenticatingRealm(即身份驗證),而且也間接繼承了CachingRealm(帶有緩存實現)。其中主要默認實現如下:
org.apache.shiro.realm.text.IniRealm:[users]部分指定用戶名/密碼及其角色;[roles]部分指定角色即權限信息;
org.apache.shiro.realm.text.PropertiesRealm: user.username=password,role1,role2指定用戶名/密碼及其角色;role.role1=permission1,permission2指定角色及權限信息;
org.apache.shiro.realm.jdbc.JdbcRealm:通過sql查詢相應的信息,如“select password from users where username = ?”獲取用戶密碼,“select password, password_salt from users where username = ?”獲取用戶密碼及鹽;“select role_name from user_roles where username = ?”獲取用戶角色;“select permission from roles_permissions where role_name = ?”獲取角色對應的權限信息;也可以調用相應的api進行自定義sql;
JDBC Realm使用
1、數據庫及依賴
<dependency>
<groupId>mysql</groupId>
<artifactId>mysql-connector-java</artifactId>
<version>5.1.25</version>
</dependency>
<dependency>
<groupId>com.alibaba</groupId>
<artifactId>druid</artifactId>
<version>0.2.23</version>
</dependency>
本文將使用mysql數據庫及druid連接池;
2、到數據庫shiro下建三張表:users(用戶名/密碼)、user_roles(用戶/角色)、roles_permissions(角色/權限),具體請參照shiro-example-chapter2/sql/shiro.sql;並添加一個用戶記錄,用戶名/密碼為zhang/123;
3、ini配置(shiro-jdbc-realm.ini)
jdbcRealm=org.apache.shiro.realm.jdbc.JdbcRealm
dataSource=com.alibaba.druid.pool.DruidDataSource
dataSource.driverClassName=com.mysql.jdbc.Driver
dataSource.url=jdbc:mysql://localhost:3306/shiro
dataSource.username=root
#dataSource.password=
jdbcRealm.dataSource=$dataSource
securityManager.realms=$jdbcRealm
1、變量名=全限定類名會自動創建一個類實例
2、變量名.屬性=值 自動調用相應的setter方法進行賦值
3、$變量名 引用之前的一個對象實例
4、測試代碼請參照com.github.zhangkaitao.shiro.chapter2.LoginLogoutTest的testJDBCRealm方法,和之前的沒什麽區別。
2.6 Authenticator及AuthenticationStrategy
Authenticator的職責是驗證用戶帳號,是Shiro API中身份驗證核心的入口點:
public AuthenticationInfo authenticate(AuthenticationToken authenticationToken)
            throws AuthenticationException;
如果驗證成功,將返回AuthenticationInfo驗證信息;此信息中包含了身份及憑證;如果驗證失敗將拋出相應的AuthenticationException實現。
SecurityManager接口繼承了Authenticator,另外還有一個ModularRealmAuthenticator實現,其委托給多個Realm進行驗證,驗證規則通過AuthenticationStrategy接口指定,默認提供的實現:
FirstSuccessfulStrategy:只要有一個Realm驗證成功即可,只返回第一個Realm身份驗證成功的認證信息,其他的忽略;
AtLeastOneSuccessfulStrategy:只要有一個Realm驗證成功即可,和FirstSuccessfulStrategy不同,返回所有Realm身份驗證成功的認證信息;
AllSuccessfulStrategy:所有Realm驗證成功才算成功,且返回所有Realm身份驗證成功的認證信息,如果有一個失敗就失敗了。
ModularRealmAuthenticator默認使用AtLeastOneSuccessfulStrategy策略。
假設我們有三個realm:
myRealm1: 用戶名/密碼為zhang/123時成功,且返回身份/憑據為zhang/123;
myRealm2: 用戶名/密碼為wang/123時成功,且返回身份/憑據為wang/123;
myRealm3: 用戶名/密碼為zhang/123時成功,且返回身份/憑據為[email protected]/123,和myRealm1不同的是返回時的身份變了;
1、ini配置文件(shiro-authenticator-all-success.ini)
#指定securityManager的authenticator實現
authenticator=org.apache.shiro.authc.pam.ModularRealmAuthenticator
securityManager.authenticator=$authenticator

#指定securityManager.authenticator的authenticationStrategy
allSuccessfulStrategy=org.apache.shiro.authc.pam.AllSuccessfulStrategy
securityManager.authenticator.authenticationStrategy=$allSuccessfulStrategy
myRealm1=com.github.zhangkaitao.shiro.chapter2.realm.MyRealm1
myRealm2=com.github.zhangkaitao.shiro.chapter2.realm.MyRealm2
myRealm3=com.github.zhangkaitao.shiro.chapter2.realm.MyRealm3
securityManager.realms=$myRealm1,$myRealm3
2、測試代碼(com.github.zhangkaitao.shiro.chapter2.AuthenticatorTest)
2.1、首先通用化登錄邏輯
    private void login(String configFile) {
        //1、獲取SecurityManager工廠,此處使用Ini配置文件初始化SecurityManager
        Factory<org.apache.shiro.mgt.SecurityManager> factory =
                new IniSecurityManagerFactory(configFile);

        //2、得到SecurityManager實例 並綁定給SecurityUtils
        org.apache.shiro.mgt.SecurityManager securityManager = factory.getInstance();
        SecurityUtils.setSecurityManager(securityManager);

        //3、得到Subject及創建用戶名/密碼身份驗證Token(即用戶身份/憑證)
        Subject subject = SecurityUtils.getSubject();
        UsernamePasswordToken token = new UsernamePasswordToken("zhang", "123");

        subject.login(token);
    }
2.2、測試AllSuccessfulStrategy成功:
    @Test
    public void testAllSuccessfulStrategyWithSuccess() {
        login("classpath:shiro-authenticator-all-success.ini");
        Subject subject = SecurityUtils.getSubject();

        //得到一個身份集合,其包含了Realm驗證成功的身份信息
        PrincipalCollection principalCollection = subject.getPrincipals();
        Assert.assertEquals(2, principalCollection.asList().size());
    }
即PrincipalCollection包含了zhang和[email protected]身份信息。
2.3、測試AllSuccessfulStrategy失敗:
    @Test(expected = UnknownAccountException.class)
    public void testAllSuccessfulStrategyWithFail() {
        login("classpath:shiro-authenticator-all-fail.ini");
        Subject subject = SecurityUtils.getSubject();
}
shiro-authenticator-all-fail.ini與shiro-authenticator-all-success.ini不同的配置是使用了securityManager.realms=$myRealm1,$myRealm2;即myRealm驗證失敗。
對於AtLeastOneSuccessfulStrategy和FirstSuccessfulStrategy的區別,請參照testAtLeastOneSuccessfulStrategyWithSuccess和testFirstOneSuccessfulStrategyWithSuccess測試方法。唯一不同點一個是返回所有驗證成功的Realm的認證信息;另一個是只返回第一個驗證成功的Realm的認證信息。
自定義AuthenticationStrategy實現,首先看其API:
//在所有Realm驗證之前調用 AuthenticationInfo beforeAllAttempts( Collection<? extends Realm> realms, AuthenticationToken token) throws AuthenticationException; //在每個Realm之前調用 AuthenticationInfo beforeAttempt( Realm realm, AuthenticationToken token, AuthenticationInfo aggregate) throws AuthenticationException; //在每個Realm之後調用 AuthenticationInfo afterAttempt( Realm realm, AuthenticationToken token, AuthenticationInfo singleRealmInfo, AuthenticationInfo aggregateInfo, Throwable t) throws AuthenticationException; //在所有Realm之後調用 AuthenticationInfo afterAllAttempts( AuthenticationToken token, AuthenticationInfo aggregate) throws AuthenticationException;
因為每個AuthenticationStrategy實例都是無狀態的,所有每次都通過接口將相應的認證信息傳入下一次流程;通過如上接口可以進行如合並/返回第一個驗證成功的認證信息。
自定義實現時一般繼承org.apache.shiro.authc.pam.AbstractAuthenticationStrategy即可,具體可以參考代碼com.github.zhangkaitao.shiro.chapter2.authenticator.strategy包下OnlyOneAuthenticatorStrategy 和AtLeastTwoAuthenticatorStrategy。
到此基本的身份驗證就搞定了,對於AuthenticationToken 、AuthenticationInfo和Realm的詳細使用後續章節再陸續介紹。
示例源代碼:https://github.com/zhangkaitao/shiro-example;
轉自http://jinnianshilongnian.iteye.com/blog/2019547.強烈推薦此博主的博客
Shiro學習之身份驗證