
iOS SDK開發匯總
阿新 • • 發佈:2017-12-18
彈出 arc imu void div elf hub 分代 編譯 以前也做過靜態庫的開發,不過都是一些簡單的調用,最近在做項目的時候,發現其中還有很多問題,所以建個小項目簡單記錄遇到的問題以及正確的解決辦法。
在項目中遇到的問題如下:xib文件獲取不到, storyboard提示not loadead yet , xib和storyboard中的圖片獲取不到。 通常我們進行靜態庫開發的過程包括下面幾個方面:(可以實現在開發靜態庫的同時在主工程中查看代碼結果是否和預期一致) 1、主工程:可以實現直接測試靜態庫內的各種模塊功能; 2、靜態庫:封裝自己的靜態庫,方便使用,使功能模塊化; 3、bundle資源包:把靜態庫中的資源文件封裝到bundle包中。資源文件包括圖片、storyboard,xib文件、plist文件以及mp3等。  3、新建控制器SDKVCtest02,同時創建SDKVCtest02.storyboard,關聯控制器和故事板。SDKVCtest02.storyboard中和上面的xib一樣布局。
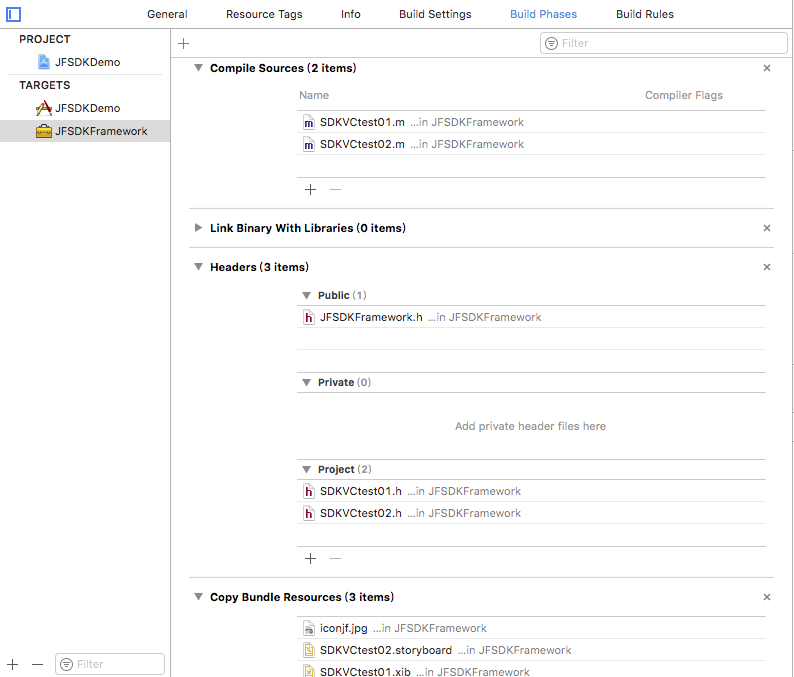
4、此時JFSDKFramework的Build Phases如下所示:(可以根據具體情況調整暴露的頭文件)
3、新建控制器SDKVCtest02,同時創建SDKVCtest02.storyboard,關聯控制器和故事板。SDKVCtest02.storyboard中和上面的xib一樣布局。
4、此時JFSDKFramework的Build Phases如下所示:(可以根據具體情況調整暴露的頭文件)
 5、此時在ViewController.m中添加兩個控制器的頭文件。然後分別展示兩個控制器(xib和storyboard),部分代碼如下:
 3、修改兩個控制器中的代碼引用,把默認的主bundle修改為我們自定義的bundle包:
//SDKVCtest01
3、修改兩個控制器中的代碼引用,把默認的主bundle修改為我們自定義的bundle包:
//SDKVCtest01
在項目中遇到的問題如下:xib文件獲取不到, storyboard提示not loadead yet , xib和storyboard中的圖片獲取不到。 通常我們進行靜態庫開發的過程包括下面幾個方面:(可以實現在開發靜態庫的同時在主工程中查看代碼結果是否和預期一致) 1、主工程:可以實現直接測試靜態庫內的各種模塊功能; 2、靜態庫:封裝自己的靜態庫,方便使用,使功能模塊化; 3、bundle資源包:把靜態庫中的資源文件封裝到bundle包中。資源文件包括圖片、storyboard,xib文件、plist文件以及mp3等。
一、新建名稱為JFSDKDemo的單控制器工程,設置最低系統版本號,設置目標設備。
二、新建名稱為JFSDKFramework的靜態庫,具體為file—new—target—cocoatouch framework。設置最低系統版本號,設置目標設備
1、設置JFSDKFramework為靜態庫:Build Settings —>Mach-O Type 設置為Static Library 2、新建控制器:SDKVCtest01(勾選xib,同時創建xib文件)。添加一張圖片備用。然後這個xib中添加兩個UIImageView,其中一個在xib中直接設置圖片,另一個在代碼中設置。xib如下:
3、新建控制器SDKVCtest02,同時創建SDKVCtest02.storyboard,關聯控制器和故事板。SDKVCtest02.storyboard中和上面的xib一樣布局。
4、此時JFSDKFramework的Build Phases如下所示:(可以根據具體情況調整暴露的頭文件)
5、此時在ViewController.m中添加兩個控制器的頭文件。然後分別展示兩個控制器(xib和storyboard),部分代碼如下:
- (IBAction)pushXib:(UIButton *)sender { SDKVCtest01*vc = [[SDKVCtest01 alloc]init]; [self presentViewController:vc animated:YES completion:nil]; } - (IBAction)pushStoryboard:(UIButton *)sender { SDKVCtest02 *vc = [[SDKVCtest02 alloc]init]; [self presentViewController:vc animated:YES completion:nil]; }
發現,啥也沒有,這就對了,因為默認的加載xib,storyboard,圖片等資源是在程序的主bundle中加載的,此時主工程中雖然添加了我們的SDK但是查找不到相應的資源,因而下面我們對資源文件進行打包,即使用bundle文件打包資源文件。
三、bundle資源包:把靜態庫中的資源文件封裝到bundle包中。資源文件包括圖片、storyboard,xib文件、plist文件以及mp3等。
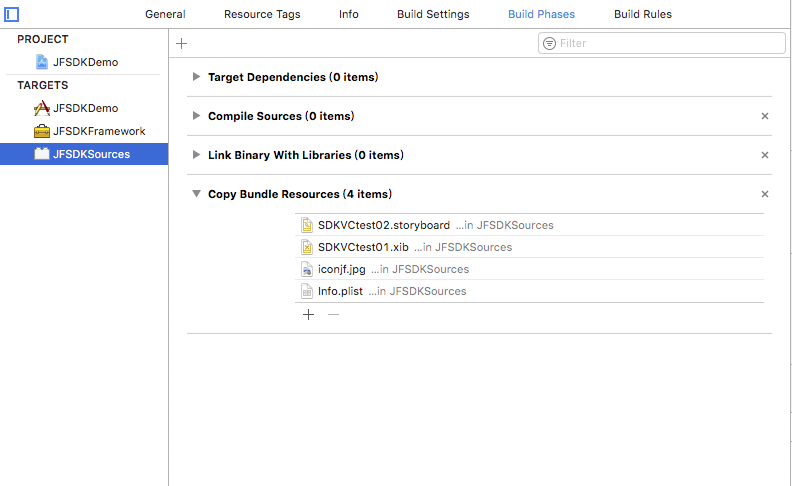
生成bundle有兩種方式, 第一種就是直接在桌面新建文件夾,修改名稱添加“.bundle”後綴,然後把資源文件添加進去即可。 第二種:在Xcode中file—>new —>target —>mac os —>bundle。然後把資源添加到編譯文件中。 我們采用第二種, 1、因為我們的靜態庫中有xib和storyboard,我們的bundle中需要的是編譯之後的nib和storyboardc文件,如果采用第一種方式需要每次編譯之後找到編譯的文件添加到bundle文件中,這樣很麻煩; 2、此外若xib或者storyboard中直接引用圖片,默認是主bundle,采用第二種方式時,若要修改為自定義bundle只能代碼解決,而第一種方式圖片和xib以及storyboard一起編譯,不用任何其他修改即可完美運行,因而第二種不予采納。 采用第二種的方式只需要添加xib和storyboard文件到bundle target中,會直接編譯文件到bundle文件中。 具體步驟如下: 1、file—>new —>target —>mac os —>bundle 新建bundle命名為“JFSDKSources”。Build Settings中設置Base SDK 為 Latest IOS;Build Settings中設置COMBINE_HIDPI_IMAGES 為NO,防止圖片被編譯為tiff格式;設置最低系統版本號,設置目標設備。 2、把第二步中的xib,storyboard以及圖片資源添加到JFSDKSources中,查看Build Phases確保資源文件被添加到Copy Bundle Resources中(因為Xcode9拖拽的文件都不會被添加,這個真的很坑,每次都要手動添加),最後如下圖:
3、修改兩個控制器中的代碼引用,把默認的主bundle修改為我們自定義的bundle包:
//SDKVCtest01
- (instancetype)init{
    SDKVCtest01 *testVC =  [[SDKVCtest01 alloc]initWithNibName:@"SDKVCtest01" bundle:[NSBundle bundleWithPath:[[NSBundle mainBundle] pathForResource:@"JFSDKSources" ofType:@"bundle"]]];
    return testVC;
}
- (void)viewDidLoad {
    [super viewDidLoad];
    // Do any additional setup after loading the view from its nib.
    self.view.backgroundColor = [UIColor whiteColor];
    self.imageView1.image = [UIImage imageNamed:@"iconjf.png" inBundle:[NSBundle bundleWithPath:[[NSBundle mainBundle] pathForResource:@"JFSDKSources" ofType:@"bundle"]] compatibleWithTraitCollection:nil];
}
//SDKVCtest02
- (void)viewDidLoad {
    [super viewDidLoad];
    self.view.backgroundColor = [UIColor whiteColor];
    // Do any additional setup after loading the view.
    self.imageView1.image = [UIImage imageNamed:@"iconjf.png" inBundle:[NSBundle bundleWithPath:[[NSBundle mainBundle] pathForResource:@"JFSDKSources" ofType:@"bundle"]] compatibleWithTraitCollection:nil];

}
- (instancetype)init{
    SDKVCtest02 *testVC =  [[UIStoryboard storyboardWithName:@"SDKVCtest02" bundle:[NSBundle bundleWithPath:[[NSBundle mainBundle] pathForResource:@"JFSDKSources" ofType:@"bundle"]]] instantiateViewControllerWithIdentifier:@"SDKVCTest02"];

    return testVC;
}
4、主工程中添加product中的JFSDKSources.bundle。 command+r,發現xib,storyboard以及png都完美呈現出來,這樣,靜態庫和bundle資源包基本完成,還需要最後一步。
四、新建aggregate:實現腳本合並靜態庫支持的設備,生成通用靜態庫。
1、file—>new —>target —>cross-platform—>aggregate 2、Build Phases 新建Run Script,添加如下腳本FMK_NAME="JFSDKFramework" # Install dir will be the final output to the framework. # The following line create it in the root folder of the current project. SDK_DIR=${SRCROOT}/Products/${FMK_NAME} INSTALL_DIR=${SRCROOT}/Products/${FMK_NAME}/${FMK_NAME}.framework # Working dir will be deleted after the framework creation. WRK_DIR=build DEVICE_DIR=${WRK_DIR}/Release-iphoneos/${FMK_NAME}.framework SIMULATOR_DIR=${WRK_DIR}/Release-iphonesimulator/${FMK_NAME}.framework # -configuration ${CONFIGURATION} # Clean and Building both architectures. xcodebuild -configuration "Release" -target "${FMK_NAME}" -sdk iphoneos xcodebuild -configuration "Release" -target "${FMK_NAME}" -sdk iphonesimulator # Cleaning the oldest. if [ -d "${SDK_DIR}" ] then rm -rf "${SDK_DIR}" fi mkdir -p "${INSTALL_DIR}" cp -R "${DEVICE_DIR}/" "${INSTALL_DIR}/" # Uses the Lipo Tool to merge both binary files (i386 + armv6/armv7) into one Universal final product. lipo -create "${DEVICE_DIR}/${FMK_NAME}" "${SIMULATOR_DIR}/${FMK_NAME}" -output "${INSTALL_DIR}/${FMK_NAME}" rm -r "${WRK_DIR}" #mv "${INSTALL_DIR}/${FMK_NAME}.bundle" "${SDK_DIR}" open "${SDK_DIR}"
3、command +R,編譯幾秒鐘彈出framework文件。 大功告成!!! 附:不同資源在靜態庫中的加
 //圖片
    UIImage *image = [UIImage imageNamed:@"iconjf.png" inBundle:[NSBundle bundleWithPath:[[NSBundle mainBundle] pathForResource:@"JFSDKSources" ofType:@"bundle"]] compatibleWithTraitCollection:nil];
    //storyboard
    UIStoryboard *storyboard = [UIStoryboard storyboardWithName:@"SDKVCtest02" bundle:[NSBundle bundleWithPath:[[NSBundle mainBundle] pathForResource:@"JFSDKSources" ofType:@"bundle"]]];
    //xib
    SDKVCtest01 *testVC =  [[SDKVCtest01 alloc]initWithNibName:@"SDKVCtest01" bundle:[NSBundle bundleWithPath:[[NSBundle mainBundle] pathForResource:@"JFSDKSources" ofType:@"bundle"]]];

    NSArray *array = [[NSBundle bundleWithPath:[[NSBundle mainBundle] pathForResource:@"JFSDKSources" ofType:@"bundle"]] loadNibNamed:@"nibname" owner:nil options:nil];
    //mp3
    NSString *path = [[NSBundle bundleWithPath:[[NSBundle mainBundle] pathForResource:@"JFSDKSources" ofType:@"bundle"]] pathForResource:@"test" ofType:@"mp3"];

    NSURL *fileURL = [[NSURL alloc] initFileURLWithPath: path];
    //plist
    NSString *filePath = [[NSBundle bundleWithPath:[[NSBundle mainBundle] pathForResource:@"JFSDKSources" ofType:@"bundle"]] pathForResource: @"test" ofType: @"plist"];
    NSDictionary *plistDic = [NSDictionary dictionaryWithContentsOfFile:filePath];
註意: 1、storyboard 在bundle中的文件應該是編譯之後的 storyboardc 文件; 2、xib 在bundle中的文件應該是編譯之後的 nib 文件; 3、不要讓圖片編譯成tiff格式。 Demo地址:點這裏 參考文檔:靜態庫腳本合成解釋 SDK 開發
iOS SDK開發匯總