
CentOS7中搭建Cobbler自動裝機服務
下面將利用一臺CentOS系統虛擬機搭建Cobbler服務平臺,為其他新機器安裝Linux操作系統。
部署Cobbler環境
1、導入epel源
服務端共享安裝:

epel-release-latest-7.noarch.rpm
//軟件倉庫項目
該軟件包可以使得yum倉庫可以在線升級或者下載所需軟件包;
2、正式部署服務
yum install cobbler cobbler-web dhcp tftp-server pykickstart httpd rsync xinetd
//安裝所需服務(此處各項服務功能在PXE裝機中有所介紹,並且功能作相似)
// rsync為遠程同步管理服務
systemctl restart httpd.service
//啟動httpd服務systemctl start cobblerd.service
//啟動cobbler服務,只有安裝好cobbler服務後,啟動服務,才能對後面cobbler自動裝機所需服務進行優化。vim /etc/cobbler/settings //修改cobbler服務配置文件
next_server: 192.168.144.130          //指定PXE位置

server: 192.168.144.130
//指定自動裝機服務器地址
manage_dhcp: 1
//管理dhcp啟動(因為本服務器也需要提供DHCP服務,所以通過cobbler平臺一起管理)
systemctl stop firewalld.service  //關閉防火墻
setenforce 0   //關閉增強安全功能
systemctl restart cobblerd.service
上述cobbler服務配置完成後,重啟服務,利用cobbler check 繼續優化其他服務
cobbler check
1 : The ‘server‘ field in /etc/cobbler/settings must be set to something other than localhost, or kickstarting features will not work.  This should be a resolvable hostname or IP for the boot server as reachable by all machines that will use it.
2 : For PXE to be functional, the ‘next_server‘ field in /etc/cobbler/settings must be set to something other than 127.0.0.1, and should match the IP of the boot server on the PXE network.
3 : SELinux is enabled. Please review the following wiki page for details on ensuring cobbler works correctly in your SELinux environment:https://github.com/cobbler/cobbler/wiki/Selinux
4 : change ‘disable‘ to ‘no‘ in /etc/xinetd.d/tftp
5 : enable and start rsyncd.service with systemctl
6 : debmirror package is not installed, it will be required to manage debian deployments and repositories
7 : The default password used by the sample templates for newly installed machines (default_password_crypted in /etc/cobbler/settings) is still set to ‘cobbler‘ and should be changed, try: "openssl passwd -1 -salt ‘random-phrase-here‘ ‘your-password-here‘" to generate new one
8 : fencing tools were not found, and are required to use the (optional) power management features. install cman or fence-agents to use them

Restart cobblerd and then run ‘cobbler sync‘ to apply changes.
//根據上述提示優化信息進行進一步優化。

    下面三條可以忽略不去處理
1 : SELinux is enabled. Please review the following wiki page for details on ensuring cobbler works correctly in your SELinux environment:https://github.com/cobbler/cobbler/wiki/Selinux
2 : debmirror package is not installed, it will be required to manage debian deployments and repositories
3 : fencing tools were not found, and are required to use the (optional) power management features. install cman or fence-agents to use them

根據上述優化提示可知:
1、需要在/etc/cobbler/settings中
   設置PXE位置和服務器地址,即next-server和server地址;
2、在/etc/xinetd.d/tftp打開tftp服務
3、在/etc/cobbler/settings中設置自動裝機管理員密碼(利用鹽值加密工具)
4、設置rsync遠程同步管理,並且完成同步。
設置自動裝機管理員登陸密碼
openssl passwd -1 -salt ‘123123‘ ‘123123‘ //鹽值加密工具加密
$1$123123$kDle2KnwbPHdm1UZEE79V. //加密結果繼續回settings文件中:
default_password_crypted: "$1$123123$kDle2KnwbPHdm1UZEE79V." //粘貼
保存退出settings文件
下載安裝引導文件
cobbler get-loaders //利用cobbler服務自動下載引導操作系統文件
啟動遠程同步管理服務
systemctl start rsyncd.service
打開tftp服務
vim /etc/xinetd.d/tftp
disable   = no     //啟用tftp

systemctl restartxinetd.service//重啟服務
配置Cobbler服務控制dhcp模板
vim /etc/cobbler/dhcp.template
subnet 192.168.144.0 netmask 255.255.255.0 {   //設置分配網段
 option routers             192.168.144.1;     //修改網關
 option domain-name-servers 192.168.144.2;     //修改DNS
 option subnet-mask         255.255.255.0;     //設置子網掩碼
 range dynamic-bootp        192.168.144.100 192.168.144.200;   //修改地址池
同步dhcp
cobbler sync
//幫助同步生成DHCP配置文件systemctl restart dhcpd.service
//重啟dhcpd服務
到此,服務部署完成,接下來需要利用cobbler平臺復制系統鏡像文件,方便系統自動安裝。
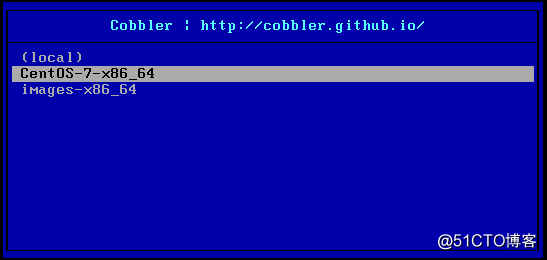
cobbler import --path=/mnt/ --name=CentOS-7-x86_64 --arch=x86_64 //導入iso鏡像
(這裏我將光盤鏡像掛載到/mnt下,因此從/mnt下導入)
/var/www/cobbler/ks_mirror/CentOS-7-x86_64 //默認導入存放位置
導入完成後,重啟所有服務:
systemctl restart xinetd.service
systemctl restart httpd.service
systemctl restart rsyncd.service
systemctl restart dhcpd.service
systemctl restart cobblerd.service
然後,找一臺新的機器連接自動安裝即可;
新機器安裝界面如下:選擇操作系統即可安裝!
cobbler web頁面管理
第一種
/etc/cobbler/modules.conf     //authn_configfile 模塊認證
htdigest -c /etc/cobbler/users.digest Cobbler cbadmin
輸入兩次確認密碼 例如:abc123

systemctl restart cobblerd.service
systemctl restart httpd.service

web賬戶為 cbadmin  密碼為 abc123

瀏覽器中訪問https://192.168.144.130/cobbler_web
第二種 pam認證
vim /etc/cobbler/modules.conf

module = authn_pam    //修改pam認證

module = authz_ownership    //在users.conf指定訪問權限

useradd webuser
passwd webuser

vim /etc/cobbler/users.conf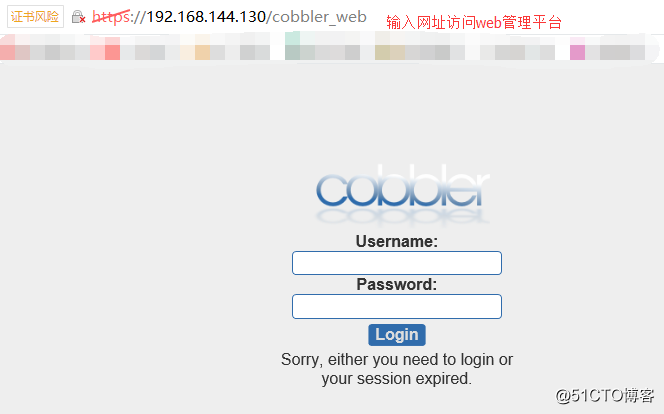
CentOS7中搭建Cobbler自動裝機服務