
防火墻USG做NAT產生路由環路及解決方法
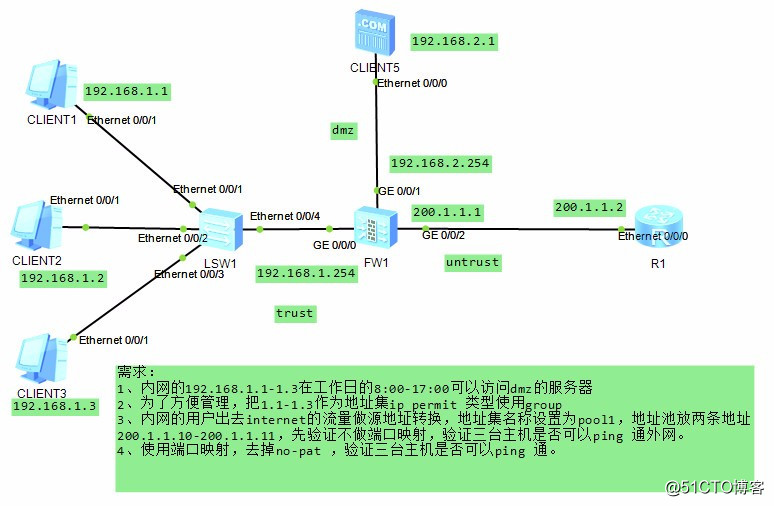
1、 根據拓撲連接設備,配置pc和服務器地址
2、 防火墻基本配置
接口地址
interface GigabitEthernet0/0/0
alias GE0/MGMT
ip address 192.168.1.254 255.255.255.0
interface GigabitEthernet0/0/1
ip address 192.168.2.254 255.255.255.0
interface GigabitEthernet0/0/2
ip address 200.1.1.1 255.255.255.0
接口加入到區域
firewall zone trust
add interface GigabitEthernet0/0/0
firewall zone untrust
firewall zone dmz
add interface GigabitEthernet0/0/1
要求三
先放行出去在ICMP流量
policy interzone trust untrust outbound
policy 1
action permit
policy service service-set icmp
創建地址池,
[SRG]nat address-group 0 pool1 200.100.100.1 200.100.100.10
創建NAT策略
[SRG]nat-policy interzone trust untrust outbound
[SRG-nat-policy-interzone-trust-untrust-outbound]policy 1
policy source any
[SRG-nat-policy-interzone-trust-untrust-outbound-1]policy destination any
[SRG-nat-policy-interzone-trust-untrust-outbound-1]action source-nat
[SRG-nat-policy-interzone-trust-untrust-outbound-1]address-group pool1 [SRG-nat-policy-interzone-trust-untrust-outbound-1]q
在防火墻接口開啟抓包功能
用路由器去ping –c 1 200.100.100.1
看到抓包效果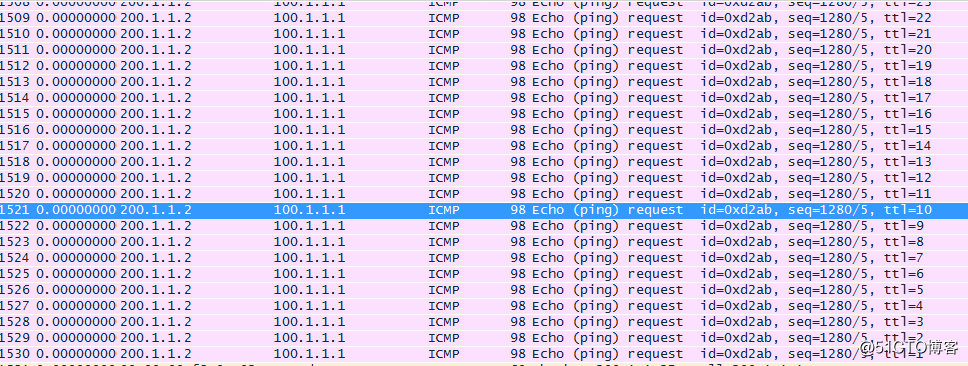
說明路由形成路由環路,
地址池路由匯總
200.100.100.00000001
200.100.100.00001010
200.100.100.0/28
在防火墻上做黑洞路由
ip route-static 100.1.1.0 28 NULL 0
在防火墻接口開啟抓包功能
用路由器去ping –c 1 200.100.100.1
(圖片上的目標地址應該是200.100.100.1,我實驗用的是100.1.1.1)
環路消除
Easy-ip 配置
[SRG-nat-policy-interzone-trust-untrust-outbound-1]undo address-group
[SRG-nat-policy-interzone-trust-untrust-outbound-1]easy-ip g0/0/2
先ping 流量出去再看會話狀態
[SRG]display firewall session table
可以看到都映射200.1.1.1出接口
我的課程首頁http://edu.51cto.com/lecturer/1025688.html
加群學習討論:32307012
防火墻USG做NAT產生路由環路及解決方法