
kubernetes之Scheduler分析
1. kubernetes Scheduler 簡介
kubernetes Scheduler 執行在 master 節點,它的核心功能是監聽 apiserver 來獲取 PodSpec.NodeName 為空的 pod,然後為每個這樣的 pod 建立一個 binding 指示 pod 應該排程到哪個節點上。
從哪裡讀取還沒有排程的 pod 呢?當然是 apiserver。怎麼知道 pod 沒有排程呢?它會向 apiserver 請求 spec.nodeName 欄位為空的 pod,然後排程得到結果之後,把結果寫入 apiserver。
雖然排程的原理說起來很簡單,但是要編寫一個優秀的排程器卻不容易,因為要考慮的東西很多:
儘可能地將 workload 平均到不同的節點,減少單個節點宕機造成的損失
可擴充套件性。隨著叢集規模的增加,怎麼保證排程器不會成為效能的瓶頸
高可用。排程器能做組成叢集,任何一個排程器出現問題,不會影響整個叢集的排程
靈活性。不同的使用者有不同的排程需求,一個優秀的排程器還要允許使用者能配置不同的排程演算法
資源合理和高效利用。排程器應該儘可能地提高叢集的資源利用率,防止資源的浪費- 和其他元件不同,scheduler 的程式碼在 plugin/ 目錄下:plugin/cmd/kube-scheduler/ 是程式碼的 main 函式入口,plugin/pkg/scheduler/ 是具體排程演算法。從這個目錄結構也可以看出來,kube-scheduler 是作為外掛接入到叢集中的,它的最終形態一定是使用者可以很容易地去定製化和二次開發的。
2. 程式碼分析
2.1 啟動流程
雖然放到了 plugin/ 目錄下,kube-scheduler 的啟動過程和其他元件還是一樣的,它會新建一個 SchedulerServer,這是一個儲存了 scheduler 啟動所需要配置資訊的結構體,然後解析命令列的引數,對結構體中的內容進行賦值,最後執行 app.Run(s) 把 scheduler 跑起來。
plugin/cmd/kube-scheduler/scheduler.go:

func main() {
    s := options.NewSchedulerServer()
    s.AddFlags(pflag.CommandLine)

    flag.InitFlags()
    logs.InitLogs()
    defer logs.FlushLogs()

    verflag.PrintAndExitIfRequested()

    app.Run(s)
}
app.Runs(s) 根據配置資訊構建出來各種例項,然後執行 scheduler 的核心邏輯,這個函式會一直執行,不會退出。
plugin/cmd/kube-scheduler/app/server.go:
func Run(s *options.SchedulerServer) error {
    ......
    configFactory := factory.NewConfigFactory(leaderElectionClient, s.SchedulerName, s.HardPodAffinitySymmetricWeight, s.FailureDomains)
    config, err := createConfig(s, configFactory)

    ......
    sched := scheduler.New(config)

    run := func(_ <-chan struct{}) {
        sched.Run()
        select {}
    }

    ......
    // 多個 kube-scheduler 部署高可用叢集會用到 leader election 功能
    ......
}- Run 方法的主要邏輯是這樣的:根據傳遞過來的引數建立 scheduler 需要的配置(主要是需要的各種結構體),然後呼叫 scheduler 的介面建立一個新的 scheduler 物件,最後執行這個物件開啟排程程式碼。需要注意的是,config 這個物件也是在 configFactory 的基礎上創建出來的。
瞭解 config 的建立和內容對後面瞭解排程器的工作原理非常重要,所以我們先來分下它的程式碼。
2.2 Config 的建立
factory.NewConfigFactory 方法會建立一個 ConfigFactory 的物件,這個物件裡面主要是一些 ListAndWatch,用來從 apiserver 中同步各種資源的內容,用作排程時候的參考。此外,還有兩個特別重要的結構體成員:PodQueue 和 PodLister,PodQueue 佇列中儲存了還沒有排程的 pod,PodLister 同步未排程的 Pod 和 Pod 的狀態資訊。
plugin/pkg/scheduler/factory/factory.go:
func NewConfigFactory(client clientset.Interface, schedulerName string, hardPodAffinitySymmetricWeight int, failureDomains string) *ConfigFactory {
    // schedulerCache 儲存了 pod 和 node 的資訊,是排程過程中兩者資訊的 source of truth
    schedulerCache := schedulercache.New(30*time.Second, stopEverything)

    informerFactory := informers.NewSharedInformerFactory(client, 0)
    pvcInformer := informerFactory.PersistentVolumeClaims()

    c := &ConfigFactory{
        Client:             client,
        PodQueue:           cache.NewFIFO(cache.MetaNamespaceKeyFunc),
        ScheduledPodLister: &cache.StoreToPodLister{},
        informerFactory:    informerFactory,

        // ConfigFactory 中非常重要的一部分就是各種 `Lister`,用來從獲取各種資源列表,它們會和 apiserver 保持實時同步
        NodeLister:                     &cache.StoreToNodeLister{},
        PVLister:                       &cache.StoreToPVFetcher{Store: cache.NewStore(cache.MetaNamespaceKeyFunc)},
        PVCLister:                      pvcInformer.Lister(),
        pvcPopulator:                   pvcInformer.Informer().GetController(),
        ServiceLister:                  &cache.StoreToServiceLister{Indexer: cache.NewIndexer(cache.MetaNamespaceKeyFunc, cache.Indexers{cache.NamespaceIndex: cache.MetaNamespaceIndexFunc})},
        ControllerLister:               &cache.StoreToReplicationControllerLister{Indexer: cache.NewIndexer(cache.MetaNamespaceKeyFunc, cache.Indexers{cache.NamespaceIndex: cache.MetaNamespaceIndexFunc})},
        ReplicaSetLister:               &cache.StoreToReplicaSetLister{Indexer: cache.NewIndexer(cache.MetaNamespaceKeyFunc, cache.Indexers{cache.NamespaceIndex: cache.MetaNamespaceIndexFunc})},

        schedulerCache:                 schedulerCache,
        StopEverything:                 stopEverything,
        SchedulerName:                  schedulerName,
        HardPodAffinitySymmetricWeight: hardPodAffinitySymmetricWeight,
        FailureDomains:                 failureDomains,
    }

    // PodLister 和其他 Lister 建立方式不同,它就是 `schedulerCache`
    c.PodLister = schedulerCache

    // ScheduledPodLister 儲存了已經排程的 pod, 即 `Spec.NodeName` 不為空且狀態不是 Failed 或者 Succeeded 的 pod
    // Informer 是對 reflector 的一層封裝,reflect 把 ListWatcher 的結果實時更新到 store 中,而 informer 在每次更新的時候會呼叫對應的 handler 函式。
    // 這裡的 handler 函式把 store 中的 pod 資料更新到 schedulerCache 中
    c.ScheduledPodLister.Indexer, c.scheduledPodPopulator = cache.NewIndexerInformer(
        c.createAssignedNonTerminatedPodLW(),
        &api.Pod{},
        0,
        cache.ResourceEventHandlerFuncs{
            AddFunc:    c.addPodToCache,
            UpdateFunc: c.updatePodInCache,
            DeleteFunc: c.deletePodFromCache,
        },
        cache.Indexers{cache.NamespaceIndex: cache.MetaNamespaceIndexFunc},
    )

    // 同上,把 node 的資料實時同步到 schedulerCache
    c.NodeLister.Store, c.nodePopulator = cache.NewInformer(
        c.createNodeLW(),
        &api.Node{},
        0,
        cache.ResourceEventHandlerFuncs{
            AddFunc:    c.addNodeToCache,
            UpdateFunc: c.updateNodeInCache,
            DeleteFunc: c.deleteNodeFromCache,
        },
    )

    ......

    return c
}
ConfigFactory 裡面儲存了各種 Lister,它們用來獲取 kubernetes 中各種資源的資訊,並且 schedulerCache 中儲存了排程過程中需要用到的 pods 和 nodes 的最新資訊。
然後,createConfig(s, configFactory) 根據配置引數和 configFactory 創建出真正被 scheduler 使用的 config 物件。
func createConfig(s *options.SchedulerServer, configFactory *factory.ConfigFactory) (*scheduler.Config, error) {
    if _, err := os.Stat(s.PolicyConfigFile); err == nil {
        var (
            policy     schedulerapi.Policy
            configData []byte
        )
        configData, err := ioutil.ReadFile(s.PolicyConfigFile)
        ......
        if err := runtime.DecodeInto(latestschedulerapi.Codec, configData, &policy); err != nil {
            return nil, fmt.Errorf("invalid configuration: %v", err)
        }
        return configFactory.CreateFromConfig(policy)
    }
    return configFactory.CreateFromProvider(s.AlgorithmProvider)
}
createConfig 根據不同的配置有兩種方式來建立 scheduler.Config:
通過 policy 檔案:使用者編寫排程器用到的 policy 檔案,控制排程器使用哪些 predicates 和 priorities 函式
通過 algorithm provider:已經在程式碼中提前編寫好的 provider,也就是 predicates 和 priorities 函式的組合
這兩種方法殊途同歸,最終都是獲取到 predicates 和 priorities 的名字,然後呼叫 CreateFromKeys 建立 Config 物件:
func (f *ConfigFactory) CreateFromKeys(predicateKeys, priorityKeys sets.String, extenders []algorithm.SchedulerExtender) (*scheduler.Config, error) {
// 獲取所有的 predicates 函式
predicateFuncs, err := f.GetPredicates(predicateKeys)
// priority 返回的不是函式,而是 priorityConfigs。一是因為 priority 還包含了權重,二是因為 priority 的實現在遷移到 map-reduce 的方式
priorityConfigs, err := f.GetPriorityFunctionConfigs(priorityKeys)
// 兩種 MetaProducer 都是用來獲取排程中用到的 metadata 資訊,比如 affinity、toleration,pod ports(用到的埠)、resource request(請求的資源)等
priorityMetaProducer, err := f.GetPriorityMetadataProducer()
predicateMetaProducer, err := f.GetPredicateMetadataProducer()
// 執行各種 informer 的內部邏輯,從 apiserver 同步資源資料到 Lister 和 cache 中
f.Run()
// 構造出 schedulerAlgorithm 物件,它最核心的方法是 `Schedule` 方法,我們會在下文說到
algo := scheduler.NewGenericScheduler(f.schedulerCache, predicateFuncs, predicateMetaProducer, priorityConfigs, priorityMetaProducer, extenders)
......
// 返回最終的 Config 物件
return &scheduler.Config{
SchedulerCache: f.schedulerCache,
NodeLister: f.NodeLister.NodeCondition(getNodeConditionPredicate()),
Algorithm: algo,
Binder: &binder{f.Client},
PodConditionUpdater: &podConditionUpdater{f.Client},
// NextPod 就是從 PodQueue 中取出 下一個未排程的 pod
NextPod: func() *api.Pod {
return f.getNextPod()
},
// 排程出錯時的處理函式,會把 pod 重新加入到 podQueue 中,等待下一次排程
Error: f.makeDefaultErrorFunc(&podBackoff, f.PodQueue),
StopEverything: f.StopEverything,
}, nil
}Config 的定義在檔案 plugins/pkg/scheduler/scheduler.go 中。它把排程器的邏輯分成幾個元件,提供了這些功能:
NextPod() 方法能返回下一個需要排程的 pod
Algorithm.Schedule() 方法能計算出某個 pod 在節點中的結果
Error() 方法能夠在出錯的時候重新把 pod 放到排程佇列中進行重試
schedulerCache 能夠暫時儲存排程中的 pod 資訊,佔用著 pod 需要的資源,保證資源不會衝突
Binder.Bind 在排程成功之後把排程結果傳送到 apiserver 中儲存起來
後面可以看到 Scheduler 物件就是組合這些邏輯元件來完成最終的排程任務的。
Config 中的邏輯元件中,負責排程 pod 的是 Algorithm.Schedule() 方法。其對應的值是 GenericScheduler,GenericScheduler 是 Scheduler 的一種實現,也是 kube-scheduler 預設使用的排程器,它只負責單個 pod 的排程並返回結果:
plugin/pkg/scheduler/generic_scheduler.go
func NewGenericScheduler(
    cache schedulercache.Cache,
    predicates map[string]algorithm.FitPredicate,
    predicateMetaProducer algorithm.MetadataProducer,
    prioritizers []algorithm.PriorityConfig,
    priorityMetaProducer algorithm.MetadataProducer,
    extenders []algorithm.SchedulerExtender) algorithm.ScheduleAlgorithm {
    return &genericScheduler{
        cache:                 cache,
        predicates:            predicates,
        predicateMetaProducer: predicateMetaProducer,
        prioritizers:          prioritizers,
        priorityMetaProducer:  priorityMetaProducer,
        extenders:             extenders,
        cachedNodeInfoMap:     make(map[string]*schedulercache.NodeInfo),
    }
}- 排程演算法的介面只有一個方法:Schedule,第一個引數是要排程的 pod,第二個引數是能夠獲取 node 列表的介面物件。它返回一個節點的名字,表示 pod 將會排程到這臺節點上。
plugin/pkg/scheduler/algorithm/scheduler_interface.go
type ScheduleAlgorithm interface {
    Schedule(*api.Pod, NodeLister) (selectedMachine string, err error)
}- Config 創建出來之後,就是 scheduler 的建立和執行,執行最核心的排程邏輯,不斷為所有需要排程的 pod 選擇合適的節點:
sched := scheduler.New(config)

run := func(_ <-chan struct{}) {
    sched.Run()
    select {}
}
總結起來,configFactory、config 和 scheduler 三者的關係如下圖所示:
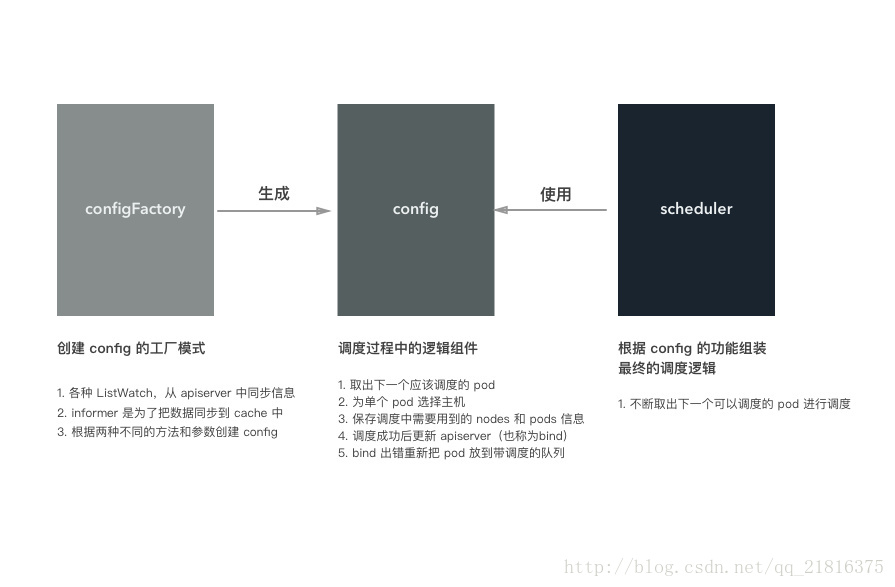
configFactory 對應工廠模式的工廠模型,根據不同的配置和引數生成 config,當然事先會準備好 config 需要的各種資料
config 是排程器中最重要的元件,裡面實現了排程的各個元件邏輯
scheduler 使用 config 提供的功能來完成排程
如果把排程對比成做菜,那麼構建 config 就相當於準備食材和調料、洗菜、對食材進行預處理。做菜就是把準備的食材變成美味佳餚的過程!
2.3 排程的邏輯
接著上面分析,看看 scheduler 建立和執行的過程。其對應的程式碼在 plugin/pkg/scheduler/scheduler.go 檔案中:
// Scheduler 結構體本身非常簡單,它把所有的東西都放到了 `Config` 物件中
type Scheduler struct {
    config *Config
}

// 建立 scheduler 就是把 config 放到結構體中
func New(c *Config) *Scheduler {
    s := &Scheduler{
        config: c,
    }
    return s
}

func (s *Scheduler) Run() {
    go wait.Until(s.scheduleOne, 0, s.config.StopEverything)
}

func (s *Scheduler) scheduleOne() {
    pod := s.config.NextPod()
    dest, err := s.config.Algorithm.Schedule(pod, s.config.NodeLister)
    ......

    // assumed 表示已經為 pod 選擇了 host,但是還沒有在 apiserver 中建立繫結
    // 這個狀態的 pod 會單獨儲存在 schedulerCache 中,並暫時佔住了節點上的資源
    assumed := *pod
    assumed.Spec.NodeName = dest
    if err := s.config.SchedulerCache.AssumePod(&assumed); err != nil {
        return
    }

    // 非同步對 pod 進行 bind 操作
    go func() {
        b := &api.Binding{
            ObjectMeta: api.ObjectMeta{Namespace: pod.Namespace, Name: pod.Name},
            Target: api.ObjectReference{
                Kind: "Node",
                Name: dest,
            },
        }

        err := s.config.Binder.Bind(b)
        if err != nil {
            // 繫結失敗,刪除 pod 的資訊,佔用的節點資源也被釋放,可以讓其他 pod 使用
            if err := s.config.SchedulerCache.ForgetPod(&assumed); err != nil {
                glog.Errorf("scheduler cache ForgetPod failed: %v", err)
            }
            s.config.PodConditionUpdater.Update(pod, &api.PodCondition{
                Type:   api.PodScheduled,
                Status: api.ConditionFalse,
                Reason: "BindingRejected",
            })
            return
        }
    }()
}
scheduler.Run 就是不斷呼叫 scheduler.scheduleOne() 每次排程一個 pod。
對應的排程邏輯如下圖所示:
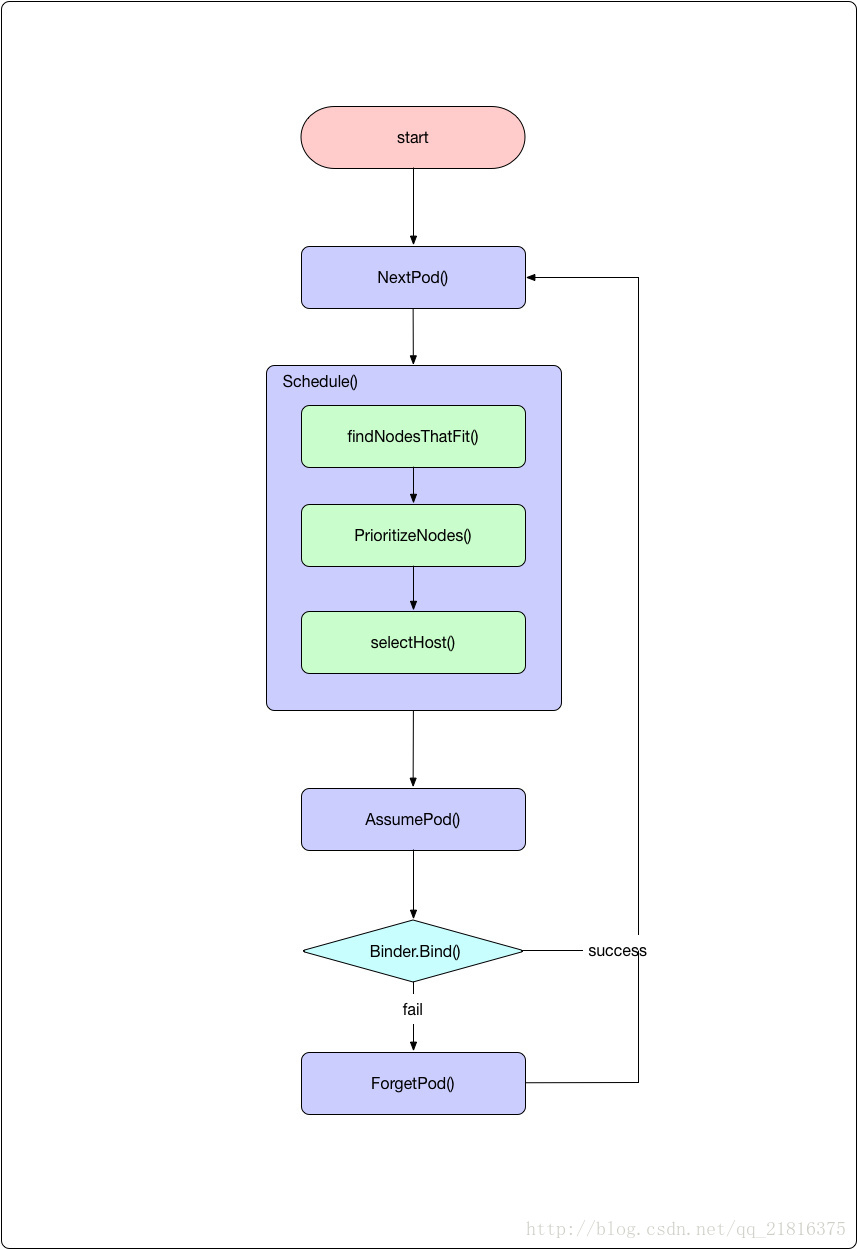
接下來我們逐步分解和解釋。
2.3.1 下一個需要排程的 pod
NextPod 函式就是 configFactory.getNextPod(),它從未排程的佇列中返回下一個應該由當前排程器排程的 pod。
它從 configFactory.PodQueue 中 pop 出來一個應該由當前排程器排程的 pod。當前 pod 可以通過 scheduler.alpha.kubernetes.io/name annotation 來設定排程器的名字,如果排程器名字發現這個名字和自己一致就認為 pod 應該由自己排程。如果對應的值為空,則預設排程器會進行排程。
PodQueue 是一個先進先出的佇列: PodQueue:cache.NewFIFO(cache.MetaNamespaceKeyFunc)
這個 FIFO 的實現程式碼在 pkg/client/cache/fifo.go 檔案中。PodQueue 的內容是 reflector 從 apiserver 實時同步過來的,裡面儲存了需要排程的 pod(spec.nodeName 為空,而且狀態不是 success 或者 failed):
func (f *ConfigFactory) Run() {
    // Watch and queue pods that need scheduling.
    cache.NewReflector(f.createUnassignedNonTerminatedPodLW(), &api.Pod{}, f.PodQueue, 0).RunUntil(f.StopEverything)
    ......
}

func (factory *ConfigFactory) createUnassignedNonTerminatedPodLW() *cache.ListWatch {
    selector := fields.ParseSelectorOrDie("spec.nodeName==" + "" + ",status.phase!=" + string(api.PodSucceeded) + ",status.phase!=" + string(api.PodFailed))
    return cache.NewListWatchFromClient(factory.Client.Core().RESTClient(), "pods", api.NamespaceAll, selector)
}
2.3.2 排程單個 pod
拿到 pod 之後,就呼叫具體的排程演算法選擇一個節點。
dest, err := s.config.Algorithm.Schedule(pod, s.config.NodeLister)- 上面已經講過,預設的排程演算法就是 generic_scheduler,
它的程式碼在 plugin/pkg/scheduler/generic_scheduler.go 檔案:
func (g *genericScheduler) Schedule(pod *api.Pod, nodeLister algorithm.NodeLister) (string, error) {

    // 第一步:從 nodeLister 中獲取 node 的資訊
    nodes, err := nodeLister.List()
    ......

    // schedulerCache 中儲存了排程用到的 pod 和 node 的最新資料,用裡面的資料更新 `cachedNodeInfoMap`,作為排程過程中節點資訊的參考
    err = g.cache.UpdateNodeNameToInfoMap(g.cachedNodeInfoMap)

    // 第二步:執行 predicate,過濾符合排程條件的節點
    filteredNodes, failedPredicateMap, err := findNodesThatFit(pod, g.cachedNodeInfoMap, nodes, g.predicates, g.extenders, g.predicateMetaProducer)

    if len(filteredNodes) == 0 {
        return "", &FitError{
            Pod:              pod,
            FailedPredicates: failedPredicateMap,
        }
    }

    // 第三步:執行 priority,為符合條件的節點排列優先順序
    metaPrioritiesInterface := g.priorityMetaProducer(pod, g.cachedNodeInfoMap)
    priorityList, err := PrioritizeNodes(pod, g.cachedNodeInfoMap, metaPrioritiesInterface, g.prioritizers, filteredNodes, g.extenders)
    if err != nil {
        return "", err
    }

    // 第四步:從最終的結果中選擇一個節點
    return g.selectHost(priorityList)
}
排程演算法的過程分為四步驟:
獲取必要的資料,這個當然就是 pod 和 nodes 資訊。pod 是作為引數傳遞過來的,nodes 有兩類,一個是通過 nodeLister 獲取的節點資訊,一類是 cachedNodeInfoMap。後一類節點資訊中額外儲存了資源的使用情況,比如節點上有多少排程的 pod、已經申請的資源、還可以分配的資源等
執行過濾操作。根據當前 pod 和 nodes 資訊,過濾掉不適合執行 pod 的節點
執行優先順序排序操作。對適合 pod 執行的節點進行優先順序排序
選擇節點。從最終優先順序最高的節點中選擇出來一個作為 pod 排程的結果
下面的幾個部分就來講講過濾和優先順序排序的過程。
2.3.3 過濾(Predicate):移除不合適的節點
排程器的輸入是一個 pod(多個 pod 排程可以通過遍歷來實現) 和多個節點,輸出是一個節點,表示 pod 將被排程到這個節點上。
如何找到最合適 pod 執行的節點呢?第一步就是移除不符合排程條件的節點,這個過程 kubernetes 稱為 Predicate,
過濾呼叫的函式是 findNodesThatFit,程式碼在 plugins/pkg/scheduler/generic_scheduler.go 檔案中:
func findNodesThatFit(
    pod *api.Pod,
    nodeNameToInfo map[string]*schedulercache.NodeInfo,
    nodes []*api.Node,
    predicateFuncs map[string]algorithm.FitPredicate,
    extenders []algorithm.SchedulerExtender,
    metadataProducer algorithm.MetadataProducer,
) ([]*api.Node, FailedPredicateMap, error) {
    // filtered 儲存通過過濾的節點
    var filtered []*api.Node

    // failedPredicateMap 儲存過濾失敗的節點,即不適合 pod 執行的節點
    failedPredicateMap := FailedPredicateMap{}

    if len(predicateFuncs) == 0 {
        filtered = nodes
    } else {
        filtered = make([]*api.Node, len(nodes))
        errs := []error{}
        var predicateResultLock sync.Mutex
        var filteredLen int32

        // meta 函式可以查詢 pod 和 node 的資訊
        meta := metadataProducer(pod, nodeNameToInfo)

        // 檢查單個 node 能否執行某個 pod
        checkNode := func(i int) {
            nodeName := nodes[i].Name
            fits, failedPredicates, err := podFitsOnNode(pod, meta, nodeNameToInfo[nodeName], predicateFuncs)
            ......
            if fits {
                filtered[atomic.AddInt32(&filteredLen, 1)-1] = nodes[i]
            } else {
                predicateResultLock.Lock()
                failedPredicateMap[nodeName] = failedPredicates
                predicateResultLock.Unlock()
            }
        }
        // 使用 workQueue 來並行執行檢查,併發數最大是 16
        workqueue.Parallelize(16, len(nodes), checkNode)
        filtered = filtered[:filteredLen]
        if len(errs) > 0 {
            return []*api.Node{}, FailedPredicateMap{}, errors.NewAggregate(errs)
        }
    }

    // 在基本過濾的基礎上,繼續執行 extender 的過濾邏輯
    .....

    return filtered, failedPredicateMap, nil
}- 上面這段程式碼主要的工作是對 pod 過濾工作進行併發控制、錯誤處理和結果儲存。沒有通過過濾的節點資訊儲存在 failedPredicateMap 字典中,key 是節點名,value 是失敗原因的列表;通過過濾的節點儲存在 filtered 陣列中。
對於每個 pod,都要檢查能否排程到叢集中的所有節點上(只包括可排程的節點),而且多個判斷邏輯之間是獨立的,也就是說 pod 是否能否排程到某個 node 上和其他 node 無關(至少目前是這樣的,如果這個假設不再成立,併發要考慮協調的問題),所以可以使用併發來提高效能。併發是通過 workQueue 來實現的,最大併發數量是 16,這個數字是 hard code。
pod 和 node 是否匹配是呼叫是 podFitsOnNode 函式來判斷的:
func podFitsOnNode(pod *api.Pod, meta interface{}, info *schedulercache.NodeInfo, predicateFuncs map[string]algorithm.FitPredicate) (bool, []algorithm.PredicateFailureReason, error) {
    var failedPredicates []algorithm.PredicateFailureReason
    for _, predicate := range predicateFuncs {
        fit, reasons, err := predicate(pod, meta, info)
        if err != nil {
            err := fmt.Errorf("SchedulerPredicates failed due to %v, which is unexpected.", err)
            return false, []algorithm.PredicateFailureReason{}, err
        }
        if !fit {
            failedPredicates = append(failedPredicates, reasons...)
        }
    }
    return len(failedPredicates) == 0, failedPredicates, nil
}
它會迴圈呼叫所有的 predicateFuncs 定義的過濾方法,並返回節點是否滿足排程條件,以及可能的錯誤資訊。每個 predicate 函式的型別是這樣的:
plugin/pkg/scheduler/algorithm/types.go
type FitPredicate func(pod *api.Pod, meta interface{}, nodeInfo *schedulercache.NodeInfo) (bool, []PredicateFailureReason, error)它接受三個引數:
pod:要排程的 pod
meta:獲取過濾過程中 pod 以及排程引數的函式
nodeInfo:要過濾的 node 資訊- 1
- 2
- 3
具體的 predicate 實現都在 plugin/pkg/scheduler/algorithm/predicates/predicates.go:
NoVolumeZoneConflict:pod 請求的 volume 是否能在節點所在的 Zone 使用。通過匹配 node 和 PV 的 failure-domain.beta.kubernetes.io/zone 和 failure-domain.beta.kubernetes.io/region 來決定
MaxEBSVolumeCount:請求的 volumes 是否超過 EBS(Elastic Block Store) 支援的最大值,預設是 39
MaxGCEPDVolumeCount:請求的 volumes 是否超過 GCE 支援的最大值,預設是 16
MatchInterPodAffinity:根據 inter-pod affinity 來決定 pod 是否能排程到節點上。這個過濾方法會看 pod 是否和當前節點的某個 pod 互斥。關於親和性和互斥性,可以檢視之前的文章。
NoDiskConflict:檢查 pod 請求的 volume 是否就緒和衝突。如果主機上已經掛載了某個卷,則使用相同卷的 pod 不能排程到這個主機上。kubernetes 使用的 volume 型別不同,過濾邏輯也不同。比如不同雲主機的 volume 使用限制不同:GCE 允許多個 pods 使用同時使用 volume,前提是它們是隻讀的;AWS 不允許 pods 使用同一個 volume;Ceph RBD 不允許 pods 共享同一個 monitor
GeneralPredicates:普通過濾函式,主要考慮 kubernetes 資源是否能夠滿足,比如 CPU 和 Memory 是否足夠,埠是否衝突、selector 是否匹配
PodFitsResources:檢查主機上的資源是否滿足 pod 的需求。資源的計算是根據主機上執行 pod 請求的資源作為參考的,而不是以實際執行的資源數量
PodFitsHost:如果 pod 指定了 spec.NodeName,看節點的名字是否何它匹配,只有匹配的節點才能執行 pod
PodFitsHostPorts:檢查 pod 申請的主機埠是否已經被其他 pod 佔用,如果是,則不能排程
PodSelectorMatches:檢查主機的標籤是否滿足 pod 的 selector。包括 NodeAffinity 和 nodeSelector 中定義的標籤。
PodToleratesNodeTaints:根據 taints 和 toleration 的關係判斷 pod 是否可以排程到節點上
CheckNodeMemoryPressure:檢查 pod 能否排程到記憶體有壓力的節點上。如有節點有記憶體壓力, guaranteed pod(request 和 limit 相同) 不能排程到節點上。相關資料請檢視 Resource QoS Design
CheckNodeDiskPressure:檢查 pod 能否排程到磁碟有壓力的節點上,目前所有的 pod 都不能排程到磁碟有壓力的節點上
每個過濾函式的邏輯都不復雜,只需要瞭解相關的概念就能讀懂。這篇文章只講解 PodFitsResources 的實現,也就是判斷節點上的資源是否能滿足 pod 的請求。
plugin/pkg/scheduler/algorithm/predicates/predicates.go:
func PodFitsResources(pod *api.Pod, meta interface{}, nodeInfo *schedulercache.NodeInfo) (bool, []algorithm.PredicateFailureReason, error) {
    node := nodeInfo.Node()
    var predicateFails []algorithm.PredicateFailureReason

    // 判斷節點上 pod 數量是否超過限制
    allowedPodNumber := nodeInfo.AllowedPodNumber()
    if len(nodeInfo.Pods())+1 > allowedPodNumber {
        predicateFails = append(predicateFails, NewInsufficientResourceError(api.ResourcePods, 1, int64(len(nodeInfo.Pods())), int64(allowedPodNumber)))
    }

    // 獲取 pod 請求的資源,目前支援 CPU、Memory 和 GPU
    var podRequest *schedulercache.Resource
    if predicateMeta, ok := meta.(*predicateMetadata); ok {
        podRequest = predicateMeta.podRequest
    } else {
        podRequest = GetResourceRequest(pod)
    }
    ......

    // 判斷如果 pod 放到節點上,是否超過節點可分配的資源
    allocatable := nodeInfo.AllocatableResource()
    if allocatable.MilliCPU < podRequest.MilliCPU+nodeInfo.RequestedResource().MilliCPU {
        predicateFails = append(predicateFails, NewInsufficientResourceError(api.ResourceCPU, podRequest.MilliCPU, nodeInfo.RequestedResource().MilliCPU, allocatable.MilliCPU))
    }
    if allocatable.Memory < podRequest.Memory+nodeInfo.RequestedResource().Memory {
        predicateFails = append(predicateFails, NewInsufficientResourceError(api.ResourceMemory, podRequest.Memory, nodeInfo.RequestedResource().Memory, allocatable.Memory))
    }
    if allocatable.NvidiaGPU < podRequest.NvidiaGPU+nodeInfo.RequestedResource().NvidiaGPU {
        predicateFails = append(predicateFails, NewInsufficientResourceError(api.ResourceNvidiaGPU, podRequest.NvidiaGPU, nodeInfo.RequestedResource().NvidiaGPU, allocatable.NvidiaGPU))
    }
    for rName, rQuant := range podRequest.OpaqueIntResources {
        if allocatable.OpaqueIntResources[rName] < rQuant+nodeInfo.RequestedResource().OpaqueIntResources[rName] {
            predicateFails = append(predicateFails, NewInsufficientResourceError(rName, podRequest.OpaqueIntResources[rName], nodeInfo.RequestedResource().OpaqueIntResources[rName], allocatable.OpaqueIntResources[rName]))
        }
    }

    ......
    return len(predicateFails) == 0, predicateFails, nil
}
有了前面準備的所有內容,判斷節點資源是否滿足就簡單。只需要把 pod 請求的各種資源和節點上可用的資源比較大小。需要注意的是,如果 pod 沒有新增要申請的資源,那麼其對應的值為零,也就是說不會受到資源不足影響,同時也不會受資源限制。
節點上可分配資源是 kubelet 傳送給 apiserver 的,而已經請求的資源數量是上面執行的 pods 資源的總和。主要的邏輯就是判斷如果 pod 排程到節點上,那麼所有 pods 請求的資源總和是否超過節點可用的資源數量,只要有任何一個資源超標,就認為無法排程到 node 上。
2.3.4 優先順序(Priority):為合適的節點排序
過濾結束後,剩下的節點都是 pod 可以排程到上面的。如果過濾階段就把所有的節點 pass 了,那麼久直接返回排程錯誤;如果剩下多個節點,那麼我們還要從這些可用的節點中選擇一個。
雖然隨機選擇一個節點進行排程理論上也可以(畢竟它們都滿足排程條件),但是我們還是希望能找到最合適的節點。什麼是最合適呢?當然要根據需求來決定,但是有一些比較通用性的要求,比如 workload 在叢集中要儘量均衡。不同的節點對 pod 的合適程度是不同的,優先順序過程就是負責儘量找出更合適的節點的。
對每個節點,priority 函式都會計算出來一個 0-10 之間的數字,表示 pod 放到該節點的合適程度,其中 10 表示非常合適,0 表示非常不合適。每個不同的優先順序函式都有一個權重值,這個值為正數,最終的值為權重和優先順序函式結果的乘積,而一個節點的權重就是所有優先順序函式結果的加和。比如有兩種優先順序函式 priorityFunc1 和 priorityFunc2,對應的權重分別為 weight1 和 weight2,那麼節點 A 的最終得分是:
finalScoreNodeA = (weight1 * priorityFunc1) + (weight2 * priorityFunc2)而權重最高的節點自然就是最合適的排程結果,優先順序步驟對應函式 PrioritizeNodes:
func PrioritizeNodes(
    pod *api.Pod,
    nodeNameToInfo map[string]*schedulercache.NodeInfo,
    meta interface{},
    priorityConfigs []algorithm.PriorityConfig,
    nodes []*api.Node,
    extenders []algorithm.SchedulerExtender,
) (schedulerapi.HostPriorityList, error) {
    // 如果沒有配置 priority,那麼所有節點權重相同,最後的結果類似於隨機選擇一個節點
    ......

    var (
        mu   = sync.Mutex{}
        wg   = sync.WaitGroup{}
        errs []error
    )

    // results 是個二維表格,儲存著每個節點對應每個優先順序函式的得分
    results := make([]schedulerapi.HostPriorityList, 0, len(priorityConfigs))

    // 原來的計算方法,通過 `priorityConfig.Function` 計算分值。
    // 每次取出一個優先順序函式,計算所有節點的值
    for i, priorityConfig := range priorityConfigs {
        if priorityConfig.Function != nil {
            wg.Add(1)
            go func(index int, config algorithm.PriorityConfig) {
                defer wg.Done()
                results[index], err = config.Function(pod, nodeNameToInfo, nodes)
            }(i, priorityConfig)
        } else {
            results[i] = make(schedulerapi.HostPriorityList, len(nodes))
        }
    }
    // 以後會使用的計算方式,通過 map-reduce 的方式來計算分值
    processNode := func(index int) {
        nodeInfo := nodeNameToInfo[nodes[index].Name]
        var err error
        for i := range priorityConfigs {
            if priorityConfigs[i].Function != nil {
                continue
            }
            results[i][index], err = priorityConfigs[i].Map(pod, meta, nodeInfo)
        }
    }
    // 併發去計算結果
    workqueue.Parallelize(16, len(nodes), processNode)

    for i, priorityConfig := range priorityConfigs {
        if priorityConfig.Reduce == nil {
            continue
        }
        wg.Add(1)
        go func(index int, config algorithm.PriorityConfig) {
            defer wg.Done()
            if err := config.Reduce(pod, meta, nodeNameToInfo, results[index]); err != nil {
                appendError(err)
            }
        }(i, priorityConfig)
    }
    // 等待所有計算結束
    wg.Wait()
    if len(errs) != 0 {
        return schedulerapi.HostPriorityList{}, errors.NewAggregate(errs)
    }

    // 計算分值的總和,得到最終的結果
    result := make(schedulerapi.HostPriorityList, 0, len(nodes))
    for i := range nodes {
        result = append(result, schedulerapi.HostPriority{Host: nodes[i].Name, Score: 0})
        for j := range priorityConfigs {
            result[i].Score += results[j][i].Score * priorityConfigs[j].Weight
        }
    }

    ......
    return result, nil
}- 要想獲得所有節點最終的權重分值,就要先計算每個優先順序函式對應該節點的分值,然後計算總和。因此不管過程如何,如果有 N 個節點,M 個優先順序函式,一定會計算 M*N 箇中間值,構成一個二維表格:
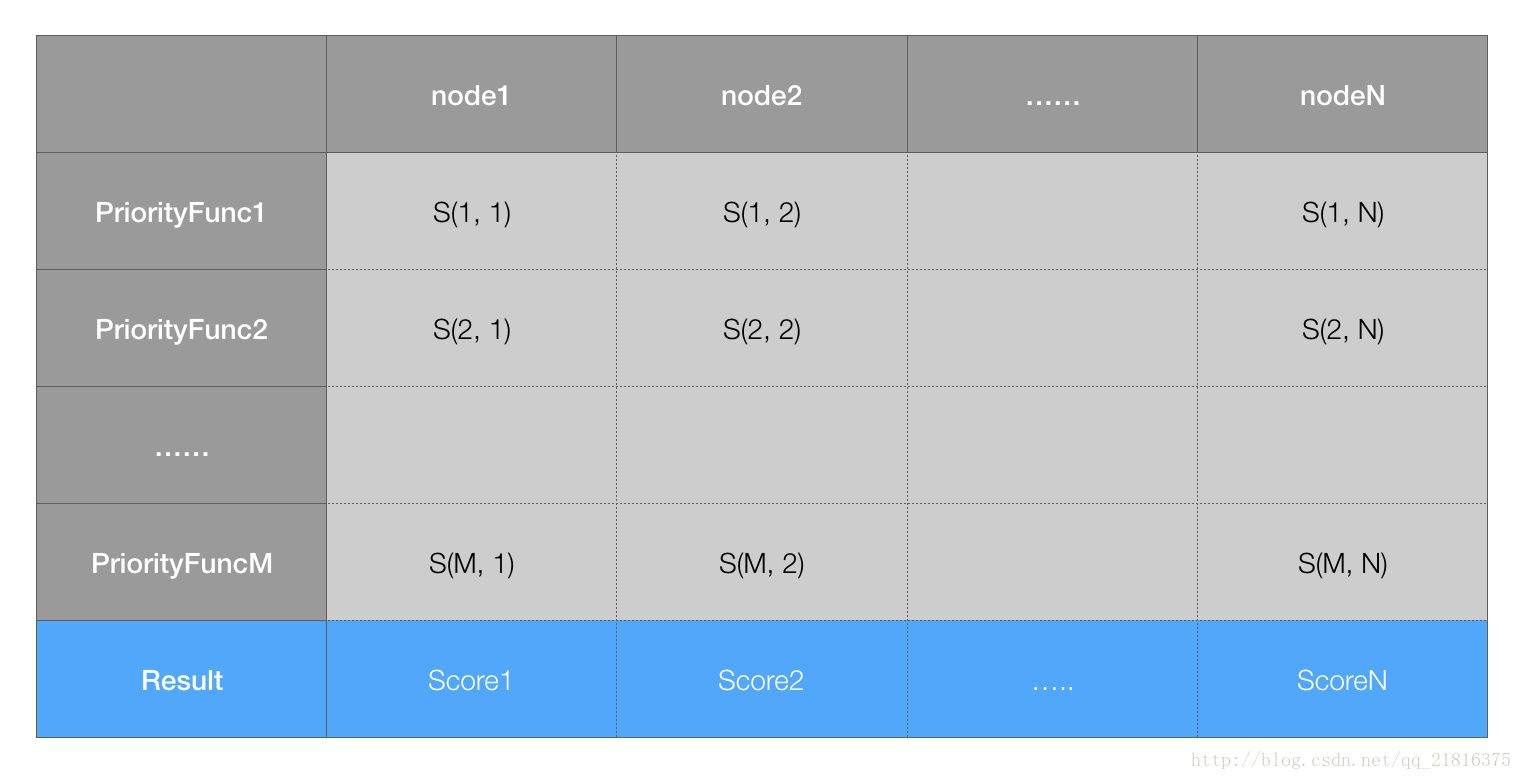
最後,會把表格中按照節點把優先順序函式的權重列表相加,得到最終節點的分值。上面的程式碼就是這個過程,當然中間過程可以併發計算,以加快速度。
目前,kubernetes scheduler 提供了很多實用的優先順序函式:
LeastRequestedPriority:最低請求優先順序。根據 CPU 和記憶體的使用率來決定優先順序,使用率越低優先順序越高,也就是說優先排程到資源利用率低的節點,這個優先順序函式能起到把負載儘量平均分到叢集的節點上。預設權重為 1
BalancedResourceAllocation:資源平衡分配。這個優先順序函式會把 pod 分配到 CPU 和 memory 利用率差不多的節點(計算的時候會考慮當前 pod 一旦分配到節點的情況)。預設權重為 1
SelectorSpreadPriority:儘量把同一個 service、replication controller、replica set 的 pod 分配到不同的節點,這些資源都是通過 selector 來選擇 pod 的,所以名字才是這樣的。預設權重為 1
CalculateAntiAffinityPriority:儘量把同一個 service 下面某個 label 相同的 pod 分配到不同的節點
ImageLocalityPriority:根據映象是否已經存在的節點上來決定優先順序,節點上存在要使用的映象,而且映象越大,優先順序越高。這個函式會盡量把 pod 分配到下載映象花銷最少的節點
NodeAffinityPriority:NodeAffinity,預設權重為 1
InterPodAffinityPriority:根據 pod 之間的親和性決定 node 的優先順序,預設權重為 1
NodePreferAvoidPodsPriority:預設權重是 10000,把這個權重設定的那麼大,就以為這一旦該函式的結果不為 0,就由它決定排序結果
TaintTolerationPriority:預設權重是 1
不同的優先順序函式計算出來節點的權重值是個 [0-10] 的值,也就是它們本身就要做好規範化。如果認為某個優先順序函式非常重要,那就增加它的 weight。
對於優先順序函式,我們只講解 LeastRequestedPriority 和 BalancedResourceAllocation 的實現,因為它們兩個和資源密切相關。
最小資源請求優先順序函式會計算每個節點的資源利用率,它目前只考慮 CPU 和記憶體兩種資源,而且兩者權重相同,具體的資源公式為:
score = (CPU Usage rate * 10 + Memory Usage Rate * 10 )/2利用率的計算一樣,都是 (capacity - requested)/capacity,capacity 指節點上資源的容量,比如 CPU 的核數,記憶體的大小;requested 表示節點當前所有 pod 請求對應資源的總和。
程式碼就不放出來了,就是做一個算術運算,對應的檔案在:plugin/pkg/scheduler/algorithm/priorities/lease_requested.go。
平衡資源優先順序函式會計算 CPU 和記憶體的平衡度,並儘量選擇更均衡的節點。它會分別計算 CPU 和記憶體的,計算公式為:
10 - abs(cpuFraction - memoryFraction)*10對應的 cpuFraction 和 memoryFraction 就是資源利用率,
計算公式都是 requested/capacity。這種方法不推薦單獨使用,一定要和最小資源請求一起使用。最小資源請求能儘量選擇資源使用率低的節點,而這個方法會盡量考慮資源使用率比較平衡的節點。它能避免這樣的情況:節點上 CPU 已經使用完了,剩下很多記憶體空間可用,但是因為 CPU 不再滿足任何 pod 的請求,因此無法排程任何 pod,導致記憶體資源白白浪費。
這種實現主要參考了 an energy efficient virtual machine placement algorithm with balanced resource utilization 論文提出的方法,感興趣的可以自行搜尋閱讀。
2.3.5 選擇節點作為排程結果
優先順序階段不會移除任何的節點,只是對節點添加了一個分值,根據分值排序,分值最高的就是最終的結果。
如果分值最高的節點有多個,就“隨機”選擇一個。這個步驟就是 selectHost 的邏輯:
func (g *genericScheduler) selectHost(priorityList schedulerapi.HostPriorityList) (string, error) {
    // 沒有節點,直接返回錯誤
    if len(priorityList) == 0 {
        return "", fmt.Errorf("empty priorityList")
    }

    // 根據權重分值從高到低排序
    sort.Sort(sort.Reverse(priorityList))

    // 找到所有最高分值的節點
    maxScore := priorityList[0].Score
    firstAfterMaxScore := sort.Search(len(priorityList), func(i int) bool { return priorityList[i].Score < maxScore })

    // “隨機”選擇一個:其實是類似於 roundrobin 方法,記錄一個 lastNodeIndex 不斷加一,對可用節點數取模
    g.lastNodeIndexLock.Lock()
    ix := int(g.lastNodeIndex % uint64(firstAfterMaxScore))
    g.lastNodeIndex++
    g.lastNodeIndexLock.Unlock()

    // 返回結果
    return priorityList[ix].Host, nil
}
3. 自定義排程器
如果對排程沒有特殊的要求,使用 kube-schduler 的預設排程就能滿足大部分的需求。如果預設排程不能滿足需求,就要對排程進行自定義。這部分介紹幾種使用者可以自定義排程邏輯的方法!
3.1 修改 policy 檔案
kube-scheduler 在啟動的時候可以通過 –policy-config-file 引數可以指定排程策略檔案,使用者可以根據需要組裝 predicates 和 priority 函式。選擇不同的過濾函式和優先順序函式、控制優先順序函式的權重、調整過濾函式的順序都會影響排程過程。
可以參考官方給出的 policy 檔案例項:
{
"kind" : "Policy",
"apiVersion" : "v1",
"predicates" : [
    {"name" : "PodFitsHostPorts"},
    {"name" : "PodFitsResources"},
    {"name" : "NoDiskConflict"},
    {"name" : "NoVolumeZoneConflict"},
    {"name" : "MatchNodeSelector"},
    {"name" : "HostName"}
    ],
"priorities" : [
    {"name" : "LeastRequestedPriority", "weight" : 1},
    {"name" : "BalancedResourceAllocation", "weight" : 1},
    {"name" : "ServiceSpreadingPriority", "weight" : 1},
    {"name" : "EqualPriority", "weight" : 1}
    ],
"hardPodAffinitySymmetricWeight" : 10
}
3.2 編寫自己的 priority 和 predicate 函式
前一種方法就是對已有的排程模組(過濾函式和優先順序函式)進行組合,如果有特殊的需求這些模組本身無法滿足,使用者還可以編寫自己的過濾函式和優先順序函式。
過濾函式的介面已經說過:
plugin/pkg/scheduler/algorithm/types.go
type FitPredicate func(pod *v1.Pod, meta interface{}, nodeInfo *schedulercache.NodeInfo) (bool, []PredicateFailureReason, error)使用者只需要在 plugin/pkg/scheduler/algorithm/predicates/predicates.go 檔案中編寫物件實現這個介面就行。
編寫完過濾函式還要把它用起來,下一步就是把它進行註冊,讓 kube-scheduler 啟動的時候知道它的存在,註冊部分可以在 plugin/pkg/scheduler/algorithmprovider/defaults/defaults.go
完成,可以參考其他過濾函式的註冊程式碼:
factory.RegisterFitPredicate("PodFitsHostPorts", predicates.PodFitsHostPorts)最後,可以在 –policy-config-file 把自定義的過濾函式寫進去,kube-scheduler 執行的時候就能執行你編寫排程器的邏輯了。
自定義優先順序函式的過程和這個過濾函式類似,就不贅述了。
3.3 編寫自己的排程器
除了在 kube-scheduler 已有的框架中進行定製化外,kubernetes 還允許你重頭編寫自己的排程器元件,並在建立資源的時候使用它。多個排程器可以同時執行和工作,只要名字不衝突就行。
使用某個排程器就是在 pod 的 spec.schedulername 欄位中填寫上排程器的名字。kubernetes 提供的排程器名字是 default,如果自定義的排程器名字是 my-scheduler,那麼只有當 spec.schedulername 欄位是 my-scheduler 才會被後者排程。
NOTE:調取器的名字並沒有統一儲存在 apiserver 中進行統一管理,而是每個調取器去 apiserver 中獲取和自己名字一直的 pod 來排程。也就是說,排程器是自己管理名字的,因此做到不衝突而且邏輯正確是每個排程器的工作。
雖然 kube-scheduler 的實現看起來很複雜,但是排程器最核心的邏輯是非常簡單的。它從 apiserver 獲取沒有排程的 pod 資訊和 node 資訊,然後從節點中選擇一個作為排程結果,然後向 apiserver 中寫入 binding 資源。比如下面就是用 bash 編寫的最精簡排程器:
#!/bin/bash
SERVER='localhost:8001'
while true;
do
    for PODNAME in $(kubectl --server $SERVER get pods -o json | jq '.items[] | select(.spec.schedulerName == "my-scheduler") | select(.spec.nodeName == null) | .metadata.name' | tr -d '"')
;
    do
        NODES=($(kubectl --server $SERVER get nodes -o json | jq '.items[].metadata.name' | tr -d '"'))
        NUMNODES=${#NODES[@]}
        CHOSEN=${NODES[$[ $RANDOM % $NUMNODES ]]}
        curl --header "Content-Type:application/json" --request POST --data '{"apiVersion":"v1", "kind": "Binding", "metadata": {"name": "'$PODNAME'"}, "target": {"apiVersion": "v1", "kind"
: "Node", "name": "'$CHOSEN'"}}' http://$SERVER/api/v1/namespaces/default/pods/$PODNAME/binding/
        echo "Assigned $PODNAME to $CHOSEN"
    done
    sleep 1
done
它通過 kubectl 命令從 apiserver 獲取未排程的 pod(spec.schedulerName 是 my-scheduler,並且spec.nodeName 為空),同樣地,用 kubectl 從 apiserver 獲取 nodes 的資訊,然後隨機選擇一個 node 作為排程結果,並寫入到 apiserver 中。
當然要想編寫一個生產級別的排程器,要完善的東西還很多,比如:
排程過程中需要保證 pod 是最新的,這個例子中每次排程 pod 的時候,它在 apiserver 中的內容可能已經發生了變化
排程過程需要考慮資源等因素(節點的資源利用率,儲存和網路的資訊等)
儘量提高排程的效能(使用併發來提高排程的效能)
雖然工作量很多,但是對於排程器要求非常高的話,編寫自己的排程器也是不錯的選擇。
4. 總結
排程的過程是這樣的:
客戶端通過 kuberctl 或者 apiserver 提交資源建立的請求,不管是 deployment、replicaset、job 還是 pod,最終都會產生要排程的 pod
排程器從 apiserver 讀取還沒有排程的 pod 列表,迴圈遍歷地為每個 pod 分配節點
排程器會儲存叢集節點的資訊。對每一個 pod,排程器先過濾掉不滿足 pod 執行條件的節點,這個過程是 Predicate
通過過濾的節點,排程器會根據一定的演算法給它們打分,確定它們的優先順序順序,並選擇分數最高的節點作為結果
排程器根據最終選擇出來的節點,把結果寫入到 apiserver(建立一個 binding 資源)
相信閱讀到這裡,你對這幾個步驟都已經非常清晰了。kube-scheduler 實現還是很讚的,目前已經達到生產級別的要求。但是我們還是能看到很多可以優化的地方,我能想到的一些點:
如果過濾的結果只有一個,應該可以直接使用這個節點,而不用再經過一遍 priority 的過程
目前每次只調度一個 pod,雖然中間排程過程利用併發來提高效率,但是如果能同時排程多個 pod,效能也會有提升。當然,如果要這樣做,一定要考慮併發帶來的共享資料的處理方法,程式碼的複雜性也會增加
排程的時候沒有考慮節點實際使用情況,只是考慮了所有 pods 請求的資源情況。大部分情況下,pod 請求的資源並不能完全被用到,如果能保證這部分資源也被充分利用就更好了。但是因為實際的資源利用率是動態的,而且會有峰值,最重要的是無法判斷 pod 未來實際的資源使用情況,想做到這一點需要有更優的演算法
沒有填寫請求資源的 pod 會對叢集帶來影響。當前的實現中,如果 pod 沒有在自己的配置中寫上需要多少資源,scheduler 會把它申請的資源當做 0,這樣會導致誤判,導致叢集不穩定。除了使用者在建立的 pod 中都寫上資源請求數量,目前還沒有很好的方法來解決這個問題
沒有排程器是完美的,但是相信 kubernetes scheduler 會在未來得到不斷優化,變得越來越好。
文章轉載於:https://blog.csdn.net/qq_21816375/article/details/78209605