
Java連結sap,RFC介面
阿新 • • 發佈:2018-11-02
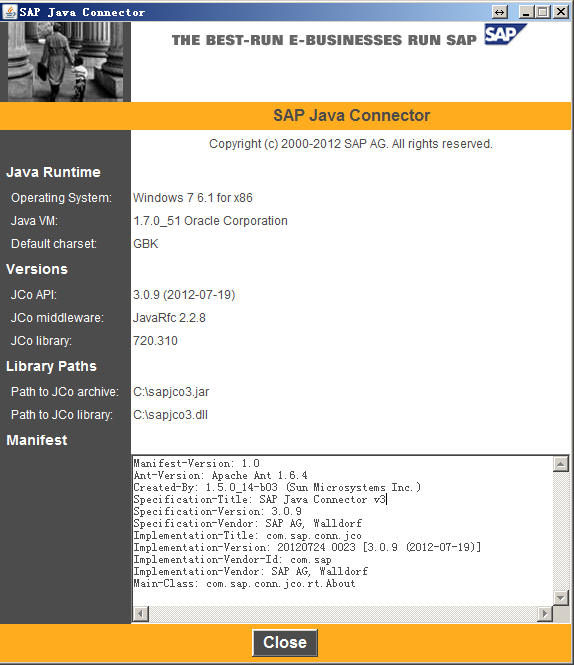
| 安裝JCo3. 78 建立JCo3連線... 79 直連... 79 連線池... 81 DestinationDataProvider介面(不需連線屬性配置檔案)... 82 訪問結構 (Structure)84 訪問表 (Table)84 Java多執行緒呼叫有/無狀態RFM.. 86 ABAP型別與JCo型別對映關係表... 96 ABAP訪問Java服務... 97 連線異常registrationnot allowed. 99 無狀態訪問... 100 ABAP客戶端程式碼... 100 Java服務端程式碼... 101 帶狀態訪問... 106 ABAP客戶端程式碼(可拷貝兩份進行測試)... 106 Java服務端程式碼... 107 JCo RFC函式異常總結 外部系統(Java)呼叫BAPI函式 在呼叫BAPI時,SAP為各程式設計環境(VB、C++、Java等)提供了RFC庫及SAP聯結器(如Jco、Nco等)。這些類庫中的RFC API封閉了外部系統和SAP的連線細節 安裝JCo3 JCo有32位和64為之分,32位的JVM選擇32位的JCO, 64位的JVM選擇64位的JCO, 在windows環境,選擇相應的sapjco3.dll, Unix和Linux環境選擇合適的sapjco3.so 32位下載:http://pan.baidu.com/s/1jGr6jSa 64位下載:http://pan.baidu.com/s/1i3mO2rj 解壓後將sapjco3.dll拷貝到c:/windows/system32與C:\Program Files (x86)\Java\jdk1.7.0_51\bin下,將sapjco3.jar加入專案的classpath中。 測試安裝成功與否,很簡單,開啟一個命令: java -jar C:/sapjco3.jar 或者 java -cp C:/sapjco3.jar com.sap.conn.jco.rt.About |
 |
建立JCo3連線 JCo連線到SAP伺服器有兩種方法,分別是直連和通過連線池進行連線。其差別在於,開啟直連連線後可以一直保持連線;連線池則是在需要時才建立連線,連線暫不需要時,將被釋放回連線池,再分配給其他使用者使用。在網路伺服器應用程式裡,一般採用連線池進行連線SAP伺服器。 如果是老系統,可能要還注意遠端登入使用者的型別: |
 |
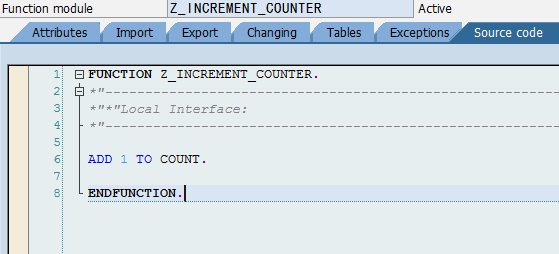
直連 import java.io.File; import java.io.FileOutputStream; import java.util.Properties; import com.sap.conn.jco.JCoDestination; import com.sap.conn.jco.JCoDestinationManager; import com.sap.conn.jco.JCoException; import com.sap.conn.jco.ext.DestinationDataProvider; public class ConnectNoPool {// 直連方式,非連線池 // 連線屬性配置檔名,名稱可以隨便取 static String ABAP_AS = "ABAP_AS_WITHOUT_POOL"; static { Properties connectProperties = new Properties(); connectProperties.setProperty(DestinationDataProvider.JCO_ASHOST, "192.168.111.137"); connectProperties.setProperty(DestinationDataProvider.JCO_SYSNR, "00"); connectProperties .setProperty(DestinationDataProvider.JCO_CLIENT, "800"); connectProperties.setProperty(DestinationDataProvider.JCO_USER, "SAPECC"); // 注:密碼是區分大小寫的,要注意大小寫 connectProperties.setProperty(DestinationDataProvider.JCO_PASSWD, "sapecc60"); connectProperties.setProperty(DestinationDataProvider.JCO_LANG, "en"); // 需要將屬性配置儲存屬性檔案,該檔案的檔名為 ABAP_AS_WITHOUT_POOL.jcoDestination, // JCoDestinationManager.getDestination()呼叫時會需要該連線配置檔案,字尾名需要為jcoDestination createDataFile(ABAP_AS, "jcoDestination", connectProperties); } // 基於上面設定的屬性生成連線配置檔案 static void createDataFile(String name, String suffix, Properties properties) { File cfg = new File(name + "." + suffix); if (!cfg.exists()) { try { FileOutputStream fos = new FileOutputStream(cfg, false); properties.store(fos, "for tests only !"); fos.close(); } catch (Exception e) { e.printStackTrace(); } } } public static void connectWithoutPool() throws JCoException { // 到當前類所在目錄中搜索 ABAP_AS_WITHOUT_POOL.jcoDestination // 屬性連線配置檔案,並根據檔案中的配置資訊來建立連線 JCoDestination destination = JCoDestinationManager .getDestination(ABAP_AS);// 只需指定檔名(不能帶副檔名jcoDestination名,會自動加上) System.out.println("Attributes:"); // 呼叫destination屬性時就會發起連線,一直等待遠端響應 System.out.println(destination.getAttributes()); } public static void main(String[] args) throws JCoException { connectWithoutPool(); } } Attributes: DEST: ABAP_AS_WITHOUT_POOL OWN_HOST: jiangzhengjun PARTNER_HOST: SAPECC6 SYSTNR: 00 SYSID: ECC CLIENT: 800 USER: SAPECC LANGUAGE: E ISO_LANGUAGE: EN OWN_CODEPAGE: 4102 OWN_CHARSET: UTF16 OWN_ENCODING: utf-16 OWN_BYTES_PER_CHAR: 2 PARTNER_CODEPAGE: 4103 PARTNER_CHARSET: UTF16 PARTNER_ENCODING: utf-16 PARNER_BYTES_PER_CHAR: 2 OWN_REL: 720 PARTNER_REL: 731 PARTNER_TYPE: 3 KERNEL_REL: 720 TRACE: RFC_ROLE: C OWN_TYPE: E CPIC_CONVID: 00000000 連線池 程式執行結果與上面直接是一樣的 import java.io.File; import java.io.FileOutputStream; import java.util.Properties; import com.sap.conn.jco.JCoDestination; import com.sap.conn.jco.JCoDestinationManager; import com.sap.conn.jco.JCoException; import com.sap.conn.jco.ext.DestinationDataProvider; public class ConnectPooled {// 連線池 static String ABAP_AS_POOLED = "ABAP_AS_WITH_POOL"; static { Properties connectProperties = new Properties(); connectProperties.setProperty(DestinationDataProvider.JCO_ASHOST, "192.168.111.137"); connectProperties.setProperty(DestinationDataProvider.JCO_SYSNR, "00"); connectProperties .setProperty(DestinationDataProvider.JCO_CLIENT, "800"); connectProperties.setProperty(DestinationDataProvider.JCO_USER, "SAPECC"); // 注:密碼是區分大小寫的,要注意大小寫 connectProperties.setProperty(DestinationDataProvider.JCO_PASSWD, "sapecc60"); connectProperties.setProperty(DestinationDataProvider.JCO_LANG, "en"); // *********連線池方式與直接不同的是設定了下面兩個連線屬性 // JCO_PEAK_LIMIT - 同時可建立的最大活動連線數,0表示無限制,預設為JCO_POOL_CAPACITY的值 // 如果小於JCO_POOL_CAPACITY的值,則自動設定為該值,在沒有設定JCO_POOL_CAPACITY的情況下為0 connectProperties.setProperty(DestinationDataProvider.JCO_PEAK_LIMIT, "10"); // JCO_POOL_CAPACITY - 空閒連線數,如果為0,則沒有連線池效果,預設為1 connectProperties.setProperty( DestinationDataProvider.JCO_POOL_CAPACITY, "3"); createDataFile(ABAP_AS_POOLED, "jcoDestination", connectProperties); } static void createDataFile(String name, String suffix, Properties properties) { File cfg = new File(name + "." + suffix); if (!cfg.exists()) { try { FileOutputStream fos = new FileOutputStream(cfg, false); properties.store(fos, "for tests only !"); fos.close(); } catch (Exception e) { e.printStackTrace(); } } } public static void connectWithPooled() throws JCoException { JCoDestination destination = JCoDestinationManager .getDestination(ABAP_AS_POOLED); System.out.println("Attributes:"); System.out.println(destination.getAttributes()); } public static void main(String[] args) throws JCoException { connectWithPooled(); } } DestinationDataProvider介面(不需連線屬性配置檔案) 上面直接連線、連線池,兩種連線方法都需要先建立一個屬性配置檔案,然後JCo再從建立好檔案裡讀取連線到SAP伺服器所需要的連線屬性,這個方法很難在實際的環境中應用,儲存SAP連線屬性配置資訊到一個檔案裡,是比較不安全的。然而,JCO為我們提供了另外一種連線的方法:DestinationDataProvider,通過它我們就可以將一個連線變數資訊存放在記憶體裡 import java.util.HashMap; import java.util.Properties; import com.sap.conn.jco.JCoDestination; import com.sap.conn.jco.JCoDestinationManager; importcom.sap.conn.jco.ext.DestinationDataEventListener; import com.sap.conn.jco.ext.DestinationDataProvider; import com.sap.conn.jco.ext.Environment; public class CustomSAPDestinationDataProvider { static class MyDestinationDataProvider implements DestinationDataProvider { privateDestinationDataEventListenereL; private HashMap<String, Properties>destinations; private static MyDestinationDataProvider provider = new MyDestinationDataProvider(); private MyDestinationDataProvider() {// 單例模式 if (provider == null) { destinations = new HashMap<String, Properties>(); } } public static MyDestinationDataProvider getInstance() { return provider; } // 實現介面:獲取連線配置屬性 public Properties getDestinationProperties(String destinationName) { if (destinations.containsKey(destinationName)) { return destinations.get(destinationName); } else { throw new RuntimeException("Destination " + destinationName + " is not available"); } } public void setDestinationDataEventListener(DestinationDataEventListener eventListener) { this.eL = eventListener; } public boolean supportsEvents() { return true; } /** * Add new destination 新增連線配置屬性 * * @param properties * holds all the required data for a destination **/ void addDestination(String destinationName, Properties properties) { synchronized (destinations) { destinations.put(destinationName, properties); } } } public static void main(String[] args) throws Exception { // 獲取單例 MyDestinationDataProvider myProvider = MyDestinationDataProvider .getInstance(); // Register the MyDestinationDataProvider 環境註冊 Environment.registerDestinationDataProvider(myProvider); // TEST 01:直接測試 // ABAP_AS is the test destination name :ABAP_AS為目標連線屬性名(只是邏輯上的命名) String destinationName = "ABAP_AS"; System.out.println("Test destination - " + destinationName); Properties connectProperties = new Properties(); connectProperties.setProperty(DestinationDataProvider.JCO_ASHOST, "192.168.111.123"); connectProperties.setProperty(DestinationDataProvider.JCO_SYSNR, "00"); connectProperties .setProperty(DestinationDataProvider.JCO_CLIENT, "800"); connectProperties.setProperty(DestinationDataProvider.JCO_USER, "SAPECC"); connectProperties.setProperty(DestinationDataProvider.JCO_PASSWD, "sapecc60"); connectProperties.setProperty(DestinationDataProvider.JCO_LANG, "en"); // Add a destination myProvider.addDestination(destinationName, connectProperties); // Get a destination with the name of "ABAP_AS" JCoDestination DES_ABAP_AS = JCoDestinationManager .getDestination(destinationName); // Test the destination with the name of "ABAP_AS" try { DES_ABAP_AS.ping(); System.out.println("Destination - " + destinationName + " is ok"); } catch (Exception ex) { ex.printStackTrace(); System.out.println("Destination - " + destinationName + " is invalid"); } // TEST 02:連線池測試 // Add another destination to test // ABAP_AS2 is the test destination name String destinationName2 = "ABAP_AS2"; System.out.println("Test destination - " + destinationName2); Properties connectProperties2 = new Properties(); connectProperties2.setProperty(DestinationDataProvider.JCO_ASHOST, "192.168.111.123"); connectProperties2.setProperty(DestinationDataProvider.JCO_SYSNR, "00"); connectProperties2 .setProperty(DestinationDataProvider.JCO_CLIENT, "800"); connectProperties2.setProperty(DestinationDataProvider.JCO_USER, "SAPECC"); connectProperties2.setProperty(DestinationDataProvider.JCO_PASSWD, "sapecc60"); connectProperties2.setProperty(DestinationDataProvider.JCO_LANG, "en"); connectProperties2.setProperty(DestinationDataProvider.JCO_PEAK_LIMIT, "10"); connectProperties2.setProperty( DestinationDataProvider.JCO_POOL_CAPACITY, "3"); // Add a destination myProvider.addDestination(destinationName2, connectProperties2); // Get a destination with the name of "ABAP_AS2" JCoDestination DES_ABAP_AS2 = JCoDestinationManager .getDestination(destinationName2); // Test the destination with the name of "ABAP_AS2" try { DES_ABAP_AS2.ping(); System.out.println("Destination - " + destinationName2 + " is ok"); } catch (Exception ex) { ex.printStackTrace(); System.out.println("Destination - " + destinationName2 + " is invalid"); } } } 訪問結構 (Structure) public static void accessSAPStructure() throws JCoException { JCoDestination destination = JCoDestinationManager .getDestination(ABAP_AS); JCoFunction function = destination.getRepository().getFunction( "RFC_SYSTEM_INFO");//從物件倉庫中獲取 RFM 函式 if (function == null) throw new RuntimeException( "RFC_SYSTEM_INFO not found in SAP."); try { function.execute(destination); } catch (AbapException e) { System.out.println(e.toString()); return ; } JCoStructure exportStructure = function.getExportParameterList() .getStructure("RFCSI_EXPORT"); System.out.println("System info for " + destination.getAttributes().getSystemID() + ":\n"); for (int i = 0; i < exportStructure.getMetaData().getFieldCount(); i++) { System.out.println(exportStructure.getMetaData().getName(i) + ":\t" + exportStructure.getString(i)); } System.out.println(); // JCo still supports the JCoFields, but direct access via getXX is more // efficient as field iterator 也可以使用下面的方式來遍歷 System.out.println("The same using field iterator: \nSystem info for " + destination.getAttributes().getSystemID() + ":\n"); for (JCoField field : exportStructure) { System.out.println(field.getName() + ":\t" + field.getString()); } System.out.println(); //*********也可直接通過結構中的欄位名或欄位所在的索引位置來讀取某個欄位的值 System.out.println("RFCPROTO:\t"+exportStructure.getString(0)); System.out.println("RFCPROTO:\t"+exportStructure.getString("RFCPROTO")); } public static void main(String[] args) throws JCoException { accessSAPStructure(); } 訪問表 (Table) public static void workWithTable() throws JCoException { JCoDestination destination = JCoDestinationManager .getDestination(ABAP_AS); JCoFunction function = destination.getRepository().getFunction( "BAPI_COMPANYCODE_GETLIST");//從物件倉庫中獲取 RFM 函式:獲取公司列表 if (function == null) throw new RuntimeException( "BAPI_COMPANYCODE_GETLIST not found in SAP."); try { function.execute(destination); } catch (AbapException e) { System.out.println(e.toString()); return ; } JCoStructure return Structure = function.getExportParameterList() .getStructure("return "); //判斷讀取是否成功 if (!(return Structure.getString("TYPE").equals("") || return Structure .getString("TYPE").equals("S"))) { throw new RuntimeException(return Structure.getString("MESSAGE")); } //獲取Table引數:COMPANYCODE_LIST JCoTable codes = function.getTableParameterList().getTable( "COMPANYCODE_LIST"); for (int i = 0; i < codes.getNumRows(); i++) {//遍歷Table codes.setRow(i);//將行指標指向特定的索引行 System.out.println(codes.getString("COMP_CODE") + '\t' + codes.getString("COMP_NAME")); } // move the table cursor to first row codes.firstRow();//從首行開始重新遍歷 codes.nextRow():如果有下一行,下移一行並返回True for (int i = 0; i < codes.getNumRows(); i++, codes.nextRow()) { //進一步獲取公司詳細資訊 function = destination.getRepository().getFunction( "BAPI_COMPANYCODE_GETDETAIL"); if (function == null) throw new RuntimeException( "BAPI_COMPANYCODE_GETDETAIL not found in SAP."); function.getImportParameterList().setValue("COMPANYCODEID", codes.getString("COMP_CODE")); // We do not need the addresses, so set the corresponding parameter // to inactive. // Inactive parameters will be either not generated or at least // converted. 不需要返回COMPANYCODE_ADDRESS引數(但伺服器端應該還是組織了此資料,只是未經過網路傳送?) function.getExportParameterList().setActive("COMPANYCODE_ADDRESS", false); try { function.execute(destination); } catch (AbapException e) { System.out.println(e.toString()); return ; } return Structure = function.getExportParameterList().getStructure( "return "); if (!(return Structure.getString("TYPE").equals("") || return Structure.getString("TYPE").equals("S") || return Structure .getString("TYPE").equals("W"))) { throw new RuntimeException(return Structure.getString("MESSAGE")); } JCoStructure detail = function.getExportParameterList() .getStructure("COMPANYCODE_DETAIL"); System.out.println(detail.getString("COMP_CODE") + '\t' + detail.getString("COUNTRY") + '\t' + detail.getString("CITY")); }// for } Java多執行緒呼叫有/無狀態RFM 有狀態呼叫:指多次呼叫某個程式(如多次呼叫某個RFC函式、呼叫某個函式組中的多個RFC函式、及BAPI函式——因為BAPI函式也是一種特殊的具有RFC功能的函式,它也有自己的函式組)時,在這一多次呼叫過程中,程式執行時的記憶體狀態(即全域性變數的值)可以在每次呼叫後保留下來,供下一次繼續使用,而不是每次呼叫後,程式所在的記憶體狀態被清除。這種呼叫適用於那些使用到函式組中的全域性變數的RFC函式的呼叫 無狀態呼叫:每次的呼叫都是獨立的一次呼叫(上一次呼叫與當前以及下一次呼叫之間不會共享任何全域性變數),呼叫後不會保留記憶體狀態,這種呼叫適用於那些沒有使用到函式組中的全域性變數的RFC函式呼叫 如果主調程式為Java時,需要通過遠端連線來呼叫RFC函式,此種情況下的有狀態呼叫的前提是: l 多次呼叫RFC函式時,Java端要確保每次呼叫所使用的連線與上次是同一個(應該不需要是同一物理連線,只需要確保是同一遠端會話,從下面演示程式來看,用的是連線池,但同一任務執行時並未去特意使用同一物理連線去傳送遠端呼叫,而只是要求是同一遠端會話) l ABAP端需要在每次呼叫後,保留每一次被呼叫後函式組的記憶體狀態,直到最後一次呼叫完成止,這需要Java與ABAP配合來完成(Java在第一次呼叫時,呼叫JCoContext.begin、JCoContext.end這兩個方法,告訴SAP這一呼叫過程將是有狀態呼叫,然後SAP端會自動保留記憶體狀態) 如果主調程式是ABAP(即ABAP程式呼叫ABAP函式),此種情況下沒有特殊的要求,直接呼叫就即可,只要是在同一程式的同一執行會話其間(會話相當於Java中的同一執行緒吧),不管是多次呼叫同一個函式、還是呼叫同一函式組中的不同函式,則都會自動保留記憶體狀態,直到程式執行結束,這是系統自己完成的。實質上一個函式組就相當於一個類,函式組中不同的函式就相當於類中不同的方法、全域性變數就相當於類中的屬性,所以只要是在同一程式的同一執行會話期間,呼叫的同一函式所在的函式組中的全域性變數都是共享的,就好比呼叫一類的某個方法時,該方法設定了某個類的屬性,再去呼叫該類的其它方法時,該屬性值還是保留了以前其它方法修改後的狀態值。 該示例採用執行緒方式來演示,狀態呼叫只要保證同一執行緒中多次遠端方法呼叫採用的都是同一會話即可。當然更簡單的方法是不使用多執行緒,而直接在主執行緒中使用同一個物理遠端連線呼叫即可(但還是需要呼叫JCoContext.begin、JCoContext.end這兩個方法,告訴SAP端需要保留記憶體狀態,直接程式結束) 這裡使用的函式是從標準程式COUNTER函式組拷貝而來,只不過系統中提供的不支援RFC呼叫,拷貝過來後修改成RFM: |
 |
 |
 |
import java.io.File; import java.io.FileOutputStream; import java.util.Collection; import java.util.Hashtable; import java.util.Properties; import java.util.concurrent.BlockingQueue; import java.util.concurrent.CountDownLatch; import java.util.concurrent.LinkedBlockingQueue; import java.util.concurrent.TimeUnit; import java.util.concurrent.atomic.AtomicInteger; import com.sap.conn.jco.JCoContext; import com.sap.conn.jco.JCoDestination; import com.sap.conn.jco.JCoDestinationManager; import com.sap.conn.jco.JCoException; import com.sap.conn.jco.JCoFunction; import com.sap.conn.jco.JCoFunctionTemplate; import com.sap.conn.jco.ext.DestinationDataProvider; import com.sap.conn.jco.ext.Environment; import com.sap.conn.jco.ext.JCoSessionReference; import com.sap.conn.jco.ext.SessionException; import com.sap.conn.jco.ext.SessionReferenceProvider; /** * MultiThreadedExample is rather complex. It demonstrates演示 how to use the * SessionReferenceProvider會話提供者 defined in the package com.sap.conn.jco.ext. * * Before discussing討論 situations情況 requiring要求 SessionReferenceProvider, we * provide a short description of how the JCo Runtime handles the stateful(有狀態) * and stateless(無狀態) calls by default. By default all RFC calls * 預設情況下所有JCoFunction.execute執行都是無狀態的 (JCoFunction.execute(JCoDestination)) are * stateless. That means the ABAP context associated with the connection will be * destroyed(意味著上下連線被銷燬). Some RFC modules save a particular state/data in the * ABAP context's area(有些函式組下的多個RFM會共用一全域性變數). In order to keep a JCo connection * and use it for subsequent (stateful) calls(為了保持多個RFM在同一連線中順序呼叫), the * JCoConext.begin(JCoDestination) API can be used. In the case of multithreaded * applications some calls to a destination can be executed concurrently(同時,併發), * so JCo Runtime(JCo執行時環境需) needs to associate a particular call or connection * to an internal session. By default JCo Runtime associates each thread with a * session of its(預設情況下每個執行緒都有它自己的會話) own, so that most applications that execute * all stateful requests en bloc(整體) or at least in the same thread will run * correctly. * * Applications that wish to execute calls belonging to a stateful sequence by * employing(採用) different threads have to implement and register the * SessionReferenceProvider. The main goal of(主要目標) the implementation is to * determine to which session the calls executing in the current thread belong. * * This example defines MultiStepJob having several execution * steps(該示例的任務有多個步驟). The test starts a certain number of threads (see * runJobs). Each thread is designed to take a job, execute one step, and put * the job back to the shared job list. There are two jobs as an example: * StatelessMultiStepExample and StatefulMultiStepExample. Both invoke the same * RFC modules, but StatefulMultiStepExample uses JCoContext.begin and * JCoContext.end to specify the stateful calls. * * To be able to execute a stateful call sequence distributed over several * steps, we register a custom implementation of SessionReferenceProvider called * MySessionReferenceProvider. The idea behind MySessionReferenceProvider is * simple: each thread holds the current session reference in its local storage. * To achieve(實現) that WorkerThread.run sets this session reference before * executing the next step and removes it after the step is finished. */ public class MultiThreadedExample { private static BlockingQueue<MultiStepJob>queue = new LinkedBlockingQueue<MultiStepJob>(); private static JCoFunctionTemplate incrementCounterTemplate, getCounterTemplate; // 任務介面 interface MultiStepJob { String getName();//任務名 boolean isFinished();//任務是否 public void runNextStep();//執行任務 public void cleanUp();//清除任務 } // 無狀態遠端RFM的呼叫(增加計數與讀取計數RFM雖然在這裡是在同一會話中呼叫的——不一定是在同一連線中, // 但沒有呼叫JCoContext.begin方法讓ABAP保留每次被呼叫後的記憶體狀態:計數器全域性變數 count的值) static class StatelessMultiStepExample implements MultiStepJob { static AtomicInteger JOB_COUNT = new AtomicInteger(0); int jobID = JOB_COUNT.addAndGet(1);// 任務編號 int calls;// 需要呼叫多少次 JCoDestination destination;// 遠端目標 int executedCalls = 0;// 記錄呼叫次數,即任務步驟 Exception ex = null;// 記錄任務執行過程出現的異常 int remoteCounter;// 計數結果 StatelessMultiStepExample(JCoDestination destination, int calls/* 呼叫次數 */) { this.calls = calls; this.destination = destination; } public boolean isFinished() { // 如果Z_INCREMENT_COUNTER已經呼叫了10次,或者呼叫過程中出現了異常時,表示任務已完成 return executedCalls == calls || ex != null; } public String getName() {// 任務名 return "無狀態呼叫 Job-" + jobID; } // 任務的某一步,究竟有多少步則外界來傳遞進來的calls變數來控制 public void runNextStep() { try { //注:在呼叫遠端RFC功能函式(如這裡的incrementCounter、getCounter)之前,JCo框架會去呼叫 // SessionReferenceProvider的getCurrentSessionReference()方法, // 取得當前任務所對應的遠端會話,確保同一任務是在同一遠端會話中執行的 JCoFunction incrementCounter = incrementCounterTemplate .getFunction();// 增加計數:即RFM中的count全域性變數加一 incrementCounter.execute(destination); executedCalls++;// 呼叫了多少次 if (isFinished()) {// 任務完後(這裡呼叫10次),才讀取計數器 JCoFunction getCounter = getCounterTemplate.getFunction(); getCounter.execute(destination); remoteCounter = getCounter.getExportParameterList().getInt( "GET_VALUE");// 讀取計數:即讀取RFM中的count全域性變數 } } catch (JCoException je) { ex = je; } catch (RuntimeException re) { ex = re; } } public void cleanUp() {// 任務結束後,清除任務 StringBuilder sb = new StringBuilder("任務 ").append(getName()) .append(" 結束:"); if (ex != null) { sb.append("異常結束 ").append(ex.toString()); } else { sb.append("成功執行完,計數器值 = ").append(remoteCounter); } System.out.println(sb.toString()); } } // 有狀態遠端RFM呼叫(增加計數與讀取計數RFM在同一遠端會話中執行,保留了記憶體狀態:計數器全域性變數 count的值) static class StatefulMultiStepExample extends StatelessMultiStepExample { StatefulMultiStepExample(JCoDestination destination, int calls) { super(destination, calls); } @Override public String getName() { return "有狀態呼叫 Job-" + jobID; } @Override public void runNextStep() { // 如果是任務的第一步,則需要讓ABAP端保留函式執行後的上下文(記憶體)狀態 if (executedCalls == 0) { // begin()與end()之間表示多個RFM執行會在同一個連線中執行,並且這之間的多個RFM屬於同一個LUW,並且按照呼叫的順序來執行 // ****不管是否有無狀態RFM呼叫(加begin後無狀態呼叫至少還可以保證同一任務中多個函式呼叫的順序),都要確保同一任務 // ****(多個RFM所組成的遠端呼叫任務)在同一會話中執行,要做到這一點,在Java端需要保證不同執行緒(同一執行緒也是) // ****在執行同一任務時,JCo連線與遠端會話都要是同一個 JCoContext.begin(destination);// 開啟狀態呼叫,會話在begin與end之間不會被重置與關閉,這樣 // SAP端使用者的上下檔案就會被保持 } super.runNextStep(); } @Override public void cleanUp() { try { JCoContext.end(destination); } catch (JCoException je) { ex = je; } super.cleanUp(); } } static class MySessionReference implements JCoSessionReference {// 遠端會話實現 static AtomicInteger atomicInt = new AtomicInteger(0); // 遠端會話ID private String id = "session-" + String.valueOf(atomicInt.addAndGet(1));; public void contextFinished() { } public void contextStarted() { } public String getID() { return id; } } // 工作執行緒,用來執行前面定義的任務:StatelessMultiStepExample、StatefulMultiStepExample static class WorkerThread extends Thread { // 任務與遠端會話對映關係表:確保同一任務要在同一遠端會話中執行 static Hashtable<MultiStepJob, MySessionReference>sessions = new Hashtable<MultiStepJob, MySessionReference>(); // ThreadLocal:執行緒全域性變數區域性化,即將原本共享的屬性全域性變數在每個執行緒中都拷貝一份,不會讓它們再在不同的執行緒中共享, // 每個執行緒拿到的都是自己所獨享的,所以看似全域性共享的屬性在多執行緒情況下,也不會出現多執行緒併發問題 // 當前執行緒所使用的遠端會話 static ThreadLocal<MySessionReference>localSessionReference = new ThreadLocal<MySessionReference>(); // 同步器:倒計時閉鎖;threadCount為倒計數值,直到該數為0時,await()才會結束繼續往下執行 // CountDownLatch同步器的作用就是讓所有執行緒都準備好以後,真正同時開始執行,這樣不會因為先建立的 // 的執行緒就會先執行,可以真正模擬多執行緒同時執行的情況,這樣在研究多執行緒在訪問同一臨界資源時,容易發現執行緒併發問題 private CountDownLatch startSignal;// 開始閥:所以執行緒都已啟動並就緒時,所有執行緒不再阻塞 private CountDownLatch doneSignal;// 結束閥:所以執行緒結束後,主執行緒才結束 WorkerThread(CountDownLatch startSignal, CountDownLatch doneSignal) { this.startSignal = startSignal; this.doneSignal = doneSignal; } // 工作執行緒 public void run() { startSignal.countDown(); try { startSignal.await();// 所有執行緒都已經執行到這裡後,才開始一起同時向下執行,否則一直阻塞 // 某一時間段內(即一次迴圈)只執行某個任務的一個步驟 for (;;) {// 直到任務佇列中沒有任務時退出 // 出隊,工作執行緒從任務佇列中取任務:如果等10秒都未取到,則返回NULL MultiStepJob job = queue.poll(10, TimeUnit.SECONDS); // stop if nothing to do if (job == null) {// 如果任務佇列中沒有任務後,工作執行緒將退出 return ; } // 取任務所對應的遠端會話,確保每個任務使用同一遠端會話 MySessionReference sesRef = sessions.get(job); if (sesRef == null) {// 如果是第一次,則新建立一個遠端會話,再將任務與該會話進行繫結 sesRef = new MySessionReference(); sessions.put(job, sesRef); } // 儲存當前執行緒所使用的遠端會話。該值的讀取是在呼叫遠端RFM前,由JCo框架的 // SessionReferenceProvider的getCurrentSessionReference()方法來讀取 // ****不管是否有無狀態RFM呼叫,最好都要確保同一任務(多個RFM所組成的遠端呼叫任務)在同一會話中執行 // ****,要做到這一點,在Java端需要保證不同執行緒(同一執行緒也是)在執行同一任務時,遠端會話要是同一個 // 注:同一任務需要設定為同一遠端會話,不同任務不能設定為相同的遠端會話,否則計數器會在多個任務中共用 localSessionReference.set(sesRef); System.out.println("任務 " + job.getName() + " 開始執行."); try { // 執行任務 job.runNextStep(); } catch (Throwable th) { th.printStackTrace(); } // 如果任務完成(呼叫遠端RFM計數器函式10次) if (job.isFinished()) { System.out.println("任務 " + job.getName() + " 執行完成."); // 如果任務執行完了,則從對映表是刪除任務與遠端會話對映記錄 sessions.remove(job); job.cleanUp();// 任務的所有步驟執行完後,輸出任務結果 } else { System.out.println("任務 " + job.getName() + " 未完成,重新放入任務佇列,等待下次繼續執行."); // 如果發現任務還沒有執行完,則重新放入任務佇列中,等待下一次繼續執行。從這裡可以看出 // 計數器的增加與讀取可能是由不同的工作執行緒來完成的,但要確保同一任務是在同一遠端會話中呼叫的 queue.add(job); } // 當某個任務某一步執行完後,清除當前執行緒所儲存的遠端會話。注:這裡的工作執行緒某一時間段內(即一次迴圈內)只能執行一個任務 localSessionReference.set(null); } } catch (InterruptedException e) { e.printStackTrace(); } finally { doneSignal.countDown(); } } } // 遠端會話提供者:負責拿到當前任務的遠端會話 static class MySessionReferenceProvider implements SessionReferenceProvider { public JCoSessionReference getCurrentSessionReference(String scopeType) { // 從當前執行緒中讀取相應的遠端會話,這樣確保了同一任務中多個RFM的呼叫是在同一遠端會話連線中執行的 MySessionReference sesRef = WorkerThread.localSessionReference .get(); if (sesRef != null) { return sesRef; } throw new RuntimeException("Unknown thread:" + Thread.currentThread().getId()); } // 遠端會話是否活著,JCo框架呼叫此來決定此連線是否銷燬? public boolean isSessionAlive(String sessionId) { Collection<MySessionReference> availableSessions = WorkerThread.sessions .values(); for (MySessionReference ref : availableSessions) { if (ref.getID().equals(sessionId)) { return true; } } return false; } public void jcoServerSessionContinued(String sessionID) throws SessionException { } public void jcoServerSessionFinished(String sessionID) { } public void jcoServerSessionPassivated(String sessionID) throws SessionException { } public JCoSessionReference jcoServerSessionStarted() throws SessionException { return null; } } // 建立任務與工作執行緒並拉起 static void runJobs(JCoDestination destination, int jobCount, int threadCount) { System.out.println(">>>啟動"); for (int i = 0; i < jobCount; i++) {// 5*2=10 個任務(一半是狀態呼叫,一半是無狀態呼叫) // 新增RFM無狀態呼叫任務 queue.add(new StatelessMultiStepExample(destination, 10/* * 每個任務需要呼叫10次 * Z_INCREMENT_COUNTER * 後,任務才算完成 */)); // 新增RFM有狀態呼叫任務 queue.add(new StatefulMultiStepExample(destination, 10)); } CountDownLatch startSignal = new CountDownLatch(threadCount); CountDownLatch doneSignal = new CountDownLatch(threadCount); for (int i = 0; i < threadCount; i++) { // 2 個工作執行緒,共同來完成10 個任務 new WorkerThread(startSignal, doneSignal).start();// 建立並啟動工作執行緒 } System.out.println(">>>等待執行任務... "); try { doneSignal.await();// 主執行緒等待所有工作任務執行緒完成後,才結束 } catch (InterruptedException ie) { ie.printStackTrace(); } System.out.println(">>>完成"); } public static void main(String[] argv) { // JCo.setTrace(5, "."); Environment .registerSessionReferenceProvider(new MySessionReferenceProvider()); try { JCoDestination destination = JCoDestinationManager .getDestination(ABAP_AS); // 遠端函式模板 incrementCounterTemplate = destination.getRepository() & |