SVN搭建以及客戶端使用
第1章 CentOS下搭建SVN伺服器
1.1 SVN簡介
SVN是Subversion的簡稱,是一個開放原始碼的版本控制系統,相較於RCS、CVS,它採用了分支管理系統,它的設計目標就是取代CVS。網際網路上很多版本控制服務已從CVS遷移到Subversion。說得簡單一點SVN就是用於多個人共同開發同一個專案,共用資源的目的
1.2 SVN安裝
官網下載: http://subversion.apache.org/packages.html
SVN客戶端TortoiseSVN :https://tortoisesvn.net/downloads.html
1.2.1 系統環境
[[email protected] ~]# cat /etc/redhat-release CentOS Linux release 7.1.1503 (Core) [[email protected] ~]# uname -r 3.10.0-229.el7.x86_64 [[email protected] ~]# systemctl status firewalld firewalld.service - firewalld - dynamic firewall daemon Loaded: loaded (/usr/lib/systemd/system/firewalld.service; disabled) Active: inactive (dead) Oct 30 22:13:43 Alex systemd[1]: Starting firewalld - dynamic firewall daemon... Oct 30 22:13:48 Alex systemd[1]: Started firewalld - dynamic firewall daemon. Oct 30 22:44:11 Alex systemd[1]: Stopping firewalld - dynamic firewall daemon... Oct 30 22:44:12 Alex systemd[1]: Stopped firewalld - dynamic firewall daemon. [[email protected] ~]# getenforce Permissive
1.2.2 安裝
使用yum命令安裝svn
$ yum install subversion -y
新建svn儲存目錄
$ mkdir /svn
新建一個測試倉庫
$ svnadmin create /svn/test/
$ ll /svn/test/
total 16
drwxr-xr-x. 2 root root   51 Oct 31 12:45 conf
drwxr-sr-x. 6 root root 4096 Oct 31 12:45 db
-r--r--r--. 1 root root    2 Oct 31 12:45 format
drwxr-xr-x. 2 root root 4096 Oct 31 12:45 hooks
drwxr-xr-x. 2 root root   39 Oct 31 12:45 locks
-rw-r--r--. 1 root root  229 Oct 31 12:45 README.txt
以下關於目錄的說明:
hooks目錄:放置hook腳步檔案的目錄
locks目錄:用來放置subversion的db鎖檔案和db_logs鎖檔案的目錄,用來追蹤存取檔案庫的客戶端
format目錄:是一個文字檔案,裡邊只放了一個整數,表示當前檔案庫配置的版本號
conf目錄:是這個倉庫配置檔案(倉庫使用者訪問賬戶,許可權)
1.2.3 配置SVN配置檔案
$ cd /svn/test/conf
$ vim svnserve.conf
### This file controls the configuration of the svnserve daemon, if you
### use it to allow access to this repository.  (If you only allow
### access through http: and/or file: URLs, then this file is
### irrelevant.)
### Visit http://subversion.tigris.org/ for more information.
[general]
### These options control access to the repository for unauthenticated
### and authenticated users.  Valid values are "write", "read",
### and "none".  The sample settings below are the defaults.
anon-access = read         ##注意前邊不要有空格,要頂齊
auth-access = write         ##注意前邊不要有空格,要頂齊
### The password-db option controls the location of the password
### database file.  Unless you specify a path starting with a /,
### the file's location is relative to the directory containing
### this configuration file.
### If SASL is enabled (see below), this file will NOT be used.
### Uncomment the line below to use the default password file.
password-db = passwd        ##注意前邊不要有空格,要頂齊
### The authz-db option controls the location of the authorization
### rules for path-based access control.  Unless you specify a path
### starting with a /, the file's location is relative to the the
### directory containing this file.  If you don't specify an
### authz-db, no path-based access control is done.
### Uncomment the line below to use the default authorization file.
authz-db = authz
### This option specifies the authentication realm of the repository.
### If two repositories have the same authentication realm, they should
### have the same password database, and vice versa.  The default realm
### is repository's uuid.
realm = This is My First Test Repository   ##這個是提示資訊
[sasl]
### This option specifies whether you want to use the Cyrus SASL
### library for authentication. Default is false.
### This section will be ignored if svnserve is not built with Cyrus
### SASL support; to check, run 'svnserve --version' and look for a line
### reading 'Cyrus SASL authentication is available.'
# use-sasl = true
### These options specify the desired strength of the security layer
### that you want SASL to provide. 0 means no encryption, 1 means
### integrity-checking only, values larger than 1 are correlated
### to the effective key length for encryption (e.g. 128 means 128-bit
### encryption). The values below are the defaults.
# min-encryption = 0
# max-encryption = 256
1.2.4 配置訪問使用者及密碼
$ cd /svn/test/conf
$ vim passwd
### This file is an example password file for svnserve.
### Its format is similar to that of svnserve.conf. As shown in the
### example below it contains one section labelled [users].
### The name and password for each user follow, one account per line.

[users]
# harry = harryssecret
# sally = sallyssecret
dev = 123456
test1 = 123456
test2 = 123456
1.2.5 配置新使用者的授權檔案
$ cd /svn/test/conf
### This file is an example authorization file for svnserve.
### Its format is identical to that of mod_authz_svn authorization
### files.
### As shown below each section defines authorizations for the path and
### (optional) repository specified by the section name.
### The authorizations follow. An authorization line can refer to:
###  - a single user,
###  - a group of users defined in a special [groups] section,
###  - an alias defined in a special [aliases] section,
###  - all authenticated users, using the '$authenticated' token,
###  - only anonymous users, using the '$anonymous' token,
###  - anyone, using the '*' wildcard.
###
### A match can be inverted by prefixing the rule with '~'. Rules can
### grant read ('r') access, read-write ('rw') access, or no access
### ('').

[aliases]
# joe = /C=XZ/ST=Dessert/L=Snake City/O=Snake Oil, Ltd./OU=Research Institute/CN=Joe Average

[groups]
# harry_and_sally = harry,sally
# harry_sally_and_joe = harry,sally,&joe

# [/foo/bar]
# harry = rw
# &joe = r
# * =

# [repository:/baz/fuz]
# @harry_and_sally = rw
# * = r
admin = dev,test1
user = test2
[/svn/test/]
@admin = rw
@user = r
* = r
說明:
admin = lqb,test2 建立admin組,組成員為:lqb,test2
user = test1 建立使用者組,使用者成員:test1
[test:/] 賦予根許可權,為了便於管理和許可權的控制,可以把許可權細化到版本庫中相應的目錄
@admin = rw admin組有讀寫的許可權
@user = r user組只有讀的許可權
*= 表示除了上面設定的許可權使用者組以外,其他所有使用者都設定空許可權,空許可權表示禁止訪問本目錄,這很重要一定要加上
1.2.6 啟動svn
$ svnserve -d -r /svn
注意:更改svnserver.conf時需要重啟SVN服務,更改authz,passwd檔案時則不需要重啟服務
第2章 通過客戶端進行連線
2.1 下載客戶端並安裝
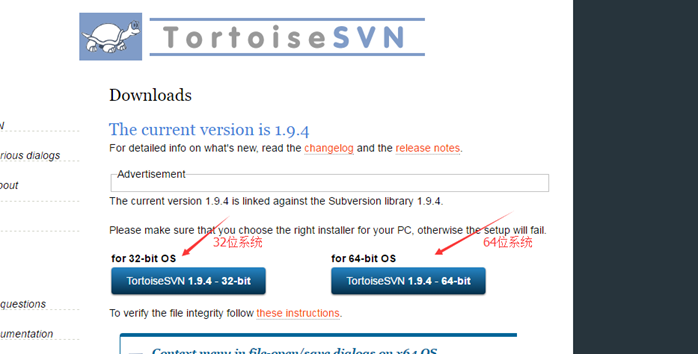
首先安裝SVN客戶端,windows一般選擇烏龜客戶端https://tortoisesvn.net/downloads.html。
根據系統位數選擇相應客戶端進行安裝
如果你喜歡用命令列操作,請務必記得勾選command line client tool為will be install on local hard driver,不用命令列的跳過這一步
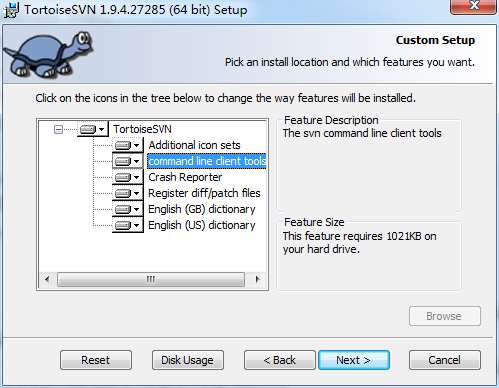
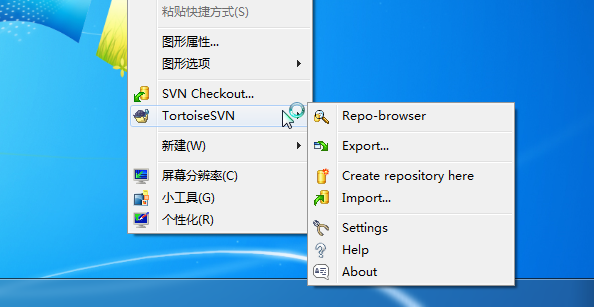
然後一路next即可安裝。安裝完畢後,在任意地方右鍵檢視快捷選單。發現TortoiseSVN即表示安裝成功。
如果勾選了安裝命令列工具,那麼輸入命令SVN,有如下提示也表示安裝成功

2.2 中文設定
但是此時選單全是英文的,如果你不習慣英文,可以去下載語言包,記得下對系統位數
官網下載,上面有地址
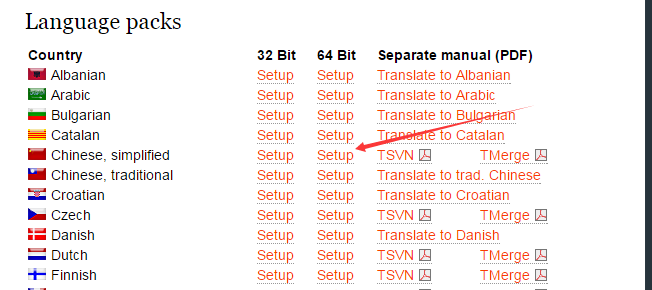
安裝完語言包之後,可以右鍵進入setting設定
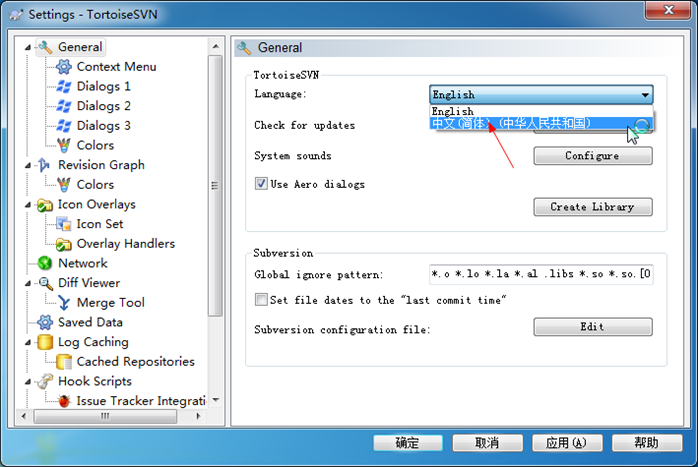
選擇你喜歡的語言(比如中文),然後確定,不出意外,現在的語言已經切換到中文了

安裝教程到此結束,下面開始介紹SVN的使用
2.3 使用說明
2.3.1 檢出專案
假如專案已經在伺服器的倉庫裡,那麼現在你要做的就是把它檢出到本地。
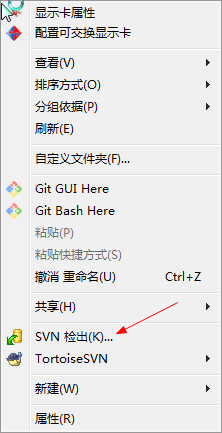
首先建立一個空資料夾。在空資料夾內右鍵,選擇SVN檢出
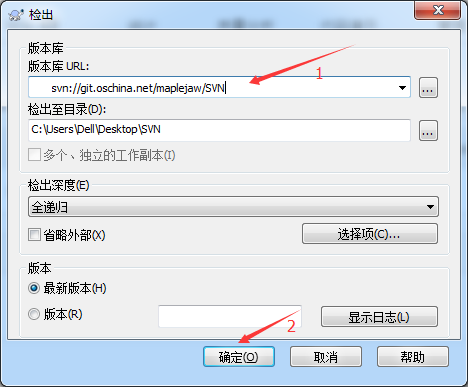
現在你看到應該是這個介面,填入版本庫地址,選擇確定
此時會彈出一個對話方塊讓你輸入賬號密碼,輸入你的賬號密碼即可。記得勾選儲存認證,不然每次操作都會讓你輸入。

等幾分鐘就可以檢出完畢
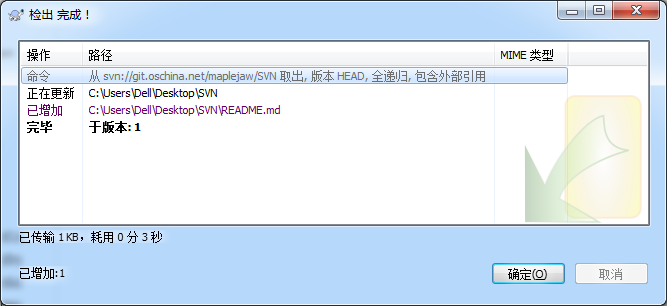
此時在你的目錄下就能看到你的專案,現在可以開始愉快的工作了
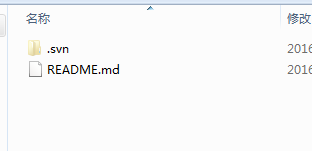
2.3.2 匯入專案
但是有時候你已經在本地建立好了專案,需要把你專案推到SVN上,此時應怎麼做呢?
右鍵選擇版本庫瀏覽器。
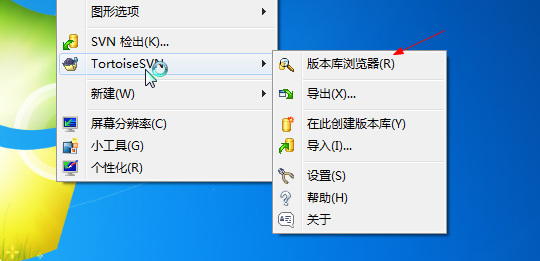
在相應目錄下,右鍵,加入檔案/加入資料夾,選擇相應目錄即可
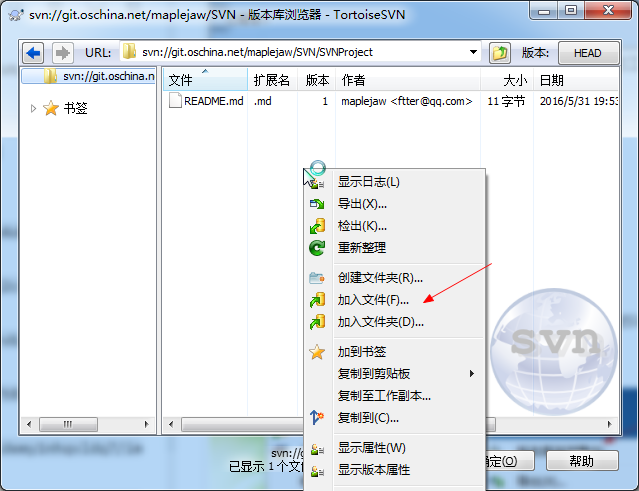
比如我現在有個專案叫SVNProject,我想把它傳到SVN上

那麼我只需選擇加入資料夾即可。

務必要輸入提交資訊。這樣別人才能知道你幹了什麼
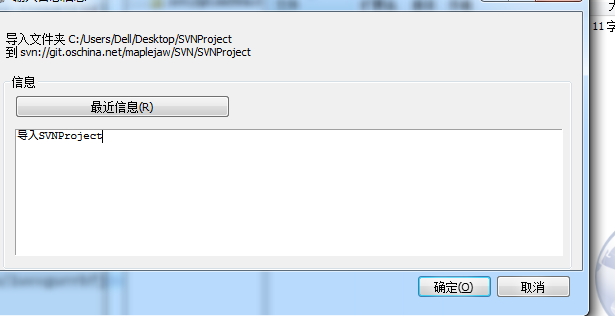
匯入成功就能看到目錄。

但是,不要以為匯入成功就可以了。你還得重新檢出,重新檢出的專案才是受SVN控制的,務必記得檢出

在SVNProject上右鍵檢出到本地,然後在裡面進行修改。現在就可以愉快的工作了。
檢出過後的右鍵選單變成了這樣。
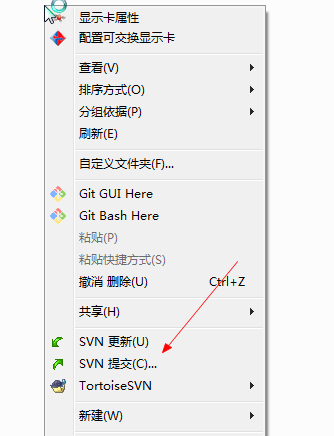
綠色表示當前檔案沒有被修改過(看不見顏色的重啟下電腦就好了)。
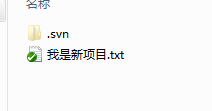
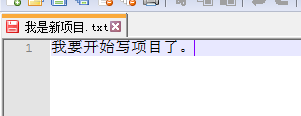
假如我現在在我是新專案.txt中加了一行字,然後儲存
發現現在變成了紅色,紅色表示已修改
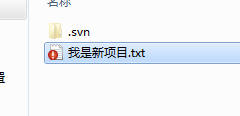
怎麼提交修改?
在根目錄下,右鍵選擇提交。
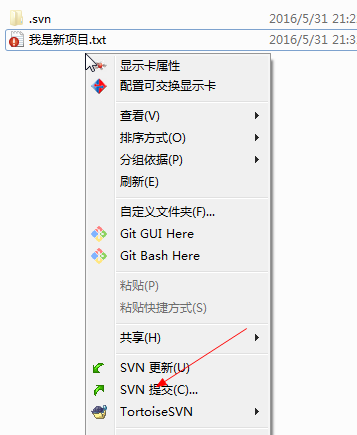
務必記得輸入提交資訊(雖然不輸入也能提交),提交資訊可以方便日後檢視。

提交完畢後,可以發現又恢復到了綠色

假如現在加入了一個新檔案。可以看出是藍色的。藍色表示不屬於版本庫的未知檔案,未知檔案是不能提交的。
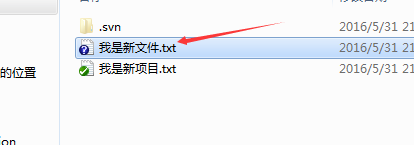
記住選擇增加把它加入到版本庫裡面去

增加完畢後,變成了藍色加號,表示新增加的版本庫檔案

接下來,只需寫程式碼,然後提交即可。
刪除檔案也應該右鍵提交,如下。
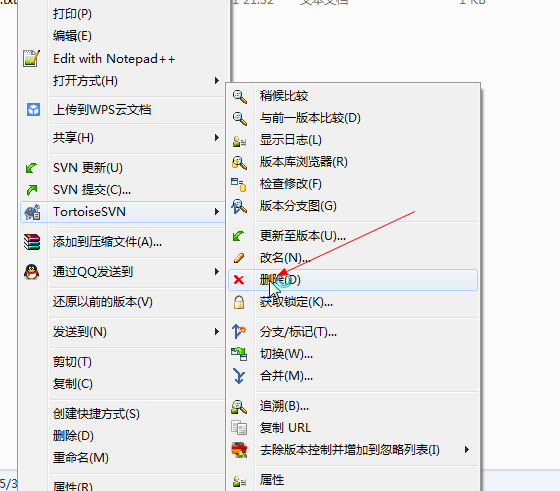
記得隨時檢查你的檔案狀態,如果沒有新增到版本控制裡要及時新增進去,不然你的檔案提交不上去。
2.3.3 更新
假如你和B同學在協作。B同學寫完程式碼提交到了SVN上,如果你想獲取最新修改,就需要選擇更新(如果伺服器上已經有別人提交過的新的,你是提交不上去的,必須先更新再提交)。
怎麼知道伺服器有沒有更新?你可以直接選擇更新,有沒有更新一下就知道。或者右鍵檢查修改,然後檢查版本庫,就能看到伺服器上改了哪些檔案

右鍵選擇HEAD和BASE比較。

左邊的表示你的程式碼,右邊的表示伺服器上的程式碼

如果有修改記得及時更新到本地然後再繼續工作
但是有時候更新會衝突,比如你和伺服器上的改了同一個地方。
這時候你需要更新下來解決衝突。

它會提示你哪個檔案衝突,你只需開啟那個檔案,按照需求解決衝突即可
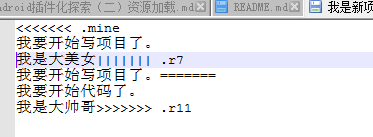
<<<<<<.mine到====表示你的程式碼,其他表示伺服器的程式碼。你只需改成你想要的

然後選擇解決,告訴SVN我已經解決衝突了就行了
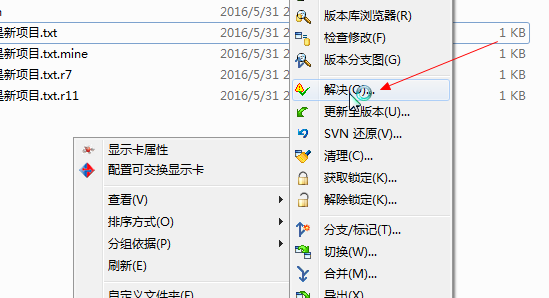
剩下的就是團隊協作間的更新提交操作,這裡不做贅述
2.3.4 檢視日誌
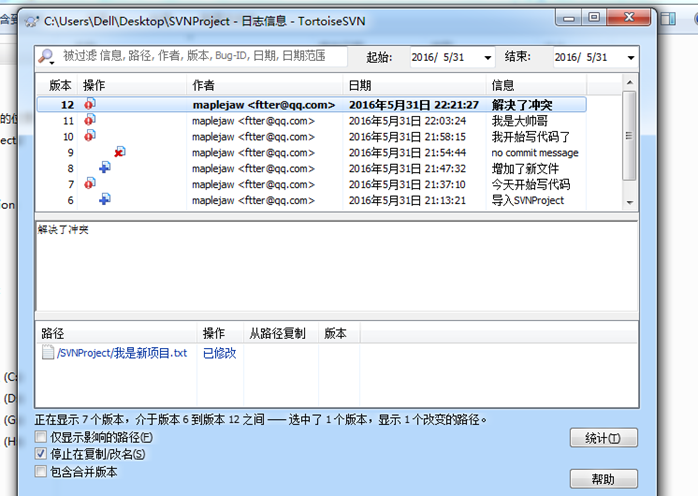
選擇顯示日誌,可以看出團隊裡面的人幹了什麼

可以看出誰誰誰,什麼時間,幹了什麼事。最後那一列資訊是自己提交的時候寫的。建議大家提交時務必要填寫提交資訊,這樣別人一看就知道你幹了什麼。提交資訊對於自己也是有好處的,時間長了也能看到當初做了什麼。
2.3.5 版本回滾
如果你改了東西,但是還沒有提交,可以使用還原功能。
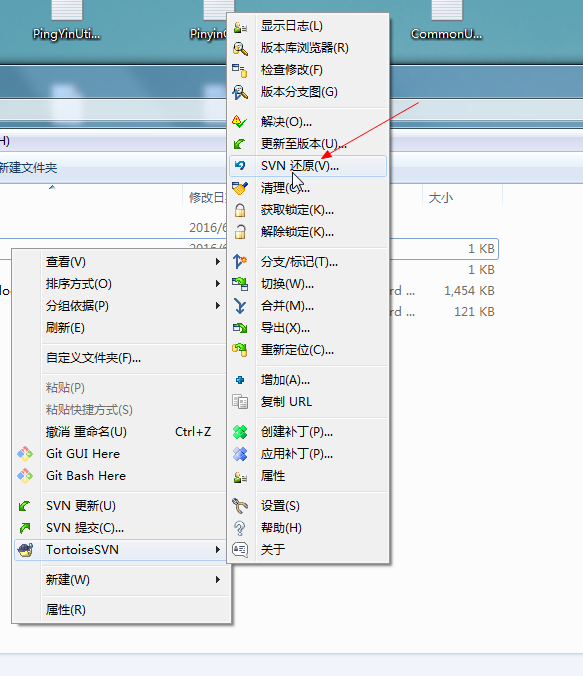
但是如果我們寫錯了東西並且提交了上去怎麼辦?通過版本回滾可以將檔案恢復到
以前的版本。右鍵更新至版本,通過檢視日誌來選擇版本,然後回滾即可

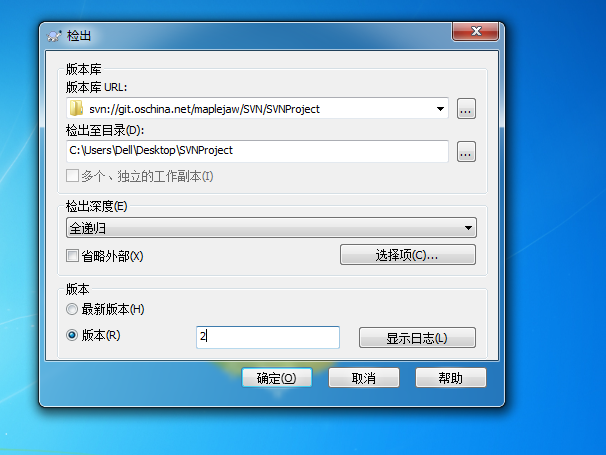
有時候我們需要檢視以前版本的程式碼。此時我們可以新建個資料夾檢出到指定版本
2.3.6 版本控制
版本控制有好幾種方法,如下。
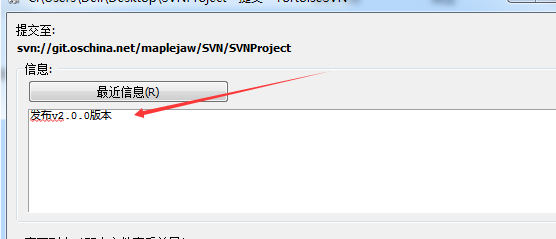
在提交發布版本時新增版本資訊,這是最簡單的一種方法。
打標籤
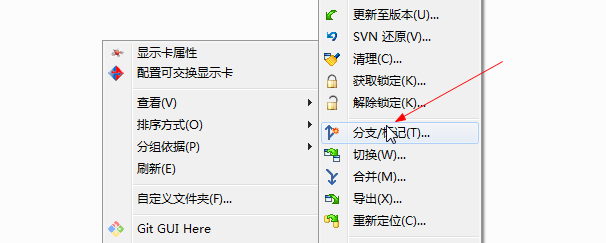
每次釋出版本時應該打標籤。右鍵選擇分支/標記。在至路徑以版本號打上標籤即可
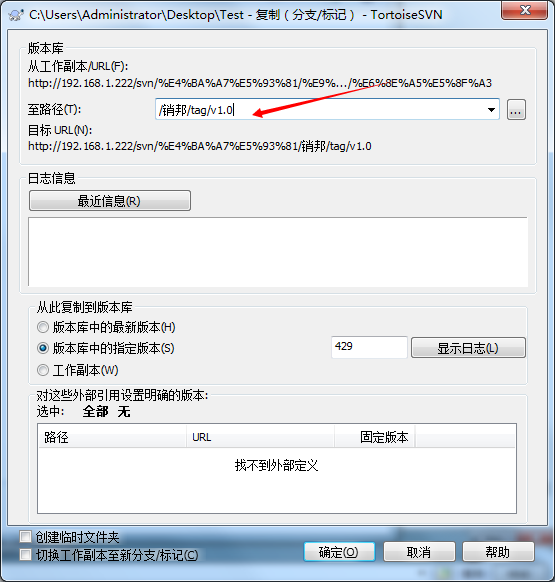
這樣你就有了一個v1.0版本的標籤。
以後如果你想檢視某個版本的程式碼,只需切換過去就行

部分摘自這位大佬的部落格:https://blog.csdn.net/maplejaw_/article/details/52874348
