拓展編輯器(十二)_Context選單
阿新 • • 發佈:2018-11-02
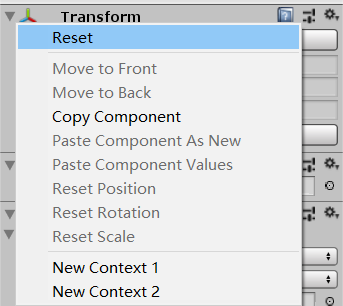
點選元件中設定(滑鼠右鍵),可以彈出Context選單,我們可以在原有選單中拓展出新的選單欄,程式碼如下所示:
using UnityEngine; using UnityEditor; public class Context選單 { [MenuItem("CONTEXT/Transform/New Context 1")] public static void NewContext1(MenuCommand command) { //獲取物件名 Debug.Log(command.context.name); } [MenuItem("CONTEXT/Transform/New Context 2")] public static void NewContext2(MenuCommand command) { Debug.Log(command.context.name); } }
其中,[MenuItem("CONTEXT/Transform/New Context 1")]表示將新選單擴充套件在Transform元件上。如果想拓展在別的元件上,例如攝像機元件,直接修改字串中的Transform為Camera即可。如果想給所有元件都新增選單欄,這裡改成Compoment即可。程式碼效果如下:

除此以外,以上的設定也可以應用在自己的寫的指令碼中。程式碼如下:
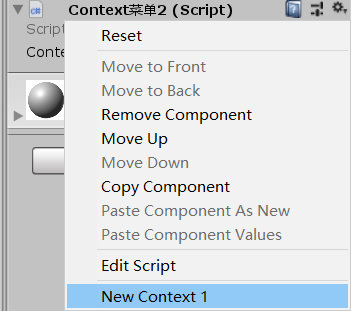
using UnityEngine; #if UNITY_EDITOR using UnityEditor; #endif public class Context選單2 :MonoBehaviour { public string contextName; #if UNITY_EDITOR [MenuItem("CONTEXT/Context選單2/New Context 1")] public static void NewContext2(MenuCommand command) { Context選單2 script= (command.context as Context選單2); script.contextName = "hello world!"; } #endif }
這段程式碼通過MenuCommand來獲取指令碼物件,從而訪問指令碼中的變數。同時使用了巨集定義標籤,其中UNITY_EDITOR標識這段程式碼只會在Editor模式下執行,釋出後將會被剔除掉。效果如下:


當然,我們也可以在自己的指令碼中這樣寫。如果和系統中的選單名稱一樣,還可以覆蓋它。比如,這裡重寫了刪除元件的按鈕,這樣就可以執行自己的一些操作了:
[ContextMenu("Remove Comconent")]
    void RemoveComponent()
    {
        Debug.Log("RemoveComponent");
        //等一幀再刪除自己
        UnityEditor.EditorApplication.delayCall = delegate ()
          {
              DestroyImmediate(this);
          };
    }
編輯模式下的程式碼同步時可能會有問題,比如上述DestroyImmediate(this)刪除自己的程式碼時,會觸發引擎底層的一個錯誤。不過我們可以使用UnityEditor.EditorApplication.delayCall來延遲一幀呼叫。如果大家在開發編輯器程式碼時發現類似問題,也可以嘗試延遲一幀再執行自己的程式碼。
