
Hystrix之@EnableCircuitBreaker原始碼解讀
Hystrix是一個供分散式系統使用,提供延遲和容錯功能,保證複雜的分佈系統在面臨不可避免的失敗時,仍能有其彈性。
比如系統中有很多服務,當某些服務不穩定的時候,使用這些服務的使用者執行緒將會阻塞,如果沒有隔離機制,系統隨時就有可能會掛掉,從而帶來很大的風險。
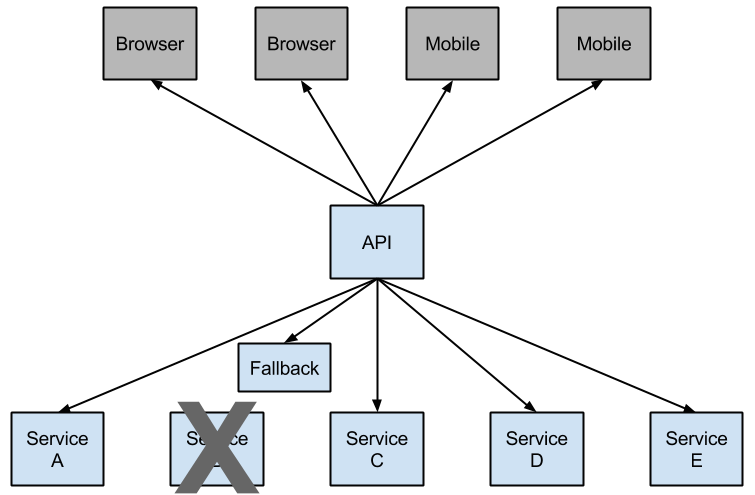
SpringCloud使用Hystrix元件提供斷路器、資源隔離與自我修復功能。下圖表示服務B觸發了斷路器,阻止了級聯失敗。
Hystrix的簡單使用
Hystrix使用了命令設計模式,只需要編寫命令即可:
public class CommandHelloWorld extends HystrixCommand<String> {

    private final String name;

    public CommandHelloWorld(String name) {
        super(HystrixCommandGroupKey.Factory.asKey("HelloWorld"));
        this.name = name;
    }

    @Override
    protected String run() throws Exception { // 完成業務邏輯
        return "Hello " + name + "!";
    }

    @Override
    protected String getFallback() { // run方法丟擲異常的時候返回備用結果
        return "Hello Failure " + name + "!";
    }

}
測試用例:
@Test
public void test() {
    assertEquals("Hello World!", new CommandHelloWorld("World").execute());
    assertEquals("Hello Format!", new CommandHelloWorld("Format").execute());
}
可能有的人覺得寫Command有點麻煩,Hystrix提供了一個類庫javanica,可以使用@HystrixCommand註解完成命令的編寫。
在SpringCloud中使用Hystrix
要在SpringCloud中使用斷路器,需要加上@EnableCircuitBreaker註解:
...
@EnableCircuitBreaker
...
public class RibbonApplication { ... }
然後在對應的方法上加入@HystrixCommand註解實現斷路器功能,當service方法對應的服務發生異常的時候,會跳轉到serviceFallback方法執行:
@HystrixCommand(fallbackMethod = "serviceFallback") // 加入@HystrixCommand註解實現斷路器功能
public String service() { // 原先的方法
    return restTemplate.getForEntity("...", String.class).getBody();
}

public String serviceFallback() { // fallback方法
    return "error";
}
工作原理
加上@EnableCircuitBreaker註解之後,就可以使用斷路器功能,所以SpringCloud內部是如何整合Hystrix的話先從這個註解開始分析。
@EnableCircuitBreaker註解定義如下:
@Target(ElementType.TYPE)
@Retention(RetentionPolicy.RUNTIME)
@Documented
@Inherited
@Import(EnableCircuitBreakerImportSelector.class)
public @interface EnableCircuitBreaker {

}
import了EnableCircuitBreakerImportSelector這個selector:
public class EnableCircuitBreakerImportSelector extends
    SpringFactoryImportSelector<EnableCircuitBreaker> {

    @Override
    protected boolean isEnabled() {
        return new RelaxedPropertyResolver(getEnvironment()).getProperty(
            "spring.cloud.circuit.breaker.enabled", Boolean.class, Boolean.TRUE);
    }

}
在之前的這篇SpringBoot自動化配置的註解開關原理文章中分析過selector的原理,這個EnableCircuitBreakerImportSelector會載入spring.factories屬性檔案中key為org.springframework.cloud.client.circuitbreaker.EnableCircuitBreaker的類:
org.springframework.cloud.client.circuitbreaker.EnableCircuitBreaker=\
    org.springframework.cloud.netflix.hystrix.HystrixCircuitBreakerConfiguration
會載入HystrixCircuitBreakerConfiguration這個配置類。
這個配置類內部構造了一個aspect:
@Bean
public HystrixCommandAspect hystrixCommandAspect() {
    return new HystrixCommandAspect();
}
這個aspect對應的pointcut如下,所以使用@HystrixCommand註解修飾的方法會被這個aspect處理:
@annotation(com.netflix.hystrix.contrib.javanica.annotation.HystrixCommand) || @annotation(com.netflix.hystrix.contrib.javanica.annotation.HystrixCollapser)
對應的aop處理方法:
public Object methodsAnnotatedWithHystrixCommand(final ProceedingJoinPoint joinPoint) throws Throwable {
    Method method = getMethodFromTarget(joinPoint);  // 得到初始的方法
    Validate.notNull(method, "failed to get method from joinPoint: %s", joinPoint);
    if (method.isAnnotationPresent(HystrixCommand.class) && method.isAnnotationPresent(HystrixCollapser.class)) { // 如果使用@HystrixCommand註解和@HystrixCollapser註解同時修改,不允許
        throw new IllegalStateException("method cannot be annotated with HystrixCommand and HystrixCollapser " +
                "annotations at the same time");
    }
    MetaHolderFactory metaHolderFactory = META_HOLDER_FACTORY_MAP.get(HystrixPointcutType.of(method));
    MetaHolder metaHolder = metaHolderFactory.create(joinPoint); // 建立一個MetaHolder,這個MetaHolder封裝了方法中的一些以及Hystrix的一些資訊
    HystrixInvokable invokable = HystrixCommandFactory.getInstance().create(metaHolder); // 根據這個metaHolder創建出一個HystrixInvokable,也就是一個HystrixCommand
    ExecutionType executionType = metaHolder.isCollapserAnnotationPresent() ?
            metaHolder.getCollapserExecutionType() : metaHolder.getExecutionType(); // 得到執行型別,有3種類型:1. 非同步 2. 同步  3. reactive
    Object result;
    try {
        result = CommandExecutor.execute(invokable, executionType, metaHolder);
    } catch (HystrixBadRequestException e) {
        throw e.getCause();
    }
    return result;
}
CommandExecutor的execute方法:
public static Object execute(HystrixInvokable invokable, ExecutionType executionType, MetaHolder metaHolder) throws RuntimeException {
    Validate.notNull(invokable);
    Validate.notNull(metaHolder);

    switch (executionType) {
        case SYNCHRONOUS: { // 同步方式的話,呼叫HystrixCommand的execute方法
            return castToExecutable(invokable, executionType).execute();
        }
        case ASYNCHRONOUS: { // 非同步方式的話,呼叫HystrixCommand的queue方法
            HystrixExecutable executable = castToExecutable(invokable, executionType);
            if (metaHolder.hasFallbackMethodCommand()
                    && ExecutionType.ASYNCHRONOUS == metaHolder.getFallbackExecutionType()) {
                return new FutureDecorator(executable.queue());
            }
            return executable.queue();
        }
        case OBSERVABLE: { // reactive方式的話,呼叫HystrixCommand的observe或者toObservable方法
            HystrixObservable observable = castToObservable(invokable);
            return ObservableExecutionMode.EAGER == metaHolder.getObservableExecutionMode() ? observable.observe() : observable.toObservable();
        }
        default:
            throw new RuntimeException("unsupported execution type: " + executionType);
    }
}
根據metaHolder創建出HystrixCommand的過程在HystrixCommandBuilderFactory中:
return HystrixCommandBuilder.builder()
            .setterBuilder(createGenericSetterBuilder(metaHolder))
            .commandActions(createCommandActions(metaHolder))
            .collapsedRequests(collapsedRequests)
            .cacheResultInvocationContext(createCacheResultInvocationContext(metaHolder))
            .cacheRemoveInvocationContext(createCacheRemoveInvocationContext(metaHolder))
            .ignoreExceptions(metaHolder.getHystrixCommand().ignoreExceptions())
            .executionType(metaHolder.getExecutionType())
            .build();
所以這個aspect的作用就是把一個普通的Java方法轉換成HystrixCommand。
其它
HystrixCircuitBreakerConfiguration配置類中有個HystrixWebConfiguration內部配置類,它構造了一個HystrixStreamEndpoint這個endpoint,這個endpoint使用HystrixMetricsStreamServlet暴露出/hystrix.stream地址來獲取hystrix的metrics資訊。
Hystrix還提供了一個dashboard,這個dashboard可以檢視各個斷路器的健康狀況,要使用這個dashboard,在專案中加入這些依賴:
<dependency>
    <groupId>org.springframework.boot</groupId>
    <artifactId>spring-boot-starter-actuator</artifactId>
</dependency>

<dependency>
    <groupId>org.springframework.cloud</groupId>
    <artifactId>spring-cloud-starter-hystrix-dashboard</artifactId>
</dependency>
然後在程式碼里加上開關:
@EnableHystrixDashboard
...
啟動專案,開啟:
http://localhost:3333/hystrix
輸入:
http://localhost:3333/hystrix.stream
我們使用wrk模擬請求:
wrk -c 10 -t 10 -d 20s http://localhost:3333/add
然後dashboard中發生了變化:
參考資料
http://cloud.spring.io/spring-cloud-static/Brixton.SR7/