iptables 完全指南
在瞭解iptables之前我們先了解一下 防火牆 的概念
防火牆是由Check Point創立者Gil Shwed於1993年發明並引入國際網際網路,防火牆也是一種位於內部網路與外部網路之間的網路安全系統,能有效地保護系統的安全。
在Windows系統中有一個我們熟悉的防火牆,在控制面板裡,但一般情況下我們會把它給關閉了,使用第三方的防毒軟體自帶的防火牆功能,在Linux中也有類似防毒軟體的防火牆的東西,而且是系統自帶過來的,那就是iptables,很多在初學Linux的時候對它很陌生,所以為了實驗的順利進行都是會先關掉防火牆。

簡單理解就是當其他使用者想要傳送資料包給伺服器,就必須經過防火牆才能到達主機,如果沒有這一層防火牆保護,那可想而知伺服器直接暴露在公網上是多麼危險的,當然防火牆也是包含有硬體防火牆和軟體防火牆兩種,其實有很多硬體防火牆也是利用Linux最小化使用iptables再去加上圖形化web介面整合硬體,就成了硬體防火牆。
在Linux系統中其實有兩個防火牆,一個是四層防火牆:iptables,另外一個是七層防火牆(tcp-wrapper)
1 應用層-----------------tcp-wrapper  (七層防火牆)
2 表示層
3 會話層
4 傳輸層-----------------iptables     (四層防火牆)
5 網路層
6 資料鏈路層
7 物理層
iptables近期歷史版本:
2.0.X核心:ipfwadm
2.2.X核心:ipchains
2.4.X核心:iptables
iptables結構
在RHEL7+的系統中除了有iptables,還有一個firewall

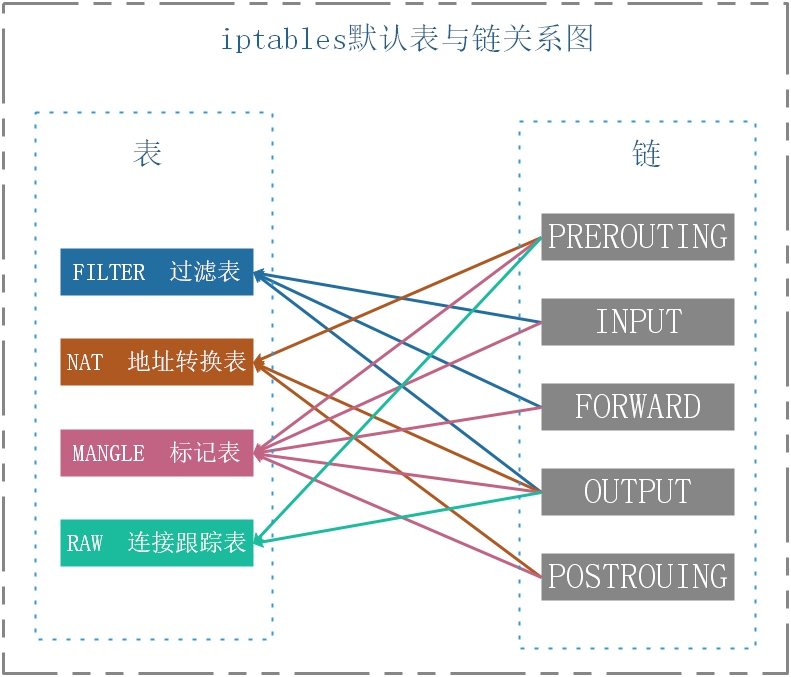
iptable 預設的表、鏈結構示意圖

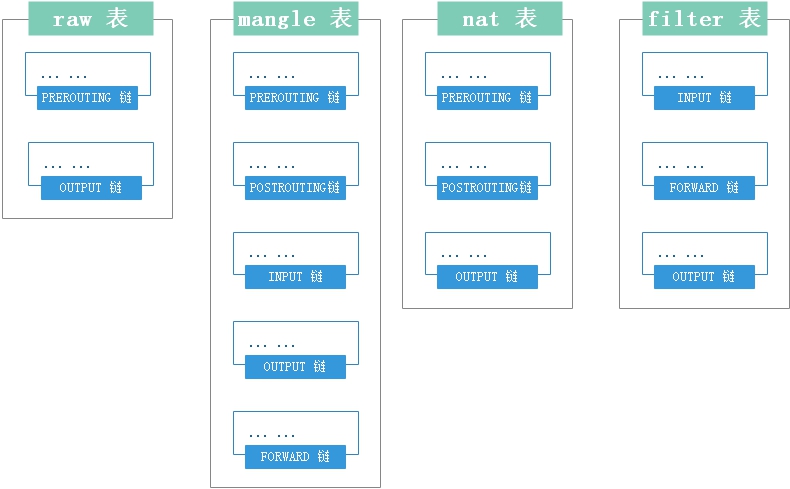
結合上圖的表結構,我們可以單獨將每個表裡的鏈結合下面這張圖知道資料包在iptable中的具體流向

以上就是iptables的結構
iptables 語法及選項
1 iptables -t [表名:raw、mangle、nat、filter,預設不加為filter] -<A/I/D/R> [鏈名] [規則號] -<i/o> [網絡卡名稱] -p [協議] -s [源IP/掩碼] --sport [源埠] -d [目標IP/掩碼] --dport [目標埠] -j [動作] 2 # 選項表 3 -t<表> :指定操作的表4 -A :向規則中新增 5 -D :從規則中刪除 6 -i :向規則中插入 7 -R :替換規則 8 -L :顯示錶中的規則 9 -F :清空表中規則 10 -Z :清空表中規則及資料包計算器和位元組計數器 11 -N :建立新的使用者自定義規則鏈 12 -P :自定義規則鏈中的預設目標 13 -h :幫助 14 -p :指定匹配的資料包協議型別 15 -s :指定匹配的資料包源ip地址 16 -j<動作> :指定要操作的動作(見下面動作表) 17 -i<網絡卡名稱> :指定資料包進入本機的入口網絡卡 18 -o<網絡卡名稱> :指定資料包離開本機的出口網絡卡 19 # 表名稱 20 raw :連線跟蹤表 21 mangle :標記表 22 net :地址轉換表 23 filter :過濾表 24 # 規則鏈名 25 INPUT :處理輸入的資料包 26 OUTPUT :處理輸出的資料包 27 PORWARD :處理轉發的資料包 28 PREROUTING :目標地址轉換 29 POSTOUTING :源地址轉換 30 # 動作 31 accept :接收資料包 32 DROP :丟棄資料包 33 REDIRECT :重定向 34 SNAT :源地址轉換 35 DNAT :目標地址轉換 36 MASQUERADE :IP偽裝 37 LOG :日誌
啟動/停止/重啟/配置永久生效
啟動iptables
1 systemctl start iptables
停止iptables
1 systemctl stop iptables
重啟iptables
1 systemctl restart iptables
將規則寫入配置檔案永久生效
1 ervice iptables save
(注意在RHEL7+無法使用systemctl將規則寫入配置檔案,無需做軟鏈,直接使用下面的命令寫入配置檔案即可)
例項:
注意:在寫入規則的時候如果不加-t指定某張表時,預設是寫到filter表裡
檢視iptables已有規則(引數:-t、-L、—line-numbers、-n)
1 # 引數
2 -t:指定表
3 -L:檢視所有規則
4 --line-numbers:檢視規則編號
5 -n:取消IP解析成主機名稱
1 iptables -t <表名> -L
 1 # iptables -L 沒有指定檢視某張表時,預設會顯示filter表
 2 [[email protected] ~]# iptables -L
 3 Chain INPUT (policy ACCEPT)
 4 target     prot opt source               destination
 5 ACCEPT     all  --  anywhere             anywhere
 6 ACCEPT     all  --  anywhere             anywhere             state RELATED,ESTABLISHED
 7 ACCEPT     tcp  --  anywhere             anywhere             tcp dpt:ssh
 8 ACCEPT     tcp  --  anywhere             anywhere             tcp dpt:http
 9 ACCEPT     tcp  --  anywhere             anywhere             tcp dpt:https
10 DROP       tcp  --  anywhere             anywhere             tcp dpt:mysql
11 ACCEPT     icmp --  anywhere             anywhere             icmp echo-request
12 Chain FORWARD (policy ACCEPT)
13 target     prot opt source               destination
14 Chain OUTPUT (policy ACCEPT)
15 target     prot opt source               destination
16 # 如果想檢視其他表,則使用-t引數指定表
17 [[email protected] ~]# iptables -t nat -L
18 Chain PREROUTING (policy ACCEPT)
19 target     prot opt source               destination
20 Chain INPUT (policy ACCEPT)
21 target     prot opt source               destination
22 Chain OUTPUT (policy ACCEPT)
23 target     prot opt source               destination
24 Chain POSTROUTING (policy ACCEPT)
25 target     prot opt source               destination
26 # 檢視規則編號
27 [[email protected] ~]# iptables -L --line-numbers
28 Chain INPUT (policy ACCEPT)
29 num  target     prot opt source               destination
30 1    ACCEPT     all  --  anywhere             anywhere
31 2    ACCEPT     all  --  anywhere             anywhere             state RELATED,ESTABLISHED
32 3    ACCEPT     tcp  --  anywhere             anywhere             tcp dpt:ssh
33 4    ACCEPT     tcp  --  anywhere             anywhere             tcp dpt:http
34 5    ACCEPT     tcp  --  anywhere             anywhere             tcp dpt:https
35 6    DROP       tcp  --  anywhere             anywhere             tcp dpt:mysql
36 7    ACCEPT     icmp --  anywhere             anywhere             icmp echo-request
37 8    ACCEPT     all  --  anywhere             anywhere
38 Chain FORWARD (policy ACCEPT)
39 num  target     prot opt source               destination
40 Chain OUTPUT (policy ACCEPT)
41 num  target     prot opt source               destination
42 # 當規則多的時候檢視規則很慢時,是因為iptables要將規則裡的IP從hosts檔案裡解析成主機名稱所以會慢,可以加-n引數取消解析
43 iptables -L -n
新增規則(引數:-A、-j、-I、-N)
1 -A:新增
2 -j:動作
3 -I:插入
4 -N:新增使用者自定義規則鏈
1 # 用法
2 iptables -t <表> -A <鏈> -j <動作>
3 # 再次強調沒有加-t引數預設是filter表(四表見上面結構說明)
4 # 指定表新增規則:iptables -t filter -A INPUT -j ACCEPT
5 ACCEPT  :接受
6 DROP    :拒絕
 1 # 新增允許所有人訪問
 2 [[email protected] ~]# iptables -A INPUT -j ACCEPT
 3 # 檢視規則
 4 [[email protected] ~]# iptables -L
 5 Chain INPUT (policy ACCEPT)
 6 target     prot opt source               destination
 7 ACCEPT     all  --  anywhere             anywhere        # 剛剛新增的規則
 8
 9 Chain FORWARD (policy ACCEPT)
10 target     prot opt source               destination
11
12 Chain OUTPUT (policy ACCEPT)
13 target     prot opt source               destination
14
15 # 在filter表中的INPUT鏈第5行中插入規則
16 [[email protected] ~]# iptables -I INPUT 5 -j ACCEPT
17 # 新增使用者自定義規則鏈
18 [[email protected] ~]# iptables -N userflood
順序匹配(權重)
在原有規則裡再新增規則時,第一條規則權重比第二條高
注意:這裡ACCEPT權重優先順序比DROP高,所以DROP不生效,如果反過來則DROP生效而ACCEPT不生效
 1 [[email protected] ~]# iptables -A INPUT -j ACCEPT
 2 [[email protected] ~]# iptables -A INPUT -j DROP
 3 [[email protected] ~]# iptables -L
 4 Chain INPUT (policy ACCEPT)
 5 target     prot opt source               destination
 6 ACCEPT     all  --  anywhere             anywhere
 7 DROP       all  --  anywhere             anywhere
 8 Chain FORWARD (policy ACCEPT)
 9 target     prot opt source               destination
10 Chain OUTPUT (policy ACCEPT)
11 target     prot opt source               destination
清除規則(引數:-F、-D、-X、-Z)
清除所有規則(引數:-F)
1 # 清空指定表所有鏈的規則
2 [[email protected] ~]# iptables -F
3 # 清空指定表指定鏈的規則
4 [[email protected] ~]# iptables -F OUTPUT
再次強調,-t指定表
刪除指定規則(引數:-D)
1 # 刪除filter表中INPUT鏈的第8行(行編號上面有講)
2 [[email protected] ~]# iptables -t filter -D INPUT 8
刪除使用者自定義鏈
1 [[email protected] ~]# iptables -X userflood
清除鏈的計數器(引數:-Z)
1 [[email protected] ~]# iptables -Z
修改規則/鏈名(引數:-R、-E)
1 # 修改filter表中的INPUT鏈第6條改為ACCEPT
2 # 如規則多的話修改某條規則還不如刪掉重新新增
3 [[email protected] ~]# iptables -t filter -R INPUT 6 -j ACCEPT
4 # 重新命名使用者自定義鏈名
5 [[email protected] ~]# iptables -E userflood floodname
預設規則
1 Chain INPUT (policy ACCEPT)  # 其中的polucy是預設規則
2 ACCEPT  允許
3 DROP    拒絕
4 修改指定表指定鏈預設規則
5 [[email protected] ~]# iptables -t filter -P OUTPUT DROP
匹配規則條件(引數:-p、-d、-s、-i、-o、—dport、time、state、connlimit、mac、iprang)
 1 -p:指定協議
 2 -d:指定原IP
 3 -s:指定目標IP
 4 -i:指定入口網絡卡
 5 -o:指定出口網絡卡
 6 -m:指定模組
 7 --dport:指定埠
 8 time:時間段
 9 state:
10 connlimit:
11 mac:
12 iprang:
 1 # 指定協議指定IP指定埠拒絕訪問
 2 iptables -t filter -A INPUT -p tcp  -d 202.96.146.12/24 --dport 22 -j DROP
 3
 4 # 只允許訪問本機80埠(其他埠都禁止訪問)
 5 [[email protected] ~]# iptables -A INPUT -p tcp ! --dport 80 -j DROP
 6
 7 # 拒絕所有人訪問80埠
 8 [[email protected] ~]# iptables -A INPUT -p tcp --dport 80 -j DROP
 9
10 # 單獨允許訪問指定埠,其他埠拒絕連線(主動模式)
11 [[email protected] ~]# iptables -A INPUT -p tcp --dport 22 -j ACCEPT
12 [[email protected] ~]# iptables -A INPUT -j DROP
被動模式:當發現某一埠被攻擊時才去禁止相應的埠連結
1 # 根據協議禁止訪問
2 [[email protected] ~]# iptables -A INPUT --dport -j DROP
1 # 根據網絡卡禁止訪問
2 # 入口網絡卡
3 [[email protected] ~]# iptables -A INPUT -i eth0 -j DROP
4 # 出口網絡卡
5 [[email protected] ~]# iptables -A INPUT -o eth0 -j DROP
-m 載入模組
 1 # multiport 匹配多個埠
 2 # 匹配多個埠
 3 [[email protected] ~]# iptables -A INPUT -p tcp -m multiport --dport 22,80 -j ACCEPT
 4 # 匹配埠範圍
 5 [[email protected] ~]# iptables -A INPUT -p tcp -m multiport --dport 1024:2048 -j ACCEPT
 6
 7 # iprange 匹配IP地址
 8 # 匹配IP範圍 # --src-range來源IP
 9 [[email protected] ~]# iptables -A INPUT -p tcp -m iprange --src-range 10.0.8.100-10.0.8.200 -j ACCEPT
10 # 匹配整個網段 # --dst-range目標IP
11 [[email protected] ~]# iptables -A INPUT -p tcp -m iprange --dst-range 10.0.8.0 -j ACCEPT
12
13 # string 匹配字串
14 # 匹配演算法:kmp、bm
15 [[email protected] ~]# iptables -A OUTPUT -p tcp -m string --algo kmp --string "baidu" -j DROP
16 # 備註:“baidu”為匹配的物件
17
18 # connlimit 單個IP併發連結數限制
19 [[email protected] ~]# iptables -A INPUT -p tcp --dport 80 -m connlimit ! --connlimit-above 3 -j ACCEPT
20
21 # limit 限速
