Node爬蟲之使用 eventproxy 控制併發
上一篇文章《Node實現簡單爬蟲》我們介紹瞭如何使用 superagent和cheerio來取主頁內容,那隻需要發起一次 http get 請求就能辦到。但這次,我們需要取出每個主題的第一條評論,這就要求我們對每個主題的連結發起請求,並用 cheerio 去取出其中的第一條評論。
eventproxy 模組
在這之前,先介紹一下eventproxy模組,假設我們不使用 eventproxy 也不使用計數器時,抓取三個源的寫法是這樣的:
$.get("http://data1_source", function (data1) {
		  // something
  $.get("http://data2_source", function (data2) {
		    // something
    $.get("http://data3_source", function (data3) {
		      // something
    });
  });
});
但是如果是 10 次請求呢?那就要巢狀 10 個回調了,這樣寫不僅程式碼太亂,而且這樣寫效率太低,跟同步獲取是一樣的!
但如果我們用計數器來寫,可以這樣寫:
(function () {
  var count = 0;
  var result = {};

  $.get('http://data1_source', function (data) {
    result.data1 = data;
    count++;
    handle();
    });
  $.get('http://data2_source', function (data) {
    result.data2 = data;
    count++;
    handle();
    });

  function handle() {
    if (count === 2) {
       // do something
    }
  }
})();
上面的程式碼是先定義一個 var count = 0,然後每次抓取成功以後,就count++。如果你是要抓取兩個源的資料,由於你根本不知道這些非同步操作到底誰先完成,那麼每次當抓取成功的時候,就判斷一下 count === 2。當值為真時,使用另一個函式繼續完成操作。
而 eventproxy 模組就起到了這個計數器的作用,它來幫你管理到底這些非同步操作是否完成,完成之後,它會自動呼叫你提供的處理函式,並將抓取到的資料當引數傳過來。
如果用 eventproxy 模組,可以這樣寫:
var ep = new eventproxy();
ep.all('data1_event', 'data2_event', , function (data1, data2) {
  // do something
});

$.get('http://data1_source', function (data) {
  ep.emit('data1_event', data);
  });

$.get('http://data2_source', function (data) {
  ep.emit('data2_event', data);
  });
通過 ep.all('data1_event', 'data2_event', function (data1, data2) {}); 監聽了兩個事件,分別是 data1_event , data2_event,每次當一個源的資料抓取完成時,就通過 ep.emit() 來告訴 ep 自己,某某事件已經完成了。
當三個事件未同時完成時,ep.emit()呼叫之後不會做任何事;當三個事件都完成的時候,就會呼叫末尾的那個回撥函式,來對它們進行統一處理。
實踐
1、首先獲取首頁所有URL的地址
	superagent.get(cnodeUrl)
		.end(function(err, res) {
			if(err) {
				return console.error(err);
			}

			var topicUrls = [];
			var $ = cheerio.load(res.text);

			$('.clearfix .list_con  .title h2 a').each(function(idx, element) {
				var $element = $(element);
				// console.log('$element',$element);

				var href = url.resolve(cnodeUrl,$element.attr('href'));
				topicUrls.push(href);
			});

			console.log('topicUrls', topicUrls);
})
2、接下來,我們把這些地址都抓取一遍,就完成了
		 // 得到一個 eventproxy 的例項
           var ep = new eventproxy();

        //  命令 ep 重複監聽 topicUrls.length 次(在這裡也就是 21 次) 'topic_html' 事件再行動
			ep.after('topic_html', topicUrls.length, function(topics) {
				topics = topics.map(function(topicPair) {
					var topicUrl = topicPair[0];
					var topicHtml = topicPair[1];
					var $ = cheerio.load(topicHtml);

					return ({
						title: $('.title-article').text().trim(),
						href: topicUrl,
						comment1: $('.comment').eq(0).text().trim()
					})
				})

				console.log('final:', topics);
				response.send(topics);
			})

			topicUrls.forEach(function(topicUrl) {
				superagent.get(topicUrl)
					.end(function(err, res) {
						console.log('fetch ' + topicUrl + ' successful.');
						ep.emit('topic_html', [topicUrl, res.text])
					})
			})
完整程式碼:
var eventproxy = require('eventproxy');
var superagent = require('superagent');
var cheerio = require('cheerio');
var express = require('express');
var url = require('url');

var cnodeUrl = 'https://blog.csdn.net/';

var app = express();

app.get('/', function(request, response, next) {
	superagent.get(cnodeUrl)
		.end(function(err, res) {
			if(err) {
				return console.error(err);
			}

			var topicUrls = [];
			var $ = cheerio.load(res.text);

			$('.clearfix .list_con  .title h2 a').each(function(idx, element) {
				var $element = $(element);
				// console.log('$element',$element);

				var href = url.resolve(cnodeUrl,$element.attr('href'));
				topicUrls.push(href);
			});

			console.log('topicUrls', topicUrls);

			var ep = new eventproxy();

			ep.after('topic_html', topicUrls.length, function(topics) {
				topics = topics.map(function(topicPair) {
					var topicUrl = topicPair[0];
					var topicHtml = topicPair[1];
					var $ = cheerio.load(topicHtml);

					return ({
						title: $('.title-article').text().trim(),
						href: topicUrl,
						comment1: $('.comment').eq(0).text().trim()
					})
				})

				console.log('final:', topics);
				response.send(topics);
			})

			topicUrls.forEach(function(topicUrl) {
				superagent.get(topicUrl)
					.end(function(err, res) {
						console.log('fetch ' + topicUrl + ' successful.');
						ep.emit('topic_html', [topicUrl, res.text])
					})
			})

		})

})


app.listen(3000, function () {
    console.log('app is listenling at port 3000');
});
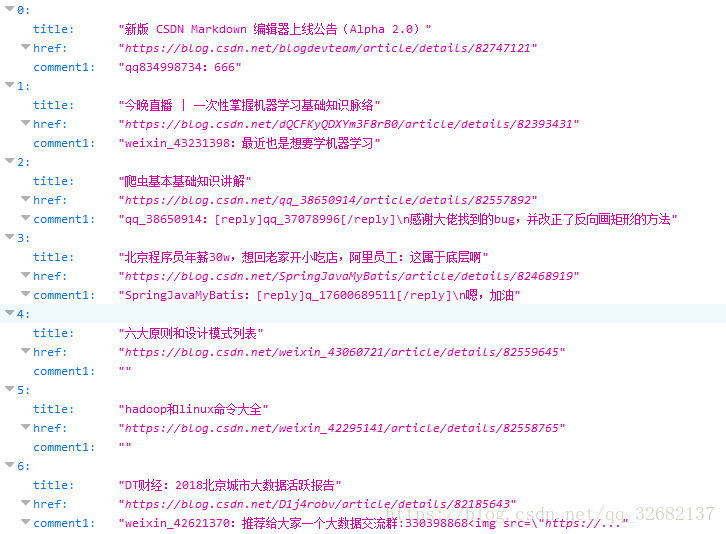
結果: